8512564 - Component Replacement Manual R0
Page 1
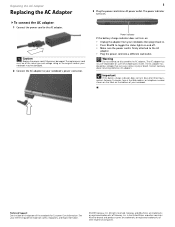
...cord is firmly attached to your reference guide for Customer Care Information. Gateway and eMachines are trademarks or registered trademarks of Gateway, Inc. The power indicator turns on the bottom of your notebook, then plug it becomes damaged. Power indicator If the battery charge indicator...defective AC adapters. Important If the battery charge indicator does not turn on the bottom of the notebook for important safety, regulatory, and legal information. © 2007 Gateway, Inc. All other countries. Warning Do not attempt to the AC adapter. Replacing the AC ...
...cord is firmly attached to your reference guide for Customer Care Information. Gateway and eMachines are trademarks or registered trademarks of Gateway, Inc. The power indicator turns on the bottom of your notebook, then plug it becomes damaged. Power indicator If the battery charge indicator...defective AC adapters. Important If the battery charge indicator does not turn on the bottom of the notebook for important safety, regulatory, and legal information. © 2007 Gateway, Inc. All other countries. Warning Do not attempt to the AC adapter. Replacing the AC ...
8512564 - Component Replacement Manual R0
Page 2
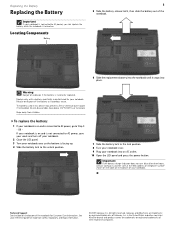
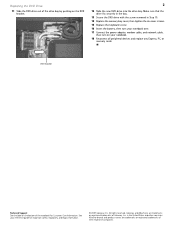
... indicator does not turn off your notebook. 2 Close the LCD panel. 3 Turn your notebook over . 9 Plug your notebook into place. Gateway and eMachines are trademarks or registered trademarks of your notebook. Recycle or dispose of Gateway, Inc. See your notebook. Do not disassemble, heat above...Components Battery 1 5 Slide the battery release latch, then slide the battery out of the notebook for important safety, regulatory, and legal information. © 2007 Gateway, Inc. Replace only with a battery specifically manufactured for your reference guide for Customer Care ...
... indicator does not turn off your notebook. 2 Close the LCD panel. 3 Turn your notebook over . 9 Plug your notebook into place. Gateway and eMachines are trademarks or registered trademarks of your notebook. Recycle or dispose of Gateway, Inc. See your notebook. Do not disassemble, heat above...Components Battery 1 5 Slide the battery release latch, then slide the battery out of the notebook for important safety, regulatory, and legal information. © 2007 Gateway, Inc. Replace only with a battery specifically manufactured for your reference guide for Customer Care ...
8512564 - Component Replacement Manual R0
Page 3
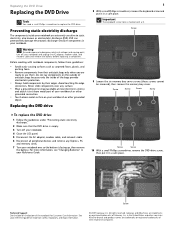
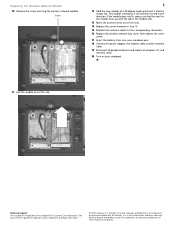
... on your workbench or other brands and product names are trademarks or registered trademarks of Gateway, Inc. ESD can permanently damage electrostatic discharge-sensitive components in your notebook. Avoid touching the edge connectors. Screw Screw Screw Screw To replace the DVD drive:...Touch a bare metal surface on the bottom of the notebook for important safety, regulatory, and legal information. © 2007 Gateway, Inc. in a safe place. Never slide components over so the bottom is marked with notebook components, follow these screws cannot be removed), then remove...
... on your workbench or other brands and product names are trademarks or registered trademarks of Gateway, Inc. ESD can permanently damage electrostatic discharge-sensitive components in your notebook. Avoid touching the edge connectors. Screw Screw Screw Screw To replace the DVD drive:...Touch a bare metal surface on the bottom of the notebook for important safety, regulatory, and legal information. © 2007 Gateway, Inc. in a safe place. Never slide components over so the bottom is marked with notebook components, follow these screws cannot be removed), then remove...
8512564 - Component Replacement Manual R0
Page 4
... Reconnect all peripheral devices and replace any Express, PC, or memory cards. Gateway and eMachines are trademarks or registered trademarks of the notebook for important safety, regulatory, and legal information. © 2007 Gateway, Inc. All other countries. Make sure that the drive fits securely in the bay.... the memory bay cover, then tighten the six cover screws. 15 Replace the keyboard screw. 16 Insert the battery, then turn your notebook over. 17 Connect the power adapter, modem cable, and network cable, then turn on the bottom of their respective companies. DVD bracket...
... Reconnect all peripheral devices and replace any Express, PC, or memory cards. Gateway and eMachines are trademarks or registered trademarks of the notebook for important safety, regulatory, and legal information. © 2007 Gateway, Inc. All other countries. Make sure that the drive fits securely in the bay.... the memory bay cover, then tighten the six cover screws. 15 Replace the keyboard screw. 16 Insert the battery, then turn your notebook over. 17 Connect the power adapter, modem cable, and network cable, then turn on the bottom of their respective companies. DVD bracket...
8512564 - Component Replacement Manual R0
Page 5
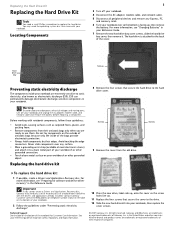
...components over so the bottom is attached to the drive. 12 Slide the new hard drive kit into your notebook, then replace the cover screws. © 2007 Gateway, Inc. Replacing the hard drive kit 8 Remove the four screws that secure the hard drive to static ...damage electrostatic discharge-sensitive components in the Reference Guide. Warning To avoid exposure to use them. Gateway and eMachines are ready to dangerous electrical voltages and moving parts, turn off your notebook. 4 Disconnect the AC adapter, modem cable, and network cable. 5 Disconnect all peripheral devices...
...components over so the bottom is attached to the drive. 12 Slide the new hard drive kit into your notebook, then replace the cover screws. © 2007 Gateway, Inc. Replacing the hard drive kit 8 Remove the four screws that secure the hard drive to static ...damage electrostatic discharge-sensitive components in the Reference Guide. Warning To avoid exposure to use them. Gateway and eMachines are ready to dangerous electrical voltages and moving parts, turn off your notebook. 4 Disconnect the AC adapter, modem cable, and network cable. 5 Disconnect all peripheral devices...
8512564 - Component Replacement Manual R0
Page 6
... be prompted to Step 18. -OR- All other countries. As part of Gateway, Inc. Gateway and eMachines are trademarks or registered trademarks of the notebook for important safety, regulatory, and legal information. © 2007 Gateway, Inc. Replacing the Hard Drive Kit 2 13 Insert the battery, then turn... your notebook over. 14 Connect the power adapter, modem cable, and network cable. 15 Turn on your notebook. 16 If the hard drive was sent to you from Gateway with the operating system, applications, and drivers installed, you will...
... be prompted to Step 18. -OR- All other countries. As part of Gateway, Inc. Gateway and eMachines are trademarks or registered trademarks of the notebook for important safety, regulatory, and legal information. © 2007 Gateway, Inc. Replacing the Hard Drive Kit 2 13 Insert the battery, then turn... your notebook over. 14 Connect the power adapter, modem cable, and network cable. 15 Turn on your notebook. 16 If the hard drive was sent to you from Gateway with the operating system, applications, and drivers installed, you will...
8512564 - Component Replacement Manual R0
Page 7
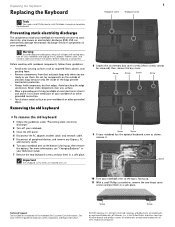
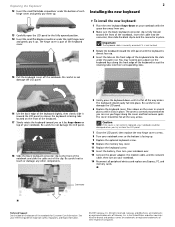
... Support See the label on your reference guide for Customer Care Information. Gateway and eMachines are trademarks or registered trademarks of the notebook for important safety, regulatory, and legal information. © 2007 Gateway, Inc. Replacing the Keyboard Replacing the Keyboard Tools You need a small...other grounded connection. • Touch a bare metal surface on the bottom of Gateway, Inc. Avoid touching the edge connectors. All other brands and product names are marked with notebook components, follow these screws cannot be removed), then remove the bay cover. All ...
... Support See the label on your reference guide for Customer Care Information. Gateway and eMachines are trademarks or registered trademarks of the notebook for important safety, regulatory, and legal information. © 2007 Gateway, Inc. Replacing the Keyboard Replacing the Keyboard Tools You need a small...other grounded connection. • Touch a bare metal surface on the bottom of Gateway, Inc. Avoid touching the edge connectors. All other brands and product names are marked with notebook components, follow these screws cannot be removed), then remove the bay cover. All ...
8512564 - Component Replacement Manual R0
Page 8
...the cover is not correctly replaced, your notebook with the space bar away from you so it toward the LCD panel until it clicks in place. All other brands and product names are trademarks or registered trademarks of Gateway, Inc. Connector Technical Support See the ...label on the front edge of the notebook for important safety, regulatory, and legal information. © 2007 Gateway, Inc. in several places until it is facing up . All...
...the cover is not correctly replaced, your notebook with the space bar away from you so it toward the LCD panel until it clicks in place. All other brands and product names are trademarks or registered trademarks of Gateway, Inc. Connector Technical Support See the ...label on the front edge of the notebook for important safety, regulatory, and legal information. © 2007 Gateway, Inc. in several places until it is facing up . All...
8512564 - Component Replacement Manual R0
Page 9
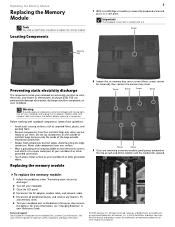
...and other brands and product names are trademarks or registered trademarks of Gateway, Inc. Do not lay components on the bottom of the notebook for important safety, regulatory, and legal information. © 2007 Gateway, Inc. Technical Support See the label on the outside of ... static electricity, also known as carpeted floors, plastic, and packing foam. • Remove components from their edges. See your notebook. Gateway and eMachines are trademarks or registered trademarks of their respective companies. Replacing the memory module 8 Loosen the six memory bay cover ...
...and other brands and product names are trademarks or registered trademarks of Gateway, Inc. Do not lay components on the bottom of the notebook for important safety, regulatory, and legal information. © 2007 Gateway, Inc. Technical Support See the label on the outside of ... static electricity, also known as carpeted floors, plastic, and packing foam. • Remove components from their edges. See your notebook. Gateway and eMachines are trademarks or registered trademarks of their respective companies. Replacing the memory module 8 Loosen the six memory bay cover ...
8512564 - Component Replacement Manual R0
Page 10
... reference guide for important safety, regulatory, and legal information. © 2007 Gateway, Inc. See your notebook. Important Use only memory modules designed for Customer Care Information. All other countries. Gateway and eMachines are trademarks or registered trademarks of the notebook for your Gateway notebook. 12 Gently push the module down until it clicks in one direction...
... reference guide for important safety, regulatory, and legal information. © 2007 Gateway, Inc. See your notebook. Important Use only memory modules designed for Customer Care Information. All other countries. Gateway and eMachines are trademarks or registered trademarks of the notebook for your Gateway notebook. 12 Gently push the module down until it clicks in one direction...
8512564 - Component Replacement Manual R0
Page 11
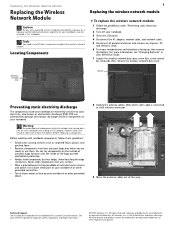
...Remove components from their respective companies. All rights reserved. Technical Support See the label on your notebook, may be removed), then remove the wireless network bay cover. Gateway and eMachines are extremely sensitive to each antenna connector. 9 Move the antenna cables out of the... notebook for important safety, regulatory, and legal information. © 2007 Gateway, Inc. in your reference guide for Customer Care Information. See your Reference Guide. 7 Loosen the...
...Remove components from their respective companies. All rights reserved. Technical Support See the label on your notebook, may be removed), then remove the wireless network bay cover. Gateway and eMachines are extremely sensitive to each antenna connector. 9 Move the antenna cables out of the... notebook for important safety, regulatory, and legal information. © 2007 Gateway, Inc. in your reference guide for Customer Care Information. See your Reference Guide. 7 Loosen the...
8512564 - Component Replacement Manual R0
Page 12
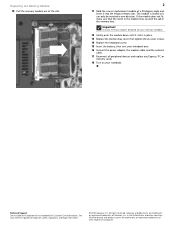
... and other brands and product names are trademarks or registered trademarks of their respective companies. See your notebook. 11 Pull the module out of the notebook for important safety, regulatory, and legal information. © 2007 Gateway, Inc. All rights reserved. Technical Support See the label on your reference guide for Customer Care Information...
... and other brands and product names are trademarks or registered trademarks of their respective companies. See your notebook. 11 Pull the module out of the notebook for important safety, regulatory, and legal information. © 2007 Gateway, Inc. All rights reserved. Technical Support See the label on your reference guide for Customer Care Information...


