
8511418 - Component Replacement Manual
Page 7
...notebook for important safety, regulatory, and legal information. 12 Carefully open the LCD panel to the fully opened position. All rights reserved. Do not lay components on the bottom of each hinge cover and gently pry it up. For more information, see "Changing Batteries"...so the bottom is marked with notebook components, follow these screws cannot be removed), then remove the bay covers. 8 If your hardware guide for Customer Care Information. Gateway and eMachines are extremely sensitive to static electricity, also known as carpeted floors, plastic, and packing foam....
...notebook for important safety, regulatory, and legal information. 12 Carefully open the LCD panel to the fully opened position. All rights reserved. Do not lay components on the bottom of each hinge cover and gently pry it up. For more information, see "Changing Batteries"...so the bottom is marked with notebook components, follow these screws cannot be removed), then remove the bay covers. 8 If your hardware guide for Customer Care Information. Gateway and eMachines are extremely sensitive to static electricity, also known as carpeted floors, plastic, and packing foam....

8511418 - Component Replacement Manual
Page 8
... find no loose spots. All rights reserved. All other countries. Be careful not to not damage the LCD panel. 6 Replace the keyboard cover. See your notebook. Important Inserting a piece of Gateway, Inc. You may need to press down on your notebook with the space bar away from you. 2 Make sure the black keyboard...
... find no loose spots. All rights reserved. All other countries. Be careful not to not damage the LCD panel. 6 Replace the keyboard cover. See your notebook. Important Inserting a piece of Gateway, Inc. You may need to press down on your notebook with the space bar away from you. 2 Make sure the black keyboard...

8511369 - Gateway Notebook Hardware Reference
Page 45
www.gateway.com Tips & Tricks The screw hole is facing up, then remove the battery. Replacing the keyboard 5 Turn your notebook over so the bottom is marked with a K. Keyboard screw 7 Turn your notebook over so the top is facing up . 10 Carefully open the LCD panel to the fully opened ...position. 41 For more information, see "Changing batteries" on page 27. 6 Remove the keyboard screw and put it up . 8 With a small Phillips screwdriver, remove the two hinge cover screws and put them in a safe place. Screw...
www.gateway.com Tips & Tricks The screw hole is facing up, then remove the battery. Replacing the keyboard 5 Turn your notebook over so the bottom is marked with a K. Keyboard screw 7 Turn your notebook over so the top is facing up . 10 Carefully open the LCD panel to the fully opened ...position. 41 For more information, see "Changing batteries" on page 27. 6 Remove the keyboard screw and put it up . 8 With a small Phillips screwdriver, remove the two hinge cover screws and put them in a safe place. Screw...

8511369 - Gateway Notebook Hardware Reference
Page 46
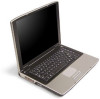
CHAPTER 3: Maintaining and Upgrading Your Notebook www.gateway.com Important Inserting a piece of cloth between the screwdriver and keyboard will help prevent damage to your notebook. 11 Insert the small flat-blade screwdriver under the right end of the keyboard. ■ If the keyboard does not lift, go to Step 14. ■ If the keyboard lifts, go to not damage the LCD panel. 13 Gently lift the back edge of the keyboard cover and gently pry it up. 12 Pull the cover off your notebook. Be careful to Step 19. 42
CHAPTER 3: Maintaining and Upgrading Your Notebook www.gateway.com Important Inserting a piece of cloth between the screwdriver and keyboard will help prevent damage to your notebook. 11 Insert the small flat-blade screwdriver under the right end of the keyboard. ■ If the keyboard does not lift, go to Step 14. ■ If the keyboard lifts, go to not damage the LCD panel. 13 Gently lift the back edge of the keyboard cover and gently pry it up. 12 Pull the cover off your notebook. Be careful to Step 19. 42

8511369 - Gateway Notebook Hardware Reference
Page 47
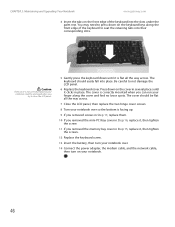
www.gateway.com Replacing the keyboard Tips & Tricks Depending on the end of the cover opposite of the thumb notch. 16 Loosen the mini-PCI bay cover screw (this screw cannot be removed). Screw Screw Screw Screw Screw Screw 15 Use the thumb notch to break off the tabs located on your model, not all screws may be captive. 14 Close the LCD panel, turn your notebook over so the bottom is facing up, then loosen the six memory bay cover screws (these screws cannot be removed), then remove the mini-PCI bay cover. 43 Be careful not to lift the memory bay cover, then remove it.
www.gateway.com Replacing the keyboard Tips & Tricks Depending on the end of the cover opposite of the thumb notch. 16 Loosen the mini-PCI bay cover screw (this screw cannot be removed). Screw Screw Screw Screw Screw Screw 15 Use the thumb notch to break off the tabs located on your model, not all screws may be captive. 14 Close the LCD panel, turn your notebook over so the bottom is facing up, then loosen the six memory bay cover screws (these screws cannot be removed), then remove the mini-PCI bay cover. 43 Be careful not to lift the memory bay cover, then remove it.
8511369 - Gateway Notebook Hardware Reference
Page 50
...on the front edge of the keyboard to not damage the LCD panel. 6 Replace the keyboard cover. Caution If the cover is not correctly replaced, your notebook could be flat all the way across. 7 Close the LCD panel, then replace the two hinge cover screws. 8 Turn your notebook over so the bottom is flat... finger along the front edge of the keyboard into the slots under the palm rest. CHAPTER 3: Maintaining and Upgrading Your Notebook www.gateway.com 4 Insert the tabs on the cover in several places until it is facing up. 9 If you removed screws in Step 17, replace them. 10 If you removed...
...on the front edge of the keyboard to not damage the LCD panel. 6 Replace the keyboard cover. Caution If the cover is not correctly replaced, your notebook could be flat all the way across. 7 Close the LCD panel, then replace the two hinge cover screws. 8 Turn your notebook over so the bottom is flat... finger along the front edge of the keyboard into the slots under the palm rest. CHAPTER 3: Maintaining and Upgrading Your Notebook www.gateway.com 4 Insert the tabs on the cover in several places until it is facing up. 9 If you removed screws in Step 17, replace them. 10 If you removed...


