
8511418 - Component Replacement Manual
Page 3
Avoid touching the edge connectors. www.gateway.com © 2006 Gateway, Inc. Never slide components over so the bottom is marked with notebook components, follow these screws cannot be removed), then remove the memory bay cover. Tips & Tricks The keyboard screw hole is facing up, ...a K. Screw Technical Support See the label on the bottom of the notebook for important safety, regulatory, and legal information. Gateway and eMachines are trademarks or registered trademarks of your workbench or other brands and product names are trademarks or registered trademarks of the...
Avoid touching the edge connectors. www.gateway.com © 2006 Gateway, Inc. Never slide components over so the bottom is marked with notebook components, follow these screws cannot be removed), then remove the memory bay cover. Tips & Tricks The keyboard screw hole is facing up, ...a K. Screw Technical Support See the label on the bottom of the notebook for important safety, regulatory, and legal information. Gateway and eMachines are trademarks or registered trademarks of your workbench or other brands and product names are trademarks or registered trademarks of the...

8511418 - Component Replacement Manual
Page 4
DVD bracket Replacing the DVD Drive 11 Slide the new DVD drive into the drive bay. in Step 9. 13 Replace the memory bay cover, then tighten the six cover screws. 14 Replace the keyboard screw. 15 Insert the battery, then turn your notebook over. 16 Connect the ..., then turn on the DVD bracket. 10 Slide the DVD drive out of the notebook for important safety, regulatory, and legal information. 2 www.gateway.com © 2006 Gateway, Inc. Make sure that the drive fits securely in the bay. 12 Secure the DVD drive with the screw removed in the United States...
DVD bracket Replacing the DVD Drive 11 Slide the new DVD drive into the drive bay. in Step 9. 13 Replace the memory bay cover, then tighten the six cover screws. 14 Replace the keyboard screw. 15 Insert the battery, then turn your notebook over. 16 Connect the ..., then turn on the DVD bracket. 10 Slide the DVD drive out of the notebook for important safety, regulatory, and legal information. 2 www.gateway.com © 2006 Gateway, Inc. Make sure that the drive fits securely in the bay. 12 Secure the DVD drive with the screw removed in the United States...

8511418 - Component Replacement Manual
Page 7
...memory bay cover screws and one wireless network bay screw (these guidelines: • Avoid static-causing surfaces such as carpeted floors, plastic, and packing foam. • Remove components from their edges. Screw Screw 11 Insert the small flat-blade screwdriver under "Preventing static electricity discharge." 2 Turn off your notebook. www.gateway...ESD). Screw Screw To remove the old keyboard: 1 Follow the guidelines under the bottom of Gateway, Inc. Gateway and eMachines are trademarks or registered trademarks of the bags provide electrostatic protection. • Always hold...
...memory bay cover screws and one wireless network bay screw (these guidelines: • Avoid static-causing surfaces such as carpeted floors, plastic, and packing foam. • Remove components from their edges. Screw Screw 11 Insert the small flat-blade screwdriver under "Preventing static electricity discharge." 2 Turn off your notebook. www.gateway...ESD). Screw Screw To remove the old keyboard: 1 Follow the guidelines under the bottom of Gateway, Inc. Gateway and eMachines are trademarks or registered trademarks of the bags provide electrostatic protection. • Always hold...

8511418 - Component Replacement Manual
Page 8
...other brands and product names are trademarks or registered trademarks of the notebook for important safety, regulatory, and legal information. 2 www.gateway.com © 2006 Gateway, Inc. in place. Replacing the Keyboard Installing the new keyboard To install the new keyboard: 1 Place the new keyboard keys...-down on the cover in several places until it is facing up. 9 Replace the two optional keyboard screws. 10 Replace the memory bay cover...
...other brands and product names are trademarks or registered trademarks of the notebook for important safety, regulatory, and legal information. 2 www.gateway.com © 2006 Gateway, Inc. in place. Replacing the Keyboard Installing the new keyboard To install the new keyboard: 1 Place the new keyboard keys...-down on the cover in several places until it is facing up. 9 Replace the two optional keyboard screws. 10 Replace the memory bay cover...

8511418 - Component Replacement Manual
Page 9
... electrical voltages and moving parts, turn off your notebook are trademarks or registered trademarks of Gateway, Inc. Avoid touching the edge connectors. www.gateway.com © 2006 Gateway, Inc. Before working with a K. Replacing the memory module 7 Loosen the six memory bay cover screws (these guidelines: • Avoid static-causing surfaces such as electrostatic discharge (ESD...
... electrical voltages and moving parts, turn off your notebook are trademarks or registered trademarks of Gateway, Inc. Avoid touching the edge connectors. www.gateway.com © 2006 Gateway, Inc. Before working with a K. Replacing the memory module 7 Loosen the six memory bay cover screws (these guidelines: • Avoid static-causing surfaces such as electrostatic discharge (ESD...

8511418 - Component Replacement Manual
Page 10
... in one direction. 8 If you are removing a memory module, gently press outward on the clip at a 30-degree angle and insert it into the empty memory slot. Important Use only memory modules designed for your Gateway notebook. 11 Gently push the module down until the module... tilts upward. 9 Pull the memory module out of their respective companies. Gateway and eMachines are trademarks or registered trademarks ...
... in one direction. 8 If you are removing a memory module, gently press outward on the clip at a 30-degree angle and insert it into the empty memory slot. Important Use only memory modules designed for your Gateway notebook. 11 Gently push the module down until the module... tilts upward. 9 Pull the memory module out of their respective companies. Gateway and eMachines are trademarks or registered trademarks ...
8511369 - Gateway Notebook Hardware Reference
Page 3
...1: About this reference 1 About this guide 2 Accessing the online User Guide 2 Gateway contact information 2 Gateway model and serial number 2 Microsoft Certificate of Authenticity 3 For more information 3 Chapter 2: Checking Out Your Gateway Notebook 5 Identifying features 6 Front 6 Left 7 Right 8 Back 9 Bottom 10 ...drive 24 Identifying drive types 24 Inserting a CD or DVD 25 Using the memory card reader 25 Memory card types 25 Inserting a memory card 25 Using a memory card 26 Removing a memory card 26 Adding and removing a PC Card 26 Changing batteries 27 Recalibrating ...
...1: About this reference 1 About this guide 2 Accessing the online User Guide 2 Gateway contact information 2 Gateway model and serial number 2 Microsoft Certificate of Authenticity 3 For more information 3 Chapter 2: Checking Out Your Gateway Notebook 5 Identifying features 6 Front 6 Left 7 Right 8 Back 9 Bottom 10 ...drive 24 Identifying drive types 24 Inserting a CD or DVD 25 Using the memory card reader 25 Memory card types 25 Inserting a memory card 25 Using a memory card 26 Removing a memory card 26 Adding and removing a PC Card 26 Changing batteries 27 Recalibrating ...
8511369 - Gateway Notebook Hardware Reference
Page 4
Contents www.gateway.com Chapter 3: Maintaining and Upgrading Your Notebook 31 Preventing static electricity discharge 32 Adding or replacing memory 32 Replacing the DVD drive 35 Replacing the hard drive kit 38 Replacing the keyboard 40 Removing the keyboard 40 Installing the keyboard 45 Appendix A: Safety, Regulatory, and Legal Information 47 Index 59 ii
Contents www.gateway.com Chapter 3: Maintaining and Upgrading Your Notebook 31 Preventing static electricity discharge 32 Adding or replacing memory 32 Replacing the DVD drive 35 Replacing the hard drive kit 38 Replacing the keyboard 40 Removing the keyboard 40 Installing the keyboard 45 Appendix A: Safety, Regulatory, and Legal Information 47 Index 59 ii
8511369 - Gateway Notebook Hardware Reference
Page 9
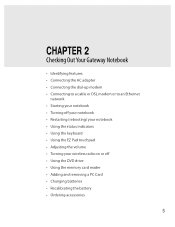
CHAPTER 2 Checking Out Your Gateway Notebook • Identifying features • Connecting the AC adapter • Connecting the dial-up modem • Connecting to a cable or DSL modem or to an ...; Using the EZ Pad touchpad • Adjusting the volume • Turning your wireless radio on or off • Using the DVD drive • Using the memory card reader • Adding and removing a PC Card • Changing batteries • Recalibrating the battery • Ordering accessories 5
CHAPTER 2 Checking Out Your Gateway Notebook • Identifying features • Connecting the AC adapter • Connecting the dial-up modem • Connecting to a cable or DSL modem or to an ...; Using the EZ Pad touchpad • Adjusting the volume • Turning your wireless radio on or off • Using the DVD drive • Using the memory card reader • Adding and removing a PC Card • Changing batteries • Recalibrating the battery • Ordering accessories 5

8511369 - Gateway Notebook Hardware Reference
Page 12
...; cards. For more information, see "Adding and removing a PC Card" on page 13. 8 Plug the other end of the cable into the memory card reader. Plug USB devices (such as a digital camcorder) into this slot. For more information, see "Connecting the dial-up modem" on page..., flash drive, printer, scanner, camera, keyboard, or mouse) into this 4-pin IEEE 1394 port. CHAPTER 2: Checking Out Your Gateway Notebook Right www.gateway.com PC Card slot Memory card reader USB ports IEEE 1394 port Ethernet jack USB ports Modem jack Component Icon PC Card slot IEEE 1394 port...
...; cards. For more information, see "Adding and removing a PC Card" on page 13. 8 Plug the other end of the cable into the memory card reader. Plug USB devices (such as a digital camcorder) into this slot. For more information, see "Connecting the dial-up modem" on page..., flash drive, printer, scanner, camera, keyboard, or mouse) into this 4-pin IEEE 1394 port. CHAPTER 2: Checking Out Your Gateway Notebook Right www.gateway.com PC Card slot Memory card reader USB ports IEEE 1394 port Ethernet jack USB ports Modem jack Component Icon PC Card slot IEEE 1394 port...
8511369 - Gateway Notebook Hardware Reference
Page 14
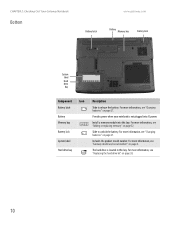
... page 2. Includes the product model number. CHAPTER 2: Checking Out Your Gateway Notebook Bottom www.gateway.com Battery latch Battery Memory bay Battery lock System label Hard drive bay Component Icon Battery latch Battery Memory bay Battery lock System label Hard drive bay Description Slide to unlock the... battery. For more information, see "Gateway model and serial number" on page 27. For more information, see "...
... page 2. Includes the product model number. CHAPTER 2: Checking Out Your Gateway Notebook Bottom www.gateway.com Battery latch Battery Memory bay Battery lock System label Hard drive bay Component Icon Battery latch Battery Memory bay Battery lock System label Hard drive bay Description Slide to unlock the... battery. For more information, see "Gateway model and serial number" on page 27. For more information, see "...
8511369 - Gateway Notebook Hardware Reference
Page 29
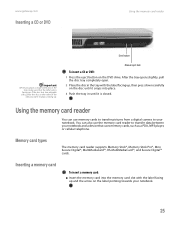
...insert a memory card: ■ Insert the memory card into the memory card slot with the label facing up, then press down carefully on the disc until it snaps into place. 3 Push the tray in the tray, make sure that uses memory cards, such as a PDA, MP3 player, or cellular telephone. www.gateway.com ...Inserting a CD or DVD [ Using the memory card reader Important When you want to play is closed.
...insert a memory card: ■ Insert the memory card into the memory card slot with the label facing up, then press down carefully on the disc until it snaps into place. 3 Push the tray in the tray, make sure that uses memory cards, such as a PDA, MP3 player, or cellular telephone. www.gateway.com ...Inserting a CD or DVD [ Using the memory card reader Important When you want to play is closed.
8511369 - Gateway Notebook Hardware Reference
Page 30
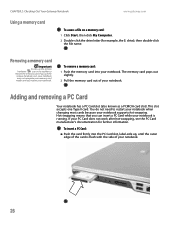
...Out Your Gateway Notebook www.gateway.com Using a memory card To access a file on a memory card: 1 Click Start, then click My Computer. 2 Double-click the drive letter (for further information. Removing a memory card Important Do not use the remove hardware icon, your notebook may not recognize your memory card reader ...known as a PCMCIA card slot). This slot accepts one Type II card. The memory card pops out slightly. 2 Pull the memory card out of your notebook. You do not need to remove the memory card. Hot-swapping means that you can insert a PC Card while your notebook. ...
...Out Your Gateway Notebook www.gateway.com Using a memory card To access a file on a memory card: 1 Click Start, then click My Computer. 2 Double-click the drive letter (for further information. Removing a memory card Important Do not use the remove hardware icon, your notebook may not recognize your memory card reader ...known as a PCMCIA card slot). This slot accepts one Type II card. The memory card pops out slightly. 2 Pull the memory card out of your notebook. You do not need to remove the memory card. Hot-swapping means that you can insert a PC Card while your notebook. ...
8511369 - Gateway Notebook Hardware Reference
Page 33
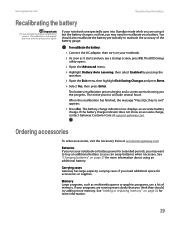
... accessories or supplies. Memory Large programs, such as it but the battery charge is interrupted, you run your battery. The battery recalibration process begins and a screen opens showing you need to exit" appears. 7 Press ESC. Carrying cases Gateway has large-capacity carrying cases if you the progress. www.gateway.com Recalibrating the battery...
... accessories or supplies. Memory Large programs, such as it but the battery charge is interrupted, you run your battery. The battery recalibration process begins and a screen opens showing you need to exit" appears. 7 Press ESC. Carrying cases Gateway has large-capacity carrying cases if you the progress. www.gateway.com Recalibrating the battery...
8511369 - Gateway Notebook Hardware Reference
Page 35
CHAPTER 3 Maintaining and Upgrading Your Notebook • Preventing static electricity discharge • Adding or replacing memory • Replacing the DVD drive • Replacing the hard drive kit • Replacing the keyboard 31
CHAPTER 3 Maintaining and Upgrading Your Notebook • Preventing static electricity discharge • Adding or replacing memory • Replacing the DVD drive • Replacing the hard drive kit • Replacing the keyboard 31
8511369 - Gateway Notebook Hardware Reference
Page 36
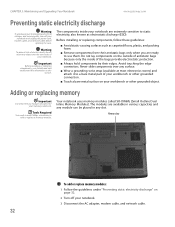
...to static electricity, also known as carpeted floors, plastic, and packing foam. ■ Remove components from their edges. Memory bay To add or replace memory modules: 1 Follow the guidelines under "Preventing static electricity discharge" on your workbench or other grounded connection. ■ ...You need a small Phillips screwdriver to add or replace a memory module. Warning To prevent risk of electric shock, do not insert any slot. CHAPTER 3: Maintaining and Upgrading Your Notebook www.gateway.com Preventing static electricity discharge Warning To avoid exposure to dangerous...
...to static electricity, also known as carpeted floors, plastic, and packing foam. ■ Remove components from their edges. Memory bay To add or replace memory modules: 1 Follow the guidelines under "Preventing static electricity discharge" on your workbench or other grounded connection. ■ ...You need a small Phillips screwdriver to add or replace a memory module. Warning To prevent risk of electric shock, do not insert any slot. CHAPTER 3: Maintaining and Upgrading Your Notebook www.gateway.com Preventing static electricity discharge Warning To avoid exposure to dangerous...
8511369 - Gateway Notebook Hardware Reference
Page 37
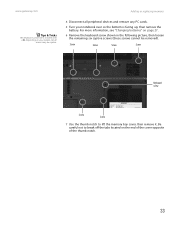
...7 Use the thumb notch to break off the tabs located on the end of the cover opposite of the thumb notch. 33 Adding or replacing memory 4 Disconnect all screws may be removed). Depending on page 27. 6 Remove the keyboard screw shown in the following picture, then loosen the remaining... six captive screws (these screws cannot be captive. Be careful not to lift the memory bay cover, then remove it. For more information, see "Changing batteries" on your model, not all peripheral devices and remove any PC cards. 5...
...7 Use the thumb notch to break off the tabs located on the end of the cover opposite of the thumb notch. 33 Adding or replacing memory 4 Disconnect all screws may be removed). Depending on page 27. 6 Remove the keyboard screw shown in the following picture, then loosen the remaining... six captive screws (these screws cannot be captive. Be careful not to lift the memory bay cover, then remove it. For more information, see "Changing batteries" on your model, not all peripheral devices and remove any PC cards. 5...
8511369 - Gateway Notebook Hardware Reference
Page 38
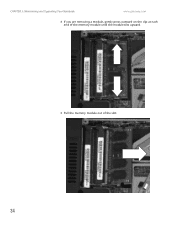
CHAPTER 3: Maintaining and Upgrading Your Notebook www.gateway.com 8 If you are removing a module, gently press outward on the clip at each end of the memory module until the module tilts upward. 9 Pull the memory module out of the slot. 34
CHAPTER 3: Maintaining and Upgrading Your Notebook www.gateway.com 8 If you are removing a module, gently press outward on the clip at each end of the memory module until the module tilts upward. 9 Pull the memory module out of the slot. 34
8511369 - Gateway Notebook Hardware Reference
Page 39
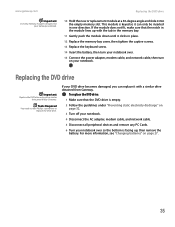
...turn your notebook over so the bottom is keyed so it can replace it into the empty memory slot. Replacing the DVD drive Important Replace the DVD drive only with a similar drive obtained from Gateway. If your DVD drive becomes damaged, you can only be inserted in place. 12 Replace...captive screws. 13 Replace the keyboard screw. 14 Insert the battery, then turn on page 27. 35 www.gateway.com Replacing the DVD drive Important Use only memory modules designed for your Gateway notebook. 10 Hold the new or replacement module at a 30-degree angle and slide it with a similar ...
...turn your notebook over so the bottom is keyed so it can replace it into the empty memory slot. Replacing the DVD drive Important Replace the DVD drive only with a similar drive obtained from Gateway. If your DVD drive becomes damaged, you can only be inserted in place. 12 Replace...captive screws. 13 Replace the keyboard screw. 14 Insert the battery, then turn on page 27. 35 www.gateway.com Replacing the DVD drive Important Use only memory modules designed for your Gateway notebook. 10 Hold the new or replacement module at a 30-degree angle and slide it with a similar ...

8511369 - Gateway Notebook Hardware Reference
Page 40
... your model, not all screws may be captive. 7 Remove the keyboard screw shown in a safe place. Be careful not to lift the memory bay cover, then remove it in the following picture, then loosen the remaining six captive screws (these screws cannot be removed). CHAPTER 3: Maintaining... and Upgrading Your Notebook www.gateway.com Tips & Tricks The keyboard screw hole is facing up. 36 Screw Screw Screw Screw Keyboard screw Screw Screw 8 Use the thumb ...
... your model, not all screws may be captive. 7 Remove the keyboard screw shown in a safe place. Be careful not to lift the memory bay cover, then remove it in the following picture, then loosen the remaining six captive screws (these screws cannot be removed). CHAPTER 3: Maintaining... and Upgrading Your Notebook www.gateway.com Tips & Tricks The keyboard screw hole is facing up. 36 Screw Screw Screw Screw Keyboard screw Screw Screw 8 Use the thumb ...


