
8511418 - Component Replacement Manual
Page 5
..., and packing foam. • Remove components from their antistatic bags only when you a set of Gateway, Inc. The hard drive is facing up, then remove the battery. Gateway and eMachines are extremely sensitive to the back of their edges. in your notebook over any PC Cards... and Applications Recovery discs" in your online hardware guide. 7 Remove the two hard drive bay cover screws, slide the hard drive bay cover, then remove it to use them. www.gateway.com © 2006 Gateway, Inc. Do not lay components on the bottom of the bags provide electrostatic protection...
..., and packing foam. • Remove components from their antistatic bags only when you a set of Gateway, Inc. The hard drive is facing up, then remove the battery. Gateway and eMachines are extremely sensitive to the back of their edges. in your notebook over any PC Cards... and Applications Recovery discs" in your online hardware guide. 7 Remove the two hard drive bay cover screws, slide the hard drive bay cover, then remove it to use them. www.gateway.com © 2006 Gateway, Inc. Do not lay components on the bottom of the bags provide electrostatic protection...

8511418 - Component Replacement Manual
Page 6
...and replace any PC Cards. 16 Turn on your notebook. 17 If the hard drive was sent to the hard drive cover. Technical Support See the label on -screen instructions. Replacing the Hard Drive Kit 10 Place the new drive, label side up, onto the cover so the screw holes line up. 11... the four screws that secure the hard drive to you see a blank screen, restart your notebook, then press F11 while your hardware guide for Customer Care Information. in the United States and other brands and product names are trademarks or registered trademarks of Gateway, Inc. Screws Screws 9 Remove the...
...and replace any PC Cards. 16 Turn on your notebook. 17 If the hard drive was sent to the hard drive cover. Technical Support See the label on -screen instructions. Replacing the Hard Drive Kit 10 Place the new drive, label side up, onto the cover so the screw holes line up. 11... the four screws that secure the hard drive to you see a blank screen, restart your notebook, then press F11 while your hardware guide for Customer Care Information. in the United States and other brands and product names are trademarks or registered trademarks of Gateway, Inc. Screws Screws 9 Remove the...
8511180 - Hardware Reference Gateway Notebook
Page 4
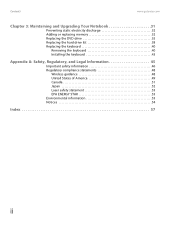
Contents www.gateway.com Chapter 3: Maintaining and Upgrading Your Notebook 31 Preventing static electricity discharge 32 Adding or replacing memory 32 Replacing the DVD drive 35 Replacing the hard drive kit 38 Replacing the keyboard 40 Removing the keyboard 40 Installing the keyboard 43 Appendix A: Safety, Regulatory, and Legal Information 45 Important safety information 46...
Contents www.gateway.com Chapter 3: Maintaining and Upgrading Your Notebook 31 Preventing static electricity discharge 32 Adding or replacing memory 32 Replacing the DVD drive 35 Replacing the hard drive kit 38 Replacing the keyboard 40 Removing the keyboard 40 Installing the keyboard 43 Appendix A: Safety, Regulatory, and Legal Information 45 Important safety information 46...

8511180 - Hardware Reference Gateway Notebook
Page 6
... Label information varies by model, features ordered, and location. Gateway contact information Gateway model and serial number Important The label shown in -depth, easy-to your model of Gateway notebook. Gateway Customer Care will need this information if you call for informational...and other notebook information, see your online User Guide. The label on your hard drive. Online Support: Tech Support Phone: Hours: Model: S/No: 2 CHAPTER 1: About this reference www.gateway.com About this guide This guide includes information and maintenance instructions that identifies ...
... Label information varies by model, features ordered, and location. Gateway contact information Gateway model and serial number Important The label shown in -depth, easy-to your model of Gateway notebook. Gateway Customer Care will need this information if you call for informational...and other notebook information, see your online User Guide. The label on your hard drive. Online Support: Tech Support Phone: Hours: Model: S/No: 2 CHAPTER 1: About this reference www.gateway.com About this guide This guide includes information and maintenance instructions that identifies ...
8511180 - Hardware Reference Gateway Notebook
Page 14
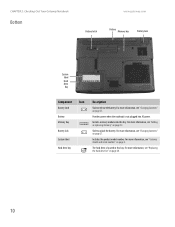
... page 38. 10 For more information, see "Replacing the hard drive kit" on page 27. CHAPTER 2: Checking Out Your Gateway Notebook Bottom www.gateway.com Battery latch Battery Memory bay Battery lock System label Hard drive bay Component Icon Description Battery latch Slide to unlock the battery.... Battery lock Slide to release the battery. Hard drive bay The hard drive is not plugged into this bay. Memory bay Install a memory module into AC power. For more information, see "Gateway model and serial number" on page 27. For more information,...
... page 38. 10 For more information, see "Replacing the hard drive kit" on page 27. CHAPTER 2: Checking Out Your Gateway Notebook Bottom www.gateway.com Battery latch Battery Memory bay Battery lock System label Hard drive bay Component Icon Description Battery latch Slide to unlock the battery.... Battery lock Slide to release the battery. Hard drive bay The hard drive is not plugged into this bay. Memory bay Install a memory module into AC power. For more information, see "Gateway model and serial number" on page 27. For more information,...
8511180 - Hardware Reference Gateway Notebook
Page 21
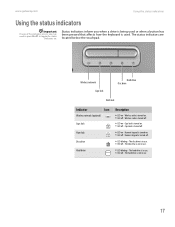
... being used . The status indicators are on - Wireless radio is not in use . 17 The disc drive is in use . ■ LED off - The hard drive is in use . ■ LED off - Status indicators inform you may need to press FN+F1 to toggle the status indicators on . ...network (optional) Caps lock A Num lock 1 Disc drive Hard drive Description ■ LED on - Wireless radio is used or when a button has been pressed that affects how the keyboard is turned off - Numeric keypad is turned on . www.gateway.com Using the status indicators Using the status indicators Important...
... being used . The status indicators are on - Wireless radio is not in use . 17 The disc drive is in use . ■ LED off - The hard drive is in use . ■ LED off - Status indicators inform you may need to press FN+F1 to toggle the status indicators on . ...network (optional) Caps lock A Num lock 1 Disc drive Hard drive Description ■ LED on - Wireless radio is used or when a button has been pressed that affects how the keyboard is turned off - Numeric keypad is turned on . www.gateway.com Using the status indicators Using the status indicators Important...
8511180 - Hardware Reference Gateway Notebook
Page 35
CHAPTER 3 Maintaining and Upgrading Your Notebook • Adding or replacing memory • Replacing the DVD drive • Replacing the hard drive • Replacing the keyboard 31
CHAPTER 3 Maintaining and Upgrading Your Notebook • Adding or replacing memory • Replacing the DVD drive • Replacing the hard drive • Replacing the keyboard 31
8511180 - Hardware Reference Gateway Notebook
Page 42
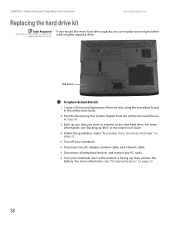
...the bottom is facing up any data you can replace your original drive with a higher-capacity drive. For more hard drive capacity, you want to transfer to replace the hard drive kit. Hard drive kit To replace the hard drive kit: 1 Create a Drivers and Applications Recovery disc using the procedure... static electricity discharge" on page 27. 38 CHAPTER 3: Maintaining and Upgrading Your Notebook www.gateway.com Replacing the hard drive kit Tools Required You need a small Phillips screwdriver to the new hard drive. If you would like more information, see "Backing up files" in Step 18. 3...
...the bottom is facing up any data you can replace your original drive with a higher-capacity drive. For more hard drive capacity, you want to transfer to replace the hard drive kit. Hard drive kit To replace the hard drive kit: 1 Create a Drivers and Applications Recovery disc using the procedure... static electricity discharge" on page 27. 38 CHAPTER 3: Maintaining and Upgrading Your Notebook www.gateway.com Replacing the hard drive kit Tools Required You need a small Phillips screwdriver to the new hard drive. If you would like more information, see "Backing up files" in Step 18. 3...
8511180 - Hardware Reference Gateway Notebook
Page 43
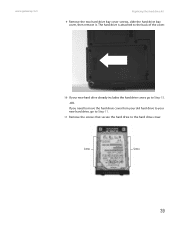
If you need to move the hard drive cover from your old hard drive to your new hard drive already includes the hard drive cover, go to Step 11. 11 Remove the screws that secure the hard drive to Step 15. -OR- The hard drive is attached to the back of the cover. 10 If your new hard drive, go to the hard drive cover. www.gateway.com Replacing the hard drive kit 9 Remove the two hard drive bay cover screws, slide the hard drive bay cover, then remove it. Screws Screws 39
If you need to move the hard drive cover from your old hard drive to your new hard drive already includes the hard drive cover, go to Step 11. 11 Remove the screws that secure the hard drive to Step 15. -OR- The hard drive is attached to the back of the cover. 10 If your new hard drive, go to the hard drive cover. www.gateway.com Replacing the hard drive kit 9 Remove the two hard drive bay cover screws, slide the hard drive bay cover, then remove it. Screws Screws 39
8511180 - Hardware Reference Gateway Notebook
Page 44
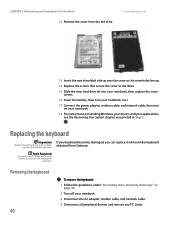
Tools Required You need a small Phillips and a small flat-blade screwdriver to the drive. 15 Slide the new hard drive kit into your notebook, then replace the cover screws. 16 Insert the battery, then turn your notebook over. 17 Connect the power adapter, modem cable,...applications, see the Recovering Your System chapter you can replace it with a similar keyboard provided by Gateway. CHAPTER 3: Maintaining and Upgrading Your Notebook 12 Remove the cover from Gateway. www.gateway.com 13 Insert the new drive label side up onto the cover so the screw holes line up. 14 Replace the screws ...
Tools Required You need a small Phillips and a small flat-blade screwdriver to the drive. 15 Slide the new hard drive kit into your notebook, then replace the cover screws. 16 Insert the battery, then turn your notebook over. 17 Connect the power adapter, modem cable,...applications, see the Recovering Your System chapter you can replace it with a similar keyboard provided by Gateway. CHAPTER 3: Maintaining and Upgrading Your Notebook 12 Remove the cover from Gateway. www.gateway.com 13 Insert the new drive label side up onto the cover so the screw holes line up. 14 Replace the screws ...
8511180 - Hardware Reference Gateway Notebook
Page 61
... 27 charge indicator 6 charging 12 installing 27 latch 10 locating 10 purchasing 30 recalibrating 29 recharging 12 release latch 10 replacing 27 bays battery 27 hard drive 10 memory 10, 32 BIOS Setup utility 29 brightness adjusting 19 brightness keys 20 C cable lock 7 cable modem 14 Caps Lock indicator 17 cards inserting...
... 27 charge indicator 6 charging 12 installing 27 latch 10 locating 10 purchasing 30 recalibrating 29 recharging 12 release latch 10 replacing 27 bays battery 27 hard drive 10 memory 10, 32 BIOS Setup utility 29 brightness adjusting 19 brightness keys 20 C cable lock 7 cable modem 14 Caps Lock indicator 17 cards inserting...
8511180 - Hardware Reference Gateway Notebook
Page 62
..., 19 folders opening 22 function keys 18 G Gateway model number 2, 10 serial number 2, 3 Support 3 H hard drive bay 10 indicator 17 installing 38 replacing 38 headphone jack 6 hot-swapping 26 I i.Link port 8 IEEE 1394 port 8 indicators See status indicators inkjet printer 30 installing battery 27 DVD drive 35 hard drive 38 keyboard 40 memory 32 PC Card...
..., 19 folders opening 22 function keys 18 G Gateway model number 2, 10 serial number 2, 3 Support 3 H hard drive bay 10 indicator 17 installing 38 replacing 38 headphone jack 6 hot-swapping 26 I i.Link port 8 IEEE 1394 port 8 indicators See status indicators inkjet printer 30 installing battery 27 DVD drive 35 hard drive 38 keyboard 40 memory 32 PC Card...
8511180 - Hardware Reference Gateway Notebook
Page 63
www.gateway.com Index status box 19 status indicator 6 turning off notebook 15 turning on notebook 15 printer inkjet 30 laser 30 USB port 8 programs closing unresponsive ... 6 jack 6 specifications 3 Standby mode 15, 19 system key 19 starting notebook 15 programs 22 static electricity 32 status indicators battery charge 6 Caps Lock 17 drive activity 17 hard drive 17 location 11 numeric keypad 17 Pad Lock 17 power 6 toggle on or off 19 Support getting specifications 3 surge protector 13 Suspend 19 S-Video...
www.gateway.com Index status box 19 status indicator 6 turning off notebook 15 turning on notebook 15 printer inkjet 30 laser 30 USB port 8 programs closing unresponsive ... 6 jack 6 specifications 3 Standby mode 15, 19 system key 19 starting notebook 15 programs 22 static electricity 32 status indicators battery charge 6 Caps Lock 17 drive activity 17 hard drive 17 location 11 numeric keypad 17 Pad Lock 17 power 6 toggle on or off 19 Support getting specifications 3 surge protector 13 Suspend 19 S-Video...

