8512216 - Gateway Notebook User Guide R1
Page 20
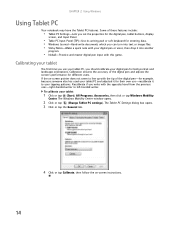
... the properties for the digital pen, tablet buttons, display screen, and Input Panel. • Table PC Input Panel (TIP)-Use its writing pad or soft keyboard for both portrait and landscape orientations. Calibrating your tablet The first time you use -recalibrate it for different users. Recalibrate if you can turn into...
... the properties for the digital pen, tablet buttons, display screen, and Input Panel. • Table PC Input Panel (TIP)-Use its writing pad or soft keyboard for both portrait and landscape orientations. Calibrating your tablet The first time you use -recalibrate it for different users. Recalibrate if you can turn into...
8512216 - Gateway Notebook User Guide R1
Page 21
Using the digital pen Digital pen button The digital pen button serves the same function as pressing the corresponding key on a standard keyboard. When you use gestures to control the insertion point in the active program. Enter Draw a vertical line down, then horizontally to open right-...accomplish Backspace Draw a right-to-left Tab Draw a vertical line up the pointer with your digital pen to send a command to the right. www.gateway.com Using gestures A gesture is a shape you draw with the object on the screen before you tap, in cases where the pointer and digital pen...
Using the digital pen Digital pen button The digital pen button serves the same function as pressing the corresponding key on a standard keyboard. When you use gestures to control the insertion point in the active program. Enter Draw a vertical line down, then horizontally to open right-...accomplish Backspace Draw a right-to-left Tab Draw a vertical line up the pointer with your digital pen to send a command to the right. www.gateway.com Using gestures A gesture is a shape you draw with the object on the screen before you tap, in cases where the pointer and digital pen...
8512216 - Gateway Notebook User Guide R1
Page 22
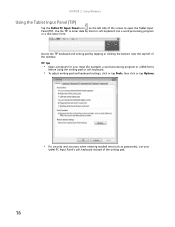
...; Open a program for your input (for example, a word processing program or a Web form) before using the writing pad or soft keyboard. • To adjust writing pad and keyboard settings, click or tap Tools, then click or tap Options. • For security and accuracy when entering masked text (such as passwords...), use your tablet PC Input Panel's soft keyboard instead of the screen to enter data by tapping or clicking the buttons near the top left side of the writing pad. 16 Access the...
...; Open a program for your input (for example, a word processing program or a Web form) before using the writing pad or soft keyboard. • To adjust writing pad and keyboard settings, click or tap Tools, then click or tap Options. • For security and accuracy when entering masked text (such as passwords...), use your tablet PC Input Panel's soft keyboard instead of the screen to enter data by tapping or clicking the buttons near the top left side of the writing pad. 16 Access the...
8512216 - Gateway Notebook User Guide R1
Page 25
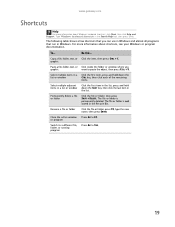
... not stored in the list. The following table shows a few shortcuts that run in the Search Help box, then press ENTER. Press ALT + F4. www.gateway.com Shortcuts Help For more information about Windows keyboard shortcuts, click Start, then click Help and Support. Type Windows...
... not stored in the list. The following table shows a few shortcuts that run in the Search Help box, then press ENTER. Press ALT + F4. www.gateway.com Shortcuts Help For more information about Windows keyboard shortcuts, click Start, then click Help and Support. Type Windows...

8512216 - Gateway Notebook User Guide R1
Page 50
... Windows Media Center: 1 Click (Start), All Programs, then click Windows Media Center. The Windows Media Center's main screen opens. 3 Use the arrow buttons on your keyboard to music, and view photos. CHAPTER 4: Playing and Creating Media Files Using Windows Media Center If your notebook has Windows Vista Home Premium or Windows...
... Windows Media Center: 1 Click (Start), All Programs, then click Windows Media Center. The Windows Media Center's main screen opens. 3 Use the arrow buttons on your keyboard to music, and view photos. CHAPTER 4: Playing and Creating Media Files Using Windows Media Center If your notebook has Windows Vista Home Premium or Windows...

8512216 - Gateway Notebook User Guide R1
Page 89
... print a list of common voice commands. 3 You can press keys on the on-screen keyboard by clicking them with your mouse. • Start Narrator reads on select Gateway notebooks) and configure Windows to better understand you helps you create several voice samples that your voice...changes to Windows: • Start Magnifier provides a close-up view of the area near your mouse pointer. • Start On-Screen Keyboard displays a keyboard on speech recognition. With a a built-in microphone on -screen text and describes graphics. • Set up microphone configures your microphone ...
... print a list of common voice commands. 3 You can press keys on the on-screen keyboard by clicking them with your mouse. • Start Narrator reads on select Gateway notebooks) and configure Windows to better understand you helps you create several voice samples that your voice...changes to Windows: • Start Magnifier provides a close-up view of the area near your mouse pointer. • Start On-Screen Keyboard displays a keyboard on speech recognition. With a a built-in microphone on -screen text and describes graphics. • Set up microphone configures your microphone ...
8512216 - Gateway Notebook User Guide R1
Page 102
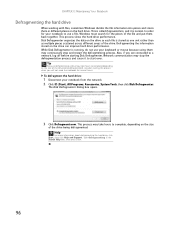
... is normal. Network communication may take hours to complete, depending on the hard drive. To defragment the hard drive: 1 Disconnect your notebook to use your keyboard or mouse because using them may take hours to complete (depending on the size of the drive being defragmented), consider starting Disk Defragmenter. The Disk...
... is normal. Network communication may take hours to complete, depending on the hard drive. To defragment the hard drive: 1 Disconnect your notebook to use your keyboard or mouse because using them may take hours to complete (depending on the size of the drive being defragmented), consider starting Disk Defragmenter. The Disk...
8512216 - Gateway Notebook User Guide R1
Page 108
...55 viewing list 9 fragmentation 96 G gadgets adding 75 configuring 75 configuring Sidebar 76 control panel 76 Sidebar 75 using 75 game access restricting 87 Gateway Web address 2 Web site 2 Gigabit Ethernet 46 H hard drive backing up files 97 checking for errors 95 checking for free space 93 ... provider (ISP) 22 connecting to 23 disconnecting from 22 setting up account 22 IP address entering 52 ISP See Internet service provider K keyboard icon 16 keyboard shortcuts 19 L LCD panel using screen saver 74 links 23 M maintenance backing up files 97 checking for drive errors 95 checking hard ...
...55 viewing list 9 fragmentation 96 G gadgets adding 75 configuring 75 configuring Sidebar 76 control panel 76 Sidebar 75 using 75 game access restricting 87 Gateway Web address 2 Web site 2 Gigabit Ethernet 46 H hard drive backing up files 97 checking for errors 95 checking for free space 93 ... provider (ISP) 22 connecting to 23 disconnecting from 22 setting up account 22 IP address entering 52 ISP See Internet service provider K keyboard icon 16 keyboard shortcuts 19 L LCD panel using screen saver 74 links 23 M maintenance backing up files 97 checking for drive errors 95 checking hard ...

8512216 - Gateway Notebook User Guide R1
Page 109
www.gateway.com programs 7 P parental controls 86 activity reports 89 blocking specific games 88 game ratings 87 Internet filtering... folders 54 printer 55 shortcuts adding to desktop 8 closing programs 19 closing windows 19 copying 19 deleting files and folders 19 keyboard 19 pasting 19 renaming files and folders 19 selecting adjacent items in list 19 selecting items in list 19 switching between files... 34 Web browser 22, 23 Web page 23 Web site 23 connecting to 24 downloading files 24 Gateway 2 window 8 close button 9 closing 9, 19 maximize button 9 menu bar 9 minimize button 9 title bar 8 103
www.gateway.com programs 7 P parental controls 86 activity reports 89 blocking specific games 88 game ratings 87 Internet filtering... folders 54 printer 55 shortcuts adding to desktop 8 closing programs 19 closing windows 19 copying 19 deleting files and folders 19 keyboard 19 pasting 19 renaming files and folders 19 selecting adjacent items in list 19 selecting items in list 19 switching between files... 34 Web browser 22, 23 Web page 23 Web site 23 connecting to 24 downloading files 24 Gateway 2 window 8 close button 9 closing 9, 19 maximize button 9 menu bar 9 minimize button 9 title bar 8 103
8511725 - Gateway Service Guide
Page 3
... the cooling assembly 14 Replacing the processor 19 Replacing the IEEE 802.11 wireless card 22 Replacing the hard drive 26 Replacing the keyboard cover 29 Replacing the keyboard 31 Replacing the CMOS battery 36 Replacing the LCD panel assembly 38 Replacing the LCD panel inverter 42 Replacing the LCD panel 46...
... the cooling assembly 14 Replacing the processor 19 Replacing the IEEE 802.11 wireless card 22 Replacing the hard drive 26 Replacing the keyboard cover 29 Replacing the keyboard 31 Replacing the CMOS battery 36 Replacing the LCD panel assembly 38 Replacing the LCD panel inverter 42 Replacing the LCD panel 46...

8511725 - Gateway Service Guide
Page 5
... the cooling assembly • Replacing the processor • Replacing the IEEE 802.11 wireless card • Replacing the hard drive • Replacing the keyboard cover • Replacing the keyboard • Replacing the CMOS battery • Replacing the LCD panel assembly • Replacing the LCD panel inverter • Replacing the LCD panel •...
... the cooling assembly • Replacing the processor • Replacing the IEEE 802.11 wireless card • Replacing the hard drive • Replacing the keyboard cover • Replacing the keyboard • Replacing the CMOS battery • Replacing the LCD panel assembly • Replacing the LCD panel inverter • Replacing the LCD panel •...
8511725 - Gateway Service Guide
Page 7
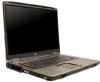
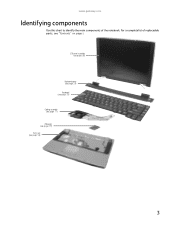
For a complete list of the notebook. LCD panel assembly (see page 38) Keyboard cover (see page 29) Keyboard (see page 31) Cooling assembly (see page 11) Processor (see page 19) Palm rest (see "Contents" on page i. www.gateway.com Identifying components Use this chart to identify the main components of replaceable parts, see page 56) 3
For a complete list of the notebook. LCD panel assembly (see page 38) Keyboard cover (see page 29) Keyboard (see page 31) Cooling assembly (see page 11) Processor (see page 19) Palm rest (see "Contents" on page i. www.gateway.com Identifying components Use this chart to identify the main components of replaceable parts, see page 56) 3
8511725 - Gateway Service Guide
Page 11
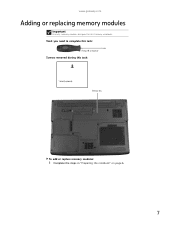
www.gateway.com Adding or replacing memory modules Important Use only memory modules designed for this task: 1 black (keyboard) Memory bay To add or replace memory modules: 1 Complete the steps in "Preparing the notebook" on page 6. 7 Tools you need to complete this task: Phillips #0 screwdriver Screws removed during this Gateway notebook.
www.gateway.com Adding or replacing memory modules Important Use only memory modules designed for this task: 1 black (keyboard) Memory bay To add or replace memory modules: 1 Complete the steps in "Preparing the notebook" on page 6. 7 Tools you need to complete this task: Phillips #0 screwdriver Screws removed during this Gateway notebook.
8511725 - Gateway Service Guide
Page 12
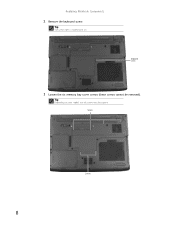
Screws Screws 8 Tip Depending on your model, not all screws may be removed). Keyboard screw 3 Loosen the six memory bay cover screws (these screws cannot be captive. Replacing Notebook Components 2 Remove the keyboard screw. Tip The screw hole is marked with a K.
Screws Screws 8 Tip Depending on your model, not all screws may be removed). Keyboard screw 3 Loosen the six memory bay cover screws (these screws cannot be captive. Replacing Notebook Components 2 Remove the keyboard screw. Tip The screw hole is marked with a K.

8511725 - Gateway Service Guide
Page 14
Tip The screw hole is keyed so it into the empty memory slot. This module is marked with the tab in the memory bay. 8 Replace the memory bay cover, then tighten the cover screws. 9 Replace the keyboard screw. If the module does not fit, make sure that the notch in the module lines up with a K. 10 Replacing Notebook Components 6 Pull the memory module out of the slot. 7 Hold the new or replacement module at a 30-degree angle and press it can only be inserted in one direction.
Tip The screw hole is keyed so it into the empty memory slot. This module is marked with the tab in the memory bay. 8 Replace the memory bay cover, then tighten the cover screws. 9 Replace the keyboard screw. If the module does not fit, make sure that the notch in the module lines up with a K. 10 Replacing Notebook Components 6 Pull the memory module out of the slot. 7 Hold the new or replacement module at a 30-degree angle and press it can only be inserted in one direction.
8511725 - Gateway Service Guide
Page 15
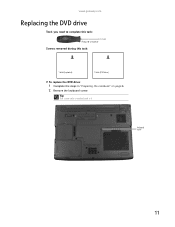
Tip The screw hole is marked with a K. Keyboard screw 11 www.gateway.com Replacing the DVD drive Tools you need to complete this task: Phillips #0 screwdriver Screws removed during this task: 1 black (keyboard) 1 black (DVD drive) To replace the DVD drive: 1 Complete the steps in "Preparing the notebook" on page 6. 2 Remove the keyboard screw.
Tip The screw hole is marked with a K. Keyboard screw 11 www.gateway.com Replacing the DVD drive Tools you need to complete this task: Phillips #0 screwdriver Screws removed during this task: 1 black (keyboard) 1 black (DVD drive) To replace the DVD drive: 1 Complete the steps in "Preparing the notebook" on page 6. 2 Remove the keyboard screw.
8511725 - Gateway Service Guide
Page 17
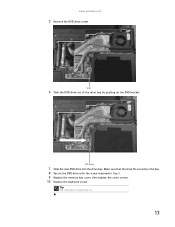
Tip The screw hole is marked with the screw removed in the bay. 8 Secure the DVD drive with a K. 13 DVD bracket 7 Slide the new DVD drive into the drive bay. Screw 6 Slide the DVD drive out of the drive bay by pushing on the DVD bracket. Make sure that the drive fits securely in Step 5. 9 Replace the memory bay cover, then tighten the cover screws. 10 Replace the keyboard screw. www.gateway.com 5 Remove the DVD drive screw.
Tip The screw hole is marked with the screw removed in the bay. 8 Secure the DVD drive with a K. 13 DVD bracket 7 Slide the new DVD drive into the drive bay. Screw 6 Slide the DVD drive out of the drive bay by pushing on the DVD bracket. Make sure that the drive fits securely in Step 5. 9 Replace the memory bay cover, then tighten the cover screws. 10 Replace the keyboard screw. www.gateway.com 5 Remove the DVD drive screw.

8511725 - Gateway Service Guide
Page 18
Keyboard screw 14 Replacing Notebook Components Replacing the cooling assembly Tools you need to complete this task: Phillips #0 screwdriver Additional materials you may need to complete this task: • X-23-7762 thermal grease Screws removed during this task: 1 black (keyboard) To replace the cooling assembly: 1 Complete the steps in "Preparing the notebook" on page 6. 2 Remove the keyboard screw. Tip The screw hole is marked with a K.
Keyboard screw 14 Replacing Notebook Components Replacing the cooling assembly Tools you need to complete this task: Phillips #0 screwdriver Additional materials you may need to complete this task: • X-23-7762 thermal grease Screws removed during this task: 1 black (keyboard) To replace the cooling assembly: 1 Complete the steps in "Preparing the notebook" on page 6. 2 Remove the keyboard screw. Tip The screw hole is marked with a K.
8511725 - Gateway Service Guide
Page 22
Tip The screw hole is marked with the numbers 1 through 4 next to them. Replacing Notebook Components 12 Tighten the three or four screws, in numerical order, in numerical order. Important The number of screws varies by model. 13 Replace the memory bay cover, then tighten the cover screws. 14 Replace the keyboard screw. Caution When tightening the cooling assembly's screws in the numbered holes, tighten them in the holes that are stamped with a K. 18
Tip The screw hole is marked with the numbers 1 through 4 next to them. Replacing Notebook Components 12 Tighten the three or four screws, in numerical order, in numerical order. Important The number of screws varies by model. 13 Replace the memory bay cover, then tighten the cover screws. 14 Replace the keyboard screw. Caution When tightening the cooling assembly's screws in the numbered holes, tighten them in the holes that are stamped with a K. 18
8511725 - Gateway Service Guide
Page 23
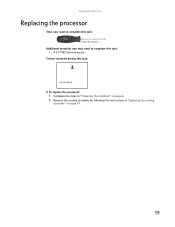
www.gateway.com Replacing the processor Tools you need to complete this task: Phillips #0 screwdriver Additional materials you may need to complete this task: • X-23-7762 thermal grease Screws removed during this task: 1 black (keyboard) To replace the processor: 1 Complete the steps in "Preparing the notebook" on page 6. 2 Remove the cooling assembly by following the instructions in "Replacing the cooling assembly" on page 14. 19
www.gateway.com Replacing the processor Tools you need to complete this task: Phillips #0 screwdriver Additional materials you may need to complete this task: • X-23-7762 thermal grease Screws removed during this task: 1 black (keyboard) To replace the processor: 1 Complete the steps in "Preparing the notebook" on page 6. 2 Remove the cooling assembly by following the instructions in "Replacing the cooling assembly" on page 14. 19


