8511725 - Gateway Service Guide
Page 3
... Replacing the cooling assembly 14 Replacing the processor 19 Replacing the IEEE 802.11 wireless card 22 Replacing the hard drive 26 Replacing the keyboard cover 29 Replacing the keyboard 31 Replacing the CMOS battery 36 Replacing the LCD panel assembly 38 Replacing the LCD panel ...
... Replacing the cooling assembly 14 Replacing the processor 19 Replacing the IEEE 802.11 wireless card 22 Replacing the hard drive 26 Replacing the keyboard cover 29 Replacing the keyboard 31 Replacing the CMOS battery 36 Replacing the LCD panel assembly 38 Replacing the LCD panel ...

8511725 - Gateway Service Guide
Page 5
...; Replacing the cooling assembly • Replacing the processor • Replacing the IEEE 802.11 wireless card • Replacing the hard drive • Replacing the keyboard cover • Replacing the keyboard • Replacing the CMOS battery • Replacing the LCD panel assembly • Replacing the LCD panel ...
...; Replacing the cooling assembly • Replacing the processor • Replacing the IEEE 802.11 wireless card • Replacing the hard drive • Replacing the keyboard cover • Replacing the keyboard • Replacing the CMOS battery • Replacing the LCD panel assembly • Replacing the LCD panel ...

8511725 - Gateway Service Guide
Page 30
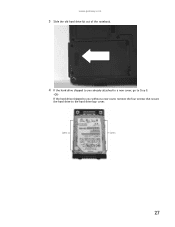
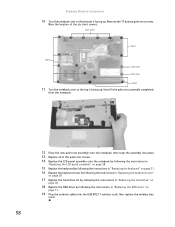
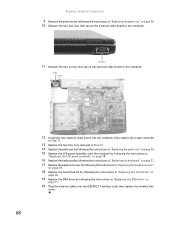
Replacing Notebook Components Replacing the hard drive Tools you need to complete this task: Phillips #0 screwdriver Screws removed during this task: 2 black (hard drive kit) 4 chrome (hard drive cover) Hard drive kit To replace the hard drive: 1 Complete the steps in "Preparing the notebook" on page 6. 2 Remove the two hard drive kit screws. 26
Replacing Notebook Components Replacing the hard drive Tools you need to complete this task: Phillips #0 screwdriver Screws removed during this task: 2 black (hard drive kit) 4 chrome (hard drive cover) Hard drive kit To replace the hard drive: 1 Complete the steps in "Preparing the notebook" on page 6. 2 Remove the two hard drive kit screws. 26
8511725 - Gateway Service Guide
Page 31
Screws Screws 27 www.gateway.com 3 Slide the old hard drive kit out of the notebook. 4 If the hard drive shipped to you without a new cover, remove the four screws that secure the hard drive to Step 8. -OR- If the hard drive shipped to you already attached to a new cover, go to the hard drive bay cover.
Screws Screws 27 www.gateway.com 3 Slide the old hard drive kit out of the notebook. 4 If the hard drive shipped to you without a new cover, remove the four screws that secure the hard drive to Step 8. -OR- If the hard drive shipped to you already attached to a new cover, go to the hard drive bay cover.

8511725 - Gateway Service Guide
Page 32
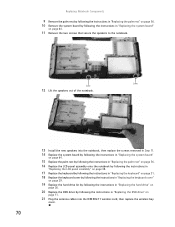
Replacing Notebook Components 5 Remove the cover from the old drive. 6 Place the new drive, label side up, onto the cover so the screw holes line up. 7 Replace the screws that secure the cover to the drive. 8 Slide the new hard drive kit into the notebook, then replace the kit screws. 28
Replacing Notebook Components 5 Remove the cover from the old drive. 6 Place the new drive, label side up, onto the cover so the screw holes line up. 7 Replace the screws that secure the cover to the drive. 8 Slide the new hard drive kit into the notebook, then replace the kit screws. 28
8511725 - Gateway Service Guide
Page 60
... 802.11 wireless card by following the instructions in "Replacing the IEEE 802.11 wireless card" on page 22. 4 Remove the hard drive kit by following the instructions in "Replacing the hard drive" on page 26. 5 Remove the keyboard cover by following the instructions in "Replacing the keyboard cover" on page 29. 6...black (palm rest - Replacing Notebook Components Replacing the palm rest Tools you need to complete this task: Scribe or non-marring tool 1 black (DVD drive) 2 black (hard drive kit) 2 black (keyboard cover) 1-3 black (keyboard) 4 black (LCD panel hinges) 4 black (palm rest -
... 802.11 wireless card by following the instructions in "Replacing the IEEE 802.11 wireless card" on page 22. 4 Remove the hard drive kit by following the instructions in "Replacing the hard drive" on page 26. 5 Remove the keyboard cover by following the instructions in "Replacing the keyboard cover" on page 29. 6...black (palm rest - Replacing Notebook Components Replacing the palm rest Tools you need to complete this task: Scribe or non-marring tool 1 black (DVD drive) 2 black (hard drive kit) 2 black (keyboard cover) 1-3 black (keyboard) 4 black (LCD panel hinges) 4 black (palm rest -
8511725 - Gateway Service Guide
Page 62
... the instructions in "Replacing the keyboard cover" on page 29. 17 Replace the hard drive kit by following the instructions in "Replacing the hard drive" on page 26. 18 Replace the DVD drive by following the instructions in "Replacing the DVD drive" on page 11. 19 Plug the antenna cables into the IEEE 802.11 wireless...
... the instructions in "Replacing the keyboard cover" on page 29. 17 Replace the hard drive kit by following the instructions in "Replacing the hard drive" on page 26. 18 Replace the DVD drive by following the instructions in "Replacing the DVD drive" on page 11. 19 Plug the antenna cables into the IEEE 802.11 wireless...
8511725 - Gateway Service Guide
Page 63
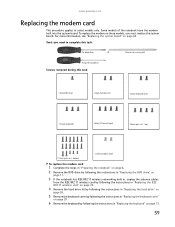
www.gateway.com Replacing the modem card This procedure applies to complete this task: 1 black (DVD drive) 2 black (hard drive kit) 2 black (keyboard cover) 1-3 black (keyboard) 4 black (LCD panel hinges) 4 black (palm rest - Tools you must replace the system board. OR - Some ...802.11 wireless card by following the instructions in "Replacing the IEEE 802.11 wireless card" on page 22. 4 Remove the hard drive kit by following the instructions in "Replacing the hard drive" on page 26. 5 Remove the keyboard cover by following the instructions in "Replacing the keyboard cover" on page 29. ...
www.gateway.com Replacing the modem card This procedure applies to complete this task: 1 black (DVD drive) 2 black (hard drive kit) 2 black (keyboard cover) 1-3 black (keyboard) 4 black (LCD panel hinges) 4 black (palm rest - Tools you must replace the system board. OR - Some ...802.11 wireless card by following the instructions in "Replacing the IEEE 802.11 wireless card" on page 22. 4 Remove the hard drive kit by following the instructions in "Replacing the hard drive" on page 26. 5 Remove the keyboard cover by following the instructions in "Replacing the keyboard cover" on page 29. ...
8511725 - Gateway Service Guide
Page 65
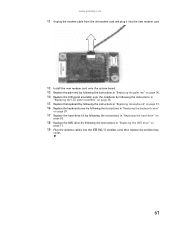
www.gateway.com 11 Unplug the modem cable from the old modem card and plug it into the new modem card. 12 Install the new modem card ... the instructions in "Replacing the keyboard cover" on page 29. 17 Replace the hard drive kit by following the instructions in "Replacing the hard drive" on page 26. 18 Replace the DVD drive by following the instructions in "Replacing the DVD drive" on page 11. 19 Plug the antenna cables into the IEEE 802.11 wireless...
www.gateway.com 11 Unplug the modem cable from the old modem card and plug it into the new modem card. 12 Install the new modem card ... the instructions in "Replacing the keyboard cover" on page 29. 17 Replace the hard drive kit by following the instructions in "Replacing the hard drive" on page 26. 18 Replace the DVD drive by following the instructions in "Replacing the DVD drive" on page 11. 19 Plug the antenna cables into the IEEE 802.11 wireless...

8511725 - Gateway Service Guide
Page 66
... following the instructions in "Replacing the IEEE 802.11 wireless card" on page 22. 4 Remove the hard drive kit by following the instructions in "Replacing the hard drive" on page 26. 5 Remove the keyboard cover by following the instructions in "Replacing the keyboard cover"... OR - Replacing Notebook Components Replacing the Bluetooth module Tools you need to complete this task: Scribe or non-marring tool 1 black (DVD drive) 2 black (hard drive kit) 2 black (keyboard cover) 1-3 black (keyboard) 4 black (LCD panel hinges) 4 black (palm rest - Phillips #0 screwdriver Screws removed...
... following the instructions in "Replacing the IEEE 802.11 wireless card" on page 22. 4 Remove the hard drive kit by following the instructions in "Replacing the hard drive" on page 26. 5 Remove the keyboard cover by following the instructions in "Replacing the keyboard cover"... OR - Replacing Notebook Components Replacing the Bluetooth module Tools you need to complete this task: Scribe or non-marring tool 1 black (DVD drive) 2 black (hard drive kit) 2 black (keyboard cover) 1-3 black (keyboard) 4 black (LCD panel hinges) 4 black (palm rest - Phillips #0 screwdriver Screws removed...
8511725 - Gateway Service Guide
Page 67
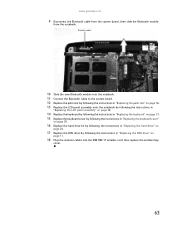
www.gateway.com 9 Disconnect the Bluetooth cable from the system board, then slide the Bluetooth module from the notebook. Bluetooth module 10 Slide the new Bluetooth module ... the instructions in "Replacing the keyboard cover" on page 29. 16 Replace the hard drive kit by following the instructions in "Replacing the hard drive" on page 26. 17 Replace the DVD drive by following the instructions in "Replacing the DVD drive" on page 11. 18 Plug the antenna cables into the IEEE 802.11 wireless...
www.gateway.com 9 Disconnect the Bluetooth cable from the system board, then slide the Bluetooth module from the notebook. Bluetooth module 10 Slide the new Bluetooth module ... the instructions in "Replacing the keyboard cover" on page 29. 16 Replace the hard drive kit by following the instructions in "Replacing the hard drive" on page 26. 17 Replace the DVD drive by following the instructions in "Replacing the DVD drive" on page 11. 18 Plug the antenna cables into the IEEE 802.11 wireless...
8511725 - Gateway Service Guide
Page 68
... Screws removed during this task: Flat-blade driver - Scribe or non-marring tool Phillips #0 screwdriver Additional materials you need to complete this task: 1 black (DVD drive) 2 black (hard drive kit) 1 black (wireless card) Select models only 2 black (keyboard cover) 1-3 black (keyboard) 4 black (LCD panel hinges) 4 black (palm rest - top) 17 black (palm rest...
... Screws removed during this task: Flat-blade driver - Scribe or non-marring tool Phillips #0 screwdriver Additional materials you need to complete this task: 1 black (DVD drive) 2 black (hard drive kit) 1 black (wireless card) Select models only 2 black (keyboard cover) 1-3 black (keyboard) 4 black (LCD panel hinges) 4 black (palm rest - top) 17 black (palm rest...
8511725 - Gateway Service Guide
Page 69
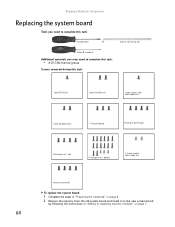
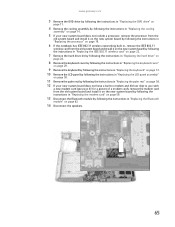
www.gateway.com 3 Remove the DVD drive by following the instructions in "Replacing the DVD drive" on page 11. 4 Remove the cooling assembly by following the instructions in "Replacing the cooling assembly" on page 14. 5 If your new system board does ... the new system board by following the instructions in "Replacing the IEEE 802.11 wireless card" on page 22. 7 Remove the hard drive kit by following the instructions in "Replacing the hard drive" on page 26. 8 Remove the keyboard cover by following the instructions in "Replacing the keyboard cover" on page 29. 9 Remove the...
www.gateway.com 3 Remove the DVD drive by following the instructions in "Replacing the DVD drive" on page 11. 4 Remove the cooling assembly by following the instructions in "Replacing the cooling assembly" on page 14. 5 If your new system board does ... the new system board by following the instructions in "Replacing the IEEE 802.11 wireless card" on page 22. 7 Remove the hard drive kit by following the instructions in "Replacing the hard drive" on page 26. 8 Remove the keyboard cover by following the instructions in "Replacing the keyboard cover" on page 29. 9 Remove the...
8511725 - Gateway Service Guide
Page 70
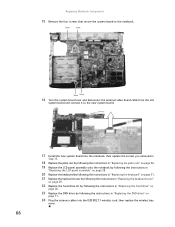
... the instructions in "Replacing the keyboard cover" on page 29. 22 Replace the hard drive kit by following the instructions in "Replacing the hard drive" on page 26. 23 Replace the DVD drive by following the instructions in "Replacing the DVD drive" on page 11. 24 Plug the antenna cables into the IEEE 802.11 wireless...
... the instructions in "Replacing the keyboard cover" on page 29. 22 Replace the hard drive kit by following the instructions in "Replacing the hard drive" on page 26. 23 Replace the DVD drive by following the instructions in "Replacing the DVD drive" on page 11. 24 Plug the antenna cables into the IEEE 802.11 wireless...
8511725 - Gateway Service Guide
Page 71
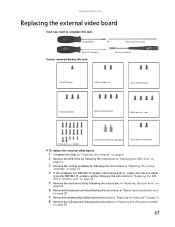
...by following the instructions in "Replacing the IEEE 802.11 wireless card" on page 22. 5 Remove the hard drive kit by following the instructions in "Replacing the hard drive" on page 26. 6 Remove the keyboard cover by following the instructions in "Replacing the keyboard cover" ... during this task: Flat-blade driver - OR - top) 17 black (palm rest - www.gateway.com Replacing the external video board Tools you need to complete this task: 5.0 mm hex nutdriver 1 black (DVD drive) 2 black (hard drive kit) 2 black (keyboard cover) 1-3 black (keyboard) 4 black (LCD panel hinges) 4 ...
...by following the instructions in "Replacing the IEEE 802.11 wireless card" on page 22. 5 Remove the hard drive kit by following the instructions in "Replacing the hard drive" on page 26. 6 Remove the keyboard cover by following the instructions in "Replacing the keyboard cover" ... during this task: Flat-blade driver - OR - top) 17 black (palm rest - www.gateway.com Replacing the external video board Tools you need to complete this task: 5.0 mm hex nutdriver 1 black (DVD drive) 2 black (hard drive kit) 2 black (keyboard cover) 1-3 black (keyboard) 4 black (LCD panel hinges) 4 ...
8511725 - Gateway Service Guide
Page 72
...that secure the external video board to the notebook. Replacing Notebook Components 9 Remove the palm rest by following the instructions in "Replacing the DVD drive" on page 11. 20 Plug the antenna cables into the notebook, then replace the screws removed in Step 11. 13 Replace the two hex... cover by following the instructions in "Replacing the keyboard cover" on page 29. 18 Replace the hard drive kit by following the instructions in "Replacing the hard drive" on page 26. 19 Replace the DVD drive by following the instructions in "Replacing the palm rest" on page 56. 10 Remove the two ...
...that secure the external video board to the notebook. Replacing Notebook Components 9 Remove the palm rest by following the instructions in "Replacing the DVD drive" on page 11. 20 Plug the antenna cables into the notebook, then replace the screws removed in Step 11. 13 Replace the two hex... cover by following the instructions in "Replacing the keyboard cover" on page 29. 18 Replace the hard drive kit by following the instructions in "Replacing the hard drive" on page 26. 19 Replace the DVD drive by following the instructions in "Replacing the palm rest" on page 56. 10 Remove the two ...
8511725 - Gateway Service Guide
Page 73
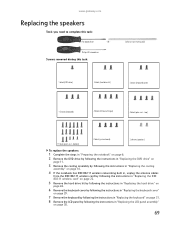
...by following the instructions in "Replacing the IEEE 802.11 wireless card" on page 22. 5 Remove the hard drive kit by following the instructions in "Replacing the hard drive" on page 26. 6 Remove the keyboard cover by following the instructions in "Replacing the keyboard cover" on...by following the instructions in "Replacing the LCD panel assembly" on page 38. 69 www.gateway.com Replacing the speakers Tools you need to complete this task: Scribe or non-marring tool 1 black (DVD drive) 2 black (hard drive kit) 2 black (keyboard cover) 1-3 black (keyboard) 4 black (LCD panel hinges)...
...by following the instructions in "Replacing the IEEE 802.11 wireless card" on page 22. 5 Remove the hard drive kit by following the instructions in "Replacing the hard drive" on page 26. 6 Remove the keyboard cover by following the instructions in "Replacing the keyboard cover" on...by following the instructions in "Replacing the LCD panel assembly" on page 38. 69 www.gateway.com Replacing the speakers Tools you need to complete this task: Scribe or non-marring tool 1 black (DVD drive) 2 black (hard drive kit) 2 black (keyboard cover) 1-3 black (keyboard) 4 black (LCD panel hinges)...
8511725 - Gateway Service Guide
Page 74
... the keyboard cover by following the instructions in "Replacing the keyboard cover" on page 29. 19 Replace the hard drive kit by following the instructions in "Replacing the hard drive" on page 26. 20 Replace the DVD drive by following the instructions in "Replacing the system board" on page 11. 21 Plug the antenna cables... by following the instructions in "Replacing the palm rest" on page 56. 10 Remove the system board by following the instructions in "Replacing the DVD drive" on page 64. 11 Remove the two screws that secure the speakers to the notebook.
... the keyboard cover by following the instructions in "Replacing the keyboard cover" on page 29. 19 Replace the hard drive kit by following the instructions in "Replacing the hard drive" on page 26. 20 Replace the DVD drive by following the instructions in "Replacing the system board" on page 11. 21 Plug the antenna cables... by following the instructions in "Replacing the palm rest" on page 56. 10 Remove the system board by following the instructions in "Replacing the DVD drive" on page 64. 11 Remove the two screws that secure the speakers to the notebook.
8512055 - Component Replacement Manual
Page 5
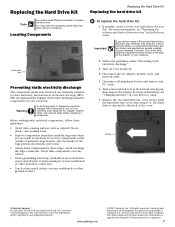
...: 1 If possible, create a Drivers and Applications Recovery disc. Do not lay components on your notebook are extremely sensitive to replace the hard drive. The hard drive is facing up, then remove the battery. Gateway and eMachines are ready to the back of your notebook. 2 Follow the guidelines under "Preventing static electricity discharge." 3 Turn off your...
...: 1 If possible, create a Drivers and Applications Recovery disc. Do not lay components on your notebook are extremely sensitive to replace the hard drive. The hard drive is facing up, then remove the battery. Gateway and eMachines are ready to the back of your notebook. 2 Follow the guidelines under "Preventing static electricity discharge." 3 Turn off your...

8512055 - Component Replacement Manual
Page 6
...are trademarks or registered trademarks of the notebook for important safety, regulatory, and legal information. 2 www.gateway.com © 2007 Gateway, Inc. Replacing the Hard Drive Kit 10 Place the new drive, label side up, onto the cover so the screw holes line up. 11 Replace the four ...screws that secure the hard drive to the hard drive cover. All other countries. Screws Screws 9 Remove the cover from Gateway with the operating system, applications, and drivers installed, you from the old drive. A list of valid boot devices appears. 18 Press the...
...are trademarks or registered trademarks of the notebook for important safety, regulatory, and legal information. 2 www.gateway.com © 2007 Gateway, Inc. Replacing the Hard Drive Kit 10 Place the new drive, label side up, onto the cover so the screw holes line up. 11 Replace the four ...screws that secure the hard drive to the hard drive cover. All other countries. Screws Screws 9 Remove the cover from Gateway with the operating system, applications, and drivers installed, you from the old drive. A list of valid boot devices appears. 18 Press the...


