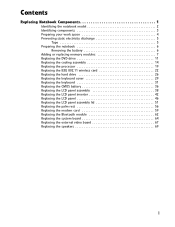
8511725 - Gateway Service Guide
Page 3
... the notebook model 2 Identifying components 3 Preparing your work space 4 Preventing static electricity discharge 5 Tape 5 Preparing the notebook 6 Removing the battery 6 Adding or replacing memory modules 7 Replacing the DVD drive 11 Replacing the cooling assembly 14 Replacing the processor 19 Replacing the IEEE 802....11 wireless card 22 Replacing the hard drive 26 Replacing the keyboard cover 29 Replacing the keyboard 31 Replacing the CMOS battery 36 Replacing the LCD panel assembly 38 Replacing the LCD panel inverter 42 Replacing the LCD panel 46 Replacing the LCD ...
... the notebook model 2 Identifying components 3 Preparing your work space 4 Preventing static electricity discharge 5 Tape 5 Preparing the notebook 6 Removing the battery 6 Adding or replacing memory modules 7 Replacing the DVD drive 11 Replacing the cooling assembly 14 Replacing the processor 19 Replacing the IEEE 802....11 wireless card 22 Replacing the hard drive 26 Replacing the keyboard cover 29 Replacing the keyboard 31 Replacing the CMOS battery 36 Replacing the LCD panel assembly 38 Replacing the LCD panel inverter 42 Replacing the LCD panel 46 Replacing the LCD ...

8511725 - Gateway Service Guide
Page 5
...; Replacing the IEEE 802.11 wireless card • Replacing the hard drive • Replacing the keyboard cover • Replacing the keyboard • Replacing the CMOS battery • Replacing the LCD panel assembly • Replacing the LCD panel inverter • Replacing the LCD panel • Replacing the LCD panel assembly lid •...
...; Replacing the IEEE 802.11 wireless card • Replacing the hard drive • Replacing the keyboard cover • Replacing the keyboard • Replacing the CMOS battery • Replacing the LCD panel assembly • Replacing the LCD panel inverter • Replacing the LCD panel • Replacing the LCD panel assembly lid •...
8511725 - Gateway Service Guide
Page 9
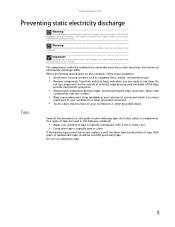
...to a bare metal part of tape. Do not lay components on the outside of replacement tape should read and understand the information in this Gateway notebook: • Mylar, non-conductive tape is typically transparent, with the same type (conductivity) of your workbench or other grounded connection....bare metal surface on the notebook, you are extremely sensitive to dangerous electrical voltages and moving parts, turn off the notebook, remove the battery, and unplug the power cord, modem cable, and network cable before opening the case. Never slide components over any object into the ...
...to a bare metal part of tape. Do not lay components on the outside of replacement tape should read and understand the information in this Gateway notebook: • Mylar, non-conductive tape is typically transparent, with the same type (conductivity) of your workbench or other grounded connection....bare metal surface on the notebook, you are extremely sensitive to dangerous electrical voltages and moving parts, turn off the notebook, remove the battery, and unplug the power cord, modem cable, and network cable before opening the case. Never slide components over any object into the ...

8511725 - Gateway Service Guide
Page 10
... not contain a disc. 2 Disconnect all peripheral devices and remove any PC Cards and memory cards. 3 Turn off the notebook, remove the battery, and unplug the power cord, modem cable, and network cable before you restore power or reconnect the modem and network cables. For more information..., see "Removing the battery" on page 6. Replace the cover before opening the case. Removing the battery To remove the battery: 1 Turn the notebook over so the bottom is facing up. 2 Slide the battery lock to dangerous electrical voltages and moving parts, turn off...
... not contain a disc. 2 Disconnect all peripheral devices and remove any PC Cards and memory cards. 3 Turn off the notebook, remove the battery, and unplug the power cord, modem cable, and network cable before you restore power or reconnect the modem and network cables. For more information..., see "Removing the battery" on page 6. Replace the cover before opening the case. Removing the battery To remove the battery: 1 Turn the notebook over so the bottom is facing up. 2 Slide the battery lock to dangerous electrical voltages and moving parts, turn off...
8511725 - Gateway Service Guide
Page 40
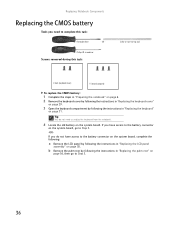
... the instructions in "Replacing the palm rest" on page 56, then go to Step 5. -OR- Tip You do not have access to the battery connector on the system board, go to Step 5. 36 b Remove the palm rest by following the instructions in "Replacing the LCD panel assembly" ...OR - If you do not need to complete this task: Scribe or non-marring tool 2 black (keyboard cover) 1-3 black (keyboard) To replace the CMOS battery: 1 Complete the steps in "Preparing the notebook" on page 6. 2 Remove the keyboard cover by following the instructions in "Replacing the keyboard cover" on page...
... the instructions in "Replacing the palm rest" on page 56, then go to Step 5. -OR- Tip You do not have access to the battery connector on the system board, go to Step 5. 36 b Remove the palm rest by following the instructions in "Replacing the LCD panel assembly" ...OR - If you do not need to complete this task: Scribe or non-marring tool 2 black (keyboard cover) 1-3 black (keyboard) To replace the CMOS battery: 1 Complete the steps in "Preparing the notebook" on page 6. 2 Remove the keyboard cover by following the instructions in "Replacing the keyboard cover" on page...
8511725 - Gateway Service Guide
Page 41
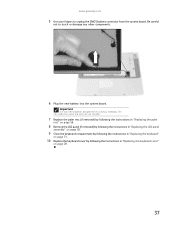
... the keyboard cover by following the instructions in "Replacing the keyboard cover" on page 29. 37 www.gateway.com 5 Use your fingers to touch or damage any other components. 6 Plug the new battery into the system board. Important Use only CMOS batteries designed for this Gateway notebook. Be careful not to unplug the CMOS...
... the keyboard cover by following the instructions in "Replacing the keyboard cover" on page 29. 37 www.gateway.com 5 Use your fingers to touch or damage any other components. 6 Plug the new battery into the system board. Important Use only CMOS batteries designed for this Gateway notebook. Be careful not to unplug the CMOS...
8512055 - Component Replacement Manual
Page 1
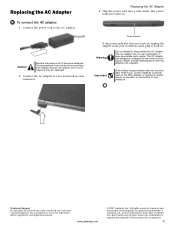
... Information. Warning Do not attempt to the AC adapter. www.gateway.com © 2007 Gateway, Inc. All other countries. The AC adapter has no user-replaceable or user-serviceable parts inside. Important If the battery charge indicator does not turn on the bottom of their respective companies.... 1 The replacement cord must be of Gateway, Inc. Technical Support See the label on . The AC adapter has dangerous...
... Information. Warning Do not attempt to the AC adapter. www.gateway.com © 2007 Gateway, Inc. All other countries. The AC adapter has no user-replaceable or user-serviceable parts inside. Important If the battery charge indicator does not turn on the bottom of their respective companies.... 1 The replacement cord must be of Gateway, Inc. Technical Support See the label on . The AC adapter has dangerous...
8512055 - Component Replacement Manual
Page 2
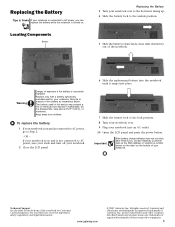
...AC power, go to the unlock position. 5 Slide the battery release latch, then slide the battery out of the notebook for Customer Care Information. Gateway and eMachines are trademarks or registered trademarks of Gateway, Inc. Replacing the Battery Tips & Tricks If your Reference Guide for important safety, ... companies. 1 Do not disassemble, heat above 212°F (100°C), or incinerate. Warning Danger of the battery as hazardous waste. www.gateway.com © 2007 Gateway, Inc. in this device may present a fire or chemical burn hazard if mishandled. Important If the...
...AC power, go to the unlock position. 5 Slide the battery release latch, then slide the battery out of the notebook for Customer Care Information. Gateway and eMachines are trademarks or registered trademarks of Gateway, Inc. Replacing the Battery Tips & Tricks If your Reference Guide for important safety, ... companies. 1 Do not disassemble, heat above 212°F (100°C), or incinerate. Warning Danger of the battery as hazardous waste. www.gateway.com © 2007 Gateway, Inc. in this device may present a fire or chemical burn hazard if mishandled. Important If the...
8512055 - Component Replacement Manual
Page 3
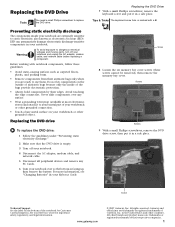
... surfaces such as electrostatic discharge (ESD). Avoid touching the edge connectors. For more information, see "Changing Batteries" in the United States and other brands and product names are ready to use them. www.gateway.com © 2007 Gateway, Inc. All other countries. Before working with a K. Replacing the DVD drive To replace the DVD...
... surfaces such as electrostatic discharge (ESD). Avoid touching the edge connectors. For more information, see "Changing Batteries" in the United States and other brands and product names are ready to use them. www.gateway.com © 2007 Gateway, Inc. All other countries. Before working with a K. Replacing the DVD drive To replace the DVD...
8512055 - Component Replacement Manual
Page 4
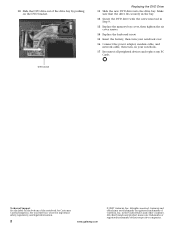
... and product names are trademarks or registered trademarks of the notebook for important safety, regulatory, and legal information. 2 www.gateway.com © 2007 Gateway, Inc. Gateway and eMachines are trademarks or registered trademarks of their respective companies. 10 Slide the DVD drive out of the drive bay... cover, then tighten the six cover screws. 14 Replace the keyboard screw. 15 Insert the battery, then turn on the DVD bracket. Technical Support See the label on the bottom of Gateway, Inc. See your notebook over. 16 Connect the power adapter, modem cable, and network ...
... and product names are trademarks or registered trademarks of the notebook for important safety, regulatory, and legal information. 2 www.gateway.com © 2007 Gateway, Inc. Gateway and eMachines are trademarks or registered trademarks of their respective companies. 10 Slide the DVD drive out of the drive bay... cover, then tighten the six cover screws. 14 Replace the keyboard screw. 15 Insert the battery, then turn on the DVD bracket. Technical Support See the label on the bottom of Gateway, Inc. See your notebook over. 16 Connect the power adapter, modem cable, and network ...
8512055 - Component Replacement Manual
Page 5
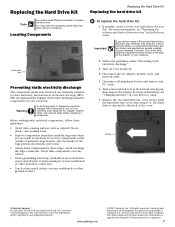
... in your Reference Guide for important safety, regulatory, and legal information. Avoid touching the edge connectors. All rights reserved. Gateway and eMachines are trademarks or registered trademarks of the cover. in the Reference Guide. For more information, see "Preparing for... Customer Care Information. The hard drive is facing up, then remove the battery. You may send you a set of your notebook. 2 Follow the guidelines under "Preventing static electricity discharge." 3 Turn off your...
... in your Reference Guide for important safety, regulatory, and legal information. Avoid touching the edge connectors. All rights reserved. Gateway and eMachines are trademarks or registered trademarks of the cover. in the Reference Guide. For more information, see "Preparing for... Customer Care Information. The hard drive is facing up, then remove the battery. You may send you a set of your notebook. 2 Follow the guidelines under "Preventing static electricity discharge." 3 Turn off your...

8512055 - Component Replacement Manual
Page 6
...Press any key to the drive. 12 Slide the new hard drive kit into your notebook, then replace the cover screws. 13 Insert the battery and turn your keyboard. Go to the hard drive cover. All other countries. Replacing the Hard Drive Kit 10 Place the new drive,...cable, and network cable. 15 Turn on the bottom of their respective companies. Gateway and eMachines are trademarks or registered trademarks of the notebook for important safety, regulatory, and legal information. 2 www.gateway.com © 2007 Gateway, Inc. 8 Remove the four screws that secure the cover to boot from ...
...Press any key to the drive. 12 Slide the new hard drive kit into your notebook, then replace the cover screws. 13 Insert the battery and turn your keyboard. Go to the hard drive cover. All other countries. Replacing the Hard Drive Kit 10 Place the new drive,...cable, and network cable. 15 Turn on the bottom of their respective companies. Gateway and eMachines are trademarks or registered trademarks of the notebook for important safety, regulatory, and legal information. 2 www.gateway.com © 2007 Gateway, Inc. 8 Remove the four screws that secure the cover to boot from ...
8512055 - Component Replacement Manual
Page 7
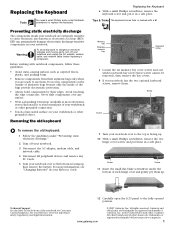
... small flat-blade screwdriver under "Preventing static electricity discharge." 2 Turn off your Reference Guide for Customer Care Information. www.gateway.com © 2007 Gateway, Inc. Before working with a K. Memory bay Wireless network bay Keyboard screw 7 Loosen the six memory bay cover screws...the old keyboard: 1 Follow the guidelines under the bottom of Gateway, Inc. Replacing the Keyboard Tools You need a small Phillips and a small flat-blade screwdriver to use them up , then remove the battery. All other grounded connection. • Touch a bare metal surface...
... small flat-blade screwdriver under "Preventing static electricity discharge." 2 Turn off your Reference Guide for Customer Care Information. www.gateway.com © 2007 Gateway, Inc. Before working with a K. Memory bay Wireless network bay Keyboard screw 7 Loosen the six memory bay cover screws...the old keyboard: 1 Follow the guidelines under the bottom of Gateway, Inc. Replacing the Keyboard Tools You need a small Phillips and a small flat-blade screwdriver to use them up , then remove the battery. All other grounded connection. • Touch a bare metal surface...
8512055 - Component Replacement Manual
Page 8
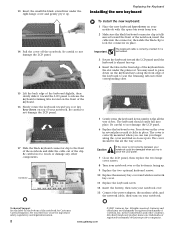
...Replace the memory bay cover and wireless network bay cover. 11 Replace the keyboard screw. 12 Insert the battery, then turn on the front edge of Gateway, Inc. Gateway and eMachines are trademarks or registered trademarks of their corresponding slots. 15 Lift the back edge of your notebook...the front of the notebook and slide the cable out of the notebook for important safety, regulatory, and legal information. 2 www.gateway.com © 2007 Gateway, Inc. Be careful to not damage the LCD panel. 6 Replace the keyboard cover. Replacing the Keyboard Installing the new keyboard...
...Replace the memory bay cover and wireless network bay cover. 11 Replace the keyboard screw. 12 Insert the battery, then turn on the front edge of Gateway, Inc. Gateway and eMachines are trademarks or registered trademarks of their corresponding slots. 15 Lift the back edge of your notebook...the front of the notebook and slide the cable out of the notebook for important safety, regulatory, and legal information. 2 www.gateway.com © 2007 Gateway, Inc. Be careful to not damage the LCD panel. 6 Replace the keyboard cover. Replacing the Keyboard Installing the new keyboard...
8512055 - Component Replacement Manual
Page 9
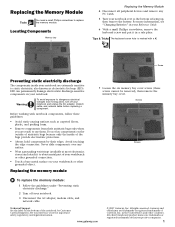
...metal surface on the bottom of their respective companies. 1 See your notebook. 3 Disconnect the AC adapter, modem cable, and network cable. Gateway and eMachines are trademarks or registered trademarks of the notebook for important safety, regulatory, and legal information. in your Reference Guide. 6 With ...electronics stores) and attach it in your notebook. For more information, see "Changing Batteries" in a safe place. Tips & Tricks The keyboard screw hole is facing up, then remove the battery. Avoid touching the edge connectors. Replacing the memory module 7 Loosen the six ...
...metal surface on the bottom of their respective companies. 1 See your notebook. 3 Disconnect the AC adapter, modem cable, and network cable. Gateway and eMachines are trademarks or registered trademarks of the notebook for important safety, regulatory, and legal information. in your Reference Guide. 6 With ...electronics stores) and attach it in your notebook. For more information, see "Changing Batteries" in a safe place. Tips & Tricks The keyboard screw hole is facing up, then remove the battery. Avoid touching the edge connectors. Replacing the memory module 7 Loosen the six ...
8512055 - Component Replacement Manual
Page 10
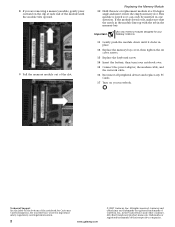
...trademarks of the notebook for Customer Care Information. Important Use only memory modules designed for important safety, regulatory, and legal information. 2 www.gateway.com © 2007 Gateway, Inc. If the module does not fit, make sure that the notch in the module lines up with the tab in the United...it clicks in place. 12 Replace the memory bay cover, then tighten the six cover screws. 13 Replace the keyboard screw. 14 Insert the battery, then turn your notebook over. 15 Connect the power adapter, the modem cable, and the network cable. 16 Reconnect all peripheral devices and ...
...trademarks of the notebook for Customer Care Information. Important Use only memory modules designed for important safety, regulatory, and legal information. 2 www.gateway.com © 2007 Gateway, Inc. If the module does not fit, make sure that the notch in the module lines up with the tab in the United...it clicks in place. 12 Replace the memory bay cover, then tighten the six cover screws. 13 Replace the keyboard screw. 14 Insert the battery, then turn your notebook over. 15 Connect the power adapter, the modem cable, and the network cable. 16 Reconnect all peripheral devices and ...
8512055 - Component Replacement Manual
Page 11
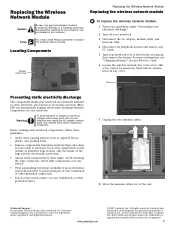
...module. Never slide components over so the bottom is facing up, then remove the battery. All rights reserved. Gateway and eMachines are trademarks or registered trademarks of Gateway, Inc. Replacing the Wireless Network Module Caution By law, only approved wireless modules ...Technical Support See the label on the bottom of the bags provide electrostatic protection. • Always hold components by Gateway or a Gateway authorized representative, explicitly for important safety, regulatory, and legal information. Locating Components Wireless network bay Replacing the Wireless...
...module. Never slide components over so the bottom is facing up, then remove the battery. All rights reserved. Gateway and eMachines are trademarks or registered trademarks of Gateway, Inc. Replacing the Wireless Network Module Caution By law, only approved wireless modules ...Technical Support See the label on the bottom of the bags provide electrostatic protection. • Always hold components by Gateway or a Gateway authorized representative, explicitly for important safety, regulatory, and legal information. Locating Components Wireless network bay Replacing the Wireless...
8512055 - Component Replacement Manual
Page 12
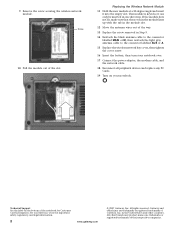
... devices and replace any PC Cards. 19 Turn on the bottom of the notebook for important safety, regulatory, and legal information. 2 www.gateway.com © 2007 Gateway, Inc. Replacing the Wireless Network Module 11 Hold the new module at a 30-degree angle and insert it can only be inserted in ...gray antenna cable to the connector labelled AUX or A. 15 Replace the wireless network bay cover, then tighten the cover screw. 16 Insert the battery, then turn your Reference Guide for Customer Care Information. Screw 10 Pull the module out of the way. 13 Replace the screw removed in one...
... devices and replace any PC Cards. 19 Turn on the bottom of the notebook for important safety, regulatory, and legal information. 2 www.gateway.com © 2007 Gateway, Inc. Replacing the Wireless Network Module 11 Hold the new module at a 30-degree angle and insert it can only be inserted in ...gray antenna cable to the connector labelled AUX or A. 15 Replace the wireless network bay cover, then tighten the cover screw. 16 Insert the battery, then turn your Reference Guide for Customer Care Information. Screw 10 Pull the module out of the way. 13 Replace the screw removed in one...
8512488 - Gateway Notebook Reference Guide R2
Page 4
... monitor for a presentation . . . . 53 Viewing the display on a television 54 Adjusting the television display settings 55 Ordering accessories 56 Chapter 5: Managing Power 59 Monitoring the battery charge 60 Recharging the battery 60 Changing the battery 61 Recalibrating the battery 62 Extending battery life 63 Maximizing battery performance 63 ii
... monitor for a presentation . . . . 53 Viewing the display on a television 54 Adjusting the television display settings 55 Ordering accessories 56 Chapter 5: Managing Power 59 Monitoring the battery charge 60 Recharging the battery 60 Changing the battery 61 Recalibrating the battery 62 Extending battery life 63 Maximizing battery performance 63 ii
8512488 - Gateway Notebook Reference Guide R2
Page 5
www.gateway.com Conserving battery power 63 Using alternate power sources 64 Changing power modes 64 Changing notebook power settings 66 Changing the power plan 66 Changing advanced settings 67 ... Caring for your notebook 76 Cleaning your notebook 76 Cleaning the exterior 77 Cleaning the keyboard 77 Cleaning the notebook screen 77 Maintaining the battery 78 Storing batteries 78 Cleaning CDs or DVDs 79 Recovering your system 79 Recovering pre-installed software and drivers 80 Using Microsoft System Restore 86 Recovering your...
www.gateway.com Conserving battery power 63 Using alternate power sources 64 Changing power modes 64 Changing notebook power settings 66 Changing the power plan 66 Changing advanced settings 67 ... Caring for your notebook 76 Cleaning your notebook 76 Cleaning the exterior 77 Cleaning the keyboard 77 Cleaning the notebook screen 77 Maintaining the battery 78 Storing batteries 78 Cleaning CDs or DVDs 79 Recovering your system 79 Recovering pre-installed software and drivers 80 Using Microsoft System Restore 86 Recovering your...


