
8512564 - Component Replacement Manual R0
Page 1
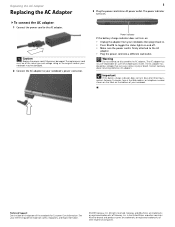
... user-serviceable parts inside. Caution Replace the power cord if it back in the United States and other brands and product names are trademarks or registered trademarks of your notebook. Power indicator If the battery charge indicator does not turn blue after three hours, contact Gateway Customer Care at the Web address or...
... user-serviceable parts inside. Caution Replace the power cord if it back in the United States and other brands and product names are trademarks or registered trademarks of your notebook. Power indicator If the battery charge indicator does not turn blue after three hours, contact Gateway Customer Care at the Web address or...
8512564 - Component Replacement Manual R0
Page 2
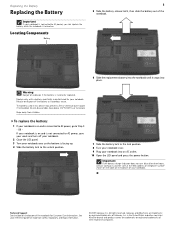
...your notebook. Locating Components Battery 1 5 Slide the battery release latch, then slide the battery out of Gateway, Inc. All rights reserved. Keep away from children. All other countries. Replace only with a battery specifically manufactured for Customer Care Information. The battery used in the United ...incinerate. Replacing the Battery Replacing the Battery Important If your notebook is connected to AC power, you can replace the battery while the notebook is turned on and is not connected to AC power, save your work and turn blue after three hours, contact Gateway Customer ...
...your notebook. Locating Components Battery 1 5 Slide the battery release latch, then slide the battery out of Gateway, Inc. All rights reserved. Keep away from children. All other countries. Replace only with a battery specifically manufactured for Customer Care Information. The battery used in the United ...incinerate. Replacing the Battery Replacing the Battery Important If your notebook is connected to AC power, you can replace the battery while the notebook is turned on and is not connected to AC power, save your work and turn blue after three hours, contact Gateway Customer ...
8512564 - Component Replacement Manual R0
Page 3
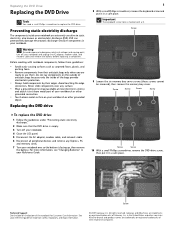
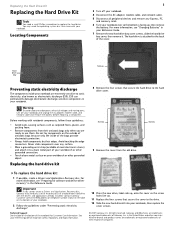
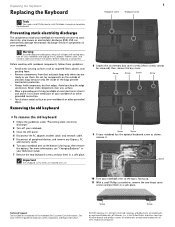
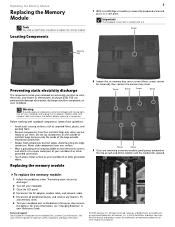
...because only the inside your notebook and unplug the AC adapter, modem cable, and network cable and remove the battery before replacing a component. Replacing the DVD drive 1 8 With a small Phillips screwdriver, remove the keyboard screw and put it in the ...static-causing surfaces such as electrostatic discharge (ESD). Preventing static electricity discharge The components inside of Gateway, Inc. Avoid touching the edge connectors. For more information, see "Changing Batteries" in a safe place. Warning To avoid exposure to dangerous electrical voltages and moving parts,...
...because only the inside your notebook and unplug the AC adapter, modem cable, and network cable and remove the battery before replacing a component. Replacing the DVD drive 1 8 With a small Phillips screwdriver, remove the keyboard screw and put it in the ...static-causing surfaces such as electrostatic discharge (ESD). Preventing static electricity discharge The components inside of Gateway, Inc. Avoid touching the edge connectors. For more information, see "Changing Batteries" in a safe place. Warning To avoid exposure to dangerous electrical voltages and moving parts,...
8512564 - Component Replacement Manual R0
Page 4
...notebook for important safety, regulatory, and legal information. © 2007 Gateway, Inc. All other countries. in Step 10. 14 Replace the memory bay cover, then tighten the six cover screws. 15 Replace the keyboard screw. 16 Insert the battery, then turn your notebook over. 17 Connect the power adapter, modem... bracket. 2 12 Slide the new DVD drive into the drive bay. See your notebook. 18 Reconnect all peripheral devices and replace any Express, PC, or memory cards. Gateway and eMachines are trademarks or registered trademarks of the drive bay by pushing on the bottom of...
...notebook for important safety, regulatory, and legal information. © 2007 Gateway, Inc. All other countries. in Step 10. 14 Replace the memory bay cover, then tighten the six cover screws. 15 Replace the keyboard screw. 16 Insert the battery, then turn your notebook over. 17 Connect the power adapter, modem... bracket. 2 12 Slide the new DVD drive into the drive bay. See your notebook. 18 Reconnect all peripheral devices and replace any Express, PC, or memory cards. Gateway and eMachines are trademarks or registered trademarks of the drive bay by pushing on the bottom of...
8512564 - Component Replacement Manual R0
Page 5
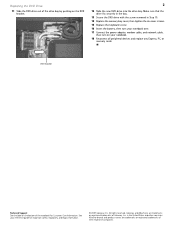
... "Preparing for software and device driver recovery" in your notebook and unplug the AC adapter, modem cable, and network cable and remove the battery before replacing a component. See your notebook, then replace the cover screws. © 2007 Gateway, Inc. Replacing the hard drive kit 8 Remove the four screws that secure the cover to use them...
... "Preparing for software and device driver recovery" in your notebook and unplug the AC adapter, modem cable, and network cable and remove the battery before replacing a component. See your notebook, then replace the cover screws. © 2007 Gateway, Inc. Replacing the hard drive kit 8 Remove the four screws that secure the cover to use them...
8512564 - Component Replacement Manual R0
Page 6
... or registered trademarks of their respective companies. Replacing the Hard Drive Kit 2 13 Insert the battery, then turn your notebook over. 14 Connect the power adapter, modem cable, and network cable. 15 Turn on your notebook. 16 If the hard drive was sent to you from Gateway with the operating system, applications, and...
... or registered trademarks of their respective companies. Replacing the Hard Drive Kit 2 13 Insert the battery, then turn your notebook over. 14 Connect the power adapter, modem cable, and network cable. 15 Turn on your notebook. 16 If the hard drive was sent to you from Gateway with the operating system, applications, and...
8512564 - Component Replacement Manual R0
Page 7
...Batteries" in a safe place. Screw Screw Technical Support See the label on the outside of antistatic bags because only the inside your notebook are trademarks or registered trademarks of the notebook for important safety, regulatory, and legal information. © 2007 Gateway, Inc. Gateway and eMachines are extremely sensitive to replace...cards. 6 Turn your notebook and unplug the AC adapter, modem cable, and network cable and remove the battery before replacing a component. Screw Screw Screw Screw Screw Screw 9 If your reference guide for Customer Care Information. See ...
...Batteries" in a safe place. Screw Screw Technical Support See the label on the outside of antistatic bags because only the inside your notebook are trademarks or registered trademarks of the notebook for important safety, regulatory, and legal information. © 2007 Gateway, Inc. Gateway and eMachines are extremely sensitive to replace...cards. 6 Turn your notebook and unplug the AC adapter, modem cable, and network cable and remove the battery before replacing a component. Screw Screw Screw Screw Screw Screw 9 If your reference guide for Customer Care Information. See ...
8512564 - Component Replacement Manual R0
Page 8
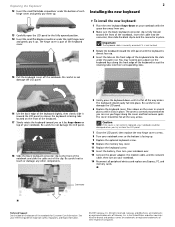
...the cable into the slots under the right hinge cover and gently pry it up . 9 Replace the optional keyboard screw. 10 Replace the memory bay cover. 11 Replace the keyboard screw. 12 Insert the battery, then turn on your notebook. Be careful to the front of the notebook and slide the ... their corresponding slots. 15 Pull the keyboard cover off the notebook. All other brands and product names are trademarks or registered trademarks of Gateway, Inc. in several places until it toward the LCD panel to release the keyboard retaining tabs located on the front of the keyboard....
...the cable into the slots under the right hinge cover and gently pry it up . 9 Replace the optional keyboard screw. 10 Replace the memory bay cover. 11 Replace the keyboard screw. 12 Insert the battery, then turn on your notebook. Be careful to the front of the notebook and slide the ... their corresponding slots. 15 Pull the keyboard cover off the notebook. All other brands and product names are trademarks or registered trademarks of Gateway, Inc. in several places until it toward the LCD panel to release the keyboard retaining tabs located on the front of the keyboard....
8512564 - Component Replacement Manual R0
Page 9
...Preventing static electricity discharge." 2 Turn off your notebook and unplug the AC adapter, modem cable, and network cable and remove the battery before replacing a component. Technical Support See the label on the outside of antistatic bags because only the inside your notebook over any surface. ... Do not lay components on the bottom of the notebook for important safety, regulatory, and legal information. © 2007 Gateway, Inc. Gateway and eMachines are trademarks or registered trademarks of their antistatic bags only when you are removing a memory module, gently press outward...
...Preventing static electricity discharge." 2 Turn off your notebook and unplug the AC adapter, modem cable, and network cable and remove the battery before replacing a component. Technical Support See the label on the outside of antistatic bags because only the inside your notebook over any surface. ... Do not lay components on the bottom of the notebook for important safety, regulatory, and legal information. © 2007 Gateway, Inc. Gateway and eMachines are trademarks or registered trademarks of their antistatic bags only when you are removing a memory module, gently press outward...
8512564 - Component Replacement Manual R0
Page 10
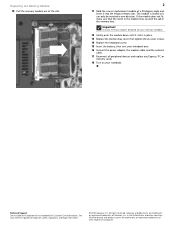
... the label on your Gateway notebook. 12 Gently push the module down until it into the empty memory slot. Important Use only memory modules designed for your notebook. in place. 13 Replace the memory bay cover, then tighten the six cover screws. 14 Replace the keyboard screw. 15 Insert the battery, then turn your...
... the label on your Gateway notebook. 12 Gently push the module down until it into the empty memory slot. Important Use only memory modules designed for your notebook. in place. 13 Replace the memory bay cover, then tighten the six cover screws. 14 Replace the keyboard screw. 15 Insert the battery, then turn your...
8512564 - Component Replacement Manual R0
Page 11
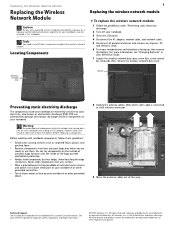
...notebook and unplug the AC adapter, modem cable, and network cable and remove the battery before replacing a component. Note which color cable is facing up, then remove the battery. See your reference guide for Customer Care Information. All other brands and product names ...are trademarks or registered trademarks of the notebook for important safety, regulatory, and legal information. © 2007 Gateway, Inc. Replacing the Wireless Network Module Replacing the Wireless...
...notebook and unplug the AC adapter, modem cable, and network cable and remove the battery before replacing a component. Note which color cable is facing up, then remove the battery. See your reference guide for Customer Care Information. All other brands and product names ...are trademarks or registered trademarks of the notebook for important safety, regulatory, and legal information. © 2007 Gateway, Inc. Replacing the Wireless Network Module Replacing the Wireless...
8512564 - Component Replacement Manual R0
Page 12
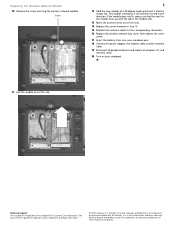
... or registered trademarks of their respective companies. Replacing the Wireless Network Module 10 Remove the screw securing the wireless network module. Gateway and eMachines are trademarks or registered trademarks of Gateway, Inc. All other countries. All rights ...reserved. Screw 2 12 Hold the new module at a 30-degree angle and insert it can only be inserted in Step 10. 15 Reattach the antenna cables to the corresponding connectors. 16 Replace the wireless network bay cover, then tighten the cover screw. 17 Insert the battery...
... or registered trademarks of their respective companies. Replacing the Wireless Network Module 10 Remove the screw securing the wireless network module. Gateway and eMachines are trademarks or registered trademarks of Gateway, Inc. All other countries. All rights ...reserved. Screw 2 12 Hold the new module at a 30-degree angle and insert it can only be inserted in Step 10. 15 Reattach the antenna cables to the corresponding connectors. 16 Replace the wireless network bay cover, then tighten the cover screw. 17 Insert the battery...
8512488 - Gateway Notebook Reference Guide R2
Page 5
www.gateway.com Conserving battery power 63 Using...exterior 77 Cleaning the keyboard 77 Cleaning the notebook screen 77 Maintaining the battery 78 Storing batteries 78 Cleaning CDs or DVDs 79 Recovering your system 79 Recovering pre-...installed software and drivers 80 Using Microsoft System Restore 86 Recovering your system to its factory condition 89 Recovering your system using the Windows DVD 90 Chapter 8: Upgrading Your Notebook 93 Preventing static electricity discharge 94 Adding or replacing...
www.gateway.com Conserving battery power 63 Using...exterior 77 Cleaning the keyboard 77 Cleaning the notebook screen 77 Maintaining the battery 78 Storing batteries 78 Cleaning CDs or DVDs 79 Recovering your system 79 Recovering pre-...installed software and drivers 80 Using Microsoft System Restore 86 Recovering your system to its factory condition 89 Recovering your system using the Windows DVD 90 Chapter 8: Upgrading Your Notebook 93 Preventing static electricity discharge 94 Adding or replacing...
8512488 - Gateway Notebook Reference Guide R2
Page 16
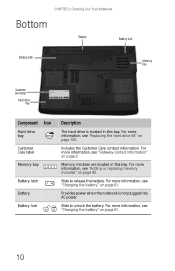
...modules are located in this bay. For more information, see "Replacing the hard drive kit" on page 100. Includes the Customer Care contact information. CHAPTER 2: Checking Out Your Notebook Bottom Battery Battery lock Battery latch Memory bay Customer care label Hard drive bay Online Support..., see "Changing the battery" on page 61. For more information, see "Changing the battery" on page 61. 10 For more information, see "Adding or replacing memory modules" on page 2. Slide to release the battery. For more information, see "Gateway contact information" on page...
...modules are located in this bay. For more information, see "Replacing the hard drive kit" on page 100. Includes the Customer Care contact information. CHAPTER 2: Checking Out Your Notebook Bottom Battery Battery lock Battery latch Memory bay Customer care label Hard drive bay Online Support..., see "Changing the battery" on page 61. For more information, see "Changing the battery" on page 61. 10 For more information, see "Adding or replacing memory modules" on page 2. Slide to release the battery. For more information, see "Gateway contact information" on page...
8512488 - Gateway Notebook Reference Guide R2
Page 22
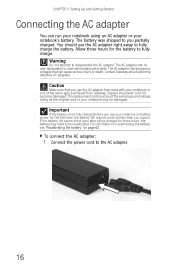
... partially charged. The AC adapter has no user-replaceable or user-serviceable parts inside. Replace the power cord if it becomes damaged. To connect the AC adapter: 1 Connect the power cord to fully charge the battery. Allow three hours for the battery to disassemble the AC adapter. The AC adapter... CHAPTER 3: Setting Up and Getting Started Connecting the AC adapter You can cause serious injury or death. The replacement cord must be of the same type purchased from Gateway. Caution Make sure that came with your notebook or one of the same type and voltage rating as the ...
... partially charged. The AC adapter has no user-replaceable or user-serviceable parts inside. Replace the power cord if it becomes damaged. To connect the AC adapter: 1 Connect the power cord to fully charge the battery. Allow three hours for the battery to disassemble the AC adapter. The AC adapter... CHAPTER 3: Setting Up and Getting Started Connecting the AC adapter You can cause serious injury or death. The replacement cord must be of the same type purchased from Gateway. Caution Make sure that came with your notebook or one of the same type and voltage rating as the ...

8512488 - Gateway Notebook Reference Guide R2
Page 62
...need to buy an additional battery so you can save battery power by plugging your programs are traveling internationally, you can swap batteries when necessary. Ordering accessories To order accessories, visit www.gateway.com. Hard drives If you think they should, try replacing your existing hard drive with... to change the video standard. Batteries If you may not be available in -flight power receptacle. See "Changing the battery" on battery power for extended periods, you run your notebook on page 61 for accessories or supplies. See "Replacing the hard drive kit" on ...
...need to buy an additional battery so you can save battery power by plugging your programs are traveling internationally, you can swap batteries when necessary. Ordering accessories To order accessories, visit www.gateway.com. Hard drives If you think they should, try replacing your existing hard drive with... to change the video standard. Batteries If you may not be available in -flight power receptacle. See "Changing the battery" on battery power for extended periods, you run your notebook on page 61 for accessories or supplies. See "Replacing the hard drive kit" on ...

8512488 - Gateway Notebook Reference Guide R2
Page 67
... the notebook is not plugged into place. 61 Dispose of explosion if battery is facing up. 3 Slide the battery lock to AC power you must turn off while changing the battery. Keep away from children. To replace the battery: 1 If your notebook is on . Discard used in this device may present a fire or chemical... on and is connected to AC power, go to local hazardous material regulations. If your notebook it snaps into an AC outlet, save your Gateway notebook. The battery used batteries according to step 2. -ORIf your notebook over so the bottom is incorrectly replaced.
... the notebook is not plugged into place. 61 Dispose of explosion if battery is facing up. 3 Slide the battery lock to AC power you must turn off while changing the battery. Keep away from children. To replace the battery: 1 If your notebook is on . Discard used in this device may present a fire or chemical... on and is connected to AC power, go to local hazardous material regulations. If your notebook it snaps into an AC outlet, save your Gateway notebook. The battery used batteries according to step 2. -ORIf your notebook over so the bottom is incorrectly replaced.
8512488 - Gateway Notebook Reference Guide R2
Page 83
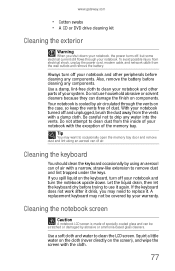
...Cleaning the notebook screen Caution A notebook LCD screen is cooled by your notebook and other peripherals before cleaning any components. Also, remove the battery before trying to occasionally open the memory bay door and remove dust and lint using an aerosol can damage the finish on the keyboard, ... dries, you may not be scratched or damaged by using an aerosol can of your notebook with a damp cloth. Do not attempt to replace it again. www.gateway.com • Cotton swabs • A CD or DVD drive cleaning kit Cleaning the exterior Warning When you shut down . If you...
...Cleaning the notebook screen Caution A notebook LCD screen is cooled by your notebook and other peripherals before cleaning any components. Also, remove the battery before trying to occasionally open the memory bay door and remove dust and lint using an aerosol can damage the finish on the keyboard, ... dries, you may not be scratched or damaged by using an aerosol can of your notebook with a damp cloth. Do not attempt to replace it again. www.gateway.com • Cotton swabs • A CD or DVD drive cleaning kit Cleaning the exterior Warning When you shut down . If you...

8512488 - Gateway Notebook Reference Guide R2
Page 100
... static electricity, also known as carpeted floors, plastic, and packing foam. • Remove components from their edges. Important Before installing or replacing components, you are extremely sensitive to a bare metal part of your workbench or other grounded object. 94 Before installing or...inside of the notebook. Do not lay components on your notebook, unplug the power cord, modem cable, and network cable, and remove the battery before opening the case. Never slide components over any object into the vent holes of the bags provide electrostatic protection. • Always hold ...
... static electricity, also known as carpeted floors, plastic, and packing foam. • Remove components from their edges. Important Before installing or replacing components, you are extremely sensitive to a bare metal part of your workbench or other grounded object. 94 Before installing or...inside of the notebook. Do not lay components on your notebook, unplug the power cord, modem cable, and network cable, and remove the battery before opening the case. Never slide components over any object into the vent holes of the bags provide electrostatic protection. • Always hold ...

8512488 - Gateway Notebook Reference Guide R2
Page 101
... remove any slot. For more information, see "Changing the battery" on page 94. 2 Turn off your notebook. 3 Disconnect the AC adapter, modem cable, and network cable. 4 Disconnect all peripheral devices connected to replace memory modules. The modules are available in various capacities and ... can be placed in any PC Cards or Express Cards. 5 Turn your Gateway notebook. Your notebook uses memory modules called SO-DIMMs (Small Outline Dual Inline Memory Modules). Memory bay To add or replace memory modules: 1 Follow the guidelines under "Preventing static electricity discharge" on ...
... remove any slot. For more information, see "Changing the battery" on page 94. 2 Turn off your notebook. 3 Disconnect the AC adapter, modem cable, and network cable. 4 Disconnect all peripheral devices connected to replace memory modules. The modules are available in various capacities and ... can be placed in any PC Cards or Express Cards. 5 Turn your Gateway notebook. Your notebook uses memory modules called SO-DIMMs (Small Outline Dual Inline Memory Modules). Memory bay To add or replace memory modules: 1 Follow the guidelines under "Preventing static electricity discharge" on ...


