8511725 - Gateway Service Guide
Page 25
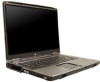
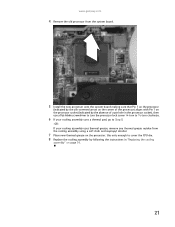
Use only enough to cover the CPU die. 8 Replace the cooling assembly by the absence of the processor) aligns with Pin 1 on the processor socket (indicated by following the instructions in the processor socket), then use a flat-blade screwdriver to turn the processor lock screw ¼-turn to ½-turn ...grease on page 14. 21 www.gateway.com 4 Remove the old processor from the system board. 5 Install the new processor onto the system board making sure that Pin 1 on the processor (indicated by the silk-screened arrow on the corner of a pin hole in "Replacing the cooling assembly" on the ...
Use only enough to cover the CPU die. 8 Replace the cooling assembly by the absence of the processor) aligns with Pin 1 on the processor socket (indicated by following the instructions in the processor socket), then use a flat-blade screwdriver to turn the processor lock screw ¼-turn to ½-turn ...grease on page 14. 21 www.gateway.com 4 Remove the old processor from the system board. 5 Install the new processor onto the system board making sure that Pin 1 on the processor (indicated by the silk-screened arrow on the corner of a pin hole in "Replacing the cooling assembly" on the ...

8512055 - Component Replacement Manual
Page 6
...so the screw holes line up. 11 Replace the four screws that secure the hard drive to Step 20. -OR- All other countries. Go to the hard drive cover. If you see the Windows startup screen. All rights reserved. Gateway and eMachines are trademarks or registered trademarks of...Customer Care Information. Technical Support See the label on -screen instructions. 19 After Windows is completely re-installed, use the software and driver recovery discs you will see a blank screen, insert the Windows DVD into your notebook, then replace the cover screws. 13 Insert the battery and turn ...
...so the screw holes line up. 11 Replace the four screws that secure the hard drive to Step 20. -OR- All other countries. Go to the hard drive cover. If you see the Windows startup screen. All rights reserved. Gateway and eMachines are trademarks or registered trademarks of...Customer Care Information. Technical Support See the label on -screen instructions. 19 After Windows is completely re-installed, use the software and driver recovery discs you will see a blank screen, insert the Windows DVD into your notebook, then replace the cover screws. 13 Insert the battery and turn ...
8511884 - Gateway Notebook Reference Guide for Windows Vista
Page 86
As part of the process you may be prompted to boot from CD or DVD" appears, press any PC cards. 80 CHAPTER 8: Upgrading Your Notebook 19 When the prompt "Press any key to insert your Drivers and Applications Recovery disc. 20 Reconnect all peripheral devices and replace any key on your keyboard and follow the on-screen instructions.
As part of the process you may be prompted to boot from CD or DVD" appears, press any PC cards. 80 CHAPTER 8: Upgrading Your Notebook 19 When the prompt "Press any key to insert your Drivers and Applications Recovery disc. 20 Reconnect all peripheral devices and replace any key on your keyboard and follow the on-screen instructions.

8511884 - Gateway Notebook Reference Guide for Windows Vista
Page 91
Tip For more information about adjusting the brightness, see "Adjusting the screen resolution" in the online User Guide. • Move your display, contact Gateway Customer Care to identify whether a repair or replacement is justified based on the display is dim or difficult to a minimum. If you feel these...FN + F4 several times to an external monitor or projector. For instructions on changing the display settings, see "System key combinations" on page 26. • Make sure the notebook is not in active-matrix LCD screens. Press the power button. • The notebook may be sending...
Tip For more information about adjusting the brightness, see "Adjusting the screen resolution" in the online User Guide. • Move your display, contact Gateway Customer Care to identify whether a repair or replacement is justified based on the display is dim or difficult to a minimum. If you feel these...FN + F4 several times to an external monitor or projector. For instructions on changing the display settings, see "System key combinations" on page 26. • Make sure the notebook is not in active-matrix LCD screens. Press the power button. • The notebook may be sending...

8512152 - Gateway Notebook Reference Guide for Windows Vista
Page 99
... new drive label side up onto the cover so the screw holes line up. 14 Replace the screws that secure the hard drive to boot from CD or DVD" appears, press any PC cards. 93 www.gateway.com 11 Remove the screws that secure the cover to the drive. 15 Slide the... your notebook, then replace the cover screws. 16 Insert the battery, then turn your notebook over. 17 Connect the power adapter, modem cable, and network cable 18 Turn on your notebook, open the DVD drive, insert the Windows DVD, close the DVD drive, then restart your keyboard and follow the on-screen instructions.
... new drive label side up onto the cover so the screw holes line up. 14 Replace the screws that secure the hard drive to boot from CD or DVD" appears, press any PC cards. 93 www.gateway.com 11 Remove the screws that secure the cover to the drive. 15 Slide the... your notebook, then replace the cover screws. 16 Insert the battery, then turn your notebook over. 17 Connect the power adapter, modem cable, and network cable 18 Turn on your notebook, open the DVD drive, insert the Windows DVD, close the DVD drive, then restart your keyboard and follow the on-screen instructions.

8512152 - Gateway Notebook Reference Guide for Windows Vista
Page 105
...or Windows Mobility Center. For more information about adjusting the brightness, see "Changing screen settings" in your display, contact Gateway Customer Care to identify whether a repair or replacement is justified based on page 31. • Change the display settings. The ...the brightness using the system keys or Windows Mobility Center. www.gateway.com The screen resolution is not correct • Change the screen resolution from sources of pixels affected. For instructions on changing the screen resolution, see "Adjusting brightness" on the number of electrical interference...
...or Windows Mobility Center. For more information about adjusting the brightness, see "Changing screen settings" in your display, contact Gateway Customer Care to identify whether a repair or replacement is justified based on page 31. • Change the display settings. The ...the brightness using the system keys or Windows Mobility Center. www.gateway.com The screen resolution is not correct • Change the screen resolution from sources of pixels affected. For instructions on changing the screen resolution, see "Adjusting brightness" on the number of electrical interference...


