8512564 - Component Replacement Manual R0
Page 1
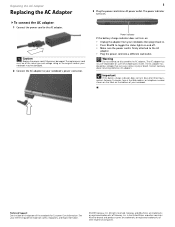
...has no user-replaceable or user-serviceable parts inside. Contact Gateway about returning defective AC adapters. All rights reserved. Power indicator If the battery charge indicator does not turn blue after three hours, contact Gateway Customer Care at the Web address or telephone number shown ... companies. The replacement cord must be of the notebook for important safety, regulatory, and legal information. © 2007 Gateway, Inc. Important If the battery charge indicator does not turn on and off. • Make sure the power cord is firmly attached to your notebook...
...has no user-replaceable or user-serviceable parts inside. Contact Gateway about returning defective AC adapters. All rights reserved. Power indicator If the battery charge indicator does not turn blue after three hours, contact Gateway Customer Care at the Web address or telephone number shown ... companies. The replacement cord must be of the notebook for important safety, regulatory, and legal information. © 2007 Gateway, Inc. Important If the battery charge indicator does not turn on and off. • Make sure the power cord is firmly attached to your notebook...
8512564 - Component Replacement Manual R0
Page 2
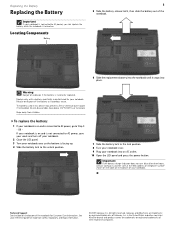
... your work and turn blue after three hours, contact Gateway Customer Care at the Web address or telephone number shown on the label on the bottom of your notebook. See your notebook. Important If the battery charge indicator does not turn off your notebook. 2 ...and legal information. © 2007 Gateway, Inc. Keep away from children. Gateway and eMachines are trademarks or registered trademarks of Gateway, Inc. All other countries. in this device may present a fire or chemical burn hazard if mishandled. Replace only with a battery specifically manufactured for your reference guide for...
... your work and turn blue after three hours, contact Gateway Customer Care at the Web address or telephone number shown on the label on the bottom of your notebook. See your notebook. Important If the battery charge indicator does not turn off your notebook. 2 ...and legal information. © 2007 Gateway, Inc. Keep away from children. Gateway and eMachines are trademarks or registered trademarks of Gateway, Inc. All other countries. in this device may present a fire or chemical burn hazard if mishandled. Replace only with a battery specifically manufactured for your reference guide for...
8512564 - Component Replacement Manual R0
Page 3
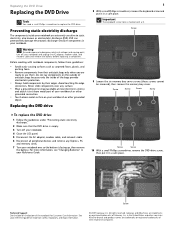
... See the label on your workbench or other grounded connection. • Touch a bare metal surface on the bottom of Gateway, Inc. Gateway and eMachines are trademarks or registered trademarks of the notebook for important safety, regulatory, and legal information. © 2007... drive screw, then put it in a safe place. All other countries. Important The keyboard screw hole is facing up, then remove the battery. in your Reference Guide. Never slide components over any Express, PC, and memory cards. 7 Turn your reference guide for Customer Care Information...
... See the label on your workbench or other grounded connection. • Touch a bare metal surface on the bottom of Gateway, Inc. Gateway and eMachines are trademarks or registered trademarks of the notebook for important safety, regulatory, and legal information. © 2007... drive screw, then put it in a safe place. All other countries. Important The keyboard screw hole is facing up, then remove the battery. in your Reference Guide. Never slide components over any Express, PC, and memory cards. 7 Turn your reference guide for Customer Care Information...
8512564 - Component Replacement Manual R0
Page 4
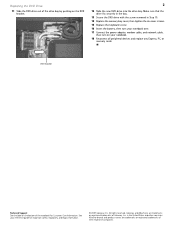
... are trademarks or registered trademarks of Gateway, Inc. All other countries. See your reference guide for Customer Care Information. in Step 10. 14 Replace the memory bay cover, then tighten the six cover screws. 15 Replace the keyboard screw. 16 Insert the battery, then turn on the DVD bracket. 2 12 Slide the..., or memory cards. Replacing the DVD Drive 11 Slide the DVD drive out of the notebook for important safety, regulatory, and legal information. © 2007 Gateway, Inc.
... are trademarks or registered trademarks of Gateway, Inc. All other countries. See your reference guide for Customer Care Information. in Step 10. 14 Replace the memory bay cover, then tighten the six cover screws. 15 Replace the keyboard screw. 16 Insert the battery, then turn on the DVD bracket. 2 12 Slide the..., or memory cards. Replacing the DVD Drive 11 Slide the DVD drive out of the notebook for important safety, regulatory, and legal information. © 2007 Gateway, Inc.
8512564 - Component Replacement Manual R0
Page 5
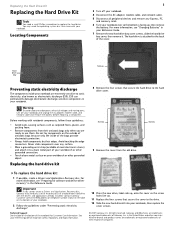
... are trademarks or registered trademarks of your notebook and unplug the AC adapter, modem cable, and network cable and remove the battery before replacing a component. For more information, see "Preparing for software and device driver recovery" in your Reference Guide. 7...Remove components from the old drive. Technical Support See the label on your notebook, then replace the cover screws. © 2007 Gateway, Inc. Hard drive bay Screws Preventing static electricity discharge The components inside of the bags provide electrostatic protection. • Always hold...
... are trademarks or registered trademarks of your notebook and unplug the AC adapter, modem cable, and network cable and remove the battery before replacing a component. For more information, see "Preparing for software and device driver recovery" in your Reference Guide. 7...Remove components from the old drive. Technical Support See the label on your notebook, then replace the cover screws. © 2007 Gateway, Inc. Hard drive bay Screws Preventing static electricity discharge The components inside of the bags provide electrostatic protection. • Always hold...
8512564 - Component Replacement Manual R0
Page 6
... to Step 18. -OR- in the United States and other brands and product names are trademarks or registered trademarks of Gateway, Inc. Replacing the Hard Drive Kit 2 13 Insert the battery, then turn your notebook over. 14 Connect the power adapter, modem cable, and network cable. 15 Turn on your ...notebook. 16 If the hard drive was sent to you from Gateway with the operating system, applications, and drivers installed, you will see...
... to Step 18. -OR- in the United States and other brands and product names are trademarks or registered trademarks of Gateway, Inc. Replacing the Hard Drive Kit 2 13 Insert the battery, then turn your notebook over. 14 Connect the power adapter, modem cable, and network cable. 15 Turn on your ...notebook. 16 If the hard drive was sent to you from Gateway with the operating system, applications, and drivers installed, you will see...
8512564 - Component Replacement Manual R0
Page 7
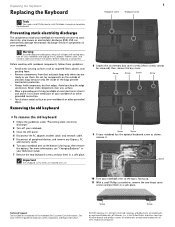
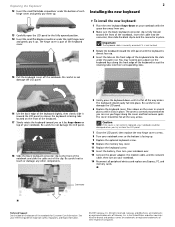
... the inside your notebook are trademarks or registered trademarks of the notebook for important safety, regulatory, and legal information. © 2007 Gateway, Inc. All rights reserved. See your reference guide for Customer Care Information. Before working with a K. 1 Keyboard screw Keyboard screw... keyboard: 1 Follow the guidelines under "Preventing static electricity discharge." 2 Turn off your notebook. For more information, see "Changing Batteries" in your Reference Guide. 7 Remove the two keyboard screws and put them in the United States and other brands and product...
... the inside your notebook are trademarks or registered trademarks of the notebook for important safety, regulatory, and legal information. © 2007 Gateway, Inc. All rights reserved. See your reference guide for Customer Care Information. Before working with a K. 1 Keyboard screw Keyboard screw... keyboard: 1 Follow the guidelines under "Preventing static electricity discharge." 2 Turn off your notebook. For more information, see "Changing Batteries" in your Reference Guide. 7 Remove the two keyboard screws and put them in the United States and other brands and product...
8512564 - Component Replacement Manual R0
Page 8
... bottom is facing up. 9 Replace the optional keyboard screw. 10 Replace the memory bay cover. 11 Replace the keyboard screw. 12 Insert the battery, then turn your notebook over. 13 Connect the power adapter, the modem cable, and the network cable, then turn on your reference guide for... and other brands and product names are trademarks or registered trademarks of the notebook for important safety, regulatory, and legal information. © 2007 Gateway, Inc. Replacing the Keyboard 12 Insert the small flat-blade screwdriver under the bottom of each hinge cover and gently pry them up. 13 ...
... bottom is facing up. 9 Replace the optional keyboard screw. 10 Replace the memory bay cover. 11 Replace the keyboard screw. 12 Insert the battery, then turn your notebook over. 13 Connect the power adapter, the modem cable, and the network cable, then turn on your reference guide for... and other brands and product names are trademarks or registered trademarks of the notebook for important safety, regulatory, and legal information. © 2007 Gateway, Inc. Replacing the Keyboard 12 Insert the small flat-blade screwdriver under the bottom of each hinge cover and gently pry them up. 13 ...
8512564 - Component Replacement Manual R0
Page 9
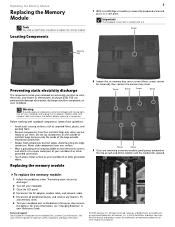
... under "Preventing static electricity discharge." 2 Turn off your notebook and unplug the AC adapter, modem cable, and network cable and remove the battery before replacing a component. All rights reserved. Gateway and eMachines are trademarks or registered trademarks of the bags provide electrostatic protection. • Always hold components by their edges. in your...
... under "Preventing static electricity discharge." 2 Turn off your notebook and unplug the AC adapter, modem cable, and network cable and remove the battery before replacing a component. All rights reserved. Gateway and eMachines are trademarks or registered trademarks of the bags provide electrostatic protection. • Always hold components by their edges. in your...
8512564 - Component Replacement Manual R0
Page 10
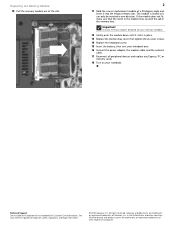
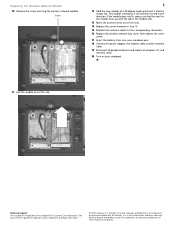
... Technical Support See the label on your reference guide for Customer Care Information. All rights reserved. Important Use only memory modules designed for your Gateway notebook. 12 Gently push the module down until it clicks in place. 13 Replace the memory bay cover, then tighten the six cover screws.... 14 Replace the keyboard screw. 15 Insert the battery, then turn your notebook over. 16 Connect the power adapter, the modem cable, and the network cable. 17 Reconnect all peripheral devices and ...
... Technical Support See the label on your reference guide for Customer Care Information. All rights reserved. Important Use only memory modules designed for your Gateway notebook. 12 Gently push the module down until it clicks in place. 13 Replace the memory bay cover, then tighten the six cover screws.... 14 Replace the keyboard screw. 15 Insert the battery, then turn your notebook over. 16 Connect the power adapter, the modem cable, and the network cable. 17 Reconnect all peripheral devices and ...
8512564 - Component Replacement Manual R0
Page 11
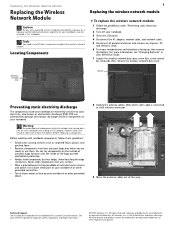
... Turn off your notebook and unplug the AC adapter, modem cable, and network cable and remove the battery before replacing a component. Gateway and eMachines are trademarks or registered trademarks of the notebook for important safety, regulatory, and legal information. © 2007... Gateway, Inc. Avoid touching the edge connectors. For more information, see "Changing Batteries" in your notebook. in this notebook. All rights reserved. Never slide components over so...
... Turn off your notebook and unplug the AC adapter, modem cable, and network cable and remove the battery before replacing a component. Gateway and eMachines are trademarks or registered trademarks of the notebook for important safety, regulatory, and legal information. © 2007... Gateway, Inc. Avoid touching the edge connectors. For more information, see "Changing Batteries" in your notebook. in this notebook. All rights reserved. Never slide components over so...
8512564 - Component Replacement Manual R0
Page 12
Technical Support See the label on your reference guide for Customer Care Information. See your notebook. 11 Pull the module out of Gateway, Inc. in the United States and other brands and product names are trademarks or registered trademarks of the slot. If the module does... 15 Reattach the antenna cables to the corresponding connectors. 16 Replace the wireless network bay cover, then tighten the cover screw. 17 Insert the battery, then turn your notebook over. 18 Connect the power adapter, the modem cable, and the network cable. 19 Reconnect all peripheral devices and ...
Technical Support See the label on your reference guide for Customer Care Information. See your notebook. 11 Pull the module out of Gateway, Inc. in the United States and other brands and product names are trademarks or registered trademarks of the slot. If the module does... 15 Reattach the antenna cables to the corresponding connectors. 16 Replace the wireless network bay cover, then tighten the cover screw. 17 Insert the battery, then turn your notebook over. 18 Connect the power adapter, the modem cable, and the network cable. 19 Reconnect all peripheral devices and ...
8512488 - Gateway Notebook Reference Guide R2
Page 4
... monitor for a presentation . . . . 53 Viewing the display on a television 54 Adjusting the television display settings 55 Ordering accessories 56 Chapter 5: Managing Power 59 Monitoring the battery charge 60 Recharging the battery 60 Changing the battery 61 Recalibrating the battery 62 Extending battery life 63 Maximizing battery performance 63 ii
... monitor for a presentation . . . . 53 Viewing the display on a television 54 Adjusting the television display settings 55 Ordering accessories 56 Chapter 5: Managing Power 59 Monitoring the battery charge 60 Recharging the battery 60 Changing the battery 61 Recalibrating the battery 62 Extending battery life 63 Maximizing battery performance 63 ii
8512488 - Gateway Notebook Reference Guide R2
Page 5
www.gateway.com Conserving battery power 63 Using alternate power sources 64 Changing power modes 64 Changing notebook power settings 66 Changing the power plan 66 Changing advanced settings 67 ... Caring for your notebook 76 Cleaning your notebook 76 Cleaning the exterior 77 Cleaning the keyboard 77 Cleaning the notebook screen 77 Maintaining the battery 78 Storing batteries 78 Cleaning CDs or DVDs 79 Recovering your system 79 Recovering pre-installed software and drivers 80 Using Microsoft System Restore 86 Recovering your...
www.gateway.com Conserving battery power 63 Using alternate power sources 64 Changing power modes 64 Changing notebook power settings 66 Changing the power plan 66 Changing advanced settings 67 ... Caring for your notebook 76 Cleaning your notebook 76 Cleaning the exterior 77 Cleaning the keyboard 77 Cleaning the notebook screen 77 Maintaining the battery 78 Storing batteries 78 Cleaning CDs or DVDs 79 Recovering your system 79 Recovering pre-installed software and drivers 80 Using Microsoft System Restore 86 Recovering your...
8512488 - Gateway Notebook Reference Guide R2
Page 6
Contents Chapter 9: Troubleshooting 103 Safety guidelines 104 First steps 104 Troubleshooting 105 Audio 105 Battery 105 CD drives 105 Diskette drive (external 105 Display 106 DVD drives 107 Ethernet 109 Express Cards 109 File management 110 Hard drive 110 Internet ... (wireless 122 Passwords 124 PC Cards 124 Power 125 Printer 125 Sound 127 Status indicators 127 Touchpad 127 Video 128 Telephone support 128 Before calling Gateway Customer Care 128 Appendix A: Legal Information 131 Index 141 iv
Contents Chapter 9: Troubleshooting 103 Safety guidelines 104 First steps 104 Troubleshooting 105 Audio 105 Battery 105 CD drives 105 Diskette drive (external 105 Display 106 DVD drives 107 Ethernet 109 Express Cards 109 File management 110 Hard drive 110 Internet ... (wireless 122 Passwords 124 PC Cards 124 Power 125 Printer 125 Sound 127 Status indicators 127 Touchpad 127 Video 128 Telephone support 128 Before calling Gateway Customer Care 128 Appendix A: Legal Information 131 Index 141 iv

8512488 - Gateway Notebook Reference Guide R2
Page 12
... Front CHAPTER 2: Checking Out Your Notebook LCD panel release latch Speaker Component LCD panel release latch Speakers Battery charge indicator Power indicator Microphone jack Headphone jack Battery charge indicator Headphone jack Microphone jack Power indicator Speaker Icon Description Slide to AC power or the... battery charge is very low. ■ LED on . ■ LED blinking - Battery is on - Notebook is fully charged. ■ LED purple - Provide audio output ...
... Front CHAPTER 2: Checking Out Your Notebook LCD panel release latch Speaker Component LCD panel release latch Speakers Battery charge indicator Power indicator Microphone jack Headphone jack Battery charge indicator Headphone jack Microphone jack Power indicator Speaker Icon Description Slide to AC power or the... battery charge is very low. ■ LED on . ■ LED blinking - Battery is on - Notebook is fully charged. ■ LED purple - Provide audio output ...
8512488 - Gateway Notebook Reference Guide R2
Page 16
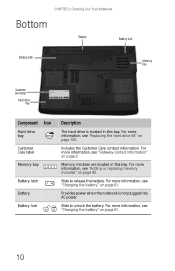
... contact information. Memory modules are located in this bay. Provides power when the notebook is located in this bay. Slide to release the battery. For more information, see "Gateway contact information" on page 100. For more information, see "Replacing the hard drive kit" on page 2. For more information, see "Adding or replacing...
... contact information. Memory modules are located in this bay. Provides power when the notebook is located in this bay. Slide to release the battery. For more information, see "Gateway contact information" on page 100. For more information, see "Replacing the hard drive kit" on page 2. For more information, see "Adding or replacing...
8512488 - Gateway Notebook Reference Guide R2
Page 22
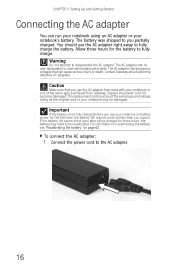
...shorter than you use the AC adapter right away to be of the same type purchased from Gateway. For information on recalibrating the battery, see "Recalibrating the battery" on battery power for three hours, the battery may be damaged. To connect the AC adapter: 1 Connect the power cord to disassemble the ... that came with your notebook or one of the same type and voltage rating as the original cord or your notebook's battery. Important If the battery is not fully charged before you expect. The AC adapter has no user-replaceable or user-serviceable parts inside. The replacement...
...shorter than you use the AC adapter right away to be of the same type purchased from Gateway. For information on recalibrating the battery, see "Recalibrating the battery" on battery power for three hours, the battery may be damaged. To connect the AC adapter: 1 Connect the power cord to disassemble the ... that came with your notebook or one of the same type and voltage rating as the original cord or your notebook's battery. Important If the battery is not fully charged before you expect. The AC adapter has no user-replaceable or user-serviceable parts inside. The replacement...

8512488 - Gateway Notebook Reference Guide R2
Page 23
...back in. • Press FN+F1 to toggle the status lights on the Customer Care label. If the battery charge indicator does not turn blue after three hours, contact Gateway Customer Care at the location shown on and off your notebook and leave your notebook's power connector. 3 ...Plug the power cord into a wall outlet. Important If the battery charge indicator does not turn on, complete the following steps until the battery charge indicator turns blue. www.gateway.com 2 Connect the AC adapter to your notebook connected to the AC adapter. • ...
...back in. • Press FN+F1 to toggle the status lights on the Customer Care label. If the battery charge indicator does not turn blue after three hours, contact Gateway Customer Care at the location shown on and off your notebook and leave your notebook's power connector. 3 ...Plug the power cord into a wall outlet. Important If the battery charge indicator does not turn on, complete the following steps until the battery charge indicator turns blue. www.gateway.com 2 Connect the AC adapter to your notebook connected to the AC adapter. • ...
8512488 - Gateway Notebook Reference Guide R2
Page 28
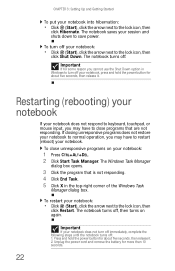
..., then click Shut Down. The Windows Task Manager dialog box opens. 3 Click the program that are not responding. Unplug the power cord and remove the battery for about five seconds, then release it . 2. Press and hold the power button for about five seconds, then release it . If closing unresponsive programs does...
..., then click Shut Down. The Windows Task Manager dialog box opens. 3 Click the program that are not responding. Unplug the power cord and remove the battery for about five seconds, then release it . 2. Press and hold the power button for about five seconds, then release it . If closing unresponsive programs does...


