8511725 - Gateway Service Guide
Page 33
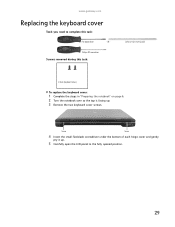
OR - Screw Screw 4 Insert the small flat-blade screwdriver under the bottom of each hinge cover and gently pry it up . 3 Remove the two keyboard cover screws. Phillips #0 screwdriver Screws removed during this task: Flat-blade driver - www.gateway.com Replacing the keyboard cover Tools you need to complete this task: Scribe or non-marring tool 2 black (keyboard cover) To replace the keyboard cover: 1 Complete the steps in "Preparing the notebook" on page 6. 2 Turn the notebook over so the top is facing up . 5 Carefully open the LCD panel to the fully opened position. 29
OR - Screw Screw 4 Insert the small flat-blade screwdriver under the bottom of each hinge cover and gently pry it up . 3 Remove the two keyboard cover screws. Phillips #0 screwdriver Screws removed during this task: Flat-blade driver - www.gateway.com Replacing the keyboard cover Tools you need to complete this task: Scribe or non-marring tool 2 black (keyboard cover) To replace the keyboard cover: 1 Complete the steps in "Preparing the notebook" on page 6. 2 Turn the notebook over so the top is facing up . 5 Carefully open the LCD panel to the fully opened position. 29
8511725 - Gateway Service Guide
Page 34
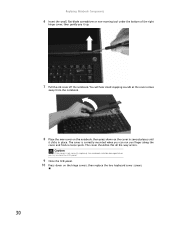
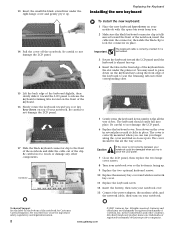
... panel. 10 Press down on the hinge covers, then replace the two keyboard cover screws. 30 You will hear small snapping sounds as the cover comes away from the notebook. 8 Place the new cover on the notebook, then press down on the cover in place. The cover is not correctly replaced, the notebook ... be flat all the way across. The cover should be damaged when you finger along the cover and find no loose spots. Replacing Notebook Components 6 Insert the small, flat-blade screwdriver or non-marring tool under the bottom of the right hinge cover, then gently pry it clicks in several...
... panel. 10 Press down on the hinge covers, then replace the two keyboard cover screws. 30 You will hear small snapping sounds as the cover comes away from the notebook. 8 Place the new cover on the notebook, then press down on the cover in place. The cover is not correctly replaced, the notebook ... be flat all the way across. The cover should be damaged when you finger along the cover and find no loose spots. Replacing Notebook Components 6 Insert the small, flat-blade screwdriver or non-marring tool under the bottom of the right hinge cover, then gently pry it clicks in several...
8511725 - Gateway Service Guide
Page 42
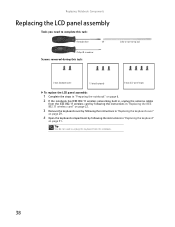
... Components Replacing the LCD panel assembly Tools you need to complete this task: Scribe or non-marring tool 2 black (keyboard cover) 1-3 black (keyboard) 4 black (LCD panel hinges) To replace the LCD panel assembly: 1 Complete the steps in "Preparing the notebook" on page 6. 2 If the notebook...by following the instructions in "Replacing the IEEE 802.11 wireless card" on page 22. 3 Remove the keyboard cover by following the instructions in "Replacing the keyboard cover" on page 29. 4 Open the keyboard compartment by following the instructions in "Replacing the keyboard" on page 31...
... Components Replacing the LCD panel assembly Tools you need to complete this task: Scribe or non-marring tool 2 black (keyboard cover) 1-3 black (keyboard) 4 black (LCD panel hinges) To replace the LCD panel assembly: 1 Complete the steps in "Preparing the notebook" on page 6. 2 If the notebook...by following the instructions in "Replacing the IEEE 802.11 wireless card" on page 22. 3 Remove the keyboard cover by following the instructions in "Replacing the keyboard cover" on page 29. 4 Open the keyboard compartment by following the instructions in "Replacing the keyboard" on page 31...
8511725 - Gateway Service Guide
Page 46
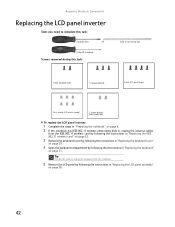
...following the instructions in "Replacing the IEEE 802.11 wireless card" on page 22. 3 Remove the keyboard cover by following the instructions in "Replacing the keyboard cover" on page 29. 4 Open the keyboard compartment by following the instructions in "Replacing the LCD panel ...Notebook Components Replacing the LCD panel inverter Tools you need to complete this task: Scribe or non-marring tool 2 black (keyboard cover) 1-3 black (keyboard) 4 black (LCD panel hinges) 4 or 6 chrome (LCD panel assembly) 2 chrome (bracket) Select models only To replace the LCD panel inverter: 1 ...
...following the instructions in "Replacing the IEEE 802.11 wireless card" on page 22. 3 Remove the keyboard cover by following the instructions in "Replacing the keyboard cover" on page 29. 4 Open the keyboard compartment by following the instructions in "Replacing the LCD panel ...Notebook Components Replacing the LCD panel inverter Tools you need to complete this task: Scribe or non-marring tool 2 black (keyboard cover) 1-3 black (keyboard) 4 black (LCD panel hinges) 4 or 6 chrome (LCD panel assembly) 2 chrome (bracket) Select models only To replace the LCD panel inverter: 1 ...

8511725 - Gateway Service Guide
Page 50
...following the instructions in "Replacing the IEEE 802.11 wireless card" on page 22. 3 Remove the keyboard cover by following the instructions in "Replacing the keyboard cover" on page 29. 4 Open the keyboard compartment by following the instructions in "Replacing the LCD panel assembly... Replacing Notebook Components Replacing the LCD panel Tools you need to complete this task: Scribe or non-marring tool 2 black (keyboard cover) 1-3 black (keyboard) 4 black (LCD panel hinges) 4 or 6 chrome (LCD panel assembly) 6 chrome (LCD panel) To replace the LCD panel: 1 Complete the steps ...
...following the instructions in "Replacing the IEEE 802.11 wireless card" on page 22. 3 Remove the keyboard cover by following the instructions in "Replacing the keyboard cover" on page 29. 4 Open the keyboard compartment by following the instructions in "Replacing the LCD panel assembly... Replacing Notebook Components Replacing the LCD panel Tools you need to complete this task: Scribe or non-marring tool 2 black (keyboard cover) 1-3 black (keyboard) 4 black (LCD panel hinges) 4 or 6 chrome (LCD panel assembly) 6 chrome (LCD panel) To replace the LCD panel: 1 Complete the steps ...
8511725 - Gateway Service Guide
Page 55
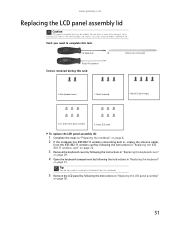
...following the instructions in "Replacing the LCD panel assembly" on page 31. Tip You do not need to complete this task: 2 black (keyboard cover) 1-3 black (keyboard) 4 black (LCD panel hinges) 4 or 6 chrome (LCD panel assembly) 6 chrome (LCD panel) To replace the LCD panel assembly lid: 1 Complete the steps in... instructions in "Replacing the keyboard" on page 38. 51 Do not force a new lid to connect to order a different lid. www.gateway.com Replacing the LCD panel assembly lid Caution LCD panel assembly lids vary by model. Tools you need to an existing LCD front if the...
...following the instructions in "Replacing the LCD panel assembly" on page 31. Tip You do not need to complete this task: 2 black (keyboard cover) 1-3 black (keyboard) 4 black (LCD panel hinges) 4 or 6 chrome (LCD panel assembly) 6 chrome (LCD panel) To replace the LCD panel assembly lid: 1 Complete the steps in... instructions in "Replacing the keyboard" on page 38. 51 Do not force a new lid to connect to order a different lid. www.gateway.com Replacing the LCD panel assembly lid Caution LCD panel assembly lids vary by model. Tools you need to an existing LCD front if the...
8511725 - Gateway Service Guide
Page 60
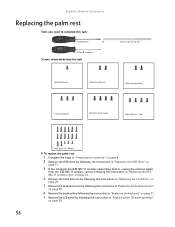
... you need to complete this task: Scribe or non-marring tool 1 black (DVD drive) 2 black (hard drive kit) 2 black (keyboard cover) 1-3 black (keyboard) 4 black (LCD panel hinges) 4 black (palm rest - bottom) To replace the palm rest: 1 Complete the steps in "Preparing the notebook" on page 6. 2 ... the hard drive kit by following the instructions in "Replacing the hard drive" on page 26. 5 Remove the keyboard cover by following the instructions in "Replacing the keyboard cover" on page 29. 6 Remove the keyboard by following the instructions in "Replacing the keyboard" on page 31. 7 ...
... you need to complete this task: Scribe or non-marring tool 1 black (DVD drive) 2 black (hard drive kit) 2 black (keyboard cover) 1-3 black (keyboard) 4 black (LCD panel hinges) 4 black (palm rest - bottom) To replace the palm rest: 1 Complete the steps in "Preparing the notebook" on page 6. 2 ... the hard drive kit by following the instructions in "Replacing the hard drive" on page 26. 5 Remove the keyboard cover by following the instructions in "Replacing the keyboard cover" on page 29. 6 Remove the keyboard by following the instructions in "Replacing the keyboard" on page 31. 7 ...
8511725 - Gateway Service Guide
Page 63
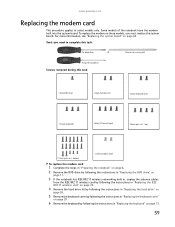
... Screws removed during this task: Flat-blade driver - www.gateway.com Replacing the modem card This procedure applies to complete this task: 1 black (DVD drive) 2 black (hard drive kit) 2 black (keyboard cover) 1-3 black (keyboard) 4 black (LCD panel hinges) 4 black (palm rest - To replace the modem on... hard drive kit by following the instructions in "Replacing the hard drive" on page 26. 5 Remove the keyboard cover by following the instructions in "Replacing the keyboard cover" on page 29. 6 Remove the keyboard by following the instructions in "Replacing the keyboard" on page 64. ...
... Screws removed during this task: Flat-blade driver - www.gateway.com Replacing the modem card This procedure applies to complete this task: 1 black (DVD drive) 2 black (hard drive kit) 2 black (keyboard cover) 1-3 black (keyboard) 4 black (LCD panel hinges) 4 black (palm rest - To replace the modem on... hard drive kit by following the instructions in "Replacing the hard drive" on page 26. 5 Remove the keyboard cover by following the instructions in "Replacing the keyboard cover" on page 29. 6 Remove the keyboard by following the instructions in "Replacing the keyboard" on page 64. ...

8511725 - Gateway Service Guide
Page 66
... Remove the hard drive kit by following the instructions in "Replacing the hard drive" on page 26. 5 Remove the keyboard cover by following the instructions in "Replacing the keyboard cover" on page 29. 6 Remove the keyboard by following the instructions in "Replacing the keyboard" on page 31. 7 Remove the... Tools you need to complete this task: Scribe or non-marring tool 1 black (DVD drive) 2 black (hard drive kit) 2 black (keyboard cover) 1-3 black (keyboard) 4 black (LCD panel hinges) 4 black (palm rest - Phillips #0 screwdriver Screws removed during this task: Flat-blade driver -
... Remove the hard drive kit by following the instructions in "Replacing the hard drive" on page 26. 5 Remove the keyboard cover by following the instructions in "Replacing the keyboard cover" on page 29. 6 Remove the keyboard by following the instructions in "Replacing the keyboard" on page 31. 7 Remove the... Tools you need to complete this task: Scribe or non-marring tool 1 black (DVD drive) 2 black (hard drive kit) 2 black (keyboard cover) 1-3 black (keyboard) 4 black (LCD panel hinges) 4 black (palm rest - Phillips #0 screwdriver Screws removed during this task: Flat-blade driver -
8511725 - Gateway Service Guide
Page 68
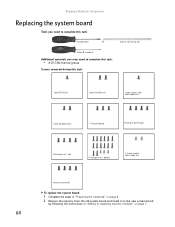
... Additional materials you need to complete this task: 1 black (DVD drive) 2 black (hard drive kit) 1 black (wireless card) Select models only 2 black (keyboard cover) 1-3 black (keyboard) 4 black (LCD panel hinges) 4 black (palm rest - bottom) 2 chrome (modem) Select models only 4 black (system board) To replace the system board: 1 Complete the steps in "Preparing...
... Additional materials you need to complete this task: 1 black (DVD drive) 2 black (hard drive kit) 1 black (wireless card) Select models only 2 black (keyboard cover) 1-3 black (keyboard) 4 black (LCD panel hinges) 4 black (palm rest - bottom) 2 chrome (modem) Select models only 4 black (system board) To replace the system board: 1 Complete the steps in "Preparing...
8511725 - Gateway Service Guide
Page 71
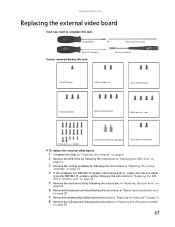
..."Replacing the keyboard cover" on page 29. 7 Remove the keyboard by following the instructions in "Replacing the keyboard" on page 31. 8 Remove the LCD panel by following the instructions in "Replacing the LCD panel assembly" on page 38. 67 www.gateway.com Replacing the ...external video board Tools you need to complete this task: 5.0 mm hex nutdriver 1 black (DVD drive) 2 black (hard drive kit) 2 black (keyboard cover) 1-3 black (keyboard) 4 black (LCD panel hinges) 4 black (palm rest -
..."Replacing the keyboard cover" on page 29. 7 Remove the keyboard by following the instructions in "Replacing the keyboard" on page 31. 8 Remove the LCD panel by following the instructions in "Replacing the LCD panel assembly" on page 38. 67 www.gateway.com Replacing the ...external video board Tools you need to complete this task: 5.0 mm hex nutdriver 1 black (DVD drive) 2 black (hard drive kit) 2 black (keyboard cover) 1-3 black (keyboard) 4 black (LCD panel hinges) 4 black (palm rest -
8511725 - Gateway Service Guide
Page 73
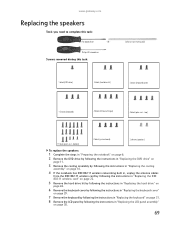
www.gateway.com Replacing the speakers Tools you need to complete this task: Scribe or non-marring tool 1 black (DVD drive) 2 black (hard drive kit) 2 black (keyboard cover) 1-3 black (keyboard) 4 black (LCD panel hinges) 4 black (palm rest - Phillips #0 screwdriver Screws removed during this task: Flat-blade driver... kit by following the instructions in "Replacing the hard drive" on page 26. 6 Remove the keyboard cover by following the instructions in "Replacing the keyboard cover" on page 29. 7 Remove the keyboard by following the instructions in "Replacing the keyboard" on page...
www.gateway.com Replacing the speakers Tools you need to complete this task: Scribe or non-marring tool 1 black (DVD drive) 2 black (hard drive kit) 2 black (keyboard cover) 1-3 black (keyboard) 4 black (LCD panel hinges) 4 black (palm rest - Phillips #0 screwdriver Screws removed during this task: Flat-blade driver... kit by following the instructions in "Replacing the hard drive" on page 26. 6 Remove the keyboard cover by following the instructions in "Replacing the keyboard cover" on page 29. 7 Remove the keyboard by following the instructions in "Replacing the keyboard" on page...
8512055 - Component Replacement Manual
Page 7
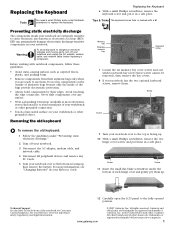
... metal part of your workbench or other grounded connection. • Touch a bare metal surface on the outside of each hinge cover and gently pry them . www.gateway.com © 2007 Gateway, Inc. Never slide components over so the top is marked with notebook components, follow these screws cannot be removed), then... screw and put them . Tips & Tricks The keyboard screw hole is facing up. 10 With a small Phillips screwdriver, remove the two hinge cover screws and put it to the fully opened position. Memory bay Wireless network bay Keyboard screw 7 Loosen the six memory bay...
... metal part of your workbench or other grounded connection. • Touch a bare metal surface on the outside of each hinge cover and gently pry them . www.gateway.com © 2007 Gateway, Inc. Never slide components over so the top is marked with notebook components, follow these screws cannot be removed), then... screw and put them . Tips & Tricks The keyboard screw hole is facing up. 10 With a small Phillips screwdriver, remove the two hinge cover screws and put it to the fully opened position. Memory bay Wireless network bay Keyboard screw 7 Loosen the six memory bay...
8512055 - Component Replacement Manual
Page 8
...the cable out of the notebook for important safety, regulatory, and legal information. 2 www.gateway.com © 2007 Gateway, Inc. Be careful not to close the LCD panel. 7 Close the LCD panel, then replace the two hinge cover screws. 8 Turn your notebook over . 13 Connect the power adapter, the modem cable,... and the network cable, then turn on the front edge of Gateway, Inc. The keyboard should be damaged when you finger along the ...
...the cable out of the notebook for important safety, regulatory, and legal information. 2 www.gateway.com © 2007 Gateway, Inc. Be careful not to close the LCD panel. 7 Close the LCD panel, then replace the two hinge cover screws. 8 Turn your notebook over . 13 Connect the power adapter, the modem cable,... and the network cable, then turn on the front edge of Gateway, Inc. The keyboard should be damaged when you finger along the ...


