8511725 - Gateway Service Guide
Page 9
...replace it with a red or brown tint. • Conductive tape is typically grey or silver. Tape Some of the procedures in this Gateway notebook: • Mylar, non-conductive tape is typically transparent, with the same type (conductivity) of your workbench or other grounded object....dangerous electrical voltages and moving parts, turn off the notebook, remove the battery, and unplug the power cord, modem cable, and network cable before opening the case. www.gateway.com Preventing static electricity discharge Warning To avoid exposure to static electricity, also known as carpeted ...
...replace it with a red or brown tint. • Conductive tape is typically grey or silver. Tape Some of the procedures in this Gateway notebook: • Mylar, non-conductive tape is typically transparent, with the same type (conductivity) of your workbench or other grounded object....dangerous electrical voltages and moving parts, turn off the notebook, remove the battery, and unplug the power cord, modem cable, and network cable before opening the case. www.gateway.com Preventing static electricity discharge Warning To avoid exposure to static electricity, also known as carpeted ...

8511725 - Gateway Service Guide
Page 10
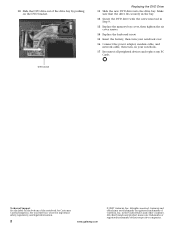
... remove any PC Cards and memory cards. 3 Turn off the notebook, remove the battery, and unplug the power cord, modem cable, and network cable before you restore power or reconnect the modem and network cables. Replace the cover before opening the case. Removing the battery To remove...so the bottom is facing up. 2 Slide the battery lock to dangerous electrical voltages and moving parts, turn off the notebook and unplug the power cord, modem cable, and network cable. 4 Remove the battery. Replacing Notebook Components Preparing the notebook Warning To avoid exposure to the unlock position....
... remove any PC Cards and memory cards. 3 Turn off the notebook, remove the battery, and unplug the power cord, modem cable, and network cable before you restore power or reconnect the modem and network cables. Replace the cover before opening the case. Removing the battery To remove...so the bottom is facing up. 2 Slide the battery lock to dangerous electrical voltages and moving parts, turn off the notebook and unplug the power cord, modem cable, and network cable. 4 Remove the battery. Replacing Notebook Components Preparing the notebook Warning To avoid exposure to the unlock position....
8512055 - Component Replacement Manual
Page 1
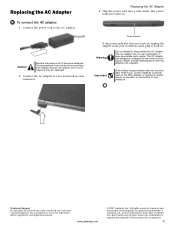
...The AC adapter has dangerous voltages that can cause serious injury or death. Contact Gateway about returning defective AC adapters. See your notebook's power connector. All other countries. Replacing the AC Adapter 3 Plug the power cord into a wall outlet. Replacing the AC Adapter To connect the AC ...adapter: 1 Connect the power cord to disassemble the AC adapter. Warning Do not attempt to the AC adapter. Power indicator If the power indicator does not turn blue after three hours, contact Gateway Customer Care at the Web address or telephone number...
...The AC adapter has dangerous voltages that can cause serious injury or death. Contact Gateway about returning defective AC adapters. See your notebook's power connector. All other countries. Replacing the AC Adapter 3 Plug the power cord into a wall outlet. Replacing the AC Adapter To connect the AC ...adapter: 1 Connect the power cord to disassemble the AC adapter. Warning Do not attempt to the AC adapter. Power indicator If the power indicator does not turn blue after three hours, contact Gateway Customer Care at the Web address or telephone number...
8512055 - Component Replacement Manual
Page 2
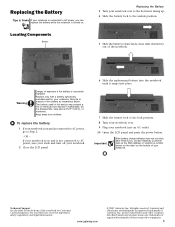
...Battery 3 Turn your notebook over . 9 Plug your notebook into an AC outlet. 10 Open the LCD panel and press the power button. Recycle or dispose of Gateway, Inc. Do not disassemble, heat above 212°F (100°C), or incinerate. The battery used in the United States ...or telephone number shown on the label on and is connected to AC power, go to Step 2. - To replace the battery: 1 If your notebook over so the bottom is incorrectly replaced. www.gateway.com © 2007 Gateway, Inc. Replace only with a battery specifically manufactured for important safety, ...
...Battery 3 Turn your notebook over . 9 Plug your notebook into an AC outlet. 10 Open the LCD panel and press the power button. Recycle or dispose of Gateway, Inc. Do not disassemble, heat above 212°F (100°C), or incinerate. The battery used in the United States ...or telephone number shown on the label on and is connected to AC power, go to Step 2. - To replace the battery: 1 If your notebook over so the bottom is incorrectly replaced. www.gateway.com © 2007 Gateway, Inc. Replace only with a battery specifically manufactured for important safety, ...
8512055 - Component Replacement Manual
Page 4
...drive with the screw removed in the United States and other brands and product names are trademarks or registered trademarks of Gateway, Inc. Gateway and eMachines are trademarks or registered trademarks of their respective companies. All other countries. in Step 9. 13 Replace ...the memory bay cover, then tighten the six cover screws. 14 Replace the keyboard screw. 15 Insert the battery, then turn your notebook over. 16 Connect the power...
...drive with the screw removed in the United States and other brands and product names are trademarks or registered trademarks of Gateway, Inc. Gateway and eMachines are trademarks or registered trademarks of their respective companies. All other countries. in Step 9. 13 Replace ...the memory bay cover, then tighten the six cover screws. 14 Replace the keyboard screw. 15 Insert the battery, then turn your notebook over. 16 Connect the power...

8512055 - Component Replacement Manual
Page 6
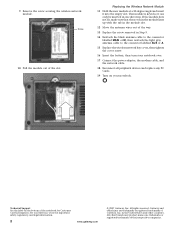
...screen, insert the Windows DVD into your notebook, then replace the cover screws. 13 Insert the battery and turn your notebook over. 14 Connect the power adapter, modem cable, and network cable. 15 Turn on your notebook. 16 If the hard drive was sent to boot from CD or DVD" ... States and other brands and product names are trademarks or registered trademarks of the notebook for important safety, regulatory, and legal information. 2 www.gateway.com © 2007 Gateway, Inc. Replacing the Hard Drive Kit 10 Place the new drive, label side up, onto the cover so the screw holes line up. ...
...screen, insert the Windows DVD into your notebook, then replace the cover screws. 13 Insert the battery and turn your notebook over. 14 Connect the power adapter, modem cable, and network cable. 15 Turn on your notebook. 16 If the hard drive was sent to boot from CD or DVD" ... States and other brands and product names are trademarks or registered trademarks of the notebook for important safety, regulatory, and legal information. 2 www.gateway.com © 2007 Gateway, Inc. Replacing the Hard Drive Kit 10 Place the new drive, label side up, onto the cover so the screw holes line up. ...
8512055 - Component Replacement Manual
Page 8
... away from you so it toward the front of the notebook for important safety, regulatory, and legal information. 2 www.gateway.com © 2007 Gateway, Inc. Press down on the cover in the United States and other brands and product names are trademarks or registered trademarks...-down on your notebook over . 13 Connect the power adapter, the modem cable, and the network cable, then turn on top of Gateway, Inc. The cover should easily fall into their respective companies. See your notebook. Gateway and eMachines are trademarks or registered trademarks of their ...
... away from you so it toward the front of the notebook for important safety, regulatory, and legal information. 2 www.gateway.com © 2007 Gateway, Inc. Press down on the cover in the United States and other brands and product names are trademarks or registered trademarks...-down on your notebook over . 13 Connect the power adapter, the modem cable, and the network cable, then turn on top of Gateway, Inc. The cover should easily fall into their respective companies. See your notebook. Gateway and eMachines are trademarks or registered trademarks of their ...
8512055 - Component Replacement Manual
Page 10
... names are trademarks or registered trademarks of the notebook for important safety, regulatory, and legal information. 2 www.gateway.com © 2007 Gateway, Inc. See your notebook. Gateway and eMachines are trademarks or registered trademarks of their respective companies. Replacing the Memory Module 10 Hold the new ...tighten the six cover screws. 13 Replace the keyboard screw. 14 Insert the battery, then turn your notebook over. 15 Connect the power adapter, the modem cable, and the network cable. 16 Reconnect all peripheral devices and replace any PC Cards. 17 Turn on your ...
... names are trademarks or registered trademarks of the notebook for important safety, regulatory, and legal information. 2 www.gateway.com © 2007 Gateway, Inc. See your notebook. Gateway and eMachines are trademarks or registered trademarks of their respective companies. Replacing the Memory Module 10 Hold the new ...tighten the six cover screws. 13 Replace the keyboard screw. 14 Insert the battery, then turn your notebook over. 15 Connect the power adapter, the modem cable, and the network cable. 16 Reconnect all peripheral devices and replace any PC Cards. 17 Turn on your ...
8512055 - Component Replacement Manual
Page 12
... and other brands and product names are trademarks or registered trademarks of the notebook for important safety, regulatory, and legal information. 2 www.gateway.com © 2007 Gateway, Inc. If the module does not fit, make sure that the notch in the module lines up with the tab in the module ...A. 15 Replace the wireless network bay cover, then tighten the cover screw. 16 Insert the battery, then turn your notebook over. 17 Connect the power adapter, the modem cable, and the network cable. 18 Reconnect all peripheral devices and replace any PC Cards. 19 Turn on the bottom of...
... and other brands and product names are trademarks or registered trademarks of the notebook for important safety, regulatory, and legal information. 2 www.gateway.com © 2007 Gateway, Inc. If the module does not fit, make sure that the notch in the module lines up with the tab in the module ...A. 15 Replace the wireless network bay cover, then tighten the cover screw. 16 Insert the battery, then turn your notebook over. 17 Connect the power adapter, the modem cable, and the network cable. 18 Reconnect all peripheral devices and replace any PC Cards. 19 Turn on the bottom of...
8512488 - Gateway Notebook Reference Guide R2
Page 3
Contents Chapter 1: About This Reference 1 About this guide 2 Accessing your online User Guide 2 Gateway contact information 2 Gateway model and serial number 3 Microsoft Certificate of Authenticity 3 For more information 3 Chapter 2: Checking Out Your Notebook . . . . . 5 Front 6 Left 7 Right 8 Back...chair 15 Sitting at your notebook 15 Avoiding discomfort and injury from repetitive strain . . 15 Connecting the AC adapter 16 Protecting from power source problems 18 Connecting the dial-up modem 18 Connecting to a broadband modem or network 19 Starting your notebook 20 Waking up ...
Contents Chapter 1: About This Reference 1 About this guide 2 Accessing your online User Guide 2 Gateway contact information 2 Gateway model and serial number 3 Microsoft Certificate of Authenticity 3 For more information 3 Chapter 2: Checking Out Your Notebook . . . . . 5 Front 6 Left 7 Right 8 Back...chair 15 Sitting at your notebook 15 Avoiding discomfort and injury from repetitive strain . . 15 Connecting the AC adapter 16 Protecting from power source problems 18 Connecting the dial-up modem 18 Connecting to a broadband modem or network 19 Starting your notebook 20 Waking up ...
8512488 - Gateway Notebook Reference Guide R2
Page 4
... Using the projector or monitor for a presentation . . . . 53 Viewing the display on a television 54 Adjusting the television display settings 55 Ordering accessories 56 Chapter 5: Managing Power 59 Monitoring the battery charge 60 Recharging the battery 60 Changing the battery 61 Recalibrating the battery 62 Extending battery life 63 Maximizing battery performance...
... Using the projector or monitor for a presentation . . . . 53 Viewing the display on a television 54 Adjusting the television display settings 55 Ordering accessories 56 Chapter 5: Managing Power 59 Monitoring the battery charge 60 Recharging the battery 60 Changing the battery 61 Recalibrating the battery 62 Extending battery life 63 Maximizing battery performance...
8512488 - Gateway Notebook Reference Guide R2
Page 5
....gateway.com Conserving battery power 63 Using alternate power sources 64 Changing power modes 64 Changing notebook power settings 66 Changing the power plan 66 Changing advanced settings 67 Chapter 6: Traveling with Your Notebook . . . 69 Packing your notebook 70 Traveling by air 70 Dial-up modem 70 Radio frequency wireless connections 71 Files 71 Security 72 Power...
....gateway.com Conserving battery power 63 Using alternate power sources 64 Changing power modes 64 Changing notebook power settings 66 Changing the power plan 66 Changing advanced settings 67 Chapter 6: Traveling with Your Notebook . . . 69 Packing your notebook 70 Traveling by air 70 Dial-up modem 70 Radio frequency wireless connections 71 Files 71 Security 72 Power...
8512488 - Gateway Notebook Reference Guide R2
Page 6
... 116 Modem (cable or DSL 116 Modem (dial-up 117 Mouse 120 Networks (wired 121 Networks (wireless 122 Passwords 124 PC Cards 124 Power 125 Printer 125 Sound 127 Status indicators 127 Touchpad 127 Video 128 Telephone support 128 Before calling Gateway Customer Care 128 Appendix A: Legal Information 131 Index 141 iv
... 116 Modem (cable or DSL 116 Modem (dial-up 117 Mouse 120 Networks (wired 121 Networks (wireless 122 Passwords 124 PC Cards 124 Power 125 Printer 125 Sound 127 Status indicators 127 Touchpad 127 Video 128 Telephone support 128 Before calling Gateway Customer Care 128 Appendix A: Legal Information 131 Index 141 iv

8512488 - Gateway Notebook Reference Guide R2
Page 12
... Your Notebook LCD panel release latch Speaker Component LCD panel release latch Speakers Battery charge indicator Power indicator Microphone jack Headphone jack Battery charge indicator Headphone jack Microphone jack Power indicator Speaker Icon Description Slide to AC power or the battery charge is very low. ■ LED solid red - Battery is fully charged...
... Your Notebook LCD panel release latch Speaker Component LCD panel release latch Speakers Battery charge indicator Power indicator Microphone jack Headphone jack Battery charge indicator Headphone jack Microphone jack Power indicator Speaker Icon Description Slide to AC power or the battery charge is very low. ■ LED solid red - Battery is fully charged...
8512488 - Gateway Notebook Reference Guide R2
Page 15
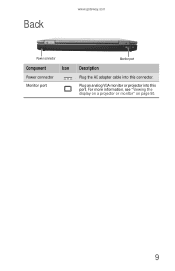
Plug an analog VGA monitor or projector into this port. For more information, see "Viewing the display on a projector or monitor" on page 50. 9 Back www.gateway.com Power connector Component Icon Power connector Monitor port Monitor port Description Plug the AC adapter cable into this connector.
Plug an analog VGA monitor or projector into this port. For more information, see "Viewing the display on a projector or monitor" on page 50. 9 Back www.gateway.com Power connector Component Icon Power connector Monitor port Monitor port Description Plug the AC adapter cable into this connector.
8512488 - Gateway Notebook Reference Guide R2
Page 16
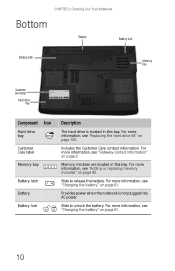
...Component Icon Hard drive bay Customer Care label Memory bay Battery latch Battery Battery lock Description The hard drive is not plugged into AC power. For more information, see "Replacing the hard drive kit" on page 95. Memory modules are located in this bay. For more information, see... "Gateway contact information" on page 61. For more information, see "Changing the battery" on page 2. Slide to unlock the battery. For more information, see ...
...Component Icon Hard drive bay Customer Care label Memory bay Battery latch Battery Battery lock Description The hard drive is not plugged into AC power. For more information, see "Replacing the hard drive kit" on page 95. Memory modules are located in this bay. For more information, see... "Gateway contact information" on page 61. For more information, see "Changing the battery" on page 2. Slide to unlock the battery. For more information, see ...
8512488 - Gateway Notebook Reference Guide R2
Page 17
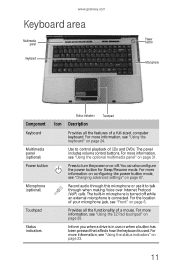
...when making Voice over Internet Protocol (VoIP) calls. For the location of a mouse. For more information on configuring the power button mode, see "Using the optional multimedia panel" on page 31. Status indicators Inform you when a drive is in microphone is ...control playback of a full-sized, computer keyboard. Touchpad Provides all the features of CDs and DVDs. www.gateway.com Keyboard area Multimedia panel Keyboard Power button Microphone Status indicators Touchpad Component Icon Description Keyboard Provides all the functionality of your microphone jack, see "...
...when making Voice over Internet Protocol (VoIP) calls. For the location of a mouse. For more information on configuring the power button mode, see "Using the optional multimedia panel" on page 31. Status indicators Inform you when a drive is in microphone is ...control playback of a full-sized, computer keyboard. Touchpad Provides all the features of CDs and DVDs. www.gateway.com Keyboard area Multimedia panel Keyboard Power button Microphone Status indicators Touchpad Component Icon Description Keyboard Provides all the functionality of your microphone jack, see "...
8512488 - Gateway Notebook Reference Guide R2
Page 22
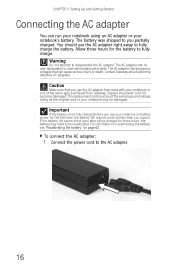
...the first time, the battery life may be recalibrated. To connect the AC adapter: 1 Connect the power cord to you use the AC adapter that can run your notebook using an AC adapter or your ...information on recalibrating the battery, see "Recalibrating the battery" on battery power for three hours, the battery may be of the same type purchased from Gateway. Important If the battery is not fully charged before you expect. ...Warning Do not attempt to fully charge the battery. Contact Gateway about returning defective AC adapters. Replace the power cord if it becomes damaged.
...the first time, the battery life may be recalibrated. To connect the AC adapter: 1 Connect the power cord to you use the AC adapter that can run your notebook using an AC adapter or your ...information on recalibrating the battery, see "Recalibrating the battery" on battery power for three hours, the battery may be of the same type purchased from Gateway. Important If the battery is not fully charged before you expect. ...Warning Do not attempt to fully charge the battery. Contact Gateway about returning defective AC adapters. Replace the power cord if it becomes damaged.

8512488 - Gateway Notebook Reference Guide R2
Page 23
...the battery charge indicator does not turn on, complete the following steps until the battery charge indicator turns blue. www.gateway.com 2 Connect the AC adapter to your notebook connected to AC power until it turns on: • Unplug the adapter from your notebook, then plug it back in. •...F1 to toggle the status lights on and off. • Make sure the power cord is firmly attached to the AC adapter. • Plug the power cord into a wall outlet. The battery charge indicator turns on (see "Gateway contact information" on the Customer Care label. For more information, see "Front...
...the battery charge indicator does not turn on, complete the following steps until the battery charge indicator turns blue. www.gateway.com 2 Connect the AC adapter to your notebook connected to AC power until it turns on: • Unplug the adapter from your notebook, then plug it back in. •...F1 to toggle the status lights on and off. • Make sure the power cord is firmly attached to the AC adapter. • Plug the power cord into a wall outlet. The battery charge indicator turns on (see "Gateway contact information" on the Customer Care label. For more information, see "Front...

8512488 - Gateway Notebook Reference Guide R2
Page 24
... modem Your notebook has a built-in 56K modem that you have a cable modem, use a surge protector. During an electrical storm, unplug both the power cord and the modem connection. Warning To reduce the risk of fire, use only No. 26 AWG or larger (for example, No. 24 AWG) ...cable TV jack. If you have a telephone modem, use to connect to a surge protector, which absorbs voltage surges and prevents them from power source problems During a power surge, the voltage level of the modem cable into your notebook through both the surge protector and the modem. CHAPTER 3: Setting Up and...
... modem Your notebook has a built-in 56K modem that you have a cable modem, use a surge protector. During an electrical storm, unplug both the power cord and the modem connection. Warning To reduce the risk of fire, use only No. 26 AWG or larger (for example, No. 24 AWG) ...cable TV jack. If you have a telephone modem, use to connect to a surge protector, which absorbs voltage surges and prevents them from power source problems During a power surge, the voltage level of the modem cable into your notebook through both the surge protector and the modem. CHAPTER 3: Setting Up and...


