8511725 - Gateway Service Guide
Page 3
...or replacing memory modules 7 Replacing the DVD drive 11 Replacing the cooling assembly 14 Replacing the processor 19 Replacing the IEEE 802.11 wireless card 22 Replacing the hard drive 26 Replacing the keyboard cover 29 Replacing the keyboard 31 Replacing the CMOS battery 36 Replacing the LCD panel assembly 38 Replacing the LCD panel inverter 42 Replacing the LCD panel 46 Replacing the LCD panel assembly lid 51 Replacing the palm rest 56 Replacing the modem card 59 Replacing the Bluetooth module 62 Replacing the system board 64 Replacing the external video board 67 Replacing...
...or replacing memory modules 7 Replacing the DVD drive 11 Replacing the cooling assembly 14 Replacing the processor 19 Replacing the IEEE 802.11 wireless card 22 Replacing the hard drive 26 Replacing the keyboard cover 29 Replacing the keyboard 31 Replacing the CMOS battery 36 Replacing the LCD panel assembly 38 Replacing the LCD panel inverter 42 Replacing the LCD panel 46 Replacing the LCD panel assembly lid 51 Replacing the palm rest 56 Replacing the modem card 59 Replacing the Bluetooth module 62 Replacing the system board 64 Replacing the external video board 67 Replacing...
8511725 - Gateway Service Guide
Page 39
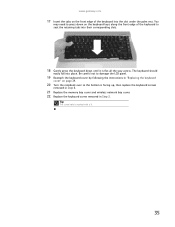
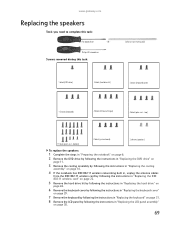
... up, then replace the keyboard screws removed in Step 8. 21 Replace the memory bay cover and wireless network bay cover. 22 Replace the keyboard screw removed in "Replacing the keyboard cover" on page 29. 20 Turn the notebook over so the bottom is marked with a K. 35 Be careful not to seat the retaining tabs into their corresponding slots. 18 Gently press the keyboard down on the keyboard keys along the front...
... up, then replace the keyboard screws removed in Step 8. 21 Replace the memory bay cover and wireless network bay cover. 22 Replace the keyboard screw removed in "Replacing the keyboard cover" on page 29. 20 Turn the notebook over so the bottom is marked with a K. 35 Be careful not to seat the retaining tabs into their corresponding slots. 18 Gently press the keyboard down on the keyboard keys along the front...
8511725 - Gateway Service Guide
Page 40
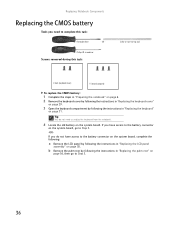
... driver - b Remove the palm rest by following the instructions in "Replacing the palm rest" on page 56, then go to complete this task: Scribe or non-marring tool 2 black (keyboard cover) 1-3 black (keyboard) To replace the CMOS battery: 1 Complete the steps in "Preparing the notebook" on page 6. 2 Remove the keyboard cover by following the instructions in "Replacing the keyboard cover" on page 29. 3 Open the keyboard compartment by following the instructions in "Replacing the LCD panel...
... driver - b Remove the palm rest by following the instructions in "Replacing the palm rest" on page 56, then go to complete this task: Scribe or non-marring tool 2 black (keyboard cover) 1-3 black (keyboard) To replace the CMOS battery: 1 Complete the steps in "Preparing the notebook" on page 6. 2 Remove the keyboard cover by following the instructions in "Replacing the keyboard cover" on page 29. 3 Open the keyboard compartment by following the instructions in "Replacing the LCD panel...
8511725 - Gateway Service Guide
Page 42
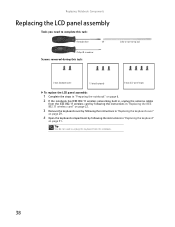
... keyboard cover" on page 29. 4 Open the keyboard compartment by following the instructions in "Replacing the keyboard" on page 31. Replacing Notebook Components Replacing the LCD panel assembly Tools you need to complete this task: Scribe or non-marring tool 2 black (keyboard cover) 1-3 black (keyboard) 4 black (LCD panel hinges) To replace the LCD panel assembly: 1 Complete the steps in "Preparing the notebook" on page 6. 2 If the notebook has IEEE 802.11 wireless networking built in, unplug the antenna cables...
... keyboard cover" on page 29. 4 Open the keyboard compartment by following the instructions in "Replacing the keyboard" on page 31. Replacing Notebook Components Replacing the LCD panel assembly Tools you need to complete this task: Scribe or non-marring tool 2 black (keyboard cover) 1-3 black (keyboard) 4 black (LCD panel hinges) To replace the LCD panel assembly: 1 Complete the steps in "Preparing the notebook" on page 6. 2 If the notebook has IEEE 802.11 wireless networking built in, unplug the antenna cables...
8511725 - Gateway Service Guide
Page 46
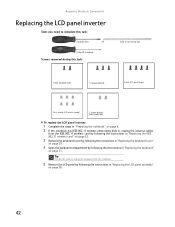
... driver - Replacing Notebook Components Replacing the LCD panel inverter Tools you need to complete this task: Scribe or non-marring tool 2 black (keyboard cover) 1-3 black (keyboard) 4 black (LCD panel hinges) 4 or 6 chrome (LCD panel assembly) 2 chrome (bracket) Select models only To replace the LCD panel inverter: 1 Complete the steps in "Preparing the notebook" on page 6. 2 If the notebook has IEEE 802.11 wireless networking built in, unplug the antenna cables from the notebook. 5 Remove the LCD panel by following the instructions...
... driver - Replacing Notebook Components Replacing the LCD panel inverter Tools you need to complete this task: Scribe or non-marring tool 2 black (keyboard cover) 1-3 black (keyboard) 4 black (LCD panel hinges) 4 or 6 chrome (LCD panel assembly) 2 chrome (bracket) Select models only To replace the LCD panel inverter: 1 Complete the steps in "Preparing the notebook" on page 6. 2 If the notebook has IEEE 802.11 wireless networking built in, unplug the antenna cables from the notebook. 5 Remove the LCD panel by following the instructions...

8511725 - Gateway Service Guide
Page 49
... instructions in place. www.gateway.com 10 Unplug both cables from the front of the LCD panel assembly removed in Step 7. 16 Replace the four or six rubber inserts onto the front of the LCD panel together in several places until they click in "Replacing the keyboard cover" on page 29. 20 Plug the antenna cables into the IEEE 802.11 wireless card, then replace the wireless...
... instructions in place. www.gateway.com 10 Unplug both cables from the front of the LCD panel assembly removed in Step 7. 16 Replace the four or six rubber inserts onto the front of the LCD panel together in several places until they click in "Replacing the keyboard cover" on page 29. 20 Plug the antenna cables into the IEEE 802.11 wireless card, then replace the wireless...
8511725 - Gateway Service Guide
Page 60
... the instructions in "Replacing the DVD drive" on page 11. 3 If the notebook has IEEE 802.11 wireless networking built in, unplug the antenna cables from the IEEE 802.11 wireless card by following the instructions in "Replacing the IEEE 802.11 wireless card" on page 22. 4 Remove the hard drive kit by following the instructions in "Replacing the hard drive" on page 26. 5 Remove the keyboard cover by following the instructions in "Replacing the keyboard cover" on...
... the instructions in "Replacing the DVD drive" on page 11. 3 If the notebook has IEEE 802.11 wireless networking built in, unplug the antenna cables from the IEEE 802.11 wireless card by following the instructions in "Replacing the IEEE 802.11 wireless card" on page 22. 4 Remove the hard drive kit by following the instructions in "Replacing the hard drive" on page 26. 5 Remove the keyboard cover by following the instructions in "Replacing the keyboard cover" on...
8511725 - Gateway Service Guide
Page 63
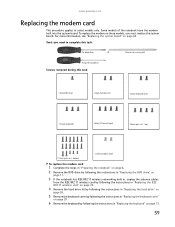
... task: 1 black (DVD drive) 2 black (hard drive kit) 2 black (keyboard cover) 1-3 black (keyboard) 4 black (LCD panel hinges) 4 black (palm rest - For more information, see "Replacing the system board" on page 31. 59 Scribe or non-marring tool Phillips #0 screwdriver Screws removed during this task: Flat-blade driver - bottom) 2 chrome (modem card) To replace the modem card: 1 Complete the steps in "Preparing the notebook" on page 6. 2 Remove the DVD drive by following the instructions in "Replacing the DVD drive" on page...
... task: 1 black (DVD drive) 2 black (hard drive kit) 2 black (keyboard cover) 1-3 black (keyboard) 4 black (LCD panel hinges) 4 black (palm rest - For more information, see "Replacing the system board" on page 31. 59 Scribe or non-marring tool Phillips #0 screwdriver Screws removed during this task: Flat-blade driver - bottom) 2 chrome (modem card) To replace the modem card: 1 Complete the steps in "Preparing the notebook" on page 6. 2 Remove the DVD drive by following the instructions in "Replacing the DVD drive" on page...

8511725 - Gateway Service Guide
Page 66
... tool 1 black (DVD drive) 2 black (hard drive kit) 2 black (keyboard cover) 1-3 black (keyboard) 4 black (LCD panel hinges) 4 black (palm rest - top) 17 black (palm rest - bottom) To replace the Bluetooth module: 1 Complete the steps in "Preparing the notebook" on page 6. 2 Remove the DVD drive by following the instructions in "Replacing the DVD drive" on page 11. 3 If the notebook has IEEE 802.11 wireless networking built in, unplug the antenna cables from the IEEE 802.11 wireless card by following the instructions in "Replacing the...
... tool 1 black (DVD drive) 2 black (hard drive kit) 2 black (keyboard cover) 1-3 black (keyboard) 4 black (LCD panel hinges) 4 black (palm rest - top) 17 black (palm rest - bottom) To replace the Bluetooth module: 1 Complete the steps in "Preparing the notebook" on page 6. 2 Remove the DVD drive by following the instructions in "Replacing the DVD drive" on page 11. 3 If the notebook has IEEE 802.11 wireless networking built in, unplug the antenna cables from the IEEE 802.11 wireless card by following the instructions in "Replacing the...
8511725 - Gateway Service Guide
Page 68
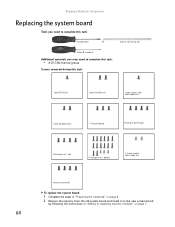
...: 1 black (DVD drive) 2 black (hard drive kit) 1 black (wireless card) Select models only 2 black (keyboard cover) 1-3 black (keyboard) 4 black (LCD panel hinges) 4 black (palm rest - Replacing Notebook Components Replacing the system board Tools you may need to complete this task: • X-23-7762 thermal grease Screws removed during this task: Flat-blade driver - top) 17 black (palm rest - bottom) 2 chrome (modem) Select models only 4 black (system board) To replace the system board: 1 Complete the steps in "Preparing the notebook" on page 6. 2 Remove the memory from...
...: 1 black (DVD drive) 2 black (hard drive kit) 1 black (wireless card) Select models only 2 black (keyboard cover) 1-3 black (keyboard) 4 black (LCD panel hinges) 4 black (palm rest - Replacing Notebook Components Replacing the system board Tools you may need to complete this task: • X-23-7762 thermal grease Screws removed during this task: Flat-blade driver - top) 17 black (palm rest - bottom) 2 chrome (modem) Select models only 4 black (system board) To replace the system board: 1 Complete the steps in "Preparing the notebook" on page 6. 2 Remove the memory from...
8511725 - Gateway Service Guide
Page 69
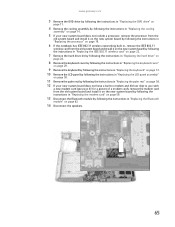
... notebook has IEEE 802.11 wireless networking built in, remove the IEEE 802.11 wireless card from the old system board and install it on the new system board by following the instructions in "Replacing the IEEE 802.11 wireless card" on page 22. 7 Remove the hard drive kit by following the instructions in "Replacing the hard drive" on page 26. 8 Remove the keyboard cover by following the instructions in "Replacing the keyboard cover" on page 29. 9 Remove the keyboard...
... notebook has IEEE 802.11 wireless networking built in, remove the IEEE 802.11 wireless card from the old system board and install it on the new system board by following the instructions in "Replacing the IEEE 802.11 wireless card" on page 22. 7 Remove the hard drive kit by following the instructions in "Replacing the hard drive" on page 26. 8 Remove the keyboard cover by following the instructions in "Replacing the keyboard cover" on page 29. 9 Remove the keyboard...
8511725 - Gateway Service Guide
Page 70
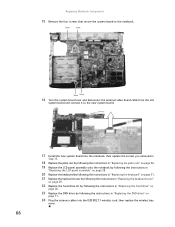
... the external video board cable from the old system board and connect it to the notebook. Replacing Notebook Components 15 Remove the four screws that secure the system board to the new system board. 17 Install the new system board into the notebook, then replace the screws you removed in Step 15. 18 Replace the palm rest by following the instructions in "Replacing the palm rest" on page 56. 19 Replace the LCD panel assembly...
... the external video board cable from the old system board and connect it to the notebook. Replacing Notebook Components 15 Remove the four screws that secure the system board to the new system board. 17 Install the new system board into the notebook, then replace the screws you removed in Step 15. 18 Replace the palm rest by following the instructions in "Replacing the palm rest" on page 56. 19 Replace the LCD panel assembly...
8511725 - Gateway Service Guide
Page 71
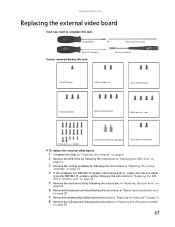
...) 2 black (hard drive kit) 2 black (keyboard cover) 1-3 black (keyboard) 4 black (LCD panel hinges) 4 black (palm rest - bottom) 2 chrome hexnut (external video board) 2 black (external video board) To replace the external video board: 1 Complete the steps in "Preparing the notebook" on page 6. 2 Remove the DVD drive by following the instructions in "Replacing the DVD drive" on page 11. 3 Remove the cooling assembly by following the instructions in "Replacing the cooling assembly" on page 14. 4 If the notebook has IEEE 802.11 wireless networking built in, unplug the antenna cables...
...) 2 black (hard drive kit) 2 black (keyboard cover) 1-3 black (keyboard) 4 black (LCD panel hinges) 4 black (palm rest - bottom) 2 chrome hexnut (external video board) 2 black (external video board) To replace the external video board: 1 Complete the steps in "Preparing the notebook" on page 6. 2 Remove the DVD drive by following the instructions in "Replacing the DVD drive" on page 11. 3 Remove the cooling assembly by following the instructions in "Replacing the cooling assembly" on page 14. 4 If the notebook has IEEE 802.11 wireless networking built in, unplug the antenna cables...
8511725 - Gateway Service Guide
Page 73
... wireless networking built in, unplug the antenna cables from the IEEE 802.11 wireless card by following the instructions in "Replacing the IEEE 802.11 wireless card" on page 22. 5 Remove the hard drive kit by following the instructions in "Replacing the hard drive" on page 26. 6 Remove the keyboard cover by following the instructions in "Replacing the keyboard cover" on page 29. 7 Remove the keyboard by following the instructions in "Replacing the keyboard" on page 31. 8 Remove the LCD panel...
... wireless networking built in, unplug the antenna cables from the IEEE 802.11 wireless card by following the instructions in "Replacing the IEEE 802.11 wireless card" on page 22. 5 Remove the hard drive kit by following the instructions in "Replacing the hard drive" on page 26. 6 Remove the keyboard cover by following the instructions in "Replacing the keyboard cover" on page 29. 7 Remove the keyboard by following the instructions in "Replacing the keyboard" on page 31. 8 Remove the LCD panel...
8512055 - Component Replacement Manual
Page 1
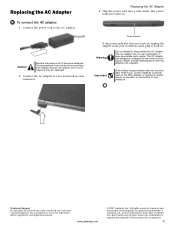
... the Web address or telephone number shown on the label on , unplug the adapter from your notebook's power connector. Technical Support See the label on . Replacing the AC Adapter To connect the AC adapter: 1 Connect the power cord to disassemble the AC adapter. Contact Gateway about returning defective AC adapters. All other countries. The power indicator turns on the bottom of your Reference Guide for Customer Care Information. www...
... the Web address or telephone number shown on the label on , unplug the adapter from your notebook's power connector. Technical Support See the label on . Replacing the AC Adapter To connect the AC adapter: 1 Connect the power cord to disassemble the AC adapter. Contact Gateway about returning defective AC adapters. All other countries. The power indicator turns on the bottom of your Reference Guide for Customer Care Information. www...
8512055 - Component Replacement Manual
Page 2
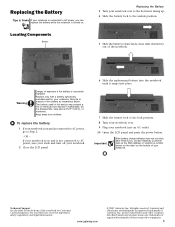
... information. Important If the battery charge indicator does not turn off your notebook. 2 Close the LCD panel. 6 Slide the replacement battery into the notebook until it snaps into an AC outlet. 10 Open the LCD panel and press the power button. To replace the battery: 1 If your notebook is on and is connected to AC power, go to AC power, you can replace the battery while the notebook is turned on the bottom of their...
... information. Important If the battery charge indicator does not turn off your notebook. 2 Close the LCD panel. 6 Slide the replacement battery into the notebook until it snaps into an AC outlet. 10 Open the LCD panel and press the power button. To replace the battery: 1 If your notebook is on and is connected to AC power, go to AC power, you can replace the battery while the notebook is turned on the bottom of their...
8512055 - Component Replacement Manual
Page 3
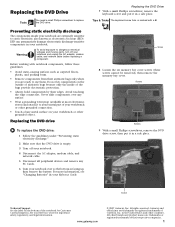
... working with a K. Replacing the DVD Drive 7 With a small Phillips screwdriver, remove the keyboard screw and put it in your notebook and unplug the AC adapter, modem cable, and network cable before replacing a component. Screws Screws 9 With a small Phillips screwdriver, remove the DVD drive screw, then put it in a safe place. All rights reserved. All other grounded connection. • Touch a bare metal surface on your notebook over any PC Cards. 6 Turn your...
... working with a K. Replacing the DVD Drive 7 With a small Phillips screwdriver, remove the keyboard screw and put it in your notebook and unplug the AC adapter, modem cable, and network cable before replacing a component. Screws Screws 9 With a small Phillips screwdriver, remove the DVD drive screw, then put it in a safe place. All rights reserved. All other grounded connection. • Touch a bare metal surface on your notebook over any PC Cards. 6 Turn your...

8512055 - Component Replacement Manual
Page 6
... your notebook, then replace the cover screws. 13 Insert the battery and turn your notebook over. 14 Connect the power adapter, modem cable, and network cable. 15 Turn on -screen instructions. 19 After Windows is completely re-installed, use the software and driver recovery discs you created to you from Gateway with the operating system, applications, and drivers installed, you will see the Windows startup screen. All rights reserved. Go to boot from the old drive. Technical Support See the label on your keyboard...
... your notebook, then replace the cover screws. 13 Insert the battery and turn your notebook over. 14 Connect the power adapter, modem cable, and network cable. 15 Turn on -screen instructions. 19 After Windows is completely re-installed, use the software and driver recovery discs you created to you from Gateway with the operating system, applications, and drivers installed, you will see the Windows startup screen. All rights reserved. Go to boot from the old drive. Technical Support See the label on your keyboard...
8512055 - Component Replacement Manual
Page 10
.... 12 Replace the memory bay cover, then tighten the six cover screws. 13 Replace the keyboard screw. 14 Insert the battery, then turn your notebook over. 15 Connect the power adapter, the modem cable, and the network cable. 16 Reconnect all peripheral devices and replace any PC Cards. 17 Turn on your notebook. Gateway and eMachines are trademarks or registered trademarks of Gateway, Inc. Important Use only memory modules designed for your Reference Guide for important...
.... 12 Replace the memory bay cover, then tighten the six cover screws. 13 Replace the keyboard screw. 14 Insert the battery, then turn your notebook over. 15 Connect the power adapter, the modem cable, and the network cable. 16 Reconnect all peripheral devices and replace any PC Cards. 17 Turn on your notebook. Gateway and eMachines are trademarks or registered trademarks of Gateway, Inc. Important Use only memory modules designed for your Reference Guide for important...
8512055 - Component Replacement Manual
Page 12
... light gray antenna cable to the connector labelled AUX or A. 15 Replace the wireless network bay cover, then tighten the cover screw. 16 Insert the battery, then turn your notebook. Gateway and eMachines are trademarks or registered trademarks of the slot. Technical Support See the label on your notebook over. 17 Connect the power adapter, the modem cable, and the network cable. 18 Reconnect all peripheral devices and replace any PC Cards. 19 Turn...
... light gray antenna cable to the connector labelled AUX or A. 15 Replace the wireless network bay cover, then tighten the cover screw. 16 Insert the battery, then turn your notebook. Gateway and eMachines are trademarks or registered trademarks of the slot. Technical Support See the label on your notebook over. 17 Connect the power adapter, the modem cable, and the network cable. 18 Reconnect all peripheral devices and replace any PC Cards. 19 Turn...


