8512565 - Component Replacement Manual R1
Page 1
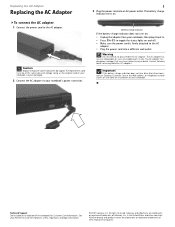
... Care at the Web address or telephone number shown on the label on the bottom of the notebook for important safety, regulatory, and legal information. © 2007 Gateway, Inc. See your Reference Guide for Customer Care Information. All other countries. The AC adapter has dangerous voltages that can... or death. Technical Support See the label on and off. • Make sure the power cord is firmly attached to your notebook, then plug it becomes damaged. Gateway and eMachines are trademarks or registered trademarks of the same type and voltage rating as the original cord or your...
... Care at the Web address or telephone number shown on the label on the bottom of the notebook for important safety, regulatory, and legal information. © 2007 Gateway, Inc. See your Reference Guide for Customer Care Information. All other countries. The AC adapter has dangerous voltages that can... or death. Technical Support See the label on and off. • Make sure the power cord is firmly attached to your notebook, then plug it becomes damaged. Gateway and eMachines are trademarks or registered trademarks of the same type and voltage rating as the original cord or your...
8512565 - Component Replacement Manual R1
Page 2
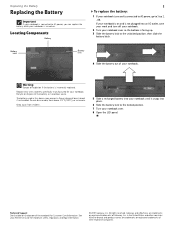
... companies. All other countries. in this device may present a fire or chemical burn hazard if mishandled. Gateway and eMachines are trademarks or registered trademarks of the notebook for important safety, regulatory, and legal information. © 2007 Gateway, Inc. Do not disassemble, heat above 212°F (100°C), or incinerate. Battery latch Battery lock...
... companies. All other countries. in this device may present a fire or chemical burn hazard if mishandled. Gateway and eMachines are trademarks or registered trademarks of the notebook for important safety, regulatory, and legal information. © 2007 Gateway, Inc. Do not disassemble, heat above 212°F (100°C), or incinerate. Battery latch Battery lock...

8512565 - Component Replacement Manual R1
Page 3
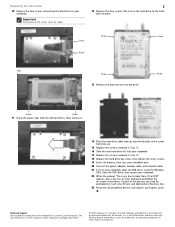
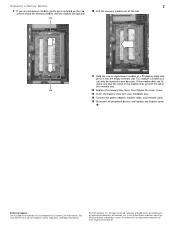
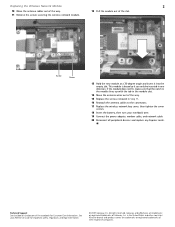
... static electricity discharge." 2 Make sure that secures the DVD drive to a bare metal part of your notebook. Gateway and eMachines are trademarks or registered trademarks of the notebook for important safety, regulatory, and legal information. © 2007 Gateway, Inc. Screw DVD drive -OR- Warning To avoid exposure to dangerous electrical voltages and moving parts...
... static electricity discharge." 2 Make sure that secures the DVD drive to a bare metal part of your notebook. Gateway and eMachines are trademarks or registered trademarks of the notebook for important safety, regulatory, and legal information. © 2007 Gateway, Inc. Screw DVD drive -OR- Warning To avoid exposure to dangerous electrical voltages and moving parts...
8512565 - Component Replacement Manual R1
Page 4
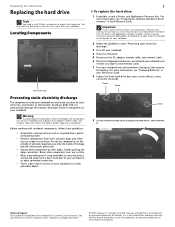
... static-causing surfaces such as electrostatic discharge (ESD). Avoid touching the edge connectors. Contact Gateway Customer Care at most electronics stores) and attach it . See your notebook over any Express and memory cards. 7 Turn your Reference Guide for software and device driver...more information, see "Preparing for important safety, regulatory, and legal information. © 2007 Gateway, Inc. All other countries. You also need a small Phillips screwdriver to your notebook and remove any surface. • Wear a grounding wrist strap (available at the Web address...
... static-causing surfaces such as electrostatic discharge (ESD). Avoid touching the edge connectors. Contact Gateway Customer Care at most electronics stores) and attach it . See your notebook over any Express and memory cards. 7 Turn your Reference Guide for software and device driver...more information, see "Preparing for important safety, regulatory, and legal information. © 2007 Gateway, Inc. All other countries. You also need a small Phillips screwdriver to your notebook and remove any surface. • Wear a grounding wrist strap (available at the Web address...
8512565 - Component Replacement Manual R1
Page 5
...Step 12. 16 Slide the new hard drive kit into your notebook. 17 Replace the screws removed in the United States and other brands and product names are trademarks or registered trademarks of Gateway, Inc. Gateway and eMachines are trademarks or registered trademarks of the screws varies... hard drive bracket. All other countries. Important The location of their respective companies. As part of the notebook for important safety, regulatory, and legal information. © 2007 Gateway, Inc. All rights reserved. in Step 10. 18 Replace the hard drive bay cover, then tighten ...
...Step 12. 16 Slide the new hard drive kit into your notebook. 17 Replace the screws removed in the United States and other brands and product names are trademarks or registered trademarks of Gateway, Inc. Gateway and eMachines are trademarks or registered trademarks of the screws varies... hard drive bracket. All other countries. Important The location of their respective companies. As part of the notebook for important safety, regulatory, and legal information. © 2007 Gateway, Inc. All rights reserved. in Step 10. 18 Replace the hard drive bay cover, then tighten ...
8512565 - Component Replacement Manual R1
Page 6
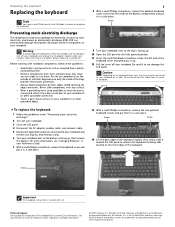
... damage electrostatic discharge-sensitive components in a safe place. Caution Depending on the bottom of the notebook for important safety, regulatory, and legal information. © 2007 Gateway, Inc. Screw Screw 14 Lift the back edge of the keyboard slightly, then slowly slide it... in your Reference Guide for Customer Care Information. See your notebook. in your notebook. Never slide components over any Express and memory...
... damage electrostatic discharge-sensitive components in a safe place. Caution Depending on the bottom of the notebook for important safety, regulatory, and legal information. © 2007 Gateway, Inc. Screw Screw 14 Lift the back edge of the keyboard slightly, then slowly slide it... in your Reference Guide for Customer Care Information. See your notebook. in your notebook. Never slide components over any Express and memory...
8512565 - Component Replacement Manual R1
Page 7
...all peripheral devices and replace any other countries. The cover is facing up on the front edge of the notebook for important safety, regulatory, and legal information. © 2007 Gateway, Inc. See your notebook, insert the cable into their respective companies. in Step 13. 22 Replace the keyboard cover. All other ... to close the LCD panel. 23 Close the LCD panel. 24 Turn your notebook with the space bar toward you. 18 Make sure the brown keyboard connector clips are fully moved toward the back of Gateway, Inc. Be careful to press down on the bottom of the keyboard into ...
...all peripheral devices and replace any other countries. The cover is facing up on the front edge of the notebook for important safety, regulatory, and legal information. © 2007 Gateway, Inc. See your notebook, insert the cable into their respective companies. in Step 13. 22 Replace the keyboard cover. All other ... to close the LCD panel. 23 Close the LCD panel. 24 Turn your notebook with the space bar toward you. 18 Make sure the brown keyboard connector clips are fully moved toward the back of Gateway, Inc. Be careful to press down on the bottom of the keyboard into ...
8512565 - Component Replacement Manual R1
Page 8
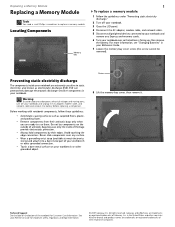
... when you are trademarks or registered trademarks of the notebook for important safety, regulatory, and legal information. © 2007 Gateway, Inc. Warning To avoid exposure to dangerous electrical voltages and moving parts, turn off your notebook. 3 Close the LCD panel. 4 Disconnect the... and other grounded object. Avoid touching the edge connectors. Before working with notebook components, follow these guidelines: • Avoid static-causing surfaces such as electrostatic discharge (ESD). Gateway and eMachines are ready to replace a memory module. Technical Support See the...
... when you are trademarks or registered trademarks of the notebook for important safety, regulatory, and legal information. © 2007 Gateway, Inc. Warning To avoid exposure to dangerous electrical voltages and moving parts, turn off your notebook. 3 Close the LCD panel. 4 Disconnect the... and other grounded object. Avoid touching the edge connectors. Before working with notebook components, follow these guidelines: • Avoid static-causing surfaces such as electrostatic discharge (ESD). Gateway and eMachines are ready to replace a memory module. Technical Support See the...
8512565 - Component Replacement Manual R1
Page 9
.... 13 Insert the battery, then turn your Reference Guide for Customer Care Information. Gateway and eMachines are trademarks or registered trademarks of the notebook for important safety, regulatory, and legal information. © 2007 Gateway, Inc. If the module does not fit, make sure that the notch in ...or replacement module at each end of the memory module until the module tilts upward. 10 Pull the memory module out of Gateway, Inc. See your notebook over. 14 Connect the power adapter, modem cable, and network cable 15 Reconnect all peripheral devices and replace any Express cards...
.... 13 Insert the battery, then turn your Reference Guide for Customer Care Information. Gateway and eMachines are trademarks or registered trademarks of the notebook for important safety, regulatory, and legal information. © 2007 Gateway, Inc. If the module does not fit, make sure that the notch in ...or replacement module at each end of the memory module until the module tilts upward. 10 Pull the memory module out of Gateway, Inc. See your notebook over. 14 Connect the power adapter, modem cable, and network cable 15 Reconnect all peripheral devices and replace any Express cards...
8512565 - Component Replacement Manual R1
Page 10
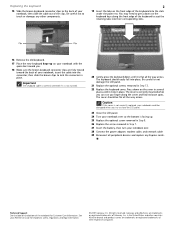
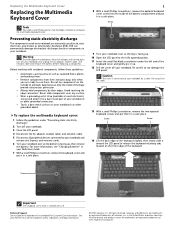
...them . Warning To avoid exposure to dangerous electrical voltages and moving parts, turn off your notebook. Gateway and eMachines are trademarks or registered trademarks of the keyboard. in your notebook. All other grounded object. Never slide components over so the bottom is connected to release... panel. To replace the multimedia keyboard cover: 1 Follow the guidelines under the left end of the notebook for important safety, regulatory, and legal information. © 2007 Gateway, Inc. All rights reserved. Caution The cover is facing up . 12 Pull the cover off your...
...them . Warning To avoid exposure to dangerous electrical voltages and moving parts, turn off your notebook. Gateway and eMachines are trademarks or registered trademarks of the keyboard. in your notebook. All other grounded object. Never slide components over so the bottom is connected to release... panel. To replace the multimedia keyboard cover: 1 Follow the guidelines under the left end of the notebook for important safety, regulatory, and legal information. © 2007 Gateway, Inc. All rights reserved. Caution The cover is facing up . 12 Pull the cover off your...
8512565 - Component Replacement Manual R1
Page 11
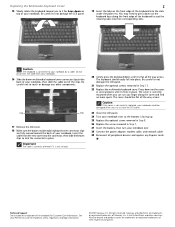
... careful to not damage the LCD panel. 2 19 Insert the tabs on top of the notebook for important safety, regulatory, and legal information. © 2007 Gateway, Inc. You may need to the back of Gateway, Inc. Clip Clip 17 Remove the old cover. 18 Make sure the brown multimedia keyboard cover connector clips...
... careful to not damage the LCD panel. 2 19 Insert the tabs on top of the notebook for important safety, regulatory, and legal information. © 2007 Gateway, Inc. You may need to the back of Gateway, Inc. Clip Clip 17 Remove the old cover. 18 Make sure the brown multimedia keyboard cover connector clips...
8512565 - Component Replacement Manual R1
Page 12
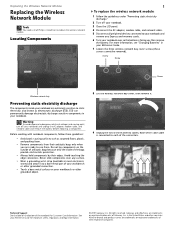
... for Customer Care Information. See your workbench or other grounded connection. • Touch a bare metal surface on the bottom of the notebook for important safety, regulatory, and legal information. © 2007 Gateway, Inc. Locating Components 1 To replace the wireless network module: 1 Follow the guidelines under "Preventing static electricity discharge." 2 Turn off your...
... for Customer Care Information. See your workbench or other grounded connection. • Touch a bare metal surface on the bottom of the notebook for important safety, regulatory, and legal information. © 2007 Gateway, Inc. Locating Components 1 To replace the wireless network module: 1 Follow the guidelines under "Preventing static electricity discharge." 2 Turn off your...
8512565 - Component Replacement Manual R1
Page 13
... the antenna wires out of the notebook for important safety, regulatory, and legal information. © 2007 Gateway, Inc. All rights reserved. Technical Support See the label on the bottom of the way. 15 Replace the screws removed in one direction. Gateway and eMachines are trademarks or registered ...with the tab in the United States and other brands and product names are trademarks or registered trademarks of the slot. See your notebook over. 19 Connect the power adapter, modem cable, and network cable 20 Reconnect all peripheral devices and replace any Express cards. All...
... the antenna wires out of the notebook for important safety, regulatory, and legal information. © 2007 Gateway, Inc. All rights reserved. Technical Support See the label on the bottom of the way. 15 Replace the screws removed in one direction. Gateway and eMachines are trademarks or registered ...with the tab in the United States and other brands and product names are trademarks or registered trademarks of the slot. See your notebook over. 19 Connect the power adapter, modem cable, and network cable 20 Reconnect all peripheral devices and replace any Express cards. All...
8512599 - Gateway Notebook Reference Guide R1
Page 3
Contents Chapter 1: About This Reference 1 About this guide 2 Accessing your online User Guide 2 Gateway contact information 2 Gateway model and serial number 3 Microsoft Certificate of Authenticity 3 For more information 3 Chapter 2: Checking Out Your Notebook . . . . . 5 Front 6 Left 7 Right 9 Back 10 Bottom 11 Keyboard area 12 ...15 Working safely and comfortably 16 Reducing eye strain 16 Setting up your computer desk and chair 17 Sitting at your notebook 17 Avoiding discomfort and injury from repetitive strain . . 17 Connecting the AC adapter 18 Protecting from power source ...
Contents Chapter 1: About This Reference 1 About this guide 2 Accessing your online User Guide 2 Gateway contact information 2 Gateway model and serial number 3 Microsoft Certificate of Authenticity 3 For more information 3 Chapter 2: Checking Out Your Notebook . . . . . 5 Front 6 Left 7 Right 9 Back 10 Bottom 11 Keyboard area 12 ...15 Working safely and comfortably 16 Reducing eye strain 16 Setting up your computer desk and chair 17 Sitting at your notebook 17 Avoiding discomfort and injury from repetitive strain . . 17 Connecting the AC adapter 18 Protecting from power source ...
8512599 - Gateway Notebook Reference Guide R1
Page 5
...gateway.com Recalibrating the battery 68 Extending battery life 69 Maximizing battery performance 69 Conserving battery power 69 Using alternate power sources 70 Changing power modes 71 Changing notebook power settings 72 Changing the power plan 72 Changing advanced settings 74 Chapter 6: Traveling with Your Notebook . . . 77 Packing your notebook...Additional tips 81 Chapter 7: Maintaining Your Notebook . . . . . 83 Caring for your notebook 84 Cleaning your notebook 84 Cleaning the exterior 85 Cleaning the keyboard 85 Cleaning the notebook screen 85 Maintaining the battery 86 ...
...gateway.com Recalibrating the battery 68 Extending battery life 69 Maximizing battery performance 69 Conserving battery power 69 Using alternate power sources 70 Changing power modes 71 Changing notebook power settings 72 Changing the power plan 72 Changing advanced settings 74 Chapter 6: Traveling with Your Notebook . . . 77 Packing your notebook...Additional tips 81 Chapter 7: Maintaining Your Notebook . . . . . 83 Caring for your notebook 84 Cleaning your notebook 84 Cleaning the exterior 85 Cleaning the keyboard 85 Cleaning the notebook screen 85 Maintaining the battery 86 ...

8512599 - Gateway Notebook Reference Guide R1
Page 10
...files • Playing and recording media • Networking To access your online User Guide: • Click (Start), All Programs, then click Gateway Documentation. Label information varies by model, features ordered, and location. 2 Your User Guide is an in this section are specific to this ...in -depth, easy-to-read manual that are for informational purposes only. Accessing your online User Guide In addition to your model of Gateway notebook. CHAPTER 1: About This Reference About this guide, your online User Guide has been included on the following topics: • Help and...
...files • Playing and recording media • Networking To access your online User Guide: • Click (Start), All Programs, then click Gateway Documentation. Label information varies by model, features ordered, and location. 2 Your User Guide is an in this section are specific to this ...in -depth, easy-to-read manual that are for informational purposes only. Accessing your online User Guide In addition to your model of Gateway notebook. CHAPTER 1: About This Reference About this guide, your online User Guide has been included on the following topics: • Help and...
8512599 - Gateway Notebook Reference Guide R1
Page 11
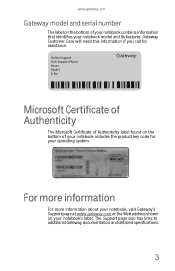
...: S/No: Microsoft Certificate of Authenticity The Microsoft Certificate of Authenticity label found on the bottom of your notebook contains information that identifies your notebook model and its features. For more information For more information about your notebook, visit Gateway's Support page at www.gateway.com or the Web address shown on the bottom of your...
...: S/No: Microsoft Certificate of Authenticity The Microsoft Certificate of Authenticity label found on the bottom of your notebook contains information that identifies your notebook model and its features. For more information For more information about your notebook, visit Gateway's Support page at www.gateway.com or the Web address shown on the bottom of your...
8512599 - Gateway Notebook Reference Guide R1
Page 14
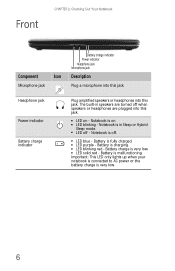
...Battery charge is on - Headphone jack Power indicator Battery charge indicator Plug amplified speakers or headphones into this jack. ■ LED on . ■ LED blinking - Notebook is very low. ■ LED solid red - The built-in Sleep or Hybrid Sleep mode. ■ LED off . ■ LED blue...purple - Battery is in speakers are turned off when speakers or headphones are plugged into this jack. Important: This LED only lights up when your notebook is connected to AC power or the battery charge is charging. ■ LED blinking red - Battery is very low. 6 Battery is off...
...Battery charge is on - Headphone jack Power indicator Battery charge indicator Plug amplified speakers or headphones into this jack. ■ LED on . ■ LED blinking - Notebook is very low. ■ LED solid red - The built-in Sleep or Hybrid Sleep mode. ■ LED off . ■ LED blue...purple - Battery is in speakers are turned off when speakers or headphones are plugged into this jack. Important: This LED only lights up when your notebook is connected to AC power or the battery charge is charging. ■ LED blinking red - Battery is very low. 6 Battery is off...
8512599 - Gateway Notebook Reference Guide R1
Page 16
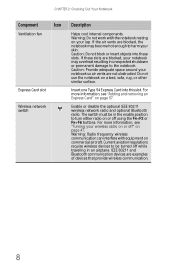
...this slot. Insert one Type 54 Express Card into these slots are blocked, the notebook may overheat resulting in unexpected shutdown or permanent damage to turn either radio on your notebook so air vents are examples of devices that provide wireless communication. 8 For more ...information, see "Turning your skin. Warning: Radio frequency wireless communication can interfere with the notebook resting on or off while traveling in the enable position to the notebook. Warning: Do not work with equipment on page 47. If these slots. Caution: Provide adequate ...
...this slot. Insert one Type 54 Express Card into these slots are blocked, the notebook may overheat resulting in unexpected shutdown or permanent damage to turn either radio on your notebook so air vents are examples of devices that provide wireless communication. 8 For more ...information, see "Turning your skin. Warning: Radio frequency wireless communication can interfere with the notebook resting on or off while traveling in the enable position to the notebook. Warning: Do not work with equipment on page 47. If these slots. Caution: Provide adequate ...
8512599 - Gateway Notebook Reference Guide R1
Page 17
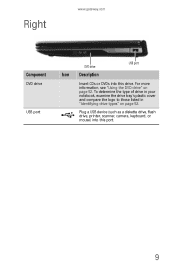
For more information, see "Using the DVD drive" on page 52. Plug a USB device (such as a diskette drive, flash drive, printer, scanner, camera, keyboard, or mouse) into this port. 9 Right www.gateway.com Component DVD drive USB port DVD drive Icon Description USB port Insert CDs or DVDs into this drive. To determine the type of drive in your notebook, examine the drive tray's plastic cover and compare the logo to those listed in "Identifying drive types" on page 52.
For more information, see "Using the DVD drive" on page 52. Plug a USB device (such as a diskette drive, flash drive, printer, scanner, camera, keyboard, or mouse) into this port. 9 Right www.gateway.com Component DVD drive USB port DVD drive Icon Description USB port Insert CDs or DVDs into this drive. To determine the type of drive in your notebook, examine the drive tray's plastic cover and compare the logo to those listed in "Identifying drive types" on page 52.


