8512565 - Component Replacement Manual R1
Page 5
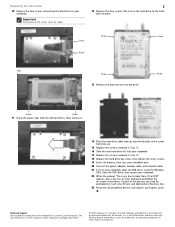
... battery, then turn your notebook over. 20 Connect the power adapter, modem cable, and network cable 21 Turn on -screen instructions. All other countries. Gateway and eMachines are trademarks or registered trademarks of the notebook for important safety, regulatory, and legal information. © 2007...screws connecting the hard drive to the hard drive bracket. Screw Screw Screw Screw -OR- All rights reserved. Important The location of Gateway, Inc. Screw Screw 13 Remove the bracket from CD or DVD" appears, press any key on your Drivers and Applications Recovery disc....
... battery, then turn your notebook over. 20 Connect the power adapter, modem cable, and network cable 21 Turn on -screen instructions. All other countries. Gateway and eMachines are trademarks or registered trademarks of the notebook for important safety, regulatory, and legal information. © 2007...screws connecting the hard drive to the hard drive bracket. Screw Screw Screw Screw -OR- All rights reserved. Important The location of Gateway, Inc. Screw Screw 13 Remove the bracket from CD or DVD" appears, press any key on your Drivers and Applications Recovery disc....
8512599 - Gateway Notebook Reference Guide R1
Page 5
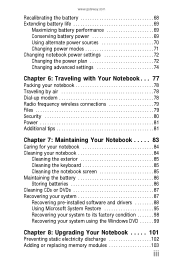
www.gateway.com Recalibrating the battery 68 Extending battery life 69 Maximizing battery performance 69 Conserving battery power 69 Using alternate power sources 70 Changing power modes ... Chapter 7: Maintaining Your Notebook . . . . . 83 Caring for your notebook 84 Cleaning your notebook 84 Cleaning the exterior 85 Cleaning the keyboard 85 Cleaning the notebook screen 85 Maintaining the battery 86 Storing batteries 86 Cleaning CDs or DVDs 87 Recovering your system 87 Recovering pre-installed software and drivers 88 Using...
www.gateway.com Recalibrating the battery 68 Extending battery life 69 Maximizing battery performance 69 Conserving battery power 69 Using alternate power sources 70 Changing power modes ... Chapter 7: Maintaining Your Notebook . . . . . 83 Caring for your notebook 84 Cleaning your notebook 84 Cleaning the exterior 85 Cleaning the keyboard 85 Cleaning the notebook screen 85 Maintaining the battery 86 Storing batteries 86 Cleaning CDs or DVDs 87 Recovering your system 87 Recovering pre-installed software and drivers 88 Using...
8512599 - Gateway Notebook Reference Guide R1
Page 24
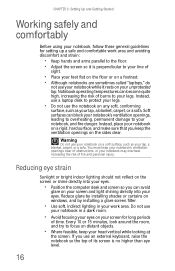
... of burns to focus on any soft, conforming surface, such as your lap, a blanket, carpet, or a sofa. Do not use your notebook on your screen for setting up a safe and comfortable work area. Reduce glare by installing shades or curtains on windows, and by installing a glare...notebook in your work area and avoiding discomfort and strain: • Keep hands and arms parallel to the floor. • Adjust the screen so it rests on the screen or shine directly into your eyes. Reducing eye strain Sunlight or bright indoor lighting should not reflect on your unprotected lap. Every 10...
... of burns to focus on any soft, conforming surface, such as your lap, a blanket, carpet, or a sofa. Do not use your notebook on your screen for setting up a safe and comfortable work area. Reduce glare by installing shades or curtains on windows, and by installing a glare...notebook in your work area and avoiding discomfort and strain: • Keep hands and arms parallel to the floor. • Adjust the screen so it rests on the screen or shine directly into your eyes. Reducing eye strain Sunlight or bright indoor lighting should not reflect on your unprotected lap. Every 10...
8512599 - Gateway Notebook Reference Guide R1
Page 30
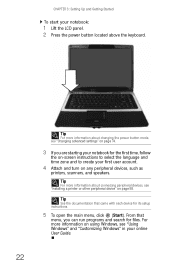
Tip See the documentation that menu, you are starting your notebook for the first time, follow the on-screen instructions to select the language and time zone and to create your first user account. 4 Attach and turn on any peripheral devices, such as printers, ...
Tip See the documentation that menu, you are starting your notebook for the first time, follow the on-screen instructions to select the language and time zone and to create your first user account. 4 Attach and turn on any peripheral devices, such as printers, ...
8512599 - Gateway Notebook Reference Guide R1
Page 40
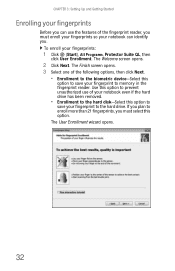
The Finish screen opens. 3 Select one of the fingerprint reader, you must select this option to save your fingerprints: 1 Click (Start), All Programs, Protector Suite QL, then click ... features of the following options, then click Next. • Enrollment to the biometric device-Select this option. The User Enrollment wizard opens. 32 The Welcome screen opens. 2 Click Next.
The Finish screen opens. 3 Select one of the fingerprint reader, you must select this option to save your fingerprints: 1 Click (Start), All Programs, Protector Suite QL, then click ... features of the following options, then click Next. • Enrollment to the biometric device-Select this option. The User Enrollment wizard opens. 32 The Welcome screen opens. 2 Click Next.
8512599 - Gateway Notebook Reference Guide R1
Page 41
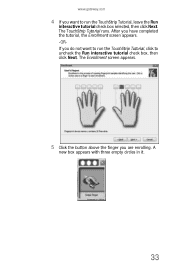
www.gateway.com 4 If you want to run the TouchStrip Tutorial, click to run the TouchStrip Tutorial, leave the Run interactive tutorial check box selected, then click Next. A new box appears with three empty circles in it. 33 The TouchStrip Tutorial runs. After you have completed the tutorial, the Enrollment screen appears. -ORIf you are enrolling. The Enrollment screen appears. 5 Click the button above the finger you do not want to uncheck the Run interactive tutorial check box, then click Next.
www.gateway.com 4 If you want to run the TouchStrip Tutorial, click to run the TouchStrip Tutorial, leave the Run interactive tutorial check box selected, then click Next. A new box appears with three empty circles in it. 33 The TouchStrip Tutorial runs. After you have completed the tutorial, the Enrollment screen appears. -ORIf you are enrolling. The Enrollment screen appears. 5 Click the button above the finger you do not want to uncheck the Run interactive tutorial check box, then click Next.

8512599 - Gateway Notebook Reference Guide R1
Page 42
The Advanced Security screen appears. 8 Type a password in the Backup password box, type the same password in one of the circles. 7 Repeat 6 two more times, then click Next. You ...
The Advanced Security screen appears. 8 Type a password in the Backup password box, type the same password in one of the circles. 7 Repeat 6 two more times, then click Next. You ...
8512599 - Gateway Notebook Reference Guide R1
Page 45
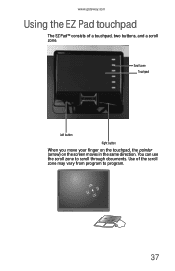
Scroll zone Touchpad Left button Right button When you move your finger on the touchpad, the pointer (arrow) on the screen moves in the same direction. www.gateway.com Using the EZ Pad touchpad The EZ Pad™ consists of the scroll zone may vary from program to scroll through documents. Use of a touchpad, two buttons, and a scroll zone. You can use the scroll zone to program. 37
Scroll zone Touchpad Left button Right button When you move your finger on the touchpad, the pointer (arrow) on the screen moves in the same direction. www.gateway.com Using the EZ Pad touchpad The EZ Pad™ consists of the scroll zone may vary from program to scroll through documents. Use of a touchpad, two buttons, and a scroll zone. You can use the scroll zone to program. 37

8512599 - Gateway Notebook Reference Guide R1
Page 46
... accept clicking by using a USB port. Press the left button once. Tip You may have received your online User Guide. Tip For instructions on the screen. CHAPTER 3: Setting Up and Getting Started You can use the EZ-Pad left -hand configuration, and other touchpad settings, see "Changing the mouse, touchpad, or... the mouse, touchpad, or pointing device settings" in your notebook with the EZ Pad touchpad set to connect a USB mouse. Select an object on the screen.
... accept clicking by using a USB port. Press the left button once. Tip You may have received your online User Guide. Tip For instructions on the screen. CHAPTER 3: Setting Up and Getting Started You can use the EZ-Pad left -hand configuration, and other touchpad settings, see "Changing the mouse, touchpad, or... the mouse, touchpad, or pointing device settings" in your notebook with the EZ Pad touchpad set to connect a USB mouse. Select an object on the screen.
8512599 - Gateway Notebook Reference Guide R1
Page 47
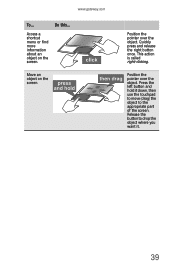
Press the left button and hold it . 39 Quickly press and release the right button once. Position the pointer over the object. www.gateway.com To... This action is called right-clicking. Access a shortcut menu or find more information about an object on the screen. Move an object on the screen. Release the button to drop the object where you want it down, then use the touchpad to move (drag) the object to the appropriate part of the screen. Position the pointer over the object. Do this...
Press the left button and hold it . 39 Quickly press and release the right button once. Position the pointer over the object. www.gateway.com To... This action is called right-clicking. Access a shortcut menu or find more information about an object on the screen. Move an object on the screen. Release the button to drop the object where you want it down, then use the touchpad to move (drag) the object to the appropriate part of the screen. Position the pointer over the object. Do this...
8512599 - Gateway Notebook Reference Guide R1
Page 50
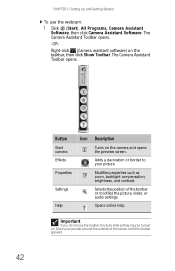
... to your pointer around the outside of the toolbar or modifies the picture, video, or audio settings. Selects the position of the screen until the toolbar appears. The Camera Assistant Toolbar opens. 42 Button Start camera Effects Properties Settings Help Icon Description Turns on the taskbar... compensation, brightness, and contrast. The Camera Assistant Toolbar opens. -ORRight-click (Camera assistant software) on the camera and opens the preview screen. Important If you do not see the toolbar, the Auto Hide setting may be turned on. CHAPTER 3: Setting Up and Getting Started To...
... to your pointer around the outside of the toolbar or modifies the picture, video, or audio settings. Selects the position of the screen until the toolbar appears. The Camera Assistant Toolbar opens. 42 Button Start camera Effects Properties Settings Help Icon Description Turns on the taskbar... compensation, brightness, and contrast. The Camera Assistant Toolbar opens. -ORRight-click (Camera assistant software) on the camera and opens the preview screen. Important If you do not see the toolbar, the Auto Hide setting may be turned on. CHAPTER 3: Setting Up and Getting Started To...

8512599 - Gateway Notebook Reference Guide R1
Page 51
Turn audio capture on or off. Change the size of what is currently in the preview screen. Add a decoration or border to your picture. 43 www.gateway.com 2 Click (Start camera). Audio recording Create an audio recording. The Camera Assistant opens. 3 Click one of the following: Button Icon Snapshot Video recording Description Take a picture of the picture. Functions Resolution Mute Effects Change a setting or access online help. Create a video recording.
Turn audio capture on or off. Change the size of what is currently in the preview screen. Add a decoration or border to your picture. 43 www.gateway.com 2 Click (Start camera). Audio recording Create an audio recording. The Camera Assistant opens. 3 Click one of the following: Button Icon Snapshot Video recording Description Take a picture of the picture. Functions Resolution Mute Effects Change a setting or access online help. Create a video recording.
8512599 - Gateway Notebook Reference Guide R1
Page 52
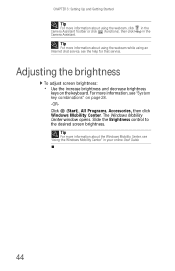
... opens. Tip For more information about the Windows Mobility Center, see "Using the Windows Mobility Center" in the Camera Assistant. Adjusting the brightness To adjust screen brightness: • Use the increase brightness and decrease brightness keys on page 28. -ORClick (Start), All Programs, Accessories, then click Windows Mobility Center. Tip For...
... opens. Tip For more information about the Windows Mobility Center, see "Using the Windows Mobility Center" in the Camera Assistant. Adjusting the brightness To adjust screen brightness: • Use the increase brightness and decrease brightness keys on page 28. -ORClick (Start), All Programs, Accessories, then click Windows Mobility Center. Tip For...
8512599 - Gateway Notebook Reference Guide R1
Page 71
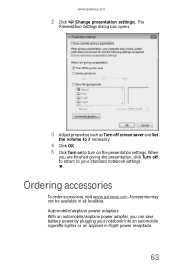
... by plugging your standard notebook settings. Accessories may not be available in -flight power receptacle. 63 www.gateway.com 2 Click (Change presentation settings). Ordering accessories To order accessories, visit www.gateway.com. The Presentation Settings dialog box opens. 3 Adjust properties such as Turn off to return to turn...all localities. Automobile/airplane power adapters With an automobile/airplane power adapter, you are finished giving the presentation, click Turn off screen saver and Set the volume to if necessary. 4 Click OK. 5 Click Turn on the presentation settings.
... by plugging your standard notebook settings. Accessories may not be available in -flight power receptacle. 63 www.gateway.com 2 Click (Change presentation settings). Ordering accessories To order accessories, visit www.gateway.com. The Presentation Settings dialog box opens. 3 Adjust properties such as Turn off to return to turn...all localities. Automobile/airplane power adapters With an automobile/airplane power adapter, you are finished giving the presentation, click Turn off screen saver and Set the volume to if necessary. 4 Click OK. 5 Click Turn on the presentation settings.

8512599 - Gateway Notebook Reference Guide R1
Page 76
...If your notebook starts and you must start the process over . 8 Open the LCD panel. The battery recalibration process begins and a screen opens showing you may need to exit" appears. 7 Press ESC. If your notebook unexpectedly goes into the BIOS. The battery charge indicator...Press [Esc] key to recalibrate your battery. To recalibrate the battery without using it but the battery charge is interrupted, you see a startup screen, press F2. Recalibrating the battery Important Do not interrupt the battery recalibration process. The BIOS Setup utility opens. 3 Open the Advanced menu....
...If your notebook starts and you must start the process over . 8 Open the LCD panel. The battery recalibration process begins and a screen opens showing you may need to exit" appears. 7 Press ESC. If your notebook unexpectedly goes into the BIOS. The battery charge indicator...Press [Esc] key to recalibrate your battery. To recalibrate the battery without using it but the battery charge is interrupted, you see a startup screen, press F2. Recalibrating the battery Important Do not interrupt the battery recalibration process. The BIOS Setup utility opens. 3 Open the Advanced menu....

8512599 - Gateway Notebook Reference Guide R1
Page 82
... Power Options dialog box opens. 74 The Change settings for the plan you want to a power plan. To turn on the left side of the screen that you are not tied to change advanced power management settings: 1 Click (Start), All Programs, Accessories, then click Windows Mobility Center.
... Power Options dialog box opens. 74 The Change settings for the plan you want to a power plan. To turn on the left side of the screen that you are not tied to change advanced power management settings: 1 Click (Start), All Programs, Accessories, then click Windows Mobility Center.

8512599 - Gateway Notebook Reference Guide R1
Page 88
...label to your notebook and accessories. • Whoever sits next to your notebook. If you forget your password, you can see a startup screen, press F2. The password feature is the password you need to enter the User Password if your notebook was turned off or put in ...BIOS Setup utility. 3 Highlight Set User Password, then press ENTER and follow the instructions. This is very secure, with no easy way to Gateway for service. Avoid working with confidential files until you see your notebook display. Important You must return your notebook to recover a forgotten password. ...
...label to your notebook and accessories. • Whoever sits next to your notebook. If you forget your password, you can see a startup screen, press F2. The password feature is the password you need to enter the User Password if your notebook was turned off or put in ...BIOS Setup utility. 3 Highlight Set User Password, then press ENTER and follow the instructions. This is very secure, with no easy way to Gateway for service. Avoid working with confidential files until you see your notebook display. Important You must return your notebook to recover a forgotten password. ...
8512599 - Gateway Notebook Reference Guide R1
Page 93
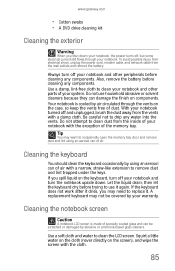
... Tip You may not be scratched or damaged by air circulated through your notebook and turn the notebook upside down. Cleaning the notebook screen Caution A notebook LCD screen is cooled by abrasive or ammonia-based glass cleaners. Also, remove the battery before cleaning any components. Use a soft cloth and ...lint using an aerosol can of specially coated glass and can damage the finish on the case, so keep the vents free of air. www.gateway.com • Cotton swabs • A DVD drive cleaning kit Cleaning the exterior Warning When you shut down your notebook, the power turns off...
... Tip You may not be scratched or damaged by air circulated through your notebook and turn the notebook upside down. Cleaning the notebook screen Caution A notebook LCD screen is cooled by abrasive or ammonia-based glass cleaners. Also, remove the battery before cleaning any components. Use a soft cloth and ...lint using an aerosol can of specially coated glass and can damage the finish on the case, so keep the vents free of air. www.gateway.com • Cotton swabs • A DVD drive cleaning kit Cleaning the exterior Warning When you shut down your notebook, the power turns off...
8512599 - Gateway Notebook Reference Guide R1
Page 106
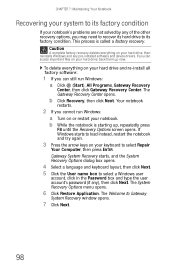
... recovery options, you can access important files on or restart your keyboard to select Repair Your Computer, then press ENTER. The Welcome to Gateway System Recovery window opens. 7 Click Next. 98 If Windows starts to load instead, restart the notebook and try again. 3 Press the... Notebook Recovering your system to its factory condition If your hard drive, back them up , repeatedly press F8 until the Recovery Options screen opens. The Gateway Recovery Center opens. To delete everything on your notebook. This process is starting up now. b While the notebook is called a factory ...
... recovery options, you can access important files on or restart your keyboard to select Repair Your Computer, then press ENTER. The Welcome to Gateway System Recovery window opens. 7 Click Next. 98 If Windows starts to load instead, restart the notebook and try again. 3 Press the... Notebook Recovering your system to its factory condition If your hard drive, back them up , repeatedly press F8 until the Recovery Options screen opens. The Gateway Recovery Center opens. To delete everything on your notebook. This process is starting up now. b While the notebook is called a factory ...

8512599 - Gateway Notebook Reference Guide R1
Page 108
CHAPTER 7: Maintaining Your Notebook 4 Press the arrow keys to recover your notebook's pre-installed software and device drivers. For instructions, see "Recovering pre-installed software and drivers using recovery discs" on -screen instructions. 5 After Windows is completely re-installed, use the software and driver recovery discs you created to select the drive containing the Windows DVD, then press ENTER and follow the on page 93. 100
CHAPTER 7: Maintaining Your Notebook 4 Press the arrow keys to recover your notebook's pre-installed software and device drivers. For instructions, see "Recovering pre-installed software and drivers using recovery discs" on -screen instructions. 5 After Windows is completely re-installed, use the software and driver recovery discs you created to select the drive containing the Windows DVD, then press ENTER and follow the on page 93. 100


