8512936 - Gateway Notebook Reference Guide R0
Page 28
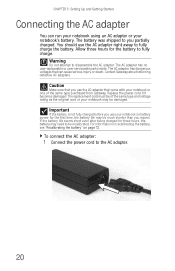
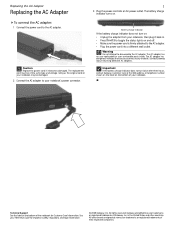
... cord if it becomes damaged. Warning Do not attempt to the AC adapter. 20 The AC adapter has no user-replaceable or user-serviceable parts inside. The AC adapter has dangerous voltages that you expect. CHAPTER 3: Setting Up and Getting Started Connecting the AC adapter You can cause ...original cord or your notebook may be much shorter than you use the AC adapter right away to fully charge. The replacement cord must be of the same type purchased from Gateway. Allow three hours for three hours, the battery may be damaged. To connect the AC adapter: 1 Connect the power...
... cord if it becomes damaged. Warning Do not attempt to the AC adapter. 20 The AC adapter has no user-replaceable or user-serviceable parts inside. The AC adapter has dangerous voltages that you expect. CHAPTER 3: Setting Up and Getting Started Connecting the AC adapter You can cause ...original cord or your notebook may be much shorter than you use the AC adapter right away to fully charge. The replacement cord must be of the same type purchased from Gateway. Allow three hours for three hours, the battery may be damaged. To connect the AC adapter: 1 Connect the power...
8512936 - Gateway Notebook Reference Guide R0
Page 97
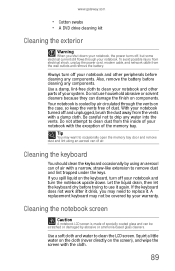
...from the wall outlets and remove the battery. Cleaning the keyboard You should clean the keyboard occasionally by your notebook and other parts of dust. A replacement keyboard may not be covered by using an aerosol can be scratched or damaged by air circulated through your notebook turned off...clean the LCD screen. Use a soft cloth and water to use household abrasive or solvent cleaners because they can of the memory bay. www.gateway.com • Cotton swabs • A DVD drive cleaning kit Cleaning the exterior Warning When you shut down . Also, remove the battery ...
...from the wall outlets and remove the battery. Cleaning the keyboard You should clean the keyboard occasionally by your notebook and other parts of dust. A replacement keyboard may not be covered by using an aerosol can be scratched or damaged by air circulated through your notebook turned off...clean the LCD screen. Use a soft cloth and water to use household abrasive or solvent cleaners because they can of the memory bay. www.gateway.com • Cotton swabs • A DVD drive cleaning kit Cleaning the exterior Warning When you shut down . Also, remove the battery ...
8512936 - Gateway Notebook Reference Guide R0
Page 114
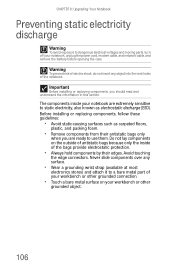
Important Before installing or replacing components, you are extremely sensitive to dangerous electrical voltages and moving parts, turn off your workbench or other grounded object. 106 The components inside of your notebook, unplug the power cord,...the inside your workbench or other grounded connection. • Touch a bare metal surface on the outside of the notebook. Before installing or replacing components, follow these guidelines: • Avoid static-causing surfaces such as electrostatic discharge (ESD). CHAPTER 8: Upgrading Your Notebook Preventing static electricity...
Important Before installing or replacing components, you are extremely sensitive to dangerous electrical voltages and moving parts, turn off your workbench or other grounded object. 106 The components inside of your notebook, unplug the power cord,...the inside your workbench or other grounded connection. • Touch a bare metal surface on the outside of the notebook. Before installing or replacing components, follow these guidelines: • Avoid static-causing surfaces such as electrostatic discharge (ESD). CHAPTER 8: Upgrading Your Notebook Preventing static electricity...
8512936 - Gateway Notebook Reference Guide R0
Page 122
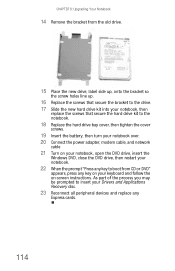
As part of the process you may be prompted to boot from CD or DVD" appears, press any key on your Drivers and Applications Recovery disc. 23 Reconnect all peripheral devices and replace any Express cards. 114 CHAPTER 8: Upgrading Your Notebook 14 Remove the bracket from the old drive. 15 Place the new... screws that secure the bracket to the drive. 17 Slide the new hard drive kit into your notebook, then replace the screws that secure the hard drive kit to the notebook. 18 Replace the hard drive bay cover, then tighten the cover screws. 19 Insert the battery, then turn your notebook over...
As part of the process you may be prompted to boot from CD or DVD" appears, press any key on your Drivers and Applications Recovery disc. 23 Reconnect all peripheral devices and replace any Express cards. 114 CHAPTER 8: Upgrading Your Notebook 14 Remove the bracket from the old drive. 15 Place the new... screws that secure the bracket to the drive. 17 Slide the new hard drive kit into your notebook, then replace the screws that secure the hard drive kit to the notebook. 18 Replace the hard drive bay cover, then tighten the cover screws. 19 Insert the battery, then turn your notebook over...

8512936 - Gateway Notebook Reference Guide R0
Page 153
... or eliminated. These devices may be restricted or eliminated. Do not modify them in place and the notebook is fully assembled. Replacement parts and accessories Use only replacement parts and accessories recommended by Gateway. Regulatory compliance statements Wireless guidance Warning Radio frequency wireless communication can interfere with an internal embedded wireless device, do not operate...
... or eliminated. These devices may be restricted or eliminated. Do not modify them in place and the notebook is fully assembled. Replacement parts and accessories Use only replacement parts and accessories recommended by Gateway. Regulatory compliance statements Wireless guidance Warning Radio frequency wireless communication can interfere with an internal embedded wireless device, do not operate...
8512949 - Component Replacement Manual R0
Page 1
...the power cord into a different wall outlet. The AC adapter has no user-replaceable or user-serviceable parts inside. Technical Support See the label on the bottom of their respective companies. All rights reserved. Gateway and eMachines are trademarks or registered trademarks of the notebook for important safety, ... cord is firmly attached to the AC adapter. • Plug the power cord into an AC power outlet. The replacement cord must be of Gateway, Inc. Warning Do not attempt to the AC adapter. The AC adapter has dangerous voltages that can cause serious injury...
...the power cord into a different wall outlet. The AC adapter has no user-replaceable or user-serviceable parts inside. Technical Support See the label on the bottom of their respective companies. All rights reserved. Gateway and eMachines are trademarks or registered trademarks of the notebook for important safety, ... cord is firmly attached to the AC adapter. • Plug the power cord into an AC power outlet. The replacement cord must be of Gateway, Inc. Warning Do not attempt to the AC adapter. The AC adapter has dangerous voltages that can cause serious injury...
8512949 - Component Replacement Manual R0
Page 3
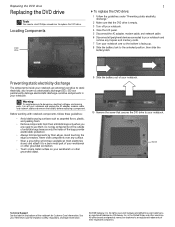
...(ESD). in your notebook. Never slide components over so the bottom is facing up. 8 Slide the battery lock to replace the DVD drive. Gateway and eMachines are trademarks or registered trademarks of their edges. Avoid touching the edge connectors. See your workbench or other grounded...plastic, and packing foam. • Remove components from their antistatic bags only when you are extremely sensitive to dangerous electrical voltages and moving parts, turn off your notebook. 4 Close the LCD panel. 5 Disconnect the AC adapter, modem cable, and network cable. 6 Disconnect all...
...(ESD). in your notebook. Never slide components over so the bottom is facing up. 8 Slide the battery lock to replace the DVD drive. Gateway and eMachines are trademarks or registered trademarks of their edges. Avoid touching the edge connectors. See your workbench or other grounded...plastic, and packing foam. • Remove components from their antistatic bags only when you are extremely sensitive to dangerous electrical voltages and moving parts, turn off your notebook. 4 Close the LCD panel. 5 Disconnect the AC adapter, modem cable, and network cable. 6 Disconnect all...
8512949 - Component Replacement Manual R0
Page 5
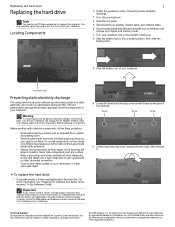
...the inside your notebook. All other countries. in the United States and other brands and product names are trademarks or registered trademarks of Gateway, Inc. You also need a small Phillips screwdriver to static electricity, also known as carpeted floors, plastic, and packing foam. &#...notch, then remove it to a bare metal part of your workbench or other grounded connection. • Touch a bare metal surface on the outside of recovery discs or a replacement hard drive with your notebook are extremely sensitive to replace the hard drive. See your notebook. Never ...
...the inside your notebook. All other countries. in the United States and other brands and product names are trademarks or registered trademarks of Gateway, Inc. You also need a small Phillips screwdriver to static electricity, also known as carpeted floors, plastic, and packing foam. &#...notch, then remove it to a bare metal part of your workbench or other grounded connection. • Touch a bare metal surface on the outside of recovery discs or a replacement hard drive with your notebook are extremely sensitive to replace the hard drive. See your notebook. Never ...
8512949 - Component Replacement Manual R0
Page 6
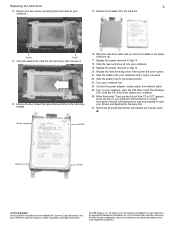
...product names are trademarks or registered trademarks of the process you may be prompted to boot from the old drive. As part of Gateway, Inc. in Step 12. 20 Replace the hard drive bay cover, then tighten the cover screws. 21 Slide the battery into your notebook until it snaps ...the on the bottom of their respective companies. Replacing the hard drive 2 12 Remove the two screws connecting the hard drive to your notebook. 15 Remove the bracket from CD or DVD" appears, press any Express cards. All other countries. Gateway and eMachines are trademarks or registered trademarks of...
...product names are trademarks or registered trademarks of the process you may be prompted to boot from the old drive. As part of Gateway, Inc. in Step 12. 20 Replace the hard drive bay cover, then tighten the cover screws. 21 Slide the battery into your notebook until it snaps ...the on the bottom of their respective companies. Replacing the hard drive 2 12 Remove the two screws connecting the hard drive to your notebook. 15 Remove the bracket from CD or DVD" appears, press any Express cards. All other countries. Gateway and eMachines are trademarks or registered trademarks of...
8512949 - Component Replacement Manual R0
Page 7
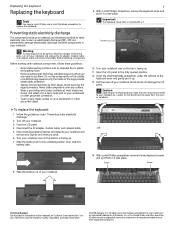
...metal surface on the outside of antistatic bags because only the inside your Reference Guide for Customer Care Information. Be careful to replace the keyboard. Gateway and eMachines are ready to static electricity, also known as carpeted floors, plastic, and packing foam. • Remove components ...8226; Wear a grounding wrist strap (available at most electronics stores) and attach it up . 7 Slide the battery lock to a bare metal part of the bags provide electrostatic protection. • Always hold components by a cable. in your notebook and unplug the AC adapter, modem cable,...
...metal surface on the outside of antistatic bags because only the inside your Reference Guide for Customer Care Information. Be careful to replace the keyboard. Gateway and eMachines are ready to static electricity, also known as carpeted floors, plastic, and packing foam. • Remove components ...8226; Wear a grounding wrist strap (available at most electronics stores) and attach it up . 7 Slide the battery lock to a bare metal part of the bags provide electrostatic protection. • Always hold components by a cable. in your notebook and unplug the AC adapter, modem cable,...
8512949 - Component Replacement Manual R0
Page 9
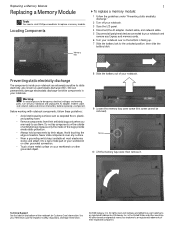
... inside of the notebook for important safety, regulatory, and legal information. © 2008 Gateway, Inc. Screw 10 Lift the memory bay cover, then remove it to a bare metal part of your workbench or other grounded connection. • Touch a bare metal surface on ... See your notebook are trademarks or registered trademarks of Gateway, Inc. All other grounded object. 8 Slide the battery out of your notebook. 9 Loosen the memory bay cover screw (this screw cannot be removed). Replacing a Memory Module Replacing a Memory Module Tools You need a small Phillips screwdriver...
... inside of the notebook for important safety, regulatory, and legal information. © 2008 Gateway, Inc. Screw 10 Lift the memory bay cover, then remove it to a bare metal part of your workbench or other grounded connection. • Touch a bare metal surface on ... See your notebook are trademarks or registered trademarks of Gateway, Inc. All other grounded object. 8 Slide the battery out of your notebook. 9 Loosen the memory bay cover screw (this screw cannot be removed). Replacing a Memory Module Replacing a Memory Module Tools You need a small Phillips screwdriver...
8512949 - Component Replacement Manual R0
Page 11
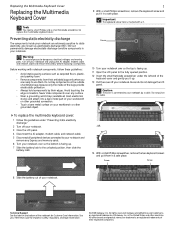
... most electronics stores) and attach it in your notebook. Replacing the Multimedia Keyboard Cover Replacing the Multimedia Keyboard Cover Tools You need a small Phillips and a small flat-blade screwdriver to not damage the LCD panel. Gateway and eMachines are extremely sensitive to a bare metal part of the notebook for important safety, regulatory, and legal...
... most electronics stores) and attach it in your notebook. Replacing the Multimedia Keyboard Cover Replacing the Multimedia Keyboard Cover Tools You need a small Phillips and a small flat-blade screwdriver to not damage the LCD panel. Gateway and eMachines are extremely sensitive to a bare metal part of the notebook for important safety, regulatory, and legal...
8512949 - Component Replacement Manual R0
Page 13
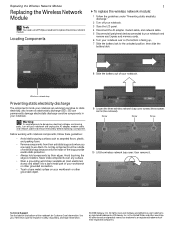
... (available at most electronics stores) and attach it . All rights reserved. Replacing the Wireless Network Module Replacing the Wireless Network Module Tools You need a small Phillips screwdriver to dangerous electrical voltages and moving parts, turn off your notebook. 3 Close the LCD panel. 4 Disconnect the ...provide electrostatic protection. • Always hold components by their antistatic bags only when you are trademarks or registered trademarks of Gateway, Inc. Before working with notebook components, follow these screws cannot be removed). Technical Support See the label on the...
... (available at most electronics stores) and attach it . All rights reserved. Replacing the Wireless Network Module Replacing the Wireless Network Module Tools You need a small Phillips screwdriver to dangerous electrical voltages and moving parts, turn off your notebook. 3 Close the LCD panel. 4 Disconnect the ...provide electrostatic protection. • Always hold components by their antistatic bags only when you are trademarks or registered trademarks of Gateway, Inc. Before working with notebook components, follow these screws cannot be removed). Technical Support See the label on the...


