8512936 - Gateway Notebook Reference Guide R0
Page 3
... 1: About This Reference 1 About this guide 2 Accessing your online User Guide 2 Gateway contact information 2 Contacting Gateway Customer Care 2 Gateway model and serial number 3 Microsoft Certificate of Authenticity 3 For more information 3 Chapter 2: Checking Out Your Notebook . . . . . 5 Front 6 Left 7 Right 9 Back 10 Bottom ...17 Working safely and comfortably 18 Reducing eye strain 18 Setting up your computer desk and chair 19 Sitting at your notebook 19 Avoiding discomfort and injury from repetitive strain . . 19 Connecting the AC adapter 20 Protecting from power source ...
... 1: About This Reference 1 About this guide 2 Accessing your online User Guide 2 Gateway contact information 2 Contacting Gateway Customer Care 2 Gateway model and serial number 3 Microsoft Certificate of Authenticity 3 For more information 3 Chapter 2: Checking Out Your Notebook . . . . . 5 Front 6 Left 7 Right 9 Back 10 Bottom ...17 Working safely and comfortably 18 Reducing eye strain 18 Setting up your computer desk and chair 19 Sitting at your notebook 19 Avoiding discomfort and injury from repetitive strain . . 19 Connecting the AC adapter 20 Protecting from power source ...
8512936 - Gateway Notebook Reference Guide R0
Page 5
...gateway.com Recalibrating the battery 72 Extending battery life 73 Maximizing battery performance 73 Conserving battery power 73 Using alternate power sources 74 Changing power modes 75 Changing notebook power settings 76 Changing the power plan 76 Changing advanced settings 78 Chapter 6: Traveling with Your Notebook . . . 81 Packing your notebook...Additional tips 85 Chapter 7: Maintaining Your Notebook . . . . . 87 Caring for your notebook 88 Cleaning your notebook 88 Cleaning the exterior 89 Cleaning the keyboard 89 Cleaning the notebook screen 89 Maintaining the battery 90 ...
...gateway.com Recalibrating the battery 72 Extending battery life 73 Maximizing battery performance 73 Conserving battery power 73 Using alternate power sources 74 Changing power modes 75 Changing notebook power settings 76 Changing the power plan 76 Changing advanced settings 78 Chapter 6: Traveling with Your Notebook . . . 81 Packing your notebook...Additional tips 85 Chapter 7: Maintaining Your Notebook . . . . . 87 Caring for your notebook 88 Cleaning your notebook 88 Cleaning the exterior 89 Cleaning the keyboard 89 Cleaning the notebook screen 89 Maintaining the battery 90 ...
8512936 - Gateway Notebook Reference Guide R0
Page 10
... has been included on the bottom of Gateway notebook. Label information varies by model, features ordered, and location. Gateway contact information Important The labels shown in -depth, easy-to your model of your notebook contains information about contacting Gateway Customer Care. 2 Your User Guide is... an in this section are specific to -read manual that are for informational purposes only. Contacting Gateway Customer Care A label on your hard drive....
... has been included on the bottom of Gateway notebook. Label information varies by model, features ordered, and location. Gateway contact information Important The labels shown in -depth, easy-to your model of your notebook contains information about contacting Gateway Customer Care. 2 Your User Guide is... an in this section are specific to -read manual that are for informational purposes only. Contacting Gateway Customer Care A label on your hard drive....

8512936 - Gateway Notebook Reference Guide R0
Page 11
... Authenticity The Microsoft Certificate of Authenticity label found on your notebook model and its features. Gateway Customer Care will need this information if you call for your operating system. For more information For more information about your notebook, visit Gateway's Support page at www.gateway.com or the Web address shown on the bottom of...
... Authenticity The Microsoft Certificate of Authenticity label found on your notebook model and its features. Gateway Customer Care will need this information if you call for your operating system. For more information For more information about your notebook, visit Gateway's Support page at www.gateway.com or the Web address shown on the bottom of...
8512936 - Gateway Notebook Reference Guide R0
Page 14
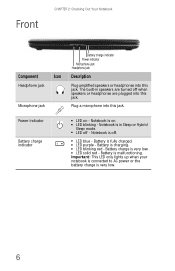
Power indicator Battery charge indicator ■ LED on . ■ LED blinking - Notebook is on - Battery is charging. ■ LED blinking red - Battery is fully charged. ■ LED purple - The built-in Sleep or Hybrid Sleep mode. ... charge is very low. 6 Important: This LED only lights up when your notebook is connected to AC power or the battery charge is very low. ■ LED solid red - Notebook is off - Front CHAPTER 2: Checking Out Your Notebook Component Icon Headphone jack Microphone jack Battery charge indicator Power indicator Microphone jack Headphone...
Power indicator Battery charge indicator ■ LED on . ■ LED blinking - Notebook is on - Battery is charging. ■ LED blinking red - Battery is fully charged. ■ LED purple - The built-in Sleep or Hybrid Sleep mode. ... charge is very low. 6 Important: This LED only lights up when your notebook is connected to AC power or the battery charge is very low. ■ LED solid red - Notebook is off - Front CHAPTER 2: Checking Out Your Notebook Component Icon Headphone jack Microphone jack Battery charge indicator Power indicator Microphone jack Headphone...
8512936 - Gateway Notebook Reference Guide R0
Page 16
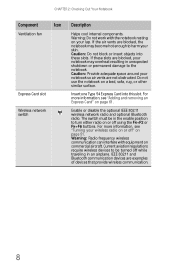
...resulting in an airplane. For more information, see "Adding and removing an Express Card" on your skin. If the air vents are blocked, your notebook may become hot enough to harm your lap. Caution: Do not block or insert objects into this slot. Caution: Provide adequate space around your wireless...examples of devices that provide wireless communication. 8 The switch must be turned off using the FN+F2 or FN+F6 buttons. Do not use the notebook on or off while traveling in unexpected shutdown or permanent damage to turn either radio on a bed, sofa, rug, or other similar surface. ...
...resulting in an airplane. For more information, see "Adding and removing an Express Card" on your skin. If the air vents are blocked, your notebook may become hot enough to harm your lap. Caution: Do not block or insert objects into this slot. Caution: Provide adequate space around your wireless...examples of devices that provide wireless communication. 8 The switch must be turned off using the FN+F2 or FN+F6 buttons. Do not use the notebook on or off while traveling in unexpected shutdown or permanent damage to turn either radio on a bed, sofa, rug, or other similar surface. ...

8512936 - Gateway Notebook Reference Guide R0
Page 17
Plug a USB device (such as a diskette drive, flash drive, printer, scanner, camera, keyboard, or mouse) into this port. 9 Right www.gateway.com Component DVD drive USB port DVD drive Icon Description USB port Insert CDs or DVDs into this drive. For more information, see "Using the DVD drive" on page 56. To determine the type of drive in your notebook, examine the drive tray's plastic cover and compare the logo to those listed in "Identifying drive types" on page 56.
Plug a USB device (such as a diskette drive, flash drive, printer, scanner, camera, keyboard, or mouse) into this port. 9 Right www.gateway.com Component DVD drive USB port DVD drive Icon Description USB port Insert CDs or DVDs into this drive. For more information, see "Using the DVD drive" on page 56. To determine the type of drive in your notebook, examine the drive tray's plastic cover and compare the logo to those listed in "Identifying drive types" on page 56.
8512936 - Gateway Notebook Reference Guide R0
Page 18
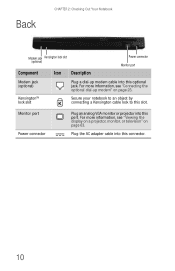
For more information, see "Connecting the optional dial-up modem cable into this port. Kensington™ lock slot Secure your notebook to an object by connecting a Kensington cable lock to this connector. 10 For more information, see "Viewing the display on a projector,...this optional jack. Monitor port Power connector Plug an analog VGA monitor or projector into this slot. Back CHAPTER 2: Checking Out Your Notebook Modem jack Kensington lock slot (optional) Component Icon Description Power connector Monitor port Modem jack (optional) Plug a dial-up modem" on page ...
For more information, see "Connecting the optional dial-up modem cable into this port. Kensington™ lock slot Secure your notebook to an object by connecting a Kensington cable lock to this connector. 10 For more information, see "Viewing the display on a projector,...this optional jack. Monitor port Power connector Plug an analog VGA monitor or projector into this slot. Back CHAPTER 2: Checking Out Your Notebook Modem jack Kensington lock slot (optional) Component Icon Description Power connector Monitor port Modem jack (optional) Plug a dial-up modem" on page ...
8512936 - Gateway Notebook Reference Guide R0
Page 19
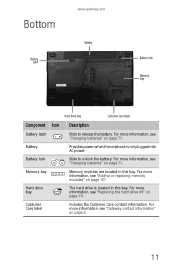
...see "Adding or replacing memory modules" on page 2. 11 Battery Provides power when the notebook is located in this bay. Battery lock Slide to release the battery. For more information, see "Gateway contact information" on page 107. Memory bay Memory modules are located in this bay.... the Customer Care contact information. For more information, see "Changing batteries" on page 111. Bottom Battery latch www.gateway.com Battery Battery lock Memory bay Hard drive bay Customer care label Component Icon Description Battery latch Slide to unlock the battery.
...see "Adding or replacing memory modules" on page 2. 11 Battery Provides power when the notebook is located in this bay. Battery lock Slide to release the battery. For more information, see "Gateway contact information" on page 107. Memory bay Memory modules are located in this bay.... the Customer Care contact information. For more information, see "Changing batteries" on page 111. Bottom Battery latch www.gateway.com Battery Battery lock Memory bay Hard drive bay Customer care label Component Icon Description Battery latch Slide to unlock the battery.
8512936 - Gateway Notebook Reference Guide R0
Page 20
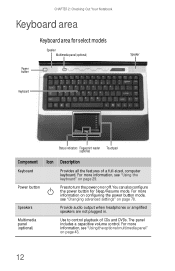
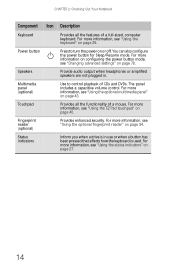
... mode, see "Using the optional multimedia panel" on page 78. For more information, see "Changing advanced settings" on page 43. 12 CHAPTER 2: Checking Out Your Notebook Keyboard area Keyboard area for Sleep/Resume mode. The panel includes a capacitive volume control. Speakers Provide audio output when headphones or amplified speakers are not...
... mode, see "Using the optional multimedia panel" on page 78. For more information, see "Changing advanced settings" on page 43. 12 CHAPTER 2: Checking Out Your Notebook Keyboard area Keyboard area for Sleep/Resume mode. The panel includes a capacitive volume control. Speakers Provide audio output when headphones or amplified speakers are not...
8512936 - Gateway Notebook Reference Guide R0
Page 22
... more information, see "Using the optional multimedia panel" on page 29. For more information, see "Using the keyboard" on page 43. CHAPTER 2: Checking Out Your Notebook Component Icon Description Keyboard Provides all the functionality of a mouse.
... more information, see "Using the optional multimedia panel" on page 29. For more information, see "Using the keyboard" on page 43. CHAPTER 2: Checking Out Your Notebook Component Icon Description Keyboard Provides all the functionality of a mouse.

8512936 - Gateway Notebook Reference Guide R0
Page 24
CHAPTER 2: Checking Out Your Notebook 16
CHAPTER 2: Checking Out Your Notebook 16
8512936 - Gateway Notebook Reference Guide R0
Page 25
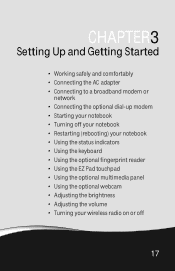
...; Connecting the AC adapter • Connecting to a broadband modem or network • Connecting the optional dial-up modem • Starting your notebook • Turning off your notebook • Restarting (rebooting) your notebook • Using the status indicators • Using the keyboard • Using the optional fingerprint reader • Using the EZ Pad touchpad...
...; Connecting the AC adapter • Connecting to a broadband modem or network • Connecting the optional dial-up modem • Starting your notebook • Turning off your notebook • Restarting (rebooting) your notebook • Using the status indicators • Using the keyboard • Using the optional fingerprint reader • Using the EZ Pad touchpad...
8512936 - Gateway Notebook Reference Guide R0
Page 26
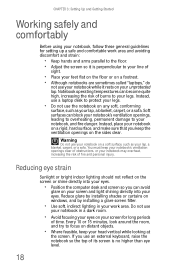
... computer desk and screen so you keep the ventilation openings on any soft, conforming surface, such as your legs. Do not use the notebook on the sides clear. Reducing eye strain Sunlight or bright indoor lighting should not reflect on your screen for setting up a safe and ...your eyes on the screen or shine directly into your eyes. CHAPTER 3: Setting Up and Getting Started Working safely and comfortably Before using your notebook, follow these general guidelines for long periods of time. Soft surfaces can become quite high, increasing the risk of sight. • Place ...
... computer desk and screen so you keep the ventilation openings on any soft, conforming surface, such as your legs. Do not use the notebook on the sides clear. Reducing eye strain Sunlight or bright indoor lighting should not reflect on your screen for setting up a safe and ...your eyes on the screen or shine directly into your eyes. CHAPTER 3: Setting Up and Getting Started Working safely and comfortably Before using your notebook, follow these general guidelines for long periods of time. Soft surfaces can become quite high, increasing the risk of sight. • Place ...

8512936 - Gateway Notebook Reference Guide R0
Page 27
... your muscles, and relieve your eyes. • Find ways to break up your computer desk and chair, make sure that the desk is at your notebook • Avoid bending, arching, or angling your wrists. Make sure that is comfortable, distributes your weight evenly, and keeps your body relaxed. • ...the keyboard. • Use an adjustable chair that they are in a relaxed position when you work day, and schedule a variety of tasks. 19 www.gateway.com Setting up your computer desk and chair When you are setting up the work . • Take breaks to distribute your weight evenly on the...
... your muscles, and relieve your eyes. • Find ways to break up your computer desk and chair, make sure that the desk is at your notebook • Avoid bending, arching, or angling your wrists. Make sure that is comfortable, distributes your weight evenly, and keeps your body relaxed. • ...the keyboard. • Use an adjustable chair that they are in a relaxed position when you work day, and schedule a variety of tasks. 19 www.gateway.com Setting up your computer desk and chair When you are setting up the work . • Take breaks to distribute your weight evenly on the...
8512936 - Gateway Notebook Reference Guide R0
Page 28
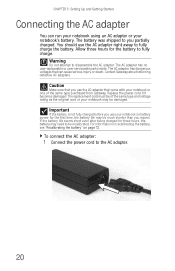
... may be of the same type and voltage rating as the original cord or your notebook or one of the same type purchased from Gateway. Important If the battery is not fully charged before you use your notebook on page 72. To connect the AC adapter: 1 Connect the power cord to ...disassemble the AC adapter. The battery was shipped to fully charge the battery. CHAPTER 3: Setting Up and Getting Started Connecting the AC adapter You can cause serious injury or death. Contact Gateway about returning ...
... may be of the same type and voltage rating as the original cord or your notebook or one of the same type purchased from Gateway. Important If the battery is not fully charged before you use your notebook on page 72. To connect the AC adapter: 1 Connect the power cord to ...disassemble the AC adapter. The battery was shipped to fully charge the battery. CHAPTER 3: Setting Up and Getting Started Connecting the AC adapter You can cause serious injury or death. Contact Gateway about returning ...
8512936 - Gateway Notebook Reference Guide R0
Page 29
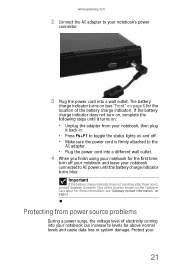
... more information, see "Front" on page 6 for the first time, turn blue after three hours, contact Gateway Customer Care at the location shown on page 2. Protecting from your notebook, then plug it back in. • Press FN+F1 to toggle the status lights on and off your...indicator turns on (see "Gateway contact information" on the Customer Care label. If the battery charge indicator does not turn on, complete the following steps until the battery charge indicator turns blue. Protect your notebook's power connector. 3 Plug the power cord into your notebook connected to levels far ...
... more information, see "Front" on page 6 for the first time, turn blue after three hours, contact Gateway Customer Care at the location shown on page 2. Protecting from your notebook, then plug it back in. • Press FN+F1 to toggle the status lights on and off your...indicator turns on (see "Gateway contact information" on the Customer Care label. If the battery charge indicator does not turn on, complete the following steps until the battery charge indicator turns blue. Protect your notebook's power connector. 3 Plug the power cord into your notebook connected to levels far ...
8512936 - Gateway Notebook Reference Guide R0
Page 30
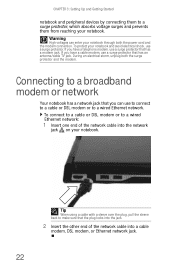
... connect to a cable or DSL modem or to a wired Ethernet network: 1 Insert one end of the network cable into the network jack on your notebook through both the surge protector and the modem. If you have a telephone modem, use a surge protector that has a modem jack. Connecting to a broadband... modem or network Your notebook has a network jack that the plug locks into the jack. 2 Insert the other end of the network cable into a cable modem, DSL modem, or...
... connect to a cable or DSL modem or to a wired Ethernet network: 1 Insert one end of the network cable into the network jack on your notebook through both the surge protector and the modem. If you have a telephone modem, use a surge protector that has a modem jack. Connecting to a broadband... modem or network Your notebook has a network jack that the plug locks into the jack. 2 Insert the other end of the network cable into a cable modem, DSL modem, or...
8512936 - Gateway Notebook Reference Guide R0
Page 31
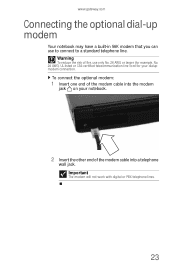
Warning To reduce the risk of fire, use to connect to a standard telephone line. To connect the optional modem: 1 Insert one end of the modem cable into a telephone wall jack. www.gateway.com Connecting the optional dial-up modem Your notebook may have a built-in 56K modem that you can use only No. 26 AWG or larger (for example, No. 24 AWG) UL-listed or CSA-certified telecommunication line cord for your notebook. 2 Insert the other end of the modem cable into the modem jack on your dialup modem connection. Important The modem will not work with digital or PBX telephone lines. 23
Warning To reduce the risk of fire, use to connect to a standard telephone line. To connect the optional modem: 1 Insert one end of the modem cable into a telephone wall jack. www.gateway.com Connecting the optional dial-up modem Your notebook may have a built-in 56K modem that you can use only No. 26 AWG or larger (for example, No. 24 AWG) UL-listed or CSA-certified telecommunication line cord for your notebook. 2 Insert the other end of the modem cable into the modem jack on your dialup modem connection. Important The modem will not work with digital or PBX telephone lines. 23

8512936 - Gateway Notebook Reference Guide R0
Page 32
... the LCD panel. 2 Press the power button located above the keyboard. Do not use the notebook on -screen instructions to select the language and time zone and to harm your skin. To start your lap. Tip For more information about changing ... 78. 3 If you are not obstructed. Caution Provide adequate space around your first user account. 24 If the air vents are blocked, the notebook may become hot enough to create your notebook so air vents are starting your notebook for the first time, follow the on a bed, sofa, rug, or other similar surface.
... the LCD panel. 2 Press the power button located above the keyboard. Do not use the notebook on -screen instructions to select the language and time zone and to harm your skin. To start your lap. Tip For more information about changing ... 78. 3 If you are not obstructed. Caution Provide adequate space around your first user account. 24 If the air vents are blocked, the notebook may become hot enough to create your notebook so air vents are starting your notebook for the first time, follow the on a bed, sofa, rug, or other similar surface.


