User Guide
Page 7
... front bezel 197 Adding or replacing a CD, DVD, or diskette drive 198 Replacing the hard drive 203 Adding or replacing add-in cards 206 Installing memory 208 Replacing the system battery 212 Replacing the power supply 214 Replacing the system board 216 v
... front bezel 197 Adding or replacing a CD, DVD, or diskette drive 198 Replacing the hard drive 203 Adding or replacing add-in cards 206 Installing memory 208 Replacing the system battery 212 Replacing the power supply 214 Replacing the system board 216 v

User Guide
Page 8
... cards 222 CD, DVD, or recordable drives 222 Cleaning CDs and DVDs 224 Computer 224 File management 225 Hard drive 225 Internet 226 Keyboard 228 Memory 228 Modem 229 Monitor 233 Mouse 235 Power 235 Printer 236 Sound 237 Using the BIOS Setup utility 238 Telephone support 240 Before calling...
... cards 222 CD, DVD, or recordable drives 222 Cleaning CDs and DVDs 224 Computer 224 File management 225 Hard drive 225 Internet 226 Keyboard 228 Memory 228 Modem 229 Monitor 233 Mouse 235 Power 235 Printer 236 Sound 237 Using the BIOS Setup utility 238 Telephone support 240 Before calling...
User Guide
Page 15
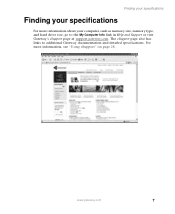
www.gateway.com 7 For more information about your specifications For more information, see "Using eSupport" on page 28. Finding your specifications Finding your computer, such as memory size, memory type, and hard drive size, go to additional Gateway documentation and detailed specifications. The eSupport page also has links to the My Computer Info link in Help and Support or visit Gateway's eSupport page at support.gateway.com.
www.gateway.com 7 For more information about your specifications For more information, see "Using eSupport" on page 28. Finding your specifications Finding your computer, such as memory size, memory type, and hard drive size, go to additional Gateway documentation and detailed specifications. The eSupport page also has links to the My Computer Info link in Help and Support or visit Gateway's eSupport page at support.gateway.com.

User Guide
Page 17
..., such as 4,700 MB of data. A UPS uses a battery to keep your files, you can store 2 GB, 20 GB, 40 GB, 130 GB, or more of memory. If you need additional storage space or you want to increase your internal storage space, try replacing your programs are... more expensive, but usually they should, try adding more memory. If your existing hard drive with a larger drive. If you are printing large documents. www.gateway...
..., such as 4,700 MB of data. A UPS uses a battery to keep your files, you can store 2 GB, 20 GB, 40 GB, 130 GB, or more of memory. If you need additional storage space or you want to increase your internal storage space, try replacing your programs are... more expensive, but usually they should, try adding more memory. If your existing hard drive with a larger drive. If you are printing large documents. www.gateway...
User Guide
Page 125
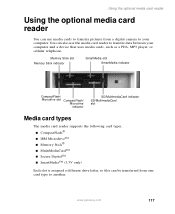
... also use media cards to transfer pictures from one card type to another. Memory Stick slot Memory Stick indicator SmartMedia slot SmartMedia indicator CompactFlash/ Microdrive slot CompactFlash/ Microdrive indicator SD...Media card types The media card reader supports the following card types. ■ CompactFlash® ■ IBM Microdrive™ ■ Memory Stick® ■ MultiMediaCard™ ■ Secure Digital™ ■ SmartMedia™ (3.3V only) Each slot is assigned ...use the media card reader to transfer data between your computer. www.gateway.com 117
... also use media cards to transfer pictures from one card type to another. Memory Stick slot Memory Stick indicator SmartMedia slot SmartMedia indicator CompactFlash/ Microdrive slot CompactFlash/ Microdrive indicator SD...Media card types The media card reader supports the following card types. ■ CompactFlash® ■ IBM Microdrive™ ■ Memory Stick® ■ MultiMediaCard™ ■ Secure Digital™ ■ SmartMedia™ (3.3V only) Each slot is assigned ...use the media card reader to transfer data between your computer. www.gateway.com 117

User Guide
Page 139
... to disk) writes all current memory (RAM) information to the hard drive, then turns your computer completely off and the entire system uses less power. The next time you turn off . In Hibernate mode Exit Hibernate mode Press the power button. www.gateway.com 131 However, the information... in Standby mode, it switches to most devices except memory. to the hard drive. activated) In Standby mode Exit Standby mode Move the mouse or press...
... to disk) writes all current memory (RAM) information to the hard drive, then turns your computer completely off and the entire system uses less power. The next time you turn off . In Hibernate mode Exit Hibernate mode Press the power button. www.gateway.com 131 However, the information... in Standby mode, it switches to most devices except memory. to the hard drive. activated) In Standby mode Exit Standby mode Move the mouse or press...

User Guide
Page 197
If you are not comfortable with these procedures, get help from a more experienced computer user or computer service technician. 189 13 Upgrading Your Computer This chapter provides information about upgrading and replacing components in cards ■ Add memory ■ Change the battery ■ Replace system boards You must open the computer case to upgrade or replace components. Read this chapter to learn how to: ■ Open and close the computer case ■ Remove and install drives and components ■ Remove and install add-in your computer.
If you are not comfortable with these procedures, get help from a more experienced computer user or computer service technician. 189 13 Upgrading Your Computer This chapter provides information about upgrading and replacing components in cards ■ Add memory ■ Change the battery ■ Replace system boards You must open the computer case to upgrade or replace components. Read this chapter to learn how to: ■ Open and close the computer case ■ Remove and install drives and components ■ Remove and install add-in your computer.
User Guide
Page 216
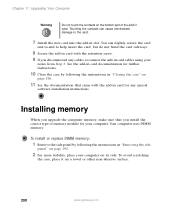
... the add-in card cables using your computer on its side. To install or replace DIMM memory: 1 Remove the side panel by following the instructions in "Removing the side panel" on ... the card sideways. 8 Secure the add-in card with the add-in slot. Installing memory When you upgrade the computer memory, make sure that came with the retention screw. 9 If you install the correct type ...of the add-in "Closing the case" on a towel or other non-abrasive surface. 208 www.gateway.com ...
... the add-in card cables using your computer on its side. To install or replace DIMM memory: 1 Remove the side panel by following the instructions in "Removing the side panel" on ... the card sideways. 8 Secure the add-in card with the add-in slot. Installing memory When you upgrade the computer memory, make sure that came with the retention screw. 9 If you install the correct type ...of the add-in "Closing the case" on a towel or other non-abrasive surface. 208 www.gateway.com ...

User Guide
Page 217
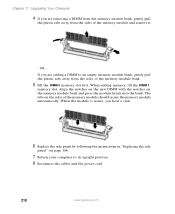
Installing memory DIMM Bank 0 DIMM Bank 1 www.gateway.com 209 3 Find the memory module banks on your system board.
Installing memory DIMM Bank 0 DIMM Bank 1 www.gateway.com 209 3 Find the memory module banks on your system board.
User Guide
Page 218
..., gently pull the plastic tabs away from the sides of the memory module and remove it. - OR - Chapter 11: Upgrading Your Computer 4 If you are adding a DIMM to its upright position. 8 Reconnect the cables and the power cord. 210 www.gateway.com Align the notches on the new DIMM with the notches... on the memory module bank and press the module firmly into the bank.
..., gently pull the plastic tabs away from the sides of the memory module and remove it. - OR - Chapter 11: Upgrading Your Computer 4 If you are adding a DIMM to its upright position. 8 Reconnect the cables and the power cord. 210 www.gateway.com Align the notches on the new DIMM with the notches... on the memory module bank and press the module firmly into the bank.
User Guide
Page 219
Windows starts and the Windows desktop appears. 10 Click Start, Control Panel, then click Performance and Maintenance (if in the General tab. The amount of the System Properties dialog box in Category view). Installing memory 9 Turn on your computer is shown at the bottom of memory in your computer. Click/Double-click System. www.gateway.com 211
Windows starts and the Windows desktop appears. 10 Click Start, Control Panel, then click Performance and Maintenance (if in the General tab. The amount of the System Properties dialog box in Category view). Installing memory 9 Turn on your computer is shown at the bottom of memory in your computer. Click/Double-click System. www.gateway.com 211

User Guide
Page 225
Replacing the system board 4 Remove the memory modules by following the instructions in "Installing memory" on page 208. 5 Disconnect the power and data cables from the system board, noting their locations and orientation. (You will reconnect the cables after you install the new board.) 6 Use a Phillips screwdriver to remove the ten system board screws. Screw Screw Screw Screw Screw Screw Screw Screw Screw www.gateway.com Screw 217
Replacing the system board 4 Remove the memory modules by following the instructions in "Installing memory" on page 208. 5 Disconnect the power and data cables from the system board, noting their locations and orientation. (You will reconnect the cables after you install the new board.) 6 Use a Phillips screwdriver to remove the ten system board screws. Screw Screw Screw Screw Screw Screw Screw Screw Screw www.gateway.com Screw 217

User Guide
Page 226
See the system board documentation for further instructions. 10 Reinstall the memory modules by following the instructions in "Installing memory" on page 208. 11 Reinstall the add-in cards by following the instructions in "Adding or replacing add-in cards" on page 206. 12 Close ... 5. Chapter 11: Upgrading Your Computer 7 Lift the system board up and out of the case. 8 Align the new system board on page 196. 218 www.gateway.com
See the system board documentation for further instructions. 10 Reinstall the memory modules by following the instructions in "Installing memory" on page 208. 11 Reinstall the add-in cards by following the instructions in "Adding or replacing add-in cards" on page 206. 12 Close ... 5. Chapter 11: Upgrading Your Computer 7 Lift the system board up and out of the case. 8 Align the new system board on page 196. 218 www.gateway.com

User Guide
Page 230
... cannot be read by pressing and holding F1 while your computer restarts. You may be able to play these CDs on page 181. 222 www.gateway.com For more information, see "Reinstalling device drivers" on your computer. ■ Clean the disc. To identify your drive type, see "Cleaning ...CDs and DVDs" on page 84. ■ Your computer may not be experiencing some temporary memory problems. Shut down and restart your computer. ■ Make sure that came with your add-in card. ■ Reset the card. Chapter 12: ...
... cannot be read by pressing and holding F1 while your computer restarts. You may be able to play these CDs on page 181. 222 www.gateway.com For more information, see "Reinstalling device drivers" on your computer. ■ Clean the disc. To identify your drive type, see "Cleaning ...CDs and DVDs" on page 84. ■ Your computer may not be experiencing some temporary memory problems. Shut down and restart your computer. ■ Make sure that came with your add-in card. ■ Reset the card. Chapter 12: ...
User Guide
Page 236
...in the keyboard ■ If you know works to help determine if a memory module is plugged in the keyboard, turn it upside down to replace it... information, see "Installing memory" on page 208. ■ Check the memory module for correct seating and orientation. Memory You see a "Not enough memory" error message ■...Clean the keyboard by using it . You see a "memory error" message during startup ■ Use PC Doctor or ... and turn off your computer. If the memory module is not stuck. For more information, see "Installing memory" on page 208. For more information, ...
...in the keyboard ■ If you know works to help determine if a memory module is plugged in the keyboard, turn it upside down to replace it... information, see "Installing memory" on page 208. ■ Check the memory module for correct seating and orientation. Memory You see a "Not enough memory" error message ■...Clean the keyboard by using it . You see a "memory error" message during startup ■ Use PC Doctor or ... and turn off your computer. If the memory module is not stuck. For more information, see "Installing memory" on page 208. For more information, ...
User Guide
Page 237
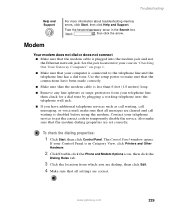
..., or voice mail, make sure that all settings are set correctly. Contact your Control Panel is disabled before using the modem. www.gateway.com 229 To check the dialing properties: 1 Click Start, then click Control Panel. If your telephone service to get the correct code.... Type the keyword memory error in Category View, click Printers and Other Hardware. 2 Click/Double-click the Phone and Modem Options icon, then click the Dialing Rules tab. 3 Click the location from your telephone line, then check for your case in "Checking Out Your Gateway Computer" on page ...
..., or voice mail, make sure that all settings are set correctly. Contact your Control Panel is disabled before using the modem. www.gateway.com 229 To check the dialing properties: 1 Click Start, then click Control Panel. If your telephone service to get the correct code.... Type the keyword memory error in Category View, click Printers and Other Hardware. 2 Click/Double-click the Phone and Modem Options icon, then click the Dialing Rules tab. 3 Click the location from your telephone line, then check for your case in "Checking Out Your Gateway Computer" on page ...
User Guide
Page 245
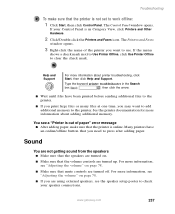
... are not getting sound from the speakers ■ Make sure that the speakers are turned on. ■ Make sure that the printer is online. www.gateway.com 237 If the menu shows a check mark next to Use Printer Offline, click Use Printer Offline to check your Control Panel is out of... to the printer. ■ If you print large files or many files at one time, you need to use. For more information about adding additional memory. If your speaker connections. Help and Support For more information, see "Adjusting the volume" on page 78. ■ If you want to add additional...
... are not getting sound from the speakers ■ Make sure that the speakers are turned on. ■ Make sure that the printer is online. www.gateway.com 237 If the menu shows a check mark next to Use Printer Offline, click Use Printer Offline to check your Control Panel is out of... to the printer. ■ If you print large files or many files at one time, you need to use. For more information about adding additional memory. If your speaker connections. Help and Support For more information, see "Adjusting the volume" on page 78. ■ If you want to add additional...
User Guide
Page 247
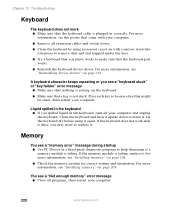
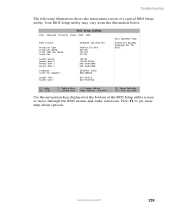
... Troubleshooting The following illustration shows the main menu screen of the BIOS Setup utility screen to get more help about options. www.gateway.com 239 Your BIOS Setup utility may vary from the illustration below. Press F1 to move through the BIOS menus and make ...selections. BIOS Setup Utility Main Advanced Security Power Boot Exit BIOS Version Processor Type Processor Speed Front Side Bus Speed Cache Ram System Memory Memory Bank 0 Memory Bank 1 Memory Bank 2 Language: Cache ECC Support: System Time: System Date: 4W4SB0X0.15A.0004.P02 Pentium (R) III 933 MHz 133 MHz...
... Troubleshooting The following illustration shows the main menu screen of the BIOS Setup utility screen to get more help about options. www.gateway.com 239 Your BIOS Setup utility may vary from the illustration below. Press F1 to move through the BIOS menus and make ...selections. BIOS Setup Utility Main Advanced Security Power Boot Exit BIOS Version Processor Type Processor Speed Front Side Bus Speed Cache Ram System Memory Memory Bank 0 Memory Bank 1 Memory Bank 2 Language: Cache ECC Support: System Time: System Date: 4W4SB0X0.15A.0004.P02 Pentium (R) III 933 MHz 133 MHz...
User Guide
Page 264
... using 84 CD-RW drive activity indicator 85 adding 198 eject button 85 identifying 84 locating drive 3 replacing 198 troubleshooting 222 using 84 cellular telephone memory cards 3, 117 Certificate of Authenticity 6 cleaning audio CD 224 case 175 CD 224 computer exterior 175 computer screen 176 DVD 224 keyboard 176 mouse 177...
... using 84 CD-RW drive activity indicator 85 adding 198 eject button 85 identifying 84 locating drive 3 replacing 198 troubleshooting 222 using 84 cellular telephone memory cards 3, 117 Certificate of Authenticity 6 cleaning audio CD 224 case 175 CD 224 computer exterior 175 computer screen 176 DVD 224 keyboard 176 mouse 177...
User Guide
Page 265
... 113 locating serial port 5 locating USB port 3, 5 digital photography connecting a digital camera 113 using media card reader 117 digital video camera 8 connecting 114 DIMM See memory directional keys 19 Disk Cleanup 168 Disk Defragmenter 171 diskette inserting 116 diskette drive adding 198 eject button 116 locating 3 locating drive 3 replacing 198 using...
... 113 locating serial port 5 locating USB port 3, 5 digital photography connecting a digital camera 113 using media card reader 117 digital video camera 8 connecting 114 DIMM See memory directional keys 19 Disk Cleanup 168 Disk Defragmenter 171 diskette inserting 116 diskette drive adding 198 eject button 116 locating 3 locating drive 3 replacing 198 using...


