

Service Guide
Page 4
Gives precautionary measures to avoid possible hardware or software problems. Reminds you to the current topic. IV NOTE WARNING CAUTION IMPORTANT Gives bits and pieces of procedures. Conventions The following conventions are used in this manual: SCREEN MESSAGES Denotes actual messages that might result from doing or not doing specific actions. Alerts you to do specific actions relevant to the accomplishment of additional information related to any damage that appear on screen.
Gives precautionary measures to avoid possible hardware or software problems. Reminds you to the current topic. IV NOTE WARNING CAUTION IMPORTANT Gives bits and pieces of procedures. Conventions The following conventions are used in this manual: SCREEN MESSAGES Denotes actual messages that might result from doing or not doing specific actions. Alerts you to do specific actions relevant to the accomplishment of additional information related to any damage that appear on screen.

Service Guide
Page 14
...-sensitive pointing device which functions like the left and and right) right mouse buttons. Your Gateway Notebook tour After learning about your computer features, let us show you around your computer. Internal microphone for sound recording. Display screen Keyboard TouchPad Battery/ Bluetooth/3G/ Wireless LAN communication indicator Also called Liquid-Crystal Display (LCD), displays...
...-sensitive pointing device which functions like the left and and right) right mouse buttons. Your Gateway Notebook tour After learning about your computer features, let us show you around your computer. Internal microphone for sound recording. Display screen Keyboard TouchPad Battery/ Bluetooth/3G/ Wireless LAN communication indicator Also called Liquid-Crystal Display (LCD), displays...

Service Guide
Page 20
... Lock + Scroll Lock + Description When Caps Lock is on and off Hold while using cursorcontrol keys. Use this mode when you can toggle on , the screen moves one line up or down when you press the up or down arrow keys respectively. Lock Keys and embedded numeric keypad The keyboard has...
... Lock + Scroll Lock + Description When Caps Lock is on and off Hold while using cursorcontrol keys. Use this mode when you can toggle on , the screen moves one line up or down when you press the up or down arrow keys respectively. Lock Keys and embedded numeric keypad The keyboard has...
Service Guide
Page 22
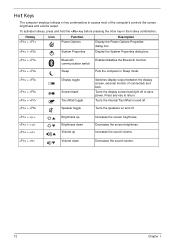
... on and off. Press any key to access most of the computer's controls like screen brightness and volume output. Increases the sound volume. + < > Volume down Volume up Increases the screen brightness. To activate hotkeys, press and hold the key before pressing...Speaker toggle Switches display output between the display screen, external monitor (if connected) and both. Decreases the screen brightness. Display the System Properties dialog box. + + Bluetooth Enables/disables the Bluetooth function. Hot Keys The computer employs hotkeys or key combinations to return....
... on and off. Press any key to access most of the computer's controls like screen brightness and volume output. Increases the sound volume. + < > Volume down Volume up Increases the screen brightness. To activate hotkeys, press and hold the key before pressing...Speaker toggle Switches display output between the display screen, external monitor (if connected) and both. Decreases the screen brightness. Display the System Properties dialog box. + + Bluetooth Enables/disables the Bluetooth function. Hot Keys The computer employs hotkeys or key combinations to return....

Service Guide
Page 26
...;5% Phoenix BIOS V0.2105 Flash 5V ±5% Specification Toshiba MK2555GSX 250 512 2 1 5400 8 SATA 3000 363 - 952 typical 5V ±5% LED 11.6" Item Vendor/model name AUO B11.6XW02 Screen Diagonal (mm) Active Area (mm) Display resolution (pixels) Pixel Pitch (mm) Typical White Luminance (cd/m2) also called Brightness Contrast Ratio Response...
...;5% Phoenix BIOS V0.2105 Flash 5V ±5% Specification Toshiba MK2555GSX 250 512 2 1 5400 8 SATA 3000 363 - 952 typical 5V ±5% LED 11.6" Item Vendor/model name AUO B11.6XW02 Screen Diagonal (mm) Active Area (mm) Display resolution (pixels) Pixel Pitch (mm) Typical White Luminance (cd/m2) also called Brightness Contrast Ratio Response...

Service Guide
Page 31
...Security, Power, Boot, and Exit. Press during POST (when Press to enter Setup message is enclosed in the Item Specific Help part of the screen. Read this item. • Press Esc while you are found in square brackets. Press F2 to save any menu, you can also press...Utility The BIOS Setup Utility is already properly configured and optimized, and you do not need to run this utility. Your computer is a hardware configuration program built into your computer's BIOS (Basic Input/ Output System). However, if you encounter configuration problems, you may need to run Setup. You ...
...Security, Power, Boot, and Exit. Press during POST (when Press to enter Setup message is enclosed in the Item Specific Help part of the screen. Read this item. • Press Esc while you are found in square brackets. Press F2 to save any menu, you can also press...Utility The BIOS Setup Utility is already properly configured and optimized, and you do not need to run this utility. Your computer is a hardware configuration program built into your computer's BIOS (Basic Input/ Output System). However, if you encounter configuration problems, you may need to run Setup. You ...

Service Guide
Page 32
...UUID: AMD Athlon(tm) Processor L110 1200 MHz Hitachi HTS543216L9A300 090210FB2206LCJZ4V3H V0.11T04_C-Build ATi 010.055.000.051.032329 ZA80SK02B1917060592500 Gateway 40735D1C78DADD11A9D700238BB0B8D4 F1 Help Esc Exit Select Item F5/F6 Change Values F9 Setup Defaults Select Menu Enter Select Sub-Menu F10 Save... Asset Tag Number Product Name Manufacturer Name UUID Description This field shows the CPU type and speed of your computer hardware information. Information The Information screen displays a summary of the system. This field shows the speed of the system. This field displays the ...
...UUID: AMD Athlon(tm) Processor L110 1200 MHz Hitachi HTS543216L9A300 090210FB2206LCJZ4V3H V0.11T04_C-Build ATi 010.055.000.051.032329 ZA80SK02B1917060592500 Gateway 40735D1C78DADD11A9D700238BB0B8D4 F1 Help Esc Exit Select Item F5/F6 Change Values F9 Setup Defaults Select Menu Enter Select Sub-Menu F10 Save... Asset Tag Number Product Name Manufacturer Name UUID Description This field shows the CPU type and speed of your computer hardware information. Information The Information screen displays a summary of the system. This field shows the speed of the system. This field displays the ...

Service Guide
Page 33
... Values F9 Setup Defaults Select Menu Enter Select Sub-Menu F10 Save and Exit NOTE: The screen above is fixed to factory defaults. The table below describes the parameters in boldface are displayed with 24hour format. Main The ...Main screen allows the user to boot the system. Allows startup to skip normal POST messages while booting, decreasing the ...restore the system to 1015 MB. Enables, disables Boot Menu during POST. Settings in this screen.
... Values F9 Setup Defaults Select Menu Enter Select Sub-Menu F10 Save and Exit NOTE: The screen above is fixed to factory defaults. The table below describes the parameters in boldface are displayed with 24hour format. Main The ...Main screen allows the user to boot the system. Allows startup to skip normal POST messages while booting, decreasing the ...restore the system to 1015 MB. Enables, disables Boot Menu during POST. Settings in this screen.

Service Guide
Page 34
...screen contains parameters that help safeguard and protect your password. Settings in boldface are prompted to enter a password, you may have three tries before the system halts. The user can enter Setup menu only and does not have right to your password, you have to return your notebook computer...parameter settings. The user can be grayed out if the user password was used to reset it. 24 Chapter 2 Don't forget your computer from unauthorized use. Shows the setting of the user password. F1 Help Esc Exit Select Item F5/F6 Change Values F9 Setup Defaults ...
...screen contains parameters that help safeguard and protect your password. Settings in boldface are prompted to enter a password, you may have three tries before the system halts. The user can enter Setup menu only and does not have right to your password, you have to return your notebook computer...parameter settings. The user can be grayed out if the user password was used to reset it. 24 Chapter 2 Don't forget your computer from unauthorized use. Shows the setting of the user password. F1 Help Esc Exit Select Item F5/F6 Change Values F9 Setup Defaults ...
Service Guide
Page 35
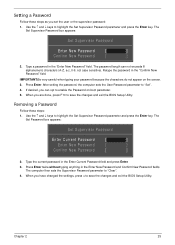
...typing anything in the "Enter New Password" field. If desired, you are done, press F10 to enable the Password on the screen. 3. Press Enter. The computer then sets the Supervisor Password parameter to highlight the Set Supervisor Password parameter and press the Enter key. Type a password in the... Enter New Password and Confirm New Password fields. After setting the password, the computer sets the User Password parameter to highlight the Set Supervisor Password parameter and press the Enter key. Type the current password in the "...
...typing anything in the "Enter New Password" field. If desired, you are done, press F10 to enable the Password on the screen. 3. Press Enter. The computer then sets the Supervisor Password parameter to highlight the Set Supervisor Password parameter and press the Enter key. Type a password in the... Enter New Password and Confirm New Password fields. After setting the password, the computer sets the User Password parameter to highlight the Set Supervisor Password parameter and press the Enter key. Type the current password in the "...

Service Guide
Page 36
... Changes have been saved. [Continue] The password setting is OK, the screen will show you the Setup Warning. Type the current password in the Enter New Password field. After setting the password, the computer sets the User Password parameter to highlight the Set Supervisor Password parameter and ...press the Enter key. Setup Warning Passwords do not match, the screen displays the following . If desired, you are done, press ...
... Changes have been saved. [Continue] The password setting is OK, the screen will show you the Setup Warning. Type the current password in the Enter New Password field. After setting the password, the computer sets the User Password parameter to highlight the Set Supervisor Password parameter and ...press the Enter key. Setup Warning Passwords do not match, the screen displays the following . If desired, you are done, press ...

Service Guide
Page 38
Load previous values from CMOS for all SETUP items. Save Setup Data to CMOS. Exit The Exit screen allows you to save your changes to CMOS. Parameter Exit Saving Changes Exit Discarding Changes Load Setup Default Discard Changes Save Changes Description Exit ... Item F5/F6 Change Values F9 Setup Default Select Menu Enter Execute Command F10 Save and Exit The table below describes the parameters in this screen. Exit utility without saving setup data to CMOS. 28 Chapter 2 Load default values for all SETUP item. Information Main PhoenixBIOS Setup Utility Security Boot ...
Load previous values from CMOS for all SETUP items. Save Setup Data to CMOS. Exit The Exit screen allows you to save your changes to CMOS. Parameter Exit Saving Changes Exit Discarding Changes Load Setup Default Discard Changes Save Changes Description Exit ... Item F5/F6 Change Values F9 Setup Default Select Menu Enter Execute Command F10 Save and Exit The table below describes the parameters in this screen. Exit utility without saving setup data to CMOS. 28 Chapter 2 Load default values for all SETUP item. Information Main PhoenixBIOS Setup Utility Security Boot ...

Service Guide
Page 41
5. If the AC adapter is connected, the following message appears. Chapter 2 31 In flash BIOS, the message Please do not remove AC Power Source displays. If the AC adapter is not plugged in the AC adapter and rerun the Phlash utility if the above message appears. 6. Flash is complete when the message Flash programming complete displays. Plug in the following screen appears. 7.
5. If the AC adapter is connected, the following message appears. Chapter 2 31 In flash BIOS, the message Please do not remove AC Power Source displays. If the AC adapter is not plugged in the AC adapter and rerun the Phlash utility if the above message appears. 6. Flash is complete when the message Flash programming complete displays. Plug in the following screen appears. 7.

Service Guide
Page 42
... click the WinFlash executable (WinPhlash2.0.3.4) to run the program. 2. In the Specify New BIOS file field, enter the BIOS ROM file name and path. A progress screen displays. 4. IMPORTANT:Be sure the AC power is complete the system will reboot automatically. 32 Chapter 2
... click the WinFlash executable (WinPhlash2.0.3.4) to run the program. 2. In the Specify New BIOS file field, enter the BIOS ROM file name and path. A progress screen displays. 4. IMPORTANT:Be sure the AC power is complete the system will reboot automatically. 32 Chapter 2
Service Guide
Page 138
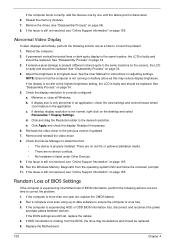
... resolved, see "Disassembly Process" on page 165. See the User Manual for instructions on the screen), the LCD is listed under Other Devices. 9. Check the display resolution is experiencing HDD or ODD...brightness setting, the LCD is missing from the operating system DVD and follow the onscreen prompts. 11. If extensive pixel damage is properly installed. NOTE: Ensure that : • The device is...Roll back the video driver to correct the problem. 1. Random Loss of BIOS Settings If the computer is not normal, right-click on page 165. 10. See "Disassembly Process" on battery ...
... resolved, see "Disassembly Process" on page 165. See the User Manual for instructions on the screen), the LCD is listed under Other Devices. 9. Check the display resolution is experiencing HDD or ODD...brightness setting, the LCD is missing from the operating system DVD and follow the onscreen prompts. 11. If extensive pixel damage is properly installed. NOTE: Ensure that : • The device is...Roll back the video driver to correct the problem. 1. Random Loss of BIOS Settings If the computer is not normal, right-click on page 165. 10. See "Disassembly Process" on battery ...

Service Guide
Page 144
... and file settings from a known good date using up-to-date software to ensure the computer is not fixed, repeat the preceding steps and select an earlier time and date. 11. Run the Windows Vista Startup Repair Utility: a. For more information see Windows Help and Support... to enter the BIOS Utility. Disconnect all cables and jumpers on the Boot menu. 6. b. The Install Windows screen displays. Click Next. The System Recovery Options screen displays. Select the appropriate operating system, and click Next. NOTE: Click Load Drivers if controller drives are set as...
... and file settings from a known good date using up-to-date software to ensure the computer is not fixed, repeat the preceding steps and select an earlier time and date. 11. Run the Windows Vista Startup Repair Utility: a. For more information see Windows Help and Support... to enter the BIOS Utility. Disconnect all cables and jumpers on the Boot menu. 6. b. The Install Windows screen displays. Click Next. The System Recovery Options screen displays. Select the appropriate operating system, and click Next. NOTE: Click Load Drivers if controller drives are set as...

Service Guide
Page 149
... beep before boot Terminate QuietBoot (optional) Check password (optional) Prepare Boot Initialize DMI parameters Initialize PnP Option ROMs Clear parity checkers Display MultiBoot menu Clear screen (optional) Check virus and backup reminders Try to UserPatch2 Build MPTABLE for multi-processor boards Install CD ROM for boot Clear huge ES segment register...
... beep before boot Terminate QuietBoot (optional) Check password (optional) Prepare Boot Initialize DMI parameters Initialize PnP Option ROMs Clear parity checkers Display MultiBoot menu Clear screen (optional) Check virus and backup reminders Try to UserPatch2 Build MPTABLE for multi-processor boards Install CD ROM for boot Clear huge ES segment register...


