
Service Guide
Page 9
...View 142 Clearing Password Check and BIOS Recovery 143 Motherboard CMOS Discharge 143 BIOS Recovery by Crisis Disk 144 FRU (Field Replaceable Unit) List 147 Gateway LT31 Exploded Diagrams 148 Main Assembly 148 LCD Assembly 149 Gateway LT Series FRU List 150 Model Definition and ...Configuration 156 Gateway LT31 Series 156 Test Compatible Components 161 Windows XP Environment Test ...
...View 142 Clearing Password Check and BIOS Recovery 143 Motherboard CMOS Discharge 143 BIOS Recovery by Crisis Disk 144 FRU (Field Replaceable Unit) List 147 Gateway LT31 Exploded Diagrams 148 Main Assembly 148 LCD Assembly 149 Gateway LT Series FRU List 150 Model Definition and ...Configuration 156 Gateway LT31 Series 156 Test Compatible Components 161 Windows XP Environment Test ...
Service Guide
Page 138
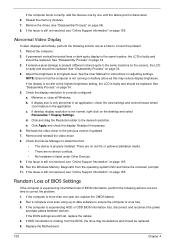
...is missing from the operating system DVD and follow the onscreen prompts. 11. See the User Manual for instructions on page 34. 4. Readjust if necessary. 6. Check the Device Manager to determine that the computer is still not resolved, see "Online Support Information" on battery alone...drive may reduce display brightness. Run a complete virus scan using up-to-date software to the previous version if updated. 7. Replace the Motherboard. 128 Chapter 4 Abnormal Video Display If video displays abnormally, perform the following actions one at a time to correct the problem. 1. ...
...is missing from the operating system DVD and follow the onscreen prompts. 11. See the User Manual for instructions on page 34. 4. Readjust if necessary. 6. Check the Device Manager to determine that the computer is still not resolved, see "Online Support Information" on battery alone...drive may reduce display brightness. Run a complete virus scan using up-to-date software to the previous version if updated. 7. Replace the Motherboard. 128 Chapter 4 Abnormal Video Display If video displays abnormally, perform the following actions one at a time to correct the problem. 1. ...

Service Guide
Page 153
Decompose the notebook and take out the Mainboard 2. Disconnect the RTC battery Chapter 5 143 Aspire one provides one Hardware Open Gap on the main board for clearing the CMOS, and one Hotkey for Aspire one. Locate the RTC Battery and Jumpers. 3. Clearing Password Check and BIOS Recovery This section provide you the standard operating procedures of clearing password and BIOS recovery for enabling BIOS Recovery. Motherboard CMOS Discharge Discharging the CMOS clears all user settings. 1.
Decompose the notebook and take out the Mainboard 2. Disconnect the RTC battery Chapter 5 143 Aspire one provides one Hardware Open Gap on the main board for clearing the CMOS, and one Hotkey for Aspire one. Locate the RTC Battery and Jumpers. 3. Clearing Password Check and BIOS Recovery This section provide you the standard operating procedures of clearing password and BIOS recovery for enabling BIOS Recovery. Motherboard CMOS Discharge Discharging the CMOS clears all user settings. 1.

