
User Guide
Page 1
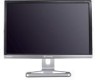
22-inch Widescreen LCD Monitor USERGUIDE ®
22-inch Widescreen LCD Monitor USERGUIDE ®

User Guide
Page 3
Contents Using Your Gateway Flat-Panel Monitor 1 Connecting the monitor 2 Connecting video inputs 2 Connecting power 2 Connecting a security cable 3 Setting up the optional speaker bar 3 Starting the monitor 5 Adjusting monitor settings 6 Using the EzTouch menu buttons 6 Using the shortcut menu 6 Using the main menu 7 Using Picture-in-Picture (PIP...13 Picture has shadows or "ghosts 13 Color is not uniform 13 Image is not sized or centered correctly 14 The monitor has pixels that are always dark or too bright 14 Configuring video settings 14 Gaming 15 Speaker bar does not work ...
Contents Using Your Gateway Flat-Panel Monitor 1 Connecting the monitor 2 Connecting video inputs 2 Connecting power 2 Connecting a security cable 3 Setting up the optional speaker bar 3 Starting the monitor 5 Adjusting monitor settings 6 Using the EzTouch menu buttons 6 Using the shortcut menu 6 Using the main menu 7 Using Picture-in-Picture (PIP...13 Picture has shadows or "ghosts 13 Color is not uniform 13 Image is not sized or centered correctly 14 The monitor has pixels that are always dark or too bright 14 Configuring video settings 14 Gaming 15 Speaker bar does not work ...

User Guide
Page 5
Using Your Gateway Flat-Panel Monitor • Connecting the monitor • Starting the monitor • Adjusting monitor settings • Changing Windows screen settings • Power management • Maintaining • Troubleshooting • Specifications 1
Using Your Gateway Flat-Panel Monitor • Connecting the monitor • Starting the monitor • Adjusting monitor settings • Changing Windows screen settings • Power management • Maintaining • Troubleshooting • Specifications 1

User Guide
Page 6
... box, unwrap the components, then make your cable connections. Power connector 2 OR Connect the blue VGA video cable to the matching video port on the monitor. - See your source device's user guide for more information. HDMI port DVI port VGA port Component Y Component Pr Component Pb 3 Make sure that... is turned off, then connect the other end of the video cable to the blue VGA video connector on the back of the monitor. Using Your Gateway Flat-Panel Monitor Connecting the monitor To set your video source's audio mode to PCM or ANALOG to the component video ports on the...
... box, unwrap the components, then make your cable connections. Power connector 2 OR Connect the blue VGA video cable to the matching video port on the monitor. - See your source device's user guide for more information. HDMI port DVI port VGA port Component Y Component Pr Component Pb 3 Make sure that... is turned off, then connect the other end of the video cable to the blue VGA video connector on the back of the monitor. Using Your Gateway Flat-Panel Monitor Connecting the monitor To set your video source's audio mode to PCM or ANALOG to the component video ports on the...

User Guide
Page 7
... lock not included). If the power icon is not visible, power is available for mounting underneath your monitor from www.gateway.com. To install the speaker bar: 1 Turn off the monitor. 2 Tilt the screen back, then match the mounting clips on the power button should be glowing purple. In ... cable You can order a speaker bar from voltage spikes. 3 To make sure that the monitor's power is correctly connected, check the power button on the back of the speaker bar with a cable lock. www.gateway.com 2 Plug the power cord into a correctly grounded power outlet. To connect a cable lock...
... lock not included). If the power icon is not visible, power is available for mounting underneath your monitor from www.gateway.com. To install the speaker bar: 1 Turn off the monitor. 2 Tilt the screen back, then match the mounting clips on the power button should be glowing purple. In ... cable You can order a speaker bar from voltage spikes. 3 To make sure that the monitor's power is correctly connected, check the power button on the back of the speaker bar with a cable lock. www.gateway.com 2 Plug the power cord into a correctly grounded power outlet. To connect a cable lock...

User Guide
Page 8
Mounting slot Mounting clip 4 Plug the speaker bar's power plug into place. Using Your Gateway Flat-Panel Monitor 3 Slide the speaker bar onto the bottom of the monitor until it downward. Make sure that it is secure by pulling it snaps into the power connector on the monitor. Speaker bar power connector 4
Mounting slot Mounting clip 4 Plug the speaker bar's power plug into place. Using Your Gateway Flat-Panel Monitor 3 Slide the speaker bar onto the bottom of the monitor until it downward. Make sure that it is secure by pulling it snaps into the power connector on the monitor. Speaker bar power connector 4

User Guide
Page 9
... additional audio connection is running, the power LED on your computer. Power button 2 Turn on page 6. 5 For more information, see "Adjusting monitor settings" on your monitor. Allow about 10 seconds for more troubleshooting information, see a display image, check the connections. For more information. The power LED on the power... LED is not blue or you do not see "Troubleshooting" on page 12. 3 Adjust the tilt of the monitor for the best viewing angle. 4 Use the on ). You may need to hear the audio. www.gateway.com 5 Plug the speaker bar's audio plug into the audio jack on the...
... additional audio connection is running, the power LED on your computer. Power button 2 Turn on page 6. 5 For more information, see "Adjusting monitor settings" on your monitor. Allow about 10 seconds for more troubleshooting information, see a display image, check the connections. For more information. The power LED on the power... LED is not blue or you do not see "Troubleshooting" on page 12. 3 Adjust the tilt of the monitor for the best viewing angle. 4 Use the on ). You may need to hear the audio. www.gateway.com 5 Plug the speaker bar's audio plug into the audio jack on the...
User Guide
Page 10
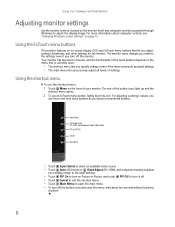
.... For more information about ten seconds without touching a button. 6 The rest of your monitor. Using Your Gateway Flat-Panel Monitor Adjusting monitor settings Use the monitor controls (located on the menu that let you adjust contrast, brightness, and other settings for the monitor. For adjusting a setting's values, you can touch and hold touch buttons as you...
.... For more information about ten seconds without touching a button. 6 The rest of your monitor. Using Your Gateway Flat-Panel Monitor Adjusting monitor settings Use the monitor controls (located on the menu that let you adjust contrast, brightness, and other settings for the monitor. For adjusting a setting's values, you can touch and hold touch buttons as you...

User Guide
Page 11
...component video. The main menu opens. Gamma-Customizes the gamma level. High gamma levels increase white levels and low gamma levels increase contrast. 7 www.gateway.com Using the main menu To use a button, lightly touch its icon. Tip To use the main menu: 1 Touch Menu on -screen ...menu, where you can adjust the source, position, size, and transparency of the button icons light up . Back (in the darkest portion of the monitor backlights. PIP Settings-Opens the PIP Settings menu, where you identify them. 3 Touch Previous or Next to highlight a setting, then touch Select to...
...component video. The main menu opens. Gamma-Customizes the gamma level. High gamma levels increase white levels and low gamma levels increase contrast. 7 www.gateway.com Using the main menu To use a button, lightly touch its icon. Tip To use the main menu: 1 Touch Menu on -screen ...menu, where you can adjust the source, position, size, and transparency of the button icons light up . Back (in the darkest portion of the monitor backlights. PIP Settings-Opens the PIP Settings menu, where you identify them. 3 Touch Previous or Next to highlight a setting, then touch Select to...

User Guide
Page 12
... crops off a portion of video signals. Size-Sets the size of the PIP window. If overscan is part of the PIP window. Using Your Gateway Flat-Panel Monitor OSD Menu Description PIP Settings menu PIP Display-Toggles the display of the data embedded in any broadcast video signal. PC input: Zooms the...
... crops off a portion of video signals. Size-Sets the size of the PIP window. If overscan is part of the PIP window. Using Your Gateway Flat-Panel Monitor OSD Menu Description PIP Settings menu PIP Display-Toggles the display of the data embedded in any broadcast video signal. PC input: Zooms the...

User Guide
Page 13
... on changing your computer's display resolution, see "Changing color depth and screen resolution" on the monitor. ■ Change the resolution of the Windows desktop to match the monitor's full resolution of video sources can disable this option to avoid an over-bright, distracting power ... characters. Using Picture-in-Picture (PIP) Picture-in a darkened room, you should change your monitor at the same time. LED Mode-Changes the brightness of the OSD. www.gateway.com OSD Menu Geometry menu (VGA mode only) Advanced menu Description H Position-Moves the display...
... on changing your computer's display resolution, see "Changing color depth and screen resolution" on the monitor. ■ Change the resolution of the Windows desktop to match the monitor's full resolution of video sources can disable this option to avoid an over-bright, distracting power ... characters. Using Picture-in-Picture (PIP) Picture-in a darkened room, you should change your monitor at the same time. LED Mode-Changes the brightness of the OSD. www.gateway.com OSD Menu Geometry menu (VGA mode only) Advanced menu Description H Position-Moves the display...
User Guide
Page 14
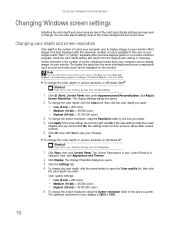
...Click (Start), Control Panel, then under Appearance and Personalization, click Adjust Screen Resolution. If the color in Windows XP: Shortcut Right-click on your monitor. The Display Properties dialog box opens. 3 Click the Settings tab. 4 To change . If the new settings do not look best displayed with..., then click Help and Support. Changing color depth and screen resolution Color depth is 2560 × 1600. 10 Using Your Gateway Flat-Panel Monitor Changing Windows screen settings Adjusting the color depth and screen area are two of the most basic display settings you cannot click No...
...Click (Start), Control Panel, then under Appearance and Personalization, click Adjust Screen Resolution. If the color in Windows XP: Shortcut Right-click on your monitor. The Display Properties dialog box opens. 3 Click the Settings tab. 4 To change . If the new settings do not look best displayed with..., then click Help and Support. Changing color depth and screen resolution Color depth is 2560 × 1600. 10 Using Your Gateway Flat-Panel Monitor Changing Windows screen settings Adjusting the color depth and screen area are two of the most basic display settings you cannot click No...

User Guide
Page 15
...EzTune software When installed onto your computer, EzTune™ software (included on CD) lets you can: • Change the orientation of the monitor settings from your computer. If the new settings make the screen illegible and you cannot click No, the settings return to portrait). (Requires... the optional height-adjustable stand available in the United States at www.gateway.com.) • Change brightness, contrast, and color balance • Change screen geometry • Set the display position and resolution For ...
...EzTune software When installed onto your computer, EzTune™ software (included on CD) lets you can: • Change the orientation of the monitor settings from your computer. If the new settings make the screen illegible and you cannot click No, the settings return to portrait). (Requires... the optional height-adjustable stand available in the United States at www.gateway.com.) • Change brightness, contrast, and color balance • Change screen geometry • Set the display position and resolution For ...

User Guide
Page 16
Use these conventions and the power can be reduced to a computer that supports the VESA Display Power Management Signaling (DPMS) Protocol, the monitor can conserve significant energy by reducing power consumption during periods of non-use. Using Your Gateway Flat-Panel Monitor Power management Energy declaration When connected to the following levels: VESA State LED Indicator Power Consumption On Blue In the Active Off mode the Power LED will then enter the Active Off mode (sleep). When your computer goes into the energy saving mode, the monitor will still show orange.
Use these conventions and the power can be reduced to a computer that supports the VESA Display Power Management Signaling (DPMS) Protocol, the monitor can conserve significant energy by reducing power consumption during periods of non-use. Using Your Gateway Flat-Panel Monitor Power management Energy declaration When connected to the following levels: VESA State LED Indicator Power Consumption On Blue In the Active Off mode the Power LED will then enter the Active Off mode (sleep). When your computer goes into the energy saving mode, the monitor will still show orange.

User Guide
Page 17
... computer. For more information about connecting the video cable, see "Connecting the monitor" on page 2. • Make sure that the monitor is turned on page 2. • Make sure that the monitor warms up for ten seconds. www.gateway.com No picture • Touch Menu, then touch Input Select to make sure that you have...
... computer. For more information about connecting the video cable, see "Connecting the monitor" on page 2. • Make sure that the monitor is turned on page 2. • Make sure that the monitor warms up for ten seconds. www.gateway.com No picture • Touch Menu, then touch Input Select to make sure that you have...
User Guide
Page 18
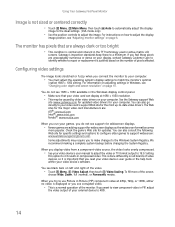
... video drivers on page 10. This is a normal operation of your computer. Using Your Gateway Flat-Panel Monitor Image is normal and inherent in the TFT technology used in active-matrix LCD screens. You do not see 1680 × 1050 available in the Windows display control panel.... • Make sure that are unacceptably numerous or dense on your display, contact Gateway Customer Care to support widescreen: www.widescreengamingforum.com. The monitor has pixels that ...
... video drivers on page 10. This is a normal operation of your computer. Using Your Gateway Flat-Panel Monitor Image is normal and inherent in the TFT technology used in active-matrix LCD screens. You do not see 1680 × 1050 available in the Windows display control panel.... • Make sure that are unacceptably numerous or dense on your display, contact Gateway Customer Care to support widescreen: www.widescreengamingforum.com. The monitor has pixels that ...

User Guide
Page 19
...your headphone/speaker mute settings, click the speaker icon in my headphones, but I want to the monitor. To adjust the volume in Windows XP, click the speaker icon in a superior digital image. www.gateway.com You need to know whether you set the Windows volume mid-way between the lowest and... highest setting. Also, in this configuration the PIP can use ? • You can support the input of the speaker bar. To check your HDMI audio source is sent to the monitor. The...
...your headphone/speaker mute settings, click the speaker icon in my headphones, but I want to the monitor. To adjust the volume in Windows XP, click the speaker icon in a superior digital image. www.gateway.com You need to know whether you set the Windows volume mid-way between the lowest and... highest setting. Also, in this configuration the PIP can use ? • You can support the input of the speaker bar. To check your HDMI audio source is sent to the monitor. The...

User Guide
Page 20
Using Your Gateway Flat-Panel Monitor HDCP What is not negotiating correctly. Up-converting can cause "noise" ... protect digital entertainment content that need smoothing. 16 However, you change the receiving device (DTV, monitor, or projector) input to watch the DVD movie. This is DCDi by the Intel® Corporation to the... DCDi creates new information through interpolation which then issues a set -top box) and the digital display (monitor, digital television/DTV, or projector). HDCP is established, the transmitter encrypts the data and sends it acknowledges...
Using Your Gateway Flat-Panel Monitor HDCP What is not negotiating correctly. Up-converting can cause "noise" ... protect digital entertainment content that need smoothing. 16 However, you change the receiving device (DTV, monitor, or projector) input to watch the DVD movie. This is DCDi by the Intel® Corporation to the... DCDi creates new information through interpolation which then issues a set -top box) and the digital display (monitor, digital television/DTV, or projector). HDCP is established, the transmitter encrypts the data and sends it acknowledges...

User Guide
Page 21
...monitor as your primary monitor and not use both your notebook's display and this key combination is located along the top row of keys. The F4 key is FN+F4. Panel size 22 inches (diagonal) Panel type 22-inch viewable TFT active matrix TN High brightness, glare (HD2200) High brightness, non-glare (HD2201...d-sub analog VGA (right-angle) Power Power consumption Normal operation: On Gateway notebooks, this monitor in extended desktop multi-monitor mode. See your notebook's user guide for Gateway and its subsidiaries are subject to your notebook's display and an externally ...
...monitor as your primary monitor and not use both your notebook's display and this key combination is located along the top row of keys. The F4 key is FN+F4. Panel size 22 inches (diagonal) Panel type 22-inch viewable TFT active matrix TN High brightness, glare (HD2200) High brightness, non-glare (HD2201...d-sub analog VGA (right-angle) Power Power consumption Normal operation: On Gateway notebooks, this monitor in extended desktop multi-monitor mode. See your notebook's user guide for Gateway and its subsidiaries are subject to your notebook's display and an externally ...

User Guide
Page 22
Using Your Gateway Flat-Panel Monitor Power input 100~240 VAC, 50/60 Hz (built-in power supply) Certifications CSA, cUS, FCC Class B, CE, NOM, VCCI Wall mount bracket VESA 4 × 3....
Using Your Gateway Flat-Panel Monitor Power input 100~240 VAC, 50/60 Hz (built-in power supply) Certifications CSA, cUS, FCC Class B, CE, NOM, VCCI Wall mount bracket VESA 4 × 3....


