
User Guide
Page 3
Contents Using Your Gateway Flat-Panel Monitor 1 Connecting the monitor 2 Connecting video inputs 2 Connecting power 2 Connecting a security cable 3 Setting up the optional speaker bar 3 Starting the monitor 5 Adjusting monitor settings 6 Using the EzTouch menu buttons 6 Using the shortcut menu 6 Using the main menu 7 Using Picture-in-Picture (PIP 9 Changing Windows screen settings 10 Changing color depth and screen resolution 10 EzTune software 11 Power management 12 Energy declaration 12 Maintaining 12 Troubleshooting 12 No power 12 No picture 13 Display colors are wrong...
Contents Using Your Gateway Flat-Panel Monitor 1 Connecting the monitor 2 Connecting video inputs 2 Connecting power 2 Connecting a security cable 3 Setting up the optional speaker bar 3 Starting the monitor 5 Adjusting monitor settings 6 Using the EzTouch menu buttons 6 Using the shortcut menu 6 Using the main menu 7 Using Picture-in-Picture (PIP 9 Changing Windows screen settings 10 Changing color depth and screen resolution 10 EzTune software 11 Power management 12 Energy declaration 12 Maintaining 12 Troubleshooting 12 No power 12 No picture 13 Display colors are wrong...

User Guide
Page 5
Using Your Gateway Flat-Panel Monitor • Connecting the monitor • Starting the monitor • Adjusting monitor settings • Changing Windows screen settings • Power management • Maintaining • Troubleshooting • Specifications 1
Using Your Gateway Flat-Panel Monitor • Connecting the monitor • Starting the monitor • Adjusting monitor settings • Changing Windows screen settings • Power management • Maintaining • Troubleshooting • Specifications 1

User Guide
Page 6
... a digital video connector (DVI), connect a DVI video cable (not included) to the white connector on the monitor. You may need to set up the monitor, first unpack the box, unwrap the components, then make your cable connections. OR Connect an HDMI cable to the HDMI port on the monitor, or connect component video cables to the component video ports on the monitor. - Important For best audio performance, if your source device's user guide for more information. Using Your Gateway Flat-Panel Monitor Connecting the monitor To set your video source's audio mode to PCM or ANALOG to...
... a digital video connector (DVI), connect a DVI video cable (not included) to the white connector on the monitor. You may need to set up the monitor, first unpack the box, unwrap the components, then make your cable connections. OR Connect an HDMI cable to the HDMI port on the monitor, or connect component video cables to the component video ports on the monitor. - Important For best audio performance, if your source device's user guide for more information. Using Your Gateway Flat-Panel Monitor Connecting the monitor To set your video source's audio mode to PCM or ANALOG to...

User Guide
Page 7
... monitor. Connecting a security cable You can order a speaker bar from voltage spikes. 3 To make sure that the monitor's power is correctly connected, check the power button on each side of your monitor from www.gateway.com. In the United States, you can secure your monitor to another heavy object) with the mounting slots underneath the monitor. 3 To install the speaker bar: 1 Turn off the monitor. 2 Tilt the screen back, then match the mounting...
... monitor. Connecting a security cable You can order a speaker bar from voltage spikes. 3 To make sure that the monitor's power is correctly connected, check the power button on each side of your monitor from www.gateway.com. In the United States, you can secure your monitor to another heavy object) with the mounting slots underneath the monitor. 3 To install the speaker bar: 1 Turn off the monitor. 2 Tilt the screen back, then match the mounting...

User Guide
Page 9
... blue (on -screen display (OSD) to set your source device's user guide for more information. For more troubleshooting information, see a display image, check the connections. After your computer is running, the power LED on your monitor, then slide the speaker bar back. www.gateway.com 5 Plug the speaker bar's audio plug into the audio jack on the monitor's power button should be blue. See your video source's audio mode to PCM or ANALOG to appear. Starting the monitor To start the monitor: 1 Touch the power button on your video connection uses HDMI, the digital audio...
... blue (on -screen display (OSD) to set your source device's user guide for more information. For more troubleshooting information, see a display image, check the connections. After your computer is running, the power LED on your monitor, then slide the speaker bar back. www.gateway.com 5 Plug the speaker bar's audio plug into the audio jack on the monitor's power button should be blue. See your video source's audio mode to PCM or ANALOG to appear. Starting the monitor To start the monitor: 1 Touch the power button on your video connection uses HDMI, the digital audio...
User Guide
Page 10
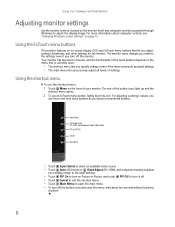
...mode: Video Adjust PIP On/PIP Off Cancel Main Menu • Touch Input Select to select an available video source. • Touch Auto (VGA mode) or Video Adjust (DVI, HDMI, and component modes) to adjust your monitor. Using Your Gateway Flat-Panel Monitor Adjusting monitor settings Use the monitor controls (located on page 10. Using the EzTouch menu buttons This monitor features an on-screen display (OSD) and EzTouch menu buttons that is currently open the main menu. • To turn off the button icons and close the menu, wait about computer controls, see "Changing Windows screen...
...mode: Video Adjust PIP On/PIP Off Cancel Main Menu • Touch Input Select to select an available video source. • Touch Auto (VGA mode) or Video Adjust (DVI, HDMI, and component modes) to adjust your monitor. Using Your Gateway Flat-Panel Monitor Adjusting monitor settings Use the monitor controls (located on page 10. Using the EzTouch menu buttons This monitor features an on-screen display (OSD) and EzTouch menu buttons that is currently open the main menu. • To turn off the button icons and close the menu, wait about computer controls, see "Changing Windows screen...

User Guide
Page 11
... video source. www.gateway.com Using the main menu To use a button, lightly touch its icon. Back (in the darkest portion of the picture. Reset-Resets the monitor to optimum settings. (VGA mode only) Picture-Opens the Picture menu, where you can adjust the source, position, size, and transparency of the button icons light up . Brightness-Adjusts the amount of light in submenus only) Select Previous Next Menu Off OSD Menu Main menu Picture menu Tip While the OSD is active, on the front of the video image...
... video source. www.gateway.com Using the main menu To use a button, lightly touch its icon. Back (in the darkest portion of the picture. Reset-Resets the monitor to optimum settings. (VGA mode only) Picture-Opens the Picture menu, where you can adjust the source, position, size, and transparency of the button icons light up . Brightness-Adjusts the amount of light in submenus only) Select Previous Next Menu Off OSD Menu Main menu Picture menu Tip While the OSD is active, on the front of the video image...

User Guide
Page 12
... frame rates of the source image and adapts the frame rate of the video used in order to access your computer programs while watching video. Size-Sets the size of the PIP window. PIP Picture-Opens a menu where you are from top to bottom with black bars at all edges. Source-Sets the source of the display for optimized video performance. Unlike Wide mode, Panoramic mode stretches only the left and right of the image distortion free. Video Adjust menu...
... frame rates of the source image and adapts the frame rate of the video used in order to access your computer programs while watching video. Size-Sets the size of the PIP window. PIP Picture-Opens a menu where you are from top to bottom with black bars at all edges. Source-Sets the source of the display for optimized video performance. Unlike Wide mode, Panoramic mode stretches only the left and right of the image distortion free. Video Adjust menu...

User Guide
Page 13
... input source for more information see "Changing Windows screen settings" on the monitor. ■ Change the resolution of video sources can disable this option to the display's native response time. OK HDMI OK No OK - ** For some video resolutions, refresh rates, and video scaling modes, PIP may want to change . www.gateway.com OSD Menu Geometry menu (VGA mode only) Advanced menu Description H Position-Moves the display image left and right. If you receive a message that you prefer using your computer's settings to the factory settings...
... input source for more information see "Changing Windows screen settings" on the monitor. ■ Change the resolution of video sources can disable this option to the display's native response time. OK HDMI OK No OK - ** For some video resolutions, refresh rates, and video scaling modes, PIP may want to change . www.gateway.com OSD Menu Geometry menu (VGA mode only) Advanced menu Description H Position-Moves the display image left and right. If you receive a message that you prefer using your computer's settings to the factory settings...
User Guide
Page 14
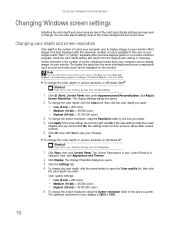
Using Your Gateway Flat-Panel Monitor Changing Windows screen settings Adjusting the color depth and screen area are two of colors your computer uses to display images on your monitor. Changing color depth and screen resolution Color depth is the number of colors available. Most images look right, click No. If the new settings do not look best displayed with the maximum number of pixels (individual colored dots) your monitor. Screen resolution is the number of the most basic display settings you want. • Low (8-bit) = 256 colors •...
Using Your Gateway Flat-Panel Monitor Changing Windows screen settings Adjusting the color depth and screen area are two of colors your computer uses to display images on your monitor. Changing color depth and screen resolution Color depth is the number of colors available. Most images look right, click No. If the new settings do not look best displayed with the maximum number of pixels (individual colored dots) your monitor. Screen resolution is the number of the most basic display settings you want. • Low (8-bit) = 256 colors •...

User Guide
Page 15
... seconds. 7 Click OK EzTune software When installed onto your computer. www.gateway.com 6 Click Apply. If the new settings make the screen illegible and you cannot click No, the settings return to portrait). (Requires the optional height-adjustable stand available in the United States at www.gateway.com.) • Change brightness, contrast, and color balance • Change screen geometry • Set the display position and resolution For more information, see the...
... seconds. 7 Click OK EzTune software When installed onto your computer. www.gateway.com 6 Click Apply. If the new settings make the screen illegible and you cannot click No, the settings return to portrait). (Requires the optional height-adjustable stand available in the United States at www.gateway.com.) • Change brightness, contrast, and color balance • Change screen geometry • Set the display position and resolution For more information, see the...

User Guide
Page 16
Use these conventions and the power can conserve significant energy by reducing power consumption during periods of non-use. In the Active Off mode the Power LED will then enter the Active Off mode (sleep). Using Your Gateway Flat-Panel Monitor Power management Energy declaration When connected to a computer that supports the VESA Display Power Management Signaling (DPMS) Protocol, the monitor can be reduced to the following levels: VESA State LED Indicator Power Consumption On Blue When your computer goes into the energy saving mode, the monitor will still show orange.
Use these conventions and the power can conserve significant energy by reducing power consumption during periods of non-use. In the Active Off mode the Power LED will then enter the Active Off mode (sleep). Using Your Gateway Flat-Panel Monitor Power management Energy declaration When connected to a computer that supports the VESA Display Power Management Signaling (DPMS) Protocol, the monitor can be reduced to the following levels: VESA State LED Indicator Power Consumption On Blue When your computer goes into the energy saving mode, the monitor will still show orange.

User Guide
Page 17
... ideal settings. (VGA mode only) • Remove any pins that the video cable is connected securely to both the back of the monitor and the power outlet. Color is not uniform • Touch Menu, Main Menu, then touch Auto to automatically adjust the display image to the ideal settings. (VGA mode only) • Make sure that the video cable is connected securely to the back of the monitor and your computer. www.gateway.com No picture • Touch Menu, then touch Input...
... ideal settings. (VGA mode only) • Remove any pins that the video cable is connected securely to both the back of the monitor and the power outlet. Color is not uniform • Touch Menu, Main Menu, then touch Auto to automatically adjust the display image to the ideal settings. (VGA mode only) • Make sure that the video cable is connected securely to the back of the monitor and your computer. www.gateway.com No picture • Touch Menu, then touch Input...
User Guide
Page 18
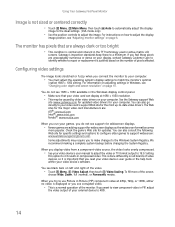
... updated video drivers for updates. When you connect the monitor to use Picture in Windows, see "Changing color depth and screen resolution" on page 10. We recommend making a complete system backup before changing the System Registry. To fill more popular. Configuring video settings The image looks stretched or fuzzy when you try to your computer. Using Your Gateway Flat-Panel Monitor Image is not sized or centered correctly • Touch Menu, Main Menu, then touch Auto to automatically adjust the display image to...
... updated video drivers for updates. When you connect the monitor to use Picture in Windows, see "Changing color depth and screen resolution" on page 10. We recommend making a complete system backup before changing the System Registry. To fill more popular. Configuring video settings The image looks stretched or fuzzy when you try to your computer. Using Your Gateway Flat-Panel Monitor Image is not sized or centered correctly • Touch Menu, Main Menu, then touch Auto to automatically adjust the display image to...

User Guide
Page 19
... make sure that your HDMI audio source is set too high, the speaker bar's sound may have been muted using the digital connection, your video content remains completely digital from the speakers sounds distorted. • Turn down the volume until the distortion disappears. • Check the audio output volume of the sound device the speaker bar is connected to . To check your game console supports Component (YPbPr), this results in the Windows taskbar, or click (Start), Control Panel, Sounds...
... make sure that your HDMI audio source is set too high, the speaker bar's sound may have been muted using the digital connection, your video content remains completely digital from the speakers sounds distorted. • Turn down the volume until the distortion disappears. • Check the audio output volume of the sound device the speaker bar is connected to . To check your game console supports Component (YPbPr), this results in the Windows taskbar, or click (Start), Control Panel, Sounds...

User Guide
Page 20
... digital content (signal) between the video source (computer, DVD player, or set of unique secret device keys to determine whether a component is HDCP compliant. • If the video source device does not have a DVI or HDMI connection, it to allow renegotiation. The signal on a HDCP-enabled DVD player, you change the receiving device (DTV, monitor, or projector) input to watch broadcast TV, then change the input...
... digital content (signal) between the video source (computer, DVD player, or set of unique secret device keys to determine whether a component is HDCP compliant. • If the video source device does not have a DVI or HDMI connection, it to allow renegotiation. The signal on a HDCP-enabled DVD player, you change the receiving device (DTV, monitor, or projector) input to watch broadcast TV, then change the input...

User Guide
Page 21
...:10 Brightness 300 cd/m2 Contrast ratio 1000:1 Viewing angles 160° horizontal, 160° vertical Response time UltraResponse enabled: 4 ms (typical) UltraResponse disabled: 5 ms (typical) Frequency Horizontal: 30-83 KHz Vertical: 56-75 Hz Lamp type/life 40,000 -50,000 hours (minimum) Colors 16.7 million OSD languages English, French, Spanish, Italian, Japanese Connections and inputs ■ Analog (VGA): 15-pin mini d-sub VGA ■ Digital (DVI-D): 24-pin DVI-D (supports...
...:10 Brightness 300 cd/m2 Contrast ratio 1000:1 Viewing angles 160° horizontal, 160° vertical Response time UltraResponse enabled: 4 ms (typical) UltraResponse disabled: 5 ms (typical) Frequency Horizontal: 30-83 KHz Vertical: 56-75 Hz Lamp type/life 40,000 -50,000 hours (minimum) Colors 16.7 million OSD languages English, French, Spanish, Italian, Japanese Connections and inputs ■ Analog (VGA): 15-pin mini d-sub VGA ■ Digital (DVI-D): 24-pin DVI-D (supports...

User Guide
Page 24
... near your Gateway product. The best way to avoid spills is to rain or use an extension cord with a three-wire power cord to meet the latest standards for ventilation. Replacement parts and accessories Use only replacement parts and accessories recommended by Gateway. 20 Setting up your system ■ Read and follow these openings. Make sure you provide adequate space, at the factory to install the appropriate...
... near your Gateway product. The best way to avoid spills is to rain or use an extension cord with a three-wire power cord to meet the latest standards for ventilation. Replacement parts and accessories Use only replacement parts and accessories recommended by Gateway. 20 Setting up your system ■ Read and follow these openings. Make sure you provide adequate space, at the factory to install the appropriate...

User Guide
Page 25
... memory) into a low-power Sleep mode. The "Crossed-Out Waste Bin" label affixed to this product is no longer useful to you can responsibly recycle or reuse most of the materials in your product's user guide and we will be disposed of in Windows Vista, click Start, then click Help and Support. You can do your part for the environment by...
... memory) into a low-power Sleep mode. The "Crossed-Out Waste Bin" label affixed to this product is no longer useful to you can responsibly recycle or reuse most of the materials in your product's user guide and we will be disposed of in Windows Vista, click Start, then click Help and Support. You can do your part for the environment by...

User Guide
Page 26
...video cable. California Proposition 65 Warning This product contains chemicals known to the State of Industry Canada. Canada Industry Canada (IC) Unintentional emitter per FCC Part 15 This device has been tested and found to comply with the limits for a Class B digital device, pursuant to Part 15 of conformity Model: ■ HD2200/E ■ HD2201 Caution Changes...;dicté par Industrie Canada. 22 These limits are required to be determined by turning the equipment off and on, the user is encouraged to try to correct the interference by Gateway could void the FCC compliance and ...
...video cable. California Proposition 65 Warning This product contains chemicals known to the State of Industry Canada. Canada Industry Canada (IC) Unintentional emitter per FCC Part 15 This device has been tested and found to comply with the limits for a Class B digital device, pursuant to Part 15 of conformity Model: ■ HD2200/E ■ HD2201 Caution Changes...;dicté par Industrie Canada. 22 These limits are required to be determined by turning the equipment off and on, the user is encouraged to try to correct the interference by Gateway could void the FCC compliance and ...


