User Guide
Page 8
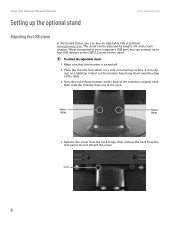
... stand. When connected to your computer's USB port, you can buy an adjustable USB stand from the LCD panel. Let the monitor base hang down on the back of the monitor's original neck, then slide the monitor base out of the table. 3 Press the two release buttons on a soft, non-marring surface. ...Release Button Release Button 4 Remove the screw from the neck hinge, then remove the neck from www.gateway.com. Do not discard the screw. The stand can connect up the optional stand www.gateway.com Attaching the USB stand In the United States, you can be adjusted for height, tilt, and ...
... stand. When connected to your computer's USB port, you can buy an adjustable USB stand from the LCD panel. Let the monitor base hang down on the back of the monitor's original neck, then slide the monitor base out of the table. 3 Press the two release buttons on a soft, non-marring surface. ...Release Button Release Button 4 Remove the screw from the neck hinge, then remove the neck from www.gateway.com. Do not discard the screw. The stand can connect up the optional stand www.gateway.com Attaching the USB stand In the United States, you can be adjusted for height, tilt, and ...

User Guide
Page 9
www.gateway.com Setting up the optional stand 5 Place the hinge cover over the hinge. Screw Screw Screw Screw 8 Slide the adjustable stand's neck onto the base. 5 The hinge cover came with your optional stand. 6 Attach the hinge cover using the screw you removed from the original neck hinge. 7 Remove the four small screws from the back of the LCD panel. Do not discard the four screws.
www.gateway.com Setting up the optional stand 5 Place the hinge cover over the hinge. Screw Screw Screw Screw 8 Slide the adjustable stand's neck onto the base. 5 The hinge cover came with your optional stand. 6 Attach the hinge cover using the screw you removed from the original neck hinge. 7 Remove the four small screws from the back of the LCD panel. Do not discard the four screws.

User Guide
Page 10
Thumbscrew 10 With the stand facing you removed previously. Screws Screws 6 Using Your Gateway Flat-panel Monitor www.gateway.com 9 Tighten the thumbscrew under the base with your fingers (or a flat screwdriver) to the LCD panel using the four screws you , press the mounting bracket lever to the left and hold it, then remove the bracket from the stand. 11 Attach the bracket to secure the neck into place.
Thumbscrew 10 With the stand facing you removed previously. Screws Screws 6 Using Your Gateway Flat-panel Monitor www.gateway.com 9 Tighten the thumbscrew under the base with your fingers (or a flat screwdriver) to the LCD panel using the four screws you , press the mounting bracket lever to the left and hold it, then remove the bracket from the stand. 11 Attach the bracket to secure the neck into place.

User Guide
Page 27
...and inherent in the TFT technology used in active-matrix LCD screens. For more information about color uniformity or brightness. For instructions on how to adjust the monitor image position, see "Connecting the monitor" on the number of the video cable for any ...to a minimum. For more information about connecting the video cable, see "Connecting the monitor" on page 13. Gateway's inspection standards keep these pixels are unacceptably numerous or dense on your monitor, contact Gateway Customer Care to identify whether a repair or replacement is justified based on page 2. ...
...and inherent in the TFT technology used in active-matrix LCD screens. For more information about color uniformity or brightness. For instructions on how to adjust the monitor image position, see "Connecting the monitor" on the number of the video cable for any ...to a minimum. For more information about connecting the video cable, see "Connecting the monitor" on page 13. Gateway's inspection standards keep these pixels are unacceptably numerous or dense on your monitor, contact Gateway Customer Care to identify whether a repair or replacement is justified based on page 2. ...


