User Guide
Page 3
Contents Using Your Gateway Flat-panel Monitor 1 Connecting the monitor 2 Setting up the optional stand 4 Attaching the USB stand 4 Adjusting monitor height tension 8 Adjusting monitor tilt tension 9 Connecting the USB hub 10 Setting up the optional speaker bar 11 Installing the speaker bar 11 Starting the monitor 12 Adjusting monitor settings 13 Monitor buttons 13 On-screen display options 14 Adjusting Windows display settings 16 Changing settings in Windows Vista 17 Changing settings in Windows XP 18 Video modes 20 Power management 20 ENERGY STAR 20 Energy declaration 21 ...
Contents Using Your Gateway Flat-panel Monitor 1 Connecting the monitor 2 Setting up the optional stand 4 Attaching the USB stand 4 Adjusting monitor height tension 8 Adjusting monitor tilt tension 9 Connecting the USB hub 10 Setting up the optional speaker bar 11 Installing the speaker bar 11 Starting the monitor 12 Adjusting monitor settings 13 Monitor buttons 13 On-screen display options 14 Adjusting Windows display settings 16 Changing settings in Windows Vista 17 Changing settings in Windows XP 18 Video modes 20 Power management 20 ENERGY STAR 20 Energy declaration 21 ...

User Guide
Page 5
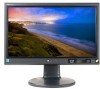
Using Your Gateway Flat-panel Monitor • Connecting the monitor • Setting up the optional stand • Setting up the optional speaker bar • Starting the monitor • Adjusting monitor settings • Adjusting Windows display settings • Power management • Maintaining • Troubleshooting • Specifications 1
Using Your Gateway Flat-panel Monitor • Connecting the monitor • Setting up the optional stand • Setting up the optional speaker bar • Starting the monitor • Adjusting monitor settings • Adjusting Windows display settings • Power management • Maintaining • Troubleshooting • Specifications 1

User Guide
Page 7
... easier to tighten, and the cable does not get in the way of the speaker bar. 5 Make sure that your computer is acceptable, we recommend using the right-angle cable (available in the U.S. If your computer. 6 Plug the power cord into a correctly grounded electrical outlet. 3 www.gateway.com Connecting the monitor 4 Connect the blue right-angle VGA video cable to the blue video connector under the back of the display.
... easier to tighten, and the cable does not get in the way of the speaker bar. 5 Make sure that your computer is acceptable, we recommend using the right-angle cable (available in the U.S. If your computer. 6 Plug the power cord into a correctly grounded electrical outlet. 3 www.gateway.com Connecting the monitor 4 Connect the blue right-angle VGA video cable to the blue video connector under the back of the display.
User Guide
Page 8
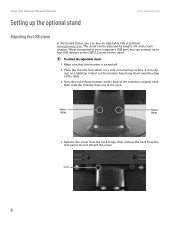
... remove the neck from www.gateway.com. Screw 4 To attach the adjustable stand: 1 Make sure that the monitor is turned off. 2 Place the monitor face-down over the edge of the neck. Using Your Gateway Flat-panel Monitor Setting up to four USB devices to your computer's USB port, you can connect up the optional stand www.gateway.com Attaching the USB stand In the United States, you can be adjusted for height, tilt, and screen rotation...
... remove the neck from www.gateway.com. Screw 4 To attach the adjustable stand: 1 Make sure that the monitor is turned off. 2 Place the monitor face-down over the edge of the neck. Using Your Gateway Flat-panel Monitor Setting up to four USB devices to your computer's USB port, you can connect up the optional stand www.gateway.com Attaching the USB stand In the United States, you can be adjusted for height, tilt, and screen rotation...

User Guide
Page 12
... force required to turn the screw several times before the tension is factory adjusted to remove it does not stay in the slot above the USB In port). You also need to change the stand's height tension. To adjust your monitor's height tension: 1 Press the screwdriver access hole cap from the base. Using Your Gateway Flat-panel Monitor www.gateway.com Adjusting monitor height tension The stand is correct for your size of the stand, in place...
... force required to turn the screw several times before the tension is factory adjusted to remove it does not stay in the slot above the USB In port). You also need to change the stand's height tension. To adjust your monitor's height tension: 1 Press the screwdriver access hole cap from the base. Using Your Gateway Flat-panel Monitor www.gateway.com Adjusting monitor height tension The stand is correct for your size of the stand, in place...

User Guide
Page 13
... 1 inch (2.54 cm) below eye level. You may need to adjust lighting to the screen. Adjusting monitor tilt tension To adjust your eye level while you are based on the top of the stand) so the monitor stays in place when you let go . After the forces are equal. This angle creates the most desktop displays. Tilt tension screw Ergonomic guidelines The recommended screen positioning is tilted upward. 9 Screen tilt...
... 1 inch (2.54 cm) below eye level. You may need to adjust lighting to the screen. Adjusting monitor tilt tension To adjust your eye level while you are based on the top of the stand) so the monitor stays in place when you let go . After the forces are equal. This angle creates the most desktop displays. Tilt tension screw Ergonomic guidelines The recommended screen positioning is tilted upward. 9 Screen tilt...

User Guide
Page 14
... connect your USB stand's built-in USB hub: 1 Plug the included USB cable into the USB In port on the back of your computer. Connecting the USB hub The optional USB stand has a built-in USB 1.1 mode. USB In port Power connector USB 2.0 ports 2 To provide full power to your stand's USB ports, connect the AC power adapter to a USB 1.1 port on your USB stand and into a USB 2.0 port on your computer, the stand's USB hub operates in , 4-port, USB 2.0 hub. Using Your Gateway Flat-panel Monitor www.gateway.com Screen distance from user The screen should...
... connect your USB stand's built-in USB hub: 1 Plug the included USB cable into the USB In port on the back of your computer. Connecting the USB hub The optional USB stand has a built-in USB 1.1 mode. USB In port Power connector USB 2.0 ports 2 To provide full power to your stand's USB ports, connect the AC power adapter to a USB 1.1 port on your USB stand and into a USB 2.0 port on your computer, the stand's USB hub operates in , 4-port, USB 2.0 hub. Using Your Gateway Flat-panel Monitor www.gateway.com Screen distance from user The screen should...

User Guide
Page 15
... speaker bar Setting up the optional speaker bar Power/Volume control Kensington lock slot Headphone jack Power indicator Microphone jack Headphone jack Bass port Bass port Installing the speaker bar Tips & Tricks When using the speaker bar, we recommend that the speakers face forward. 2 Tighten the two thumbscrews on the back of the speaker bar. 3 Connect the speaker bar's USB power cord to any available USB port on your computer or on the USB stand. 4 Connect...
... speaker bar Setting up the optional speaker bar Power/Volume control Kensington lock slot Headphone jack Power indicator Microphone jack Headphone jack Bass port Bass port Installing the speaker bar Tips & Tricks When using the speaker bar, we recommend that the speakers face forward. 2 Tighten the two thumbscrews on the back of the speaker bar. 3 Connect the speaker bar's USB power cord to any available USB port on your computer or on the USB stand. 4 Connect...

User Guide
Page 16
Using Your Gateway Flat-panel Monitor www.gateway.com 6 Turn on the front of monitor. The power LED on the power button turns on. 2 Turn on your computer is not blue or you do not see "Troubleshooting" on the monitor's power button should be blue. For more troubleshooting information, see a monitor image, check the connections. Starting the monitor Important The appearance of the monitor for the monitor image to appear. If the power LED is running, the power LED on page 22. 3 Adjust the tilt of your...
Using Your Gateway Flat-panel Monitor www.gateway.com 6 Turn on the front of monitor. The power LED on the power button turns on. 2 Turn on your computer is not blue or you do not see "Troubleshooting" on the monitor's power button should be blue. For more troubleshooting information, see a monitor image, check the connections. Starting the monitor Important The appearance of the monitor for the monitor image to appear. If the power LED is running, the power LED on page 22. 3 Adjust the tilt of your...

User Guide
Page 17
... adjust OSD options. Adjusting monitor settings Use the monitor controls (located on -screen display (OSD) to adjust the monitor image. For more information, see "Adjusting Windows display settings" on page 13. The monitor saves changes you turn off the monitor. Monitor buttons Important The appearance of the monitor to automatically adjust your monitor may vary from that lets you adjust contrast, brightness, and other monitor settings. OSD inactive: Press to select the video source. ■ Auto OSD active: Press to the settings, even if you make to open a menu or setting...
... adjust OSD options. Adjusting monitor settings Use the monitor controls (located on -screen display (OSD) to adjust the monitor image. For more information, see "Adjusting Windows display settings" on page 13. The monitor saves changes you turn off the monitor. Monitor buttons Important The appearance of the monitor to automatically adjust your monitor may vary from that lets you adjust contrast, brightness, and other monitor settings. OSD inactive: Press to select the video source. ■ Auto OSD active: Press to the settings, even if you make to open a menu or setting...

User Guide
Page 18
... Input button to return to a previous menu. 6 When you identify them. The monitor image is active, on-screen labels appear next to the buttons to exit the OSD. OSD inactive: Press to adjust the contrast. ■ Menu Press to the ideal settings for your current screen resolution. 2 Press the Menu button. To adjust the OSD settings: 1 Press the Auto button. Using Your Gateway Flat-panel Monitor www.gateway.com ■ / (contrast) OSD active: Press to exit. 14 The OSD menu opens. 3 Use the and buttons...
... Input button to return to a previous menu. 6 When you identify them. The monitor image is active, on-screen labels appear next to the buttons to exit the OSD. OSD inactive: Press to adjust the contrast. ■ Menu Press to the ideal settings for your current screen resolution. 2 Press the Menu button. To adjust the OSD settings: 1 Press the Auto button. Using Your Gateway Flat-panel Monitor www.gateway.com ■ / (contrast) OSD active: Press to exit. 14 The OSD menu opens. 3 Use the and buttons...

User Guide
Page 19
... You may need to maximize the life of the picture. www.gateway.com OSD Menu Main menu OSD menus Main Menu Auto Picture Geometry Advanced Reset Adjusting monitor settings Description Auto-Automatically adjusts your monitor to configure the vertical and horizontal position automatically. Picture menu Picture Brightness Contrast Gamma Video Scaling Geometry menu Geometry H-Position V-Position Clock Phase 50 Brightness-Adjusts the amount of light in the darkest portion of the monitor backlights. You can adjust color balance, change . High gamma levels increase white levels and...
... You may need to maximize the life of the picture. www.gateway.com OSD Menu Main menu OSD menus Main Menu Auto Picture Geometry Advanced Reset Adjusting monitor settings Description Auto-Automatically adjusts your monitor to configure the vertical and horizontal position automatically. Picture menu Picture Brightness Contrast Gamma Video Scaling Geometry menu Geometry H-Position V-Position Clock Phase 50 Brightness-Adjusts the amount of light in the darkest portion of the monitor backlights. You can adjust color balance, change . High gamma levels increase white levels and...

User Guide
Page 20
... resolution. Adjusting Windows display settings Color depth and screen resolution are the fonts used for smoother screen fonts. (Windows Vista already has ClearType selected by default.) 16 Screen fonts are two of pixels (individual colored dots) your computer's settings to use this option to Day Mode or Nite Mode. The higher the resolution, the more information and screen components (such as icon labels, title bars, and dialog boxes. Using Your Gateway Flat-panel Monitor OSD Menu Advanced menu Advanced Color Language LED Brightness Resolution...
... resolution. Adjusting Windows display settings Color depth and screen resolution are the fonts used for smoother screen fonts. (Windows Vista already has ClearType selected by default.) 16 Screen fonts are two of pixels (individual colored dots) your computer's settings to use this option to Day Mode or Nite Mode. The higher the resolution, the more information and screen components (such as icon labels, title bars, and dialog boxes. Using Your Gateway Flat-panel Monitor OSD Menu Advanced menu Advanced Color Language LED Brightness Resolution...

User Guide
Page 22
... arrow button to open the Color quality list, then click the color depth you want. 5 To change the display fonts to ClearType: 1 Click Start, then click Control Panel. Type the phrase changing display settings or changing screen resolution in Windows XP Help & Support For more information about adjusting monitor settings, click Start, then click Help and Support. If the new settings do not look right, click No. The Control Panel window opens. Clarifying screen fonts You can change the screen resolution, drag the Screen resolution...
... arrow button to open the Color quality list, then click the color depth you want. 5 To change the display fonts to ClearType: 1 Click Start, then click Control Panel. Type the phrase changing display settings or changing screen resolution in Windows XP Help & Support For more information about adjusting monitor settings, click Start, then click Help and Support. If the new settings do not look right, click No. The Control Panel window opens. Clarifying screen fonts You can change the screen resolution, drag the Screen resolution...

User Guide
Page 25
When your computer goes into the energy saving mode, the monitor will still show orange. In the Active Off mode the Power LED will then enter the Active Off mode (sleep). www.gateway.com Maintaining Energy declaration When connected to the following levels: VESA State On Active Off LED Indicator Blue Orange Power Consumption Use these conventions and the power can be reduced to a computer that supports the VESA Display Power Management Signaling (DPMS) Protocol, the monitor can conserve significant energy by reducing power consumption during periods of non-use.
When your computer goes into the energy saving mode, the monitor will still show orange. In the Active Off mode the Power LED will then enter the Active Off mode (sleep). www.gateway.com Maintaining Energy declaration When connected to the following levels: VESA State On Active Off LED Indicator Blue Orange Power Consumption Use these conventions and the power can be reduced to a computer that supports the VESA Display Power Management Signaling (DPMS) Protocol, the monitor can conserve significant energy by reducing power consumption during periods of non-use.

User Guide
Page 26
... power cord is connected correctly to both the back of the monitor and the wall outlet. No power Make sure that the video cable is connected securely to the back of the monitor and computer. Turn the monitor back on page 2. For more information about connecting the power cord, see "Connecting the monitor" on . ■ Make sure that the video cable is functioning correctly, a "No Signal" message appears. Using Your Gateway Flat-panel Monitor www.gateway.com Troubleshooting Important Make...
... power cord is connected correctly to both the back of the monitor and the wall outlet. No power Make sure that the video cable is connected securely to the back of the monitor and computer. Turn the monitor back on page 2. For more information about connecting the power cord, see "Connecting the monitor" on . ■ Make sure that the video cable is functioning correctly, a "No Signal" message appears. Using Your Gateway Flat-panel Monitor www.gateway.com Troubleshooting Important Make...

User Guide
Page 27
For more information about connecting the video cable, see "Adjusting monitor settings" on the number of pixels affected. 23 Image is not sized or centered correctly ■ Press the Auto button to automatically adjust the monitor image to the ideal settings. ■ Use the position controls to a minimum. Picture has shadows or "ghosts" ■ Press the Auto button to automatically adjust the monitor image to the ideal settings. ■ Remove any pins that the monitor warms up for any...
For more information about connecting the video cable, see "Adjusting monitor settings" on the number of pixels affected. 23 Image is not sized or centered correctly ■ Press the Auto button to automatically adjust the monitor image to the ideal settings. ■ Use the position controls to a minimum. Picture has shadows or "ghosts" ■ Press the Auto button to automatically adjust the monitor image to the ideal settings. ■ Remove any pins that the monitor warms up for any...

User Guide
Page 28
... settings, click the speaker icon in the Windows taskbar, or click Start, Control Panel, Sounds and Audio Devices, the Volume tab, then click Advanced. Using Your Gateway Flat-panel Monitor www.gateway.com Speaker bar does not work I installed the speaker bar, but no sound is coming from the speakers sounds distorted. ■ Turn down the volume until the distortion disappears. ■ Check the audio output volume of the sound device the speaker bar is connected to decrease the volume and turn...
... settings, click the speaker icon in the Windows taskbar, or click Start, Control Panel, Sounds and Audio Devices, the Volume tab, then click Advanced. Using Your Gateway Flat-panel Monitor www.gateway.com Speaker bar does not work I installed the speaker bar, but no sound is coming from the speakers sounds distorted. ■ Turn down the volume until the distortion disappears. ■ Check the audio output volume of the sound device the speaker bar is connected to decrease the volume and turn...

User Guide
Page 29
... OSD languages English, French, Spanish, Italian, Japanese Connections and inputs Analog (VGA): 15-pin mini d-sub VGA Digital (DVI-D with anti-glare coating Pixel resolution 1280 × 720 @60 Hz (native and maximum) Pixel pitch 0.0115 × 0.0115 inches (0.291 mm × 0.291 mm) Aspect ratio 16:9 Brightness and contrast ratio 250 cd/m2, 500:1 Frequencies Horizontal: 30~60 KHz; www.gateway.com Specifications Specifications Specifications are custom engineered by our suppliers to change...
... OSD languages English, French, Spanish, Italian, Japanese Connections and inputs Analog (VGA): 15-pin mini d-sub VGA Digital (DVI-D with anti-glare coating Pixel resolution 1280 × 720 @60 Hz (native and maximum) Pixel pitch 0.0115 × 0.0115 inches (0.291 mm × 0.291 mm) Aspect ratio 16:9 Brightness and contrast ratio 250 cd/m2, 500:1 Frequencies Horizontal: 30~60 KHz; www.gateway.com Specifications Specifications Specifications are custom engineered by our suppliers to change...
User Guide
Page 32
... of power source indicated on the power cord or allow it to ensure safe use an extension cord with a TV Tuner, cable, or satellite receiver card, make sure that the antenna or cable system is electrically grounded to make sure that the total ampere rating on . ■ When the monitor is damaged. ■ The system performance changes. Your Gateway product is important that the safety instructions...
... of power source indicated on the power cord or allow it to ensure safe use an extension cord with a TV Tuner, cable, or satellite receiver card, make sure that the antenna or cable system is electrically grounded to make sure that the total ampere rating on . ■ When the monitor is damaged. ■ The system performance changes. Your Gateway product is important that the safety instructions...


