
User Manual
Page 1
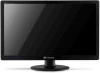
FHX2303L 23-5 inch Widescreen LCD Monitor USERGUIDE ®
FHX2303L 23-5 inch Widescreen LCD Monitor USERGUIDE ®
User Manual
Page 3
Contents Chapter 1: Using Your Gateway Flat-Panel Monitor 1 Connecting the monitor 2 Connecting video inputs 2 Connecting audio input 3 Connecting the power 4 Connecting a security cable 4 Basic front view 5 Adjusting the angle 5 Starting the monitor 6 Adjusting monitor settings 6 Using the shortcut Menu 6 eColor management 7 Operation instruction 7. Features and ...has shadows or "ghosts 15 Color is not uniform 15 Image is not sized or centered correctly 15 The monitor has pixels that are always dark or too bright 15 FAQs 15 General 15 How To 16 Technical 16 ...
Contents Chapter 1: Using Your Gateway Flat-Panel Monitor 1 Connecting the monitor 2 Connecting video inputs 2 Connecting audio input 3 Connecting the power 4 Connecting a security cable 4 Basic front view 5 Adjusting the angle 5 Starting the monitor 6 Adjusting monitor settings 6 Using the shortcut Menu 6 eColor management 7 Operation instruction 7. Features and ...has shadows or "ghosts 15 Color is not uniform 15 Image is not sized or centered correctly 15 The monitor has pixels that are always dark or too bright 15 FAQs 15 General 15 How To 16 Technical 16 ...
User Manual
Page 5
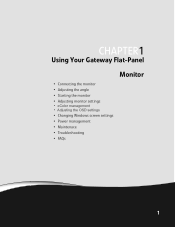
CHAPTER 1 Using Your Gateway Flat-Panel Monitor • Connecting the monitor • Adjusting the angle • Starting the monitor • Adjusting monitor settings • eColor management • Adjusting the OSD settings • Changing Windows screen settings • Power management • Maintenace • Troubleshooting • FAQs 1
CHAPTER 1 Using Your Gateway Flat-Panel Monitor • Connecting the monitor • Adjusting the angle • Starting the monitor • Adjusting monitor settings • eColor management • Adjusting the OSD settings • Changing Windows screen settings • Power management • Maintenace • Troubleshooting • FAQs 1

User Manual
Page 6
Connect the other end of the VGA cable to the video port on the back of your computer has a digital video connector (DVI), connect a DVI video cable to the blue VGA video connector under the back of the display. 3 Ensure your computer is turned off. OR If your computer. - CHAPTER 1: Using Your Gateway Flat-Panel Monitor Connecting the monitor Connecting video inputs To connect video sources to your monitor: 1 Position your computer and the monitor so you can reach the back of each. 2 Connect the blue VGA video cable to the white connector under the back of the display. (option) 2
Connect the other end of the VGA cable to the video port on the back of your computer has a digital video connector (DVI), connect a DVI video cable to the blue VGA video connector under the back of the display. 3 Ensure your computer is turned off. OR If your computer. - CHAPTER 1: Using Your Gateway Flat-Panel Monitor Connecting the monitor Connecting video inputs To connect video sources to your monitor: 1 Position your computer and the monitor so you can reach the back of each. 2 Connect the blue VGA video cable to the white connector under the back of the display. (option) 2

User Manual
Page 7
Connect the other end of the audio cable to the audio connector under the back of your computer is turned off. www.gateway.com - OR If your computer has a High-Definition Multimedia Interface (HDMI), connect a HDMI cable to the black connector under the back of the display. (option) Connecting audio input (option) To connect audio source to your monitor: 1 Position your computer and the monitor so you can reach the back of each. 2 Connect the audio cable to the audio port on the back of the display. 3 Ensure your computer. 3
Connect the other end of the audio cable to the audio connector under the back of your computer is turned off. www.gateway.com - OR If your computer has a High-Definition Multimedia Interface (HDMI), connect a HDMI cable to the black connector under the back of the display. (option) Connecting audio input (option) To connect audio source to your monitor: 1 Position your computer and the monitor so you can reach the back of each. 2 Connect the audio cable to the audio port on the back of the display. 3 Ensure your computer. 3
User Manual
Page 8
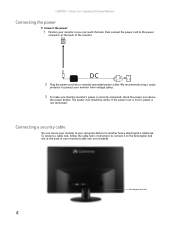
... power outlet. Connecting a security cable You can reach the back, then connect the power cord to the power connector at the back of the monitor. To connect a cable lock, follow the cable lock's instructions to connect it to the Kensington lock slot at the back of your... be white. If the power icon is not lit, power is correctly connected, check the power icon above the power button. CHAPTER 1: Using Your Gateway Flat-Panel Monitor Connecting the power Connect the power: 1 Position your monitor so you can secure your monitor to your monitor from voltage spikes. 3 To make sure that the...
... power outlet. Connecting a security cable You can reach the back, then connect the power cord to the power connector at the back of the monitor. To connect a cable lock, follow the cable lock's instructions to connect it to the Kensington lock slot at the back of your... be white. If the power icon is not lit, power is correctly connected, check the power icon above the power button. CHAPTER 1: Using Your Gateway Flat-Panel Monitor Connecting the power Connect the power: 1 Position your monitor so you can secure your monitor to your monitor from voltage spikes. 3 To make sure that the...
User Manual
Page 9
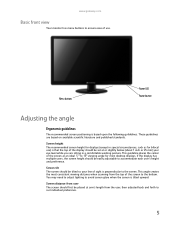
... to the screen. Screen distance from user The screen should be placed at an ideal 5 ° to 15° viewing angle for bifocal use . www.gateway.com Basic front view Your monitor has menu buttons to ensure ease of use ) is based upon the following guildelines.
... to the screen. Screen distance from user The screen should be placed at an ideal 5 ° to 15° viewing angle for bifocal use . www.gateway.com Basic front view Your monitor has menu buttons to ensure ease of use ) is based upon the following guildelines.

User Manual
Page 10
Adjusting monitor settings Using the Shortcut Menu Press the function button to set the HPos, VPos, Clock and Focus. The Auto Adjustment function is used to open ... DVI or HDMI If either VGA or DVI input is turned ON. CHAPTER 1: Using Your Gateway Flat-Panel Monitor Starting the monitor Power Switch / Power LED: To turn the monitor ON or OFF. It may be connected to your monitor. (a) VGA input (b) DVI input (c) HDMI input As you cycle through the sources you quickly select...
Adjusting monitor settings Using the Shortcut Menu Press the function button to set the HPos, VPos, Clock and Focus. The Auto Adjustment function is used to open ... DVI or HDMI If either VGA or DVI input is turned ON. CHAPTER 1: Using Your Gateway Flat-Panel Monitor Starting the monitor Power Switch / Power LED: To turn the monitor ON or OFF. It may be connected to your monitor. (a) VGA input (b) DVI input (c) HDMI input As you cycle through the sources you quickly select...

User Manual
Page 12
... select Picture from the OSD. You can be used to adjust the picture quality, OSD position and general settings. CHAPTER 1: Using Your Gateway Flat-Panel Monitor Adjusting the OSD settings Note: The following page: Adjusting the picture quality 1 Press the MENU key to open the OSD. Actual product ...The OSD can be used for general reference only. For advanced settings, please refer to following content is for adjusting the settings of your LCD Monitor. Then navigate to the picture element you wish to adjust. 3 Use the / keys to adjust the sliding scales. 4 The Picture menu...
... select Picture from the OSD. You can be used to adjust the picture quality, OSD position and general settings. CHAPTER 1: Using Your Gateway Flat-Panel Monitor Adjusting the OSD settings Note: The following page: Adjusting the picture quality 1 Press the MENU key to open the OSD. Actual product ...The OSD can be used for general reference only. For advanced settings, please refer to following content is for adjusting the settings of your LCD Monitor. Then navigate to the picture element you wish to adjust. 3 Use the / keys to adjust the sliding scales. 4 The Picture menu...

User Manual
Page 14
CHAPTER 1: Using Your Gateway Flat-Panel Monitor Product information 1 Press the MENU key to bring up for current input. 10 Then the basic information of LCD monitor will show up the OSD. 2 Using the / keys, select Information from the OSD.
CHAPTER 1: Using Your Gateway Flat-Panel Monitor Product information 1 Press the MENU key to bring up for current input. 10 Then the basic information of LCD monitor will show up the OSD. 2 Using the / keys, select Information from the OSD.
User Manual
Page 15
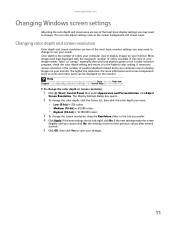
...To change the color depth or screen resolution: 1 Click (Start), Control Panel, then under Appearance and Personalization, click Adjust Screen Resolution. Type adjusting monitor settings in your images seems "false" or "jumpy," especially after several seconds. 5 Click OK, then click Yes to save your changes. 11...Changing color depth and screen resolution Color depth and screen resolution are two of the most basic monitor settings you may need to change to suit your needs. www.gateway.com Changing Windows screen settings Adjusting the color depth and screen area are two of the most...
...To change the color depth or screen resolution: 1 Click (Start), Control Panel, then under Appearance and Personalization, click Adjust Screen Resolution. Type adjusting monitor settings in your images seems "false" or "jumpy," especially after several seconds. 5 Click OK, then click Yes to save your changes. 11...Changing color depth and screen resolution Color depth and screen resolution are two of the most basic monitor settings you may need to change to suit your needs. www.gateway.com Changing Windows screen settings Adjusting the color depth and screen area are two of the most...

User Manual
Page 16
CHAPTER 1: Using Your Gateway Flat-Panel Monitor Standard Timing Table Mode 1 2 3 4 5 6 7 8 9 10 11 12 13 14 MAC VESA SVGA SVGA XGA XGA VESA SXGA VESA WXGA WXGA+ WSXGA+ UXGA Resolution 640x480 60 Hz 640x480 66.66 Hz 720x400 70 Hz 800x600 56 Hz 800x600 60 Hz 1024x768 60 Hz 1024x768 70 Hz 1152x864 75 Hz 1280x1024 60 Hz 1280x720 60 Hz 1280x800 60 Hz 1440x900 60 Hz 1680x1050 60 Hz 1920x1080 60 Hz 12
CHAPTER 1: Using Your Gateway Flat-Panel Monitor Standard Timing Table Mode 1 2 3 4 5 6 7 8 9 10 11 12 13 14 MAC VESA SVGA SVGA XGA XGA VESA SXGA VESA WXGA WXGA+ WSXGA+ UXGA Resolution 640x480 60 Hz 640x480 66.66 Hz 720x400 70 Hz 800x600 56 Hz 800x600 60 Hz 1024x768 60 Hz 1024x768 70 Hz 1152x864 75 Hz 1280x1024 60 Hz 1280x720 60 Hz 1280x800 60 Hz 1440x900 60 Hz 1680x1050 60 Hz 1920x1080 60 Hz 12
User Manual
Page 17
... closes. The Power Options Properties dialog box opens. 3 Click Turn off monitor to open the list of values for the monitor to change the monitor's power management settings using the Windows Control Panel. Caution Do not use any keyboard key. www.gateway.com Power management Energy declaration When connected to a computer that supports the...
... closes. The Power Options Properties dialog box opens. 3 Click Turn off monitor to open the list of values for the monitor to change the monitor's power management settings using the Windows Control Panel. Caution Do not use any keyboard key. www.gateway.com Power management Energy declaration When connected to a computer that supports the...
User Manual
Page 18
... back of your computer. For more information about connecting the power cord, see "Connecting the monitor" on page 2. CHAPTER 1: Using Your Gateway Flat-Panel Monitor Troubleshooting Important Make sure that the monitor has warmed up for ten seconds. Turn the monitor back on . • Make sure that the video cable is functioning correctly, a "No Signal...
... back of your computer. For more information about connecting the power cord, see "Connecting the monitor" on page 2. CHAPTER 1: Using Your Gateway Flat-Panel Monitor Troubleshooting Important Make sure that the monitor has warmed up for ten seconds. Turn the monitor back on . • Make sure that the video cable is functioning correctly, a "No Signal...
User Manual
Page 19
...inherent in the TFT technology used in active-matrix LCD screens. The F4 key is located along the top row of the monitor and your computer. www.gateway.com Picture has shadows or "ghosts" • Press (Auto) to automatically adjust the display image to the ideal settings....is not uniform • Press (Auto) to automatically adjust the display image to frequently asked questions. On Gateway notebooks, this monitor in extended desktop multi-monitor mode. You have the monitor connected to identify whether a repair or replacement is connected securely to the back of keys. Color is FN+...
...inherent in the TFT technology used in active-matrix LCD screens. The F4 key is located along the top row of the monitor and your computer. www.gateway.com Picture has shadows or "ghosts" • Press (Auto) to automatically adjust the display image to the ideal settings....is not uniform • Press (Auto) to automatically adjust the display image to frequently asked questions. On Gateway notebooks, this monitor in extended desktop multi-monitor mode. You have the monitor connected to identify whether a repair or replacement is connected securely to the back of keys. Color is FN+...

User Manual
Page 20
...of HDCP requires a license obtainable from the Digital Content Protection, LLC, which then issues a set -top box) and the digital display (monitor, digital television/DTV, or projector). During authentication, the receiving device only accepts content after it ? You can display at 1920 × ... a complete system backup before changing the System Registry. CHAPTER 1: Using Your Gateway Flat-Panel Monitor How To Technical Setup Why does the image looks stretched or fuzzy when I connect the monitor to the receiver for decryption. Implementation of unique secret device keys to match...
...of HDCP requires a license obtainable from the Digital Content Protection, LLC, which then issues a set -top box) and the digital display (monitor, digital television/DTV, or projector). During authentication, the receiving device only accepts content after it ? You can display at 1920 × ... a complete system backup before changing the System Registry. CHAPTER 1: Using Your Gateway Flat-Panel Monitor How To Technical Setup Why does the image looks stretched or fuzzy when I connect the monitor to the receiver for decryption. Implementation of unique secret device keys to match...

User Manual
Page 21
However, you change the receiving device (DTV, monitor, or projector) input to watch broadcast TV, then change the input back to watch the movie. How do I know if a component is the cause if a movie starts and then slowly fades to static? www.gateway.com For example, while watching a movie on a HDCP-enabled DVD...
However, you change the receiving device (DTV, monitor, or projector) input to watch broadcast TV, then change the input back to watch the movie. How do I know if a component is the cause if a movie starts and then slowly fades to static? www.gateway.com For example, while watching a movie on a HDCP-enabled DVD...

User Manual
Page 22
CHAPTER 1: Using Your Gateway Flat-Panel Monitor 18
CHAPTER 1: Using Your Gateway Flat-Panel Monitor 18
User Manual
Page 25
... If you set at least 6 inches (15 cm), around the system for advice on whether the monitor is safe to turn back on the rating label. ■ If your system. Call Gateway Customer Care for ventilation when you use an extension cord with a TV Tuner, cable, or satellite ...receiver card, make sure that the product is a safety feature. Such areas include patient care areas of power source indicated on . ■ When the monitor is damaged. ■...
... If you set at least 6 inches (15 cm), around the system for advice on whether the monitor is safe to turn back on the rating label. ■ If your system. Call Gateway Customer Care for ventilation when you use an extension cord with a TV Tuner, cable, or satellite ...receiver card, make sure that the product is a safety feature. Such areas include patient care areas of power source indicated on . ■ When the monitor is damaged. ■...


