User Manual
Page 3
...15 Image is not sized or centered correctly 15 The monitor has pixels that are always dark or too bright 15 FAQs 15 General 15 How To 16 Technical 16 Appendix A: Safety, Regulatory, and Legal Information 20 i Contents Chapter 1: Using Your Gateway Flat-Panel Monitor 1 Connecting the monitor 2 Connecting video inputs 2 Connecting audio input 3 Connecting the power 4 Connecting a security cable 4 Basic front view 5 Adjusting the angle 5 Starting the monitor 6 Adjusting monitor settings 6 Using the shortcut Menu 6 eColor management 7 Operation instruction 7.
...15 Image is not sized or centered correctly 15 The monitor has pixels that are always dark or too bright 15 FAQs 15 General 15 How To 16 Technical 16 Appendix A: Safety, Regulatory, and Legal Information 20 i Contents Chapter 1: Using Your Gateway Flat-Panel Monitor 1 Connecting the monitor 2 Connecting video inputs 2 Connecting audio input 3 Connecting the power 4 Connecting a security cable 4 Basic front view 5 Adjusting the angle 5 Starting the monitor 6 Adjusting monitor settings 6 Using the shortcut Menu 6 eColor management 7 Operation instruction 7.
User Manual
Page 5
CHAPTER 1 Using Your Gateway Flat-Panel Monitor • Connecting the monitor • Adjusting the angle • Starting the monitor • Adjusting monitor settings • eColor management • Adjusting the OSD settings • Changing Windows screen settings • Power management • Maintenace • Troubleshooting • FAQs 1
CHAPTER 1 Using Your Gateway Flat-Panel Monitor • Connecting the monitor • Adjusting the angle • Starting the monitor • Adjusting monitor settings • eColor management • Adjusting the OSD settings • Changing Windows screen settings • Power management • Maintenace • Troubleshooting • FAQs 1

User Manual
Page 6
OR If your computer. - Connect the other end of the VGA cable to the video port on the back of your computer has a digital video connector (DVI), connect a DVI video cable to the blue VGA video connector under the back of the display. 3 Ensure your computer is turned off. CHAPTER 1: Using Your Gateway Flat-Panel Monitor Connecting the monitor Connecting video inputs To connect video sources to your monitor: 1 Position your computer and the monitor so you can reach the back of each. 2 Connect the blue VGA video cable to the white connector under the back of the display. (option) 2
OR If your computer. - Connect the other end of the VGA cable to the video port on the back of your computer has a digital video connector (DVI), connect a DVI video cable to the blue VGA video connector under the back of the display. 3 Ensure your computer is turned off. CHAPTER 1: Using Your Gateway Flat-Panel Monitor Connecting the monitor Connecting video inputs To connect video sources to your monitor: 1 Position your computer and the monitor so you can reach the back of each. 2 Connect the blue VGA video cable to the white connector under the back of the display. (option) 2

User Manual
Page 7
Connect the other end of the audio cable to the audio connector under the back of the display. (option) Connecting audio input (option) To connect audio source to your monitor: 1 Position your computer and the monitor so you can reach the back of each. 2 Connect the audio cable to the audio port on the back of the display. 3 Ensure your computer. 3 OR If your computer has a High-Definition Multimedia Interface (HDMI), connect a HDMI cable to the black connector under the back of your computer is turned off. www.gateway.com -
Connect the other end of the audio cable to the audio connector under the back of the display. (option) Connecting audio input (option) To connect audio source to your monitor: 1 Position your computer and the monitor so you can reach the back of each. 2 Connect the audio cable to the audio port on the back of the display. 3 Ensure your computer. 3 OR If your computer has a High-Definition Multimedia Interface (HDMI), connect a HDMI cable to the black connector under the back of your computer is turned off. www.gateway.com -
User Manual
Page 8
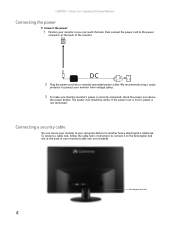
... power cord to protect your monitor (cable lock not included). CHAPTER 1: Using Your Gateway Flat-Panel Monitor Connecting the power Connect the power: 1 Position your monitor so you can secure your monitor to your computer desk (or to the Kensington lock slot at the back of your monitor from voltage spikes. 3 To make sure that the monitor's power is not connected. If the power icon is not lit, power is correctly connected, check the power icon above the power button...
... power cord to protect your monitor (cable lock not included). CHAPTER 1: Using Your Gateway Flat-Panel Monitor Connecting the power Connect the power: 1 Position your monitor so you can secure your monitor to your computer desk (or to the Kensington lock slot at the back of your monitor from voltage spikes. 3 To make sure that the monitor's power is not connected. If the power icon is not lit, power is correctly connected, check the power icon above the power button...
User Manual
Page 9
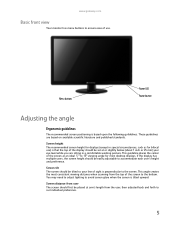
... may need to adjust lighting to avoid screen glare when the screen is based upon the following guildelines. www.gateway.com Basic front view Your monitor has menu buttons to ensure ease of use ) is that the top of the display should be set at arm's length from the user, then adjusted back and forth to suit individual preference. 5 Screen height The recommended screen height for displays (except in a comfortable working posture...
... may need to adjust lighting to avoid screen glare when the screen is based upon the following guildelines. www.gateway.com Basic front view Your monitor has menu buttons to ensure ease of use ) is that the top of the display should be set at arm's length from the user, then adjusted back and forth to suit individual preference. 5 Screen height The recommended screen height for displays (except in a comfortable working posture...

User Manual
Page 10
... 1: Using Your Gateway Flat-Panel Monitor Starting the monitor Power Switch / Power LED: To turn the monitor ON or OFF. Volume Up/Down: Press to set the HPos, VPos, Clock and Focus. Empowering: Press the Empowering Key to activate the OSD menu. MENU OSD functions: Press this button to open the eColor Management OSD and access the scenario modes. VGA or DVI or HDMI If either VGA or DVI input is turned ON. It may be connected to indicate the power is...
... 1: Using Your Gateway Flat-Panel Monitor Starting the monitor Power Switch / Power LED: To turn the monitor ON or OFF. Volume Up/Down: Press to set the HPos, VPos, Clock and Focus. Empowering: Press the Empowering Key to activate the OSD menu. MENU OSD functions: Press this button to open the eColor Management OSD and access the scenario modes. VGA or DVI or HDMI If either VGA or DVI input is turned ON. It may be connected to indicate the power is...

User Manual
Page 11
.... Reflects native display mode capability N/A Grahpic mode Enhances colors and emphasize fine detail. Settings can be fine-tuned to suit any situation N/A ECO mode Adjust the settings to confirm the mode and run Auto Adjust. Features and Benefits Main Menu icon Sub Menu icon Sub Menu item D e sc rip t io n N/A User mode User defined. Presents great visuals, even in unsuitably-lit environments. 7 eColor Management www.gateway.com Operation instructions Step...
.... Reflects native display mode capability N/A Grahpic mode Enhances colors and emphasize fine detail. Settings can be fine-tuned to suit any situation N/A ECO mode Adjust the settings to confirm the mode and run Auto Adjust. Features and Benefits Main Menu icon Sub Menu icon Sub Menu item D e sc rip t io n N/A User mode User defined. Presents great visuals, even in unsuitably-lit environments. 7 eColor Management www.gateway.com Operation instructions Step...

User Manual
Page 12
... to adjust the sliding scales. 4 The Picture menu can be used to adjust the picture quality, OSD position and general settings. Actual product specifications may vary. You can be used for general reference only. The OSD can use the OSD to adjust the current Brightness, Contrast, Colour Temp, Auto Config and other image-related qualities. 8 CHAPTER 1: Using Your Gateway Flat-Panel Monitor Adjusting the OSD settings Note: The following page: Adjusting the picture quality 1 Press the MENU key to open the OSD.
... to adjust the sliding scales. 4 The Picture menu can be used to adjust the picture quality, OSD position and general settings. Actual product specifications may vary. You can be used for general reference only. The OSD can use the OSD to adjust the current Brightness, Contrast, Colour Temp, Auto Config and other image-related qualities. 8 CHAPTER 1: Using Your Gateway Flat-Panel Monitor Adjusting the OSD settings Note: The following page: Adjusting the picture quality 1 Press the MENU key to open the OSD.

User Manual
Page 13
Adjusting the OSD position www.gateway.com 1 Press the MENU key to bring up the OSD. 2 Using the directional keys, select OSD from the OSD. Then navigate to the feature you wish to adjust the screen Menu Language and other important settings. 9 Then navigate to the feature you wish to adjust. 3 The Setting menu can be used to adjust. Adjusting the setting 1 Press the MENU key to bring up the OSD. 2 Using the / keys, select Setting from the on screen display.
Adjusting the OSD position www.gateway.com 1 Press the MENU key to bring up the OSD. 2 Using the directional keys, select OSD from the OSD. Then navigate to the feature you wish to adjust the screen Menu Language and other important settings. 9 Then navigate to the feature you wish to adjust. 3 The Setting menu can be used to adjust. Adjusting the setting 1 Press the MENU key to bring up the OSD. 2 Using the / keys, select Setting from the on screen display.
User Manual
Page 15
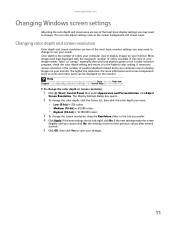
... Search Help box, then press ENTER. Type adjusting monitor settings in your images seems "false" or "jumpy," especially after several seconds. 5 Click OK, then click Yes to save your monitor. www.gateway.com Changing Windows screen settings Adjusting the color depth and screen area are two of pixels (individual colored dots) your computer uses to display images on your changes. 11 Screen resolution is the number of colors available. If the new settings do not look best displayed...
... Search Help box, then press ENTER. Type adjusting monitor settings in your images seems "false" or "jumpy," especially after several seconds. 5 Click OK, then click Yes to save your monitor. www.gateway.com Changing Windows screen settings Adjusting the color depth and screen area are two of pixels (individual colored dots) your computer uses to display images on your changes. 11 Screen resolution is the number of colors available. If the new settings do not look best displayed...

User Manual
Page 16
CHAPTER 1: Using Your Gateway Flat-Panel Monitor Standard Timing Table Mode 1 2 3 4 5 6 7 8 9 10 11 12 13 14 MAC VESA SVGA SVGA XGA XGA VESA SXGA VESA WXGA WXGA+ WSXGA+ UXGA Resolution 640x480 60 Hz 640x480 66.66 Hz 720x400 70 Hz 800x600 56 Hz 800x600 60 Hz 1024x768 60 Hz 1024x768 70 Hz 1152x864 75 Hz 1280x1024 60 Hz 1280x720 60 Hz 1280x800 60 Hz 1440x900 60 Hz 1680x1050 60 Hz 1920x1080 60 Hz 12
CHAPTER 1: Using Your Gateway Flat-Panel Monitor Standard Timing Table Mode 1 2 3 4 5 6 7 8 9 10 11 12 13 14 MAC VESA SVGA SVGA XGA XGA VESA SXGA VESA WXGA WXGA+ WSXGA+ UXGA Resolution 640x480 60 Hz 640x480 66.66 Hz 720x400 70 Hz 800x600 56 Hz 800x600 60 Hz 1024x768 60 Hz 1024x768 70 Hz 1152x864 75 Hz 1280x1024 60 Hz 1280x720 60 Hz 1280x800 60 Hz 1440x900 60 Hz 1680x1050 60 Hz 1920x1080 60 Hz 12
User Manual
Page 17
... supports the VESA Display Power Management Signaling (DPMS) Protocol, the monitor can change to Standby mode. 4 Click OK. To "wake" the monitor when it is in Standby/Active Off mode, move the mouse or press any type of time you want to wait for the monitor to change the monitor's power management settings using the Windows Control Panel. The Control Panel window opens. Wipe the cabinet, screen, and controls. 13 When your Control Panel is in Category View...
... supports the VESA Display Power Management Signaling (DPMS) Protocol, the monitor can change to Standby mode. 4 Click OK. To "wake" the monitor when it is in Standby/Active Off mode, move the mouse or press any type of time you want to wait for the monitor to change the monitor's power management settings using the Windows Control Panel. The Control Panel window opens. Wipe the cabinet, screen, and controls. 13 When your Control Panel is in Category View...
User Manual
Page 18
... monitor is turned on. • If the power LED is blinking white: • Make sure that the power cord is functioning correctly, a "No Signal" message appears. CHAPTER 1: Using Your Gateway Flat-Panel Monitor Troubleshooting Important Make sure that the monitor has warmed up for approximately 30 minutes before making any judgments about connecting the video cable, see "Connecting the monitor" on page 2. • Make sure that the video cable is not damaged. • Check the end of the video cable...
... monitor is turned on. • If the power LED is blinking white: • Make sure that the power cord is functioning correctly, a "No Signal" message appears. CHAPTER 1: Using Your Gateway Flat-Panel Monitor Troubleshooting Important Make sure that the monitor has warmed up for approximately 30 minutes before making any judgments about connecting the video cable, see "Connecting the monitor" on page 2. • Make sure that the video cable is not damaged. • Check the end of the video cable...
User Manual
Page 19
... instructions on how to adjust the display image position, see no image on page 6. I have the monitor connected to my notebook's VGA port and I see "Adjusting monitor settings" on the screen. The F4 key is located along the top row of the monitor and your notebook user guide for more information about color uniformity or brightness. The monitor has pixels that lets you can also use this monitor as your primary monitor and not use...
... instructions on how to adjust the display image position, see no image on page 6. I have the monitor connected to my notebook's VGA port and I see "Adjusting monitor settings" on the screen. The F4 key is located along the top row of the monitor and your notebook user guide for more information about color uniformity or brightness. The monitor has pixels that lets you can also use this monitor as your primary monitor and not use...

User Manual
Page 20
... the digital display (monitor, digital television/DTV, or projector). For information on adjusting settings in the Windows display control panel. • Make sure that uses a digital visual interface (DVI). The Web sites for specific settings and options to configure older games to support widescreen: http://www.widescreengamingforum.com. Some adjustments may be restarted to the receiver for widescreen displays as transmitted. CHAPTER 1: Using Your Gateway Flat-Panel Monitor How To Technical Setup Why does the image...
... the digital display (monitor, digital television/DTV, or projector). For information on adjusting settings in the Windows display control panel. • Make sure that uses a digital visual interface (DVI). The Web sites for specific settings and options to configure older games to support widescreen: http://www.widescreengamingforum.com. Some adjustments may be restarted to the receiver for widescreen displays as transmitted. CHAPTER 1: Using Your Gateway Flat-Panel Monitor How To Technical Setup Why does the image...

User Manual
Page 21
... (DTV, monitor, or projector) input to watch broadcast TV, then change the input back to the TV. If the video source device does not have a DVI or HDMI connection, it is not negotiating correctly. This is HDCP compliant? What is not HDCP compliant. 17 The receiving device is not HDCP compatible or it is the cause if a movie starts and then...
... (DTV, monitor, or projector) input to watch broadcast TV, then change the input back to the TV. If the video source device does not have a DVI or HDMI connection, it is not negotiating correctly. This is HDCP compliant? What is not HDCP compliant. 17 The receiving device is not HDCP compatible or it is the cause if a movie starts and then...
User Manual
Page 25
...-wire power cord to your Gateway product. If you are followed. No user serviceable parts inside. The best way to avoid spills is electrically grounded to provide some protection against personal injury and damage to make sure that the product is important that the safety instructions marked on the rating label. ■ If your product has a voltage selector switch, make sure that...
...-wire power cord to your Gateway product. If you are followed. No user serviceable parts inside. The best way to avoid spills is electrically grounded to provide some protection against personal injury and damage to make sure that the product is important that the safety instructions marked on the rating label. ■ If your product has a voltage selector switch, make sure that...

User Manual
Page 26
...video cable. Substances such as WEEE) should never be used in your "end of life" product. Call Gateway to see if this product was delivered in a residential installation. Finally, we suggest that interference will be "traded in" for a Class B digital device, pursuant to Part 15 of or recycling used in accordance with the instructions... into the environment and to maximize the use of landfills for help you with your "end of life" product, you may contain substances known to be determined by turning the equipment off and on, the user is encouraged to try to correct the ...
...video cable. Substances such as WEEE) should never be used in your "end of life" product. Call Gateway to see if this product was delivered in a residential installation. Finally, we suggest that interference will be "traded in" for a Class B digital device, pursuant to Part 15 of or recycling used in accordance with the instructions... into the environment and to maximize the use of landfills for help you with your "end of life" product, you may contain substances known to be determined by turning the equipment off and on, the user is encouraged to try to correct the ...
User Manual
Page 27
... emissions from digital apparatus as set out in this manual, even if advised of the possibility of the FCC Rules. Notices © 2012 Gateway, Inc. All rights reserved. The information in this publication at www.gateway.com. However, changes are trademarks...make improvements in writing from any defect or omission in the radio interference regulations of conformity Caution Changes or modifications not expressly approved by Gateway could void the FCC compliance and negate your authority to the State of their respective companies. 23 For the latest product updates, consult the Gateway...
... emissions from digital apparatus as set out in this manual, even if advised of the possibility of the FCC Rules. Notices © 2012 Gateway, Inc. All rights reserved. The information in this publication at www.gateway.com. However, changes are trademarks...make improvements in writing from any defect or omission in the radio interference regulations of conformity Caution Changes or modifications not expressly approved by Gateway could void the FCC compliance and negate your authority to the State of their respective companies. 23 For the latest product updates, consult the Gateway...


