User Guide
Page 4
... wireless radio on or off 38 4 Using Drives and Ports 39 Using the DVD drive 40 Identifying drive types 40 Inserting a CD or DVD 41 ...Playing a CD 42 Playing a DVD 42 Creating CDs and DVDs 42 Using the memory card reader 43 Memory card types 43 Inserting a memory card 43 Using a memory card 43 Removing a memory card 44 Adding and removing... 59 Preventing static electricity discharge 60 Adding or replacing memory 61 Replacing the hard drive kit 66 7 Maintaining Your Notebook 71 Caring for your notebook 72 Cleaning ...
... wireless radio on or off 38 4 Using Drives and Ports 39 Using the DVD drive 40 Identifying drive types 40 Inserting a CD or DVD 41 ...Playing a CD 42 Playing a DVD 42 Creating CDs and DVDs 42 Using the memory card reader 43 Memory card types 43 Inserting a memory card 43 Using a memory card 43 Removing a memory card 44 Adding and removing... 59 Preventing static electricity discharge 60 Adding or replacing memory 61 Replacing the hard drive kit 66 7 Maintaining Your Notebook 71 Caring for your notebook 72 Cleaning ...
User Guide
Page 62
... see "Changing notebook power settings" in use a small amount of power. 56 www.gateway.com To access this guide, click Start, All Programs, then click Gateway Documentation. ■ Use the DVD drive only when necessary. Tips & Tricks For more information about using Hibernate mode, see "... Computer which has been included on your notebook is comfortable. ■ Remove PC Cards when you are not being used. ■ Modify the power management settings for maximum power savings while your hard drive. Many PC Cards use . Extending battery life Conserving battery power To ...
... see "Changing notebook power settings" in use a small amount of power. 56 www.gateway.com To access this guide, click Start, All Programs, then click Gateway Documentation. ■ Use the DVD drive only when necessary. Tips & Tricks For more information about using Hibernate mode, see "... Computer which has been included on your notebook is comfortable. ■ Remove PC Cards when you are not being used. ■ Modify the power management settings for maximum power savings while your hard drive. Many PC Cards use . Extending battery life Conserving battery power To ...

User Guide
Page 66
...Notebook Preventing static electricity discharge Important Before installing memory or replacing the hard drive, you are extremely sensitive to a bare metal part of your workbench or other grounded object. 60 www.gateway.com Do not lay components on your notebook and unplug the power... it to static electricity, also known as carpeted floors, plastic, and packing foam. ■ Remove components from their edges. Before installing memory or replacing the hard drive, follow these guidelines: ■ Avoid static-causing surfaces such as electrostatic discharge (ESD). The ...
...Notebook Preventing static electricity discharge Important Before installing memory or replacing the hard drive, you are extremely sensitive to a bare metal part of your workbench or other grounded object. 60 www.gateway.com Do not lay components on your notebook and unplug the power... it to static electricity, also known as carpeted floors, plastic, and packing foam. ■ Remove components from their edges. Before installing memory or replacing the hard drive, follow these guidelines: ■ Avoid static-causing surfaces such as electrostatic discharge (ESD). The ...
User Guide
Page 72
.... 66 www.gateway.com For more information, see "Changing batteries" on page 60. 3 Turn off your notebook. 4 Disconnect the AC adapter, modem cable, and network cable. 5 Disconnect all peripheral devices and remove any PC cards. 6 Turn your notebook over so the bottom is facing up any data you can replace your hard drive. For...
.... 66 www.gateway.com For more information, see "Changing batteries" on page 60. 3 Turn off your notebook. 4 Disconnect the AC adapter, modem cable, and network cable. 5 Disconnect all peripheral devices and remove any PC cards. 6 Turn your notebook over so the bottom is facing up any data you can replace your hard drive. For...

User Guide
Page 73
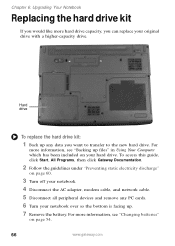
Replacing the hard drive kit 8 Remove the two hard drive bay cover screws, slide the hard drive bay cover, then remove it. www.gateway.com 67 The hard drive is attached to the back of the cover. 9 If your new hard drive, go to Step 10. If you need to move the hard drive cover from your old hard drive to your new hard drive already includes the hard drive cover, go to Step 14. -OR-
Replacing the hard drive kit 8 Remove the two hard drive bay cover screws, slide the hard drive bay cover, then remove it. www.gateway.com 67 The hard drive is attached to the back of the cover. 9 If your new hard drive, go to Step 10. If you need to move the hard drive cover from your old hard drive to your new hard drive already includes the hard drive cover, go to Step 14. -OR-
User Guide
Page 74
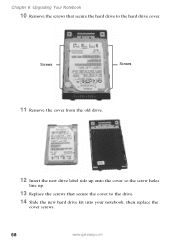
Chapter 6: Upgrading Your Notebook 10 Remove the screws that secure the cover to the hard drive cover. Screws Screws 11 Remove the cover from the old drive. 12 Insert the new drive label side up onto the cover so the screw holes line up. 13 Replace the screws that secure the hard drive to the drive. 14 Slide the new hard drive kit into your notebook, then replace the cover screws. 68 www.gateway.com
Chapter 6: Upgrading Your Notebook 10 Remove the screws that secure the cover to the hard drive cover. Screws Screws 11 Remove the cover from the old drive. 12 Insert the new drive label side up onto the cover so the screw holes line up. 13 Replace the screws that secure the hard drive to the drive. 14 Slide the new hard drive kit into your notebook, then replace the cover screws. 68 www.gateway.com
User Guide
Page 78
... and remove the battery after discharging it . Magnetic fields can become brittle and easy to support extra weight. ■ When transporting your notebook for you put any liquid can melt or warp in high temperatures. As a general rule, your notebook is on because data on hard drives. &#... is safest at temperatures that are comfortable for an extended period of it partway. 72 www.gateway.com The case (and LCD panel) can erase data on the hard drive could be lost or corrupted. ■ Avoid subjecting your notebook to the notebook. ■ When storing your notebook,...
... and remove the battery after discharging it . Magnetic fields can become brittle and easy to support extra weight. ■ When transporting your notebook for you put any liquid can melt or warp in high temperatures. As a general rule, your notebook is on because data on hard drives. &#... is safest at temperatures that are comfortable for an extended period of it partway. 72 www.gateway.com The case (and LCD panel) can erase data on the hard drive could be lost or corrupted. ■ Avoid subjecting your notebook to the notebook. ■ When storing your notebook,...

User Guide
Page 88
...computer technician. 82 www.gateway.com Warning Do not try to your notebook. ■ Make sure that you start your notebook. Chapter 8: Troubleshooting Safety guidelines While troubleshooting your notebook, follow these safety guidelines: ■ Never remove the memory bay or hard drive bay cover while your ...notebook is turned on page 60. ■ After you complete any maintenance tasks where you remove the memory bay or hard drive bay cover, make sure that you are damaged...
...computer technician. 82 www.gateway.com Warning Do not try to your notebook. ■ Make sure that you start your notebook. Chapter 8: Troubleshooting Safety guidelines While troubleshooting your notebook, follow these safety guidelines: ■ Never remove the memory bay or hard drive bay cover while your ...notebook is turned on page 60. ■ After you complete any maintenance tasks where you remove the memory bay or hard drive bay cover, make sure that you are damaged...
User Guide
Page 89
... First steps If you have problems with your notebook, try these things first: ■ Make sure that the AC power adapter is connected to your hard drive is not full. ■ If an error message appears on . ■ If a peripheral device (such as a keyboard or mouse) does not ... in a program, see the program's printed documentation or the online help. www.gateway.com 83 The message may help Gateway Customer Care in diagnosing and fixing the problem. ■ If you added or removed peripheral devices, review the installation procedures you performed and make sure that your notebook ...
... First steps If you have problems with your notebook, try these things first: ■ Make sure that the AC power adapter is connected to your hard drive is not full. ■ If an error message appears on . ■ If a peripheral device (such as a keyboard or mouse) does not ... in a program, see the program's printed documentation or the online help. www.gateway.com 83 The message may help Gateway Customer Care in diagnosing and fixing the problem. ■ If you added or removed peripheral devices, review the installation procedures you performed and make sure that your notebook ...
User Guide
Page 91
... device or port you are trying to install, then determine which has been included on your hard drive. Tips & Tricks For instructions on changing the screen resolution, see "Adjusting the screen resolution"... dialog box. A resource conflict appears as a black exclamation point in a yellow circle. 2 Remove the device you want to read ■ Adjust the brightness and contrast using the system keys....combinations" on page 31. To access this guide, click Start, All Programs, then click Gateway Documentation. The text on the display is too dark Adjust the brightness using the system ...
... device or port you are trying to install, then determine which has been included on your hard drive. Tips & Tricks For instructions on changing the screen resolution, see "Adjusting the screen resolution"... dialog box. A resource conflict appears as a black exclamation point in a yellow circle. 2 Remove the device you want to read ■ Adjust the brightness and contrast using the system keys....combinations" on page 31. To access this guide, click Start, All Programs, then click Gateway Documentation. The text on the display is too dark Adjust the brightness using the system ...

User Guide
Page 96
... click Help and Support. To access this guide, click Start, All Programs, then click Gateway Documentation. The hard drive cannot be the result of a defective area on your notebook. You see "Checking the hard drive for errors" in the Search box , then click the arrow. For more information, see... a "General failure reading drive C" error message ■ Make sure that the modem cable is plugged into the Ethernet network jack and not the modem jack. Remove it, firmly reinsert it, then restart your hard drive. Type the keyword file management in Using Your...
... click Help and Support. To access this guide, click Start, All Programs, then click Gateway Documentation. The hard drive cannot be the result of a defective area on your notebook. You see "Checking the hard drive for errors" in the Search box , then click the arrow. For more information, see... a "General failure reading drive C" error message ■ Make sure that the modem cable is plugged into the Ethernet network jack and not the modem jack. Remove it, firmly reinsert it, then restart your hard drive. Type the keyword file management in Using Your...

User Guide
Page 125
... latch 14 locating 14 managing power 56 monitoring charge 52 purchasing 17 recalibrating 53 recharging 20, 53 release latch 14 replacing 54 bays battery 54 hard drive 14 memory 14, 61 BigFix 6 BIOS Setup utility 53 brightness adjusting 32 brightness keys 32 C cable lock 11 cable modem 24 Caps Lock indicator ...28 cards inserting memory card 43 inserting PC Card 44 memory card slot 12 PC Card slot 12 removing memory card 43 removing PC Card 44 slots 43, 44 troubleshooting memory card 93 troubleshooting PC Card 98 types of memory cards supported 43 carrying case 17...
... latch 14 locating 14 managing power 56 monitoring charge 52 purchasing 17 recalibrating 53 recharging 20, 53 release latch 14 replacing 54 bays battery 54 hard drive 14 memory 14, 61 BigFix 6 BIOS Setup utility 53 brightness adjusting 32 brightness keys 32 C cable lock 11 cable modem 24 Caps Lock indicator ...28 cards inserting memory card 43 inserting PC Card 44 memory card slot 12 PC Card slot 12 removing memory card 43 removing PC Card 44 slots 43, 44 troubleshooting memory card 93 troubleshooting PC Card 98 types of memory cards supported 43 carrying case 17...

User Guide
Page 128
hot-swapping 44 I i.Link port 12 IEEE 1394 port 12 indicators See status indicators inkjet printer 17 installing battery 54 devices 84 hard drive 66 memory 61 PC Card 44 Internet troubleshooting 90, 95 IRQ conflicts 84 J jacks See connections K Kensington cable lock lock slot 11 key combinations 31 .../CRT system key 31 lock Kensington cable 11 M maintenance cleaning 73, 74 virus protection 75 Windows Update 78 memory bay 14 installing 61 purchasing 17 removing 61 replacing 61 troubleshooting 92 memory card reader 122 www...
hot-swapping 44 I i.Link port 12 IEEE 1394 port 12 indicators See status indicators inkjet printer 17 installing battery 54 devices 84 hard drive 66 memory 61 PC Card 44 Internet troubleshooting 90, 95 IRQ conflicts 84 J jacks See connections K Kensington cable lock lock slot 11 key combinations 31 .../CRT system key 31 lock Kensington cable 11 M maintenance cleaning 73, 74 virus protection 75 Windows Update 78 memory bay 14 installing 61 purchasing 17 removing 61 replacing 61 troubleshooting 92 memory card reader 122 www...

