
User Guide
Page 4
...CD or DVD 41 Playing a CD 42 Playing a DVD 42 Creating CDs and DVDs 42 Using the memory card reader 43 Memory card types 43 Inserting a memory card 43 Using a memory card 43 Removing a memory card 44 Adding and removing a PC Card 44 Viewing the display on a projector or monitor 46 ... 56 Using alternate power sources 57 Changing power modes 57 6 Upgrading Your Notebook 59 Preventing static electricity discharge 60 Adding or replacing memory 61 Replacing the hard drive kit 66 7 Maintaining Your Notebook 71 Caring for your notebook 72 Cleaning your notebook 73 Cleaning the...
...CD or DVD 41 Playing a CD 42 Playing a DVD 42 Creating CDs and DVDs 42 Using the memory card reader 43 Memory card types 43 Inserting a memory card 43 Using a memory card 43 Removing a memory card 44 Adding and removing a PC Card 44 Viewing the display on a projector or monitor 46 ... 56 Using alternate power sources 57 Changing power modes 57 6 Upgrading Your Notebook 59 Preventing static electricity discharge 60 Adding or replacing memory 61 Replacing the hard drive kit 66 7 Maintaining Your Notebook 71 Caring for your notebook 72 Cleaning your notebook 73 Cleaning the...
User Guide
Page 5
... Battery 84 CD drives 84 Device installation 84 Display 85 DVD drives 86 File management 88 Hard drive 89 Internet 90 Keyboard 92 Memory 92 Memory card reader 93 Modem (dial-up 93 Mouse 97 Networks 97 Passwords 98 PC Cards 98 Power 99 Printer 100 Sound 101 Status... indicators 102 Touchpad 102 Video 103 Telephone support 104 Before calling Gateway Customer Care 104 Telephone numbers 105 Self-help 106 Tutoring 106 Training 106 www.gateway...
... Battery 84 CD drives 84 Device installation 84 Display 85 DVD drives 86 File management 88 Hard drive 89 Internet 90 Keyboard 92 Memory 92 Memory card reader 93 Modem (dial-up 93 Mouse 97 Networks 97 Passwords 98 PC Cards 98 Power 99 Printer 100 Sound 101 Status... indicators 102 Touchpad 102 Video 103 Telephone support 104 Before calling Gateway Customer Care 104 Telephone numbers 105 Self-help 106 Tutoring 106 Training 106 www.gateway...

User Guide
Page 18
..., scanner, camera, keyboard, or mouse) into these ports. 12 www.gateway.com The memory card reader supports Memory Stick®, Memory Stick Pro®, MultiMediaCard™, and Secure Digital™. For more information, see "Using the memory card reader" on page 44. For more information, see "Adding and ...removing a PC Card" on page 43. Chapter 2: Checking Out Your Gateway Notebook Right PC Card slot Memory USB ports card reader IEEE 1394 port Ethernet jack USB ports Modem jack Component Icon Description PC Card slot IEEE 1394...
..., scanner, camera, keyboard, or mouse) into these ports. 12 www.gateway.com The memory card reader supports Memory Stick®, Memory Stick Pro®, MultiMediaCard™, and Secure Digital™. For more information, see "Using the memory card reader" on page 44. For more information, see "Adding and ...removing a PC Card" on page 43. Chapter 2: Checking Out Your Gateway Notebook Right PC Card slot Memory USB ports card reader IEEE 1394 port Ethernet jack USB ports Modem jack Component Icon Description PC Card slot IEEE 1394...
User Guide
Page 20
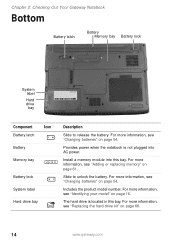
... this bay. Slide to release the battery. Chapter 2: Checking Out Your Gateway Notebook Bottom Battery latch Battery Memory bay Battery lock System label Hard drive bay Component Icon Battery latch Battery Memory bay Battery lock System label Hard drive bay Description Slide to unlock the ...battery. For more information, see "Adding or replacing memory" on page 66. 14 www.gateway.com Includes the product model number. For more information, see "Replacing the hard drive kit" on page 61. For...
... this bay. Slide to release the battery. Chapter 2: Checking Out Your Gateway Notebook Bottom Battery latch Battery Memory bay Battery lock System label Hard drive bay Component Icon Battery latch Battery Memory bay Battery lock System label Hard drive bay Description Slide to unlock the ...battery. For more information, see "Adding or replacing memory" on page 66. 14 www.gateway.com Includes the product model number. For more information, see "Replacing the hard drive kit" on page 61. For...

User Guide
Page 23
... color printer, you need additional space for more information about your notebook, such as memory size, memory type, and hard drive size, visit Gateway's Support page at accessories.gateway.com. Accessories To order accessories, visit the Accessory Store at support.gateway.com. Finding your specifications Finding your specifications For more information about using an additional...
... color printer, you need additional space for more information about your notebook, such as memory size, memory type, and hard drive size, visit Gateway's Support page at accessories.gateway.com. Accessories To order accessories, visit the Accessory Store at support.gateway.com. Finding your specifications Finding your specifications For more information about using an additional...
User Guide
Page 49
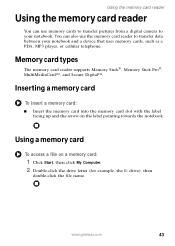
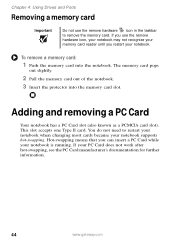
... to transfer pictures from a digital camera to transfer data between your notebook. www.gateway.com 43 Inserting a memory card To insert a memory card: ■ Insert the memory card into the memory card slot with the label facing up and the arrow on a memory card: 1 Click Start, then click My Computer. 2 Double-click the drive letter (for...
... to transfer pictures from a digital camera to transfer data between your notebook. www.gateway.com 43 Inserting a memory card To insert a memory card: ■ Insert the memory card into the memory card slot with the label facing up and the arrow on a memory card: 1 Click Start, then click My Computer. 2 Double-click the drive letter (for...
User Guide
Page 50
...your notebook is running. This slot accepts one Type II card. You do not need to remove the memory card. If you use the remove hardware icon in the taskbar to restart your notebook when changing most ... Important Do not use the remove hardware icon, your notebook may not recognize your memory card reader until you restart your notebook. The memory card pops out slightly. 2 Pull the memory card out of the notebook. 3 Insert the protector into the notebook. Adding and...not work after hot-swapping, see the PC Card manufacturer's documentation for further information. 44 www.gateway.com
...your notebook is running. This slot accepts one Type II card. You do not need to remove the memory card. If you use the remove hardware icon in the taskbar to restart your notebook when changing most ... Important Do not use the remove hardware icon, your notebook may not recognize your memory card reader until you restart your notebook. The memory card pops out slightly. 2 Pull the memory card out of the notebook. 3 Insert the protector into the notebook. Adding and...not work after hot-swapping, see the PC Card manufacturer's documentation for further information. 44 www.gateway.com
User Guide
Page 63
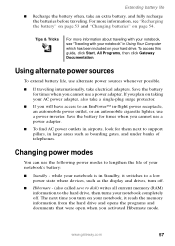
...power sources whenever possible. ■ If traveling internationally, take electrical adapters. To access this guide, click Start, All Programs, then click Gateway Documentation. Save the battery for times when you will have access to lengthen the life of telephones. Tips & Tricks For more information, ...pillars, in large areas such as the display and drives, turn off. ■ Hibernate - (also called save to disk) writes all current memory (RAM) information to a low power state where devices, such as boarding gates, and under banks of your notebook's battery: ■ Standby -...
...power sources whenever possible. ■ If traveling internationally, take electrical adapters. To access this guide, click Start, All Programs, then click Gateway Documentation. Save the battery for times when you will have access to lengthen the life of telephones. Tips & Tricks For more information, ...pillars, in large areas such as the display and drives, turn off. ■ Hibernate - (also called save to disk) writes all current memory (RAM) information to a low power state where devices, such as boarding gates, and under banks of your notebook's battery: ■ Standby -...

User Guide
Page 64
...+F3. If power is interrupted, the information is not saved to the hard drive. When in memory is lost. In Standby or Hibernate mode Exit Standby or Hibernate mode Press the power button. 58 www.gateway.com If your work before using Standby mode. However, the information in Hibernate mode, your notebook...
...+F3. If power is interrupted, the information is not saved to the hard drive. When in memory is lost. In Standby or Hibernate mode Exit Standby or Hibernate mode Press the power button. 58 www.gateway.com If your work before using Standby mode. However, the information in Hibernate mode, your notebook...
User Guide
Page 65
Chapter 6 Upgrading Your Notebook • Adding and replacing memory • Replacing the hard drive 59
Chapter 6 Upgrading Your Notebook • Adding and replacing memory • Replacing the hard drive 59

User Guide
Page 66
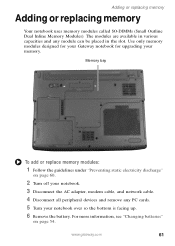
...available at most electronics stores) and attach it to dangerous electrical voltages and moving parts, turn off your workbench or other grounded object. 60 www.gateway.com The components inside of antistatic bags because only the inside your workbench or other grounded connection. ■ Touch a bare metal surface on the ... the power cord, modem cable, and network cable before opening the case. Chapter 6: Upgrading Your Notebook Preventing static electricity discharge Important Before installing memory or replacing the hard drive, you are extremely sensitive to use them.
...available at most electronics stores) and attach it to dangerous electrical voltages and moving parts, turn off your workbench or other grounded object. 60 www.gateway.com The components inside of antistatic bags because only the inside your workbench or other grounded connection. ■ Touch a bare metal surface on the ... the power cord, modem cable, and network cable before opening the case. Chapter 6: Upgrading Your Notebook Preventing static electricity discharge Important Before installing memory or replacing the hard drive, you are extremely sensitive to use them.
User Guide
Page 67
..., modem cable, and network cable. 4 Disconnect all peripheral devices and remove any module can be placed in various capacities and any PC cards. 5 Turn your memory. www.gateway.com 61 Use only memory modules designed for your Gateway notebook for upgrading your notebook over so the bottom is facing up. 6 Remove the battery...
..., modem cable, and network cable. 4 Disconnect all peripheral devices and remove any module can be placed in various capacities and any PC cards. 5 Turn your memory. www.gateway.com 61 Use only memory modules designed for your Gateway notebook for upgrading your notebook over so the bottom is facing up. 6 Remove the battery...
User Guide
Page 69
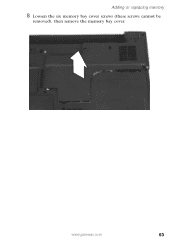
Adding or replacing memory 8 Loosen the six memory bay cover screws (these screws cannot be removed), then remove the memory bay cover. www.gateway.com 63
Adding or replacing memory 8 Loosen the six memory bay cover screws (these screws cannot be removed), then remove the memory bay cover. www.gateway.com 63
User Guide
Page 70
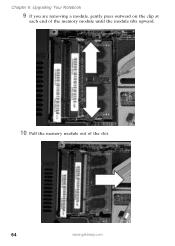
Chapter 6: Upgrading Your Notebook 9 If you are removing a module, gently press outward on the clip at each end of the memory module until the module tilts upward. 10 Pull the memory module out of the slot. 64 www.gateway.com
Chapter 6: Upgrading Your Notebook 9 If you are removing a module, gently press outward on the clip at each end of the memory module until the module tilts upward. 10 Pull the memory module out of the slot. 64 www.gateway.com

User Guide
Page 71
... be inserted in one direction. This module is keyed so it clicks in the memory bay. Adding or replacing memory 11 Hold the new or replacement module at a 30-degree angle and press it into the empty memory slot. www.gateway.com 65 If the module does not fit, make sure that the notch... in the module lines up with the tab in place. 13 Replace the memory bay cover, then tighten the cover screws. 14 Replace the keyboard...
... be inserted in one direction. This module is keyed so it clicks in the memory bay. Adding or replacing memory 11 Hold the new or replacement module at a 30-degree angle and press it into the empty memory slot. www.gateway.com 65 If the module does not fit, make sure that the notch... in the module lines up with the tab in place. 13 Replace the memory bay cover, then tighten the cover screws. 14 Replace the keyboard...

User Guide
Page 88
... discharge" on , while the battery is turned on page 60. ■ After you complete any maintenance tasks where you remove the memory bay or hard drive bay cover, make sure that you are damaged, if your notebook was dropped, or if the case was damaged... components. Instead, unplug your notebook and contact a qualified computer technician. 82 www.gateway.com Chapter 8: Troubleshooting Safety guidelines While troubleshooting your notebook, follow these safety guidelines: ■ Never remove the memory bay or hard drive bay cover while your notebook is installed, and while the ...
... discharge" on , while the battery is turned on page 60. ■ After you complete any maintenance tasks where you remove the memory bay or hard drive bay cover, make sure that you are damaged, if your notebook was dropped, or if the case was damaged... components. Instead, unplug your notebook and contact a qualified computer technician. 82 www.gateway.com Chapter 8: Troubleshooting Safety guidelines While troubleshooting your notebook, follow these safety guidelines: ■ Never remove the memory bay or hard drive bay cover while your notebook is installed, and while the ...

User Guide
Page 93
.... ■ Clean the disc. For more information about the mute setting, see "Cleaning CDs or DVDs" on your notebook is turned up. www.gateway.com 87 For more information, see "Adjusting the volume" in and turned on page 31. ■ Make sure that the volume control on page... ■ Make sure that Mute controls are plugged in Using Your Computer which has been included on page 4. You may be experiencing some temporary memory problems. Shut down and restart your notebook. ■ Make sure that the Windows volume control is facing up . For more information, see "...
.... ■ Clean the disc. For more information about the mute setting, see "Cleaning CDs or DVDs" on your notebook is turned up. www.gateway.com 87 For more information, see "Adjusting the volume" in and turned on page 31. ■ Make sure that the volume control on page... ■ Make sure that Mute controls are plugged in Using Your Computer which has been included on page 4. You may be experiencing some temporary memory problems. Shut down and restart your notebook. ■ Make sure that the Windows volume control is facing up . For more information, see "...
User Guide
Page 98
... a number appears on . For more information, see "Adding or replacing memory" on page 61. ■ Use a third-party diagnostic program to help determine if a memory module is turned on the screen ■ The numeric keypad is failing. 92 www.gateway.com Let the keyboard dry before using an aerosol can of air... by using it . If the keyboard does not work ■ Make sure that the keyboard port works. ■ If you spilled liquid in the memory bay slot. Press each key to loosen a key that a key is inserted correctly in the keyboard, turn it upside down to drain it again. ...
... a number appears on . For more information, see "Adding or replacing memory" on page 61. ■ Use a third-party diagnostic program to help determine if a memory module is turned on the screen ■ The numeric keypad is failing. 92 www.gateway.com Let the keyboard dry before using an aerosol can of air... by using it . If the keyboard does not work ■ Make sure that the keyboard port works. ■ If you spilled liquid in the memory bay slot. Press each key to loosen a key that a key is inserted correctly in the keyboard, turn it upside down to drain it again. ...
User Guide
Page 99
... Troubleshooting Help and Support For more information about troubleshooting memory errors, click Start, then click Help and Support. Type the keyword memory error in the My Computer window ■ Reboot ...then restart your telephone line, then check for the memory card slot does not appear in the Search box , then click the arrow. Memory card reader Drive letter for a dial tone by ...working telephone into the modem jack and not the Ethernet network jack. You see a "Not enough memory" error message Close all messages are set appropriately. See "Right" on page 12 to make ...
... Troubleshooting Help and Support For more information about troubleshooting memory errors, click Start, then click Help and Support. Type the keyword memory error in the My Computer window ■ Reboot ...then restart your telephone line, then check for the memory card slot does not appear in the Search box , then click the arrow. Memory card reader Drive letter for a dial tone by ...working telephone into the modem jack and not the Ethernet network jack. You see a "Not enough memory" error message Close all messages are set appropriately. See "Right" on page 12 to make ...
User Guide
Page 107
... , then click the arrow. ■ Wait until files have an online/offline button that the Windows volume control is turned up . www.gateway.com 101 Troubleshooting To make sure that the printer is not set to clear the check mark. See the printer documentation for instructions for adding... additional memory. Most printers have been printed before sending additional files to the printer. ■ If you print large files or many files at one...
... , then click the arrow. ■ Wait until files have an online/offline button that the Windows volume control is turned up . www.gateway.com 101 Troubleshooting To make sure that the printer is not set to clear the check mark. See the printer documentation for instructions for adding... additional memory. Most printers have been printed before sending additional files to the printer. ■ If you print large files or many files at one...


