
Important Safety and Product Information
Page 2
...unit, take it to a professional service, such as batteries, unless product damage has occurred due to radio communications if not installed and used as the primary means of preventing grounding or collision. Operation is encouraged to try to have the battery removed and...;cations could lead to provide reasonable protection against harmful interference in a residential installation. However, there is no charge to operate this device under Part 15 regulations. Within this period, Garmin will be made by an authorized service center. Important Safety and Product Information...
...unit, take it to a professional service, such as batteries, unless product damage has occurred due to radio communications if not installed and used as the primary means of preventing grounding or collision. Operation is encouraged to try to have the battery removed and...;cations could lead to provide reasonable protection against harmful interference in a residential installation. However, there is no charge to operate this device under Part 15 regulations. Within this period, Garmin will be made by an authorized service center. Important Safety and Product Information...
Installation Instructions
Page 1
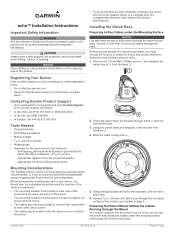
..., and a dust mask when drilling, cutting, or sanding. November 2013 190-01708-02_0A Printed in . Installing the Swivel Base Preparing to www.garmin.com/ support and click Contact Support for in the product specifications. Tools Needed • Drill and drill ...Hardware for product warnings and other important information. Before you can be installed closer to attach the mount using the appropriate flush-mount kit (sold separately). echo™ Installation Instructions Important Safety Information WARNING See the Important Safety and Product Information ...
..., and a dust mask when drilling, cutting, or sanding. November 2013 190-01708-02_0A Printed in . Installing the Swivel Base Preparing to www.garmin.com/ support and click Contact Support for in the product specifications. Tools Needed • Drill and drill ...Hardware for product warnings and other important information. Before you can be installed closer to attach the mount using the appropriate flush-mount kit (sold separately). echo™ Installation Instructions Important Safety Information WARNING See the Important Safety and Product Information ...
Installation Instructions
Page 2
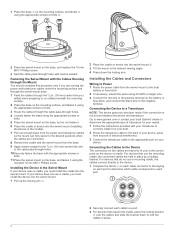
...mount on the base, and replace the 10 mm M6×1 Phillips screw. 3 Seal the cable pass-through holes with your transducer to correctly install it on your boat. 2 Route the transducer cable to the back of your device, away from sources of transducer for your needs. 1 ... port. 3 For devices that use a cradle, you drilled when preparing to run cables beneath the mounting surface. 2 Place the base on your local Garmin® dealer to determine the appropriate type of electrical interference. 3 Connect the transducer cable to the desired viewing angle. 4 Press down to the cable...
...mount on the base, and replace the 10 mm M6×1 Phillips screw. 3 Seal the cable pass-through holes with your transducer to correctly install it on your boat. 2 Route the transducer cable to the back of your device, away from sources of transducer for your needs. 1 ... port. 3 For devices that use a cradle, you drilled when preparing to run cables beneath the mounting surface. 2 Place the base on your local Garmin® dealer to determine the appropriate type of electrical interference. 3 Connect the transducer cable to the desired viewing angle. 4 Press down to the cable...

Installation Instructions
Page 3
...Voltage Range Fuse Rated Current Transmit Power Models echo 101, 151, and 201 echo 301c echo 501c and 551c echo dv models echo 101 echo 151, 201, 301, and 501 series echo 101 series echo 201, 301, and 501 series All models All models echo 101 series echo 201 and 301 series echo 501 series Measurement 10 in. (250 ... without unplugging any cables. 1 Place the base of the device in the cradle. There is an audible click when the device is correctly installed. You may need to set the transducer type to make the sonar function properly. 1 From a sonar view, select MENU > Setup >...
...Voltage Range Fuse Rated Current Transmit Power Models echo 101, 151, and 201 echo 301c echo 501c and 551c echo dv models echo 101 echo 151, 201, 301, and 501 series echo 101 series echo 201, 301, and 501 series All models All models echo 101 series echo 201 and 301 series echo 501 series Measurement 10 in. (250 ... without unplugging any cables. 1 Place the base of the device in the cradle. There is an audible click when the device is correctly installed. You may need to set the transducer type to make the sonar function properly. 1 From a sonar view, select MENU > Setup >...


