
Installation Instructions
Page 1
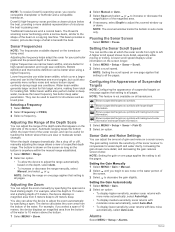
...Support • Go to www.garmin.com/ support and click Contact Support for the hardware, drill the three pilot holes. 6 Using a 5/8 in. (16 mm) drill, drill a hole through the mounting surface at the location you marked in step 4. echo™ Installation Instructions Important Safety ...the swivel base as a template, mark the pilot hole locations . Ä 4 Mark the cable routing hole . Å Mounting Considerations The fishfinder device can be mounted using the included swivelmount bracket, or it can be mounted flush with the dashboard using screws or bolts. 1 Remove the 10...
...Support • Go to www.garmin.com/ support and click Contact Support for the hardware, drill the three pilot holes. 6 Using a 5/8 in. (16 mm) drill, drill a hole through the mounting surface at the location you marked in step 4. echo™ Installation Instructions Important Safety ...the swivel base as a template, mark the pilot hole locations . Ä 4 Mark the cable routing hole . Å Mounting Considerations The fishfinder device can be mounted using the included swivelmount bracket, or it can be mounted flush with the dashboard using screws or bolts. 1 Remove the 10...
Owner's Manual
Page 6
... are better for high-speed operation and rough sea conditions. Setting the Gain Manually 1 Select MENU > Gain > Manual. 2 Select until you need a compatible chartplotter or fishfinder and a compatible transducer. Alarms Select MENU > Setup > Alarms. 2 Sonar Sonar Frequencies NOTE: The frequencies available depend on one page applies that appears on the screen...
... are better for high-speed operation and rough sea conditions. Setting the Gain Manually 1 Select MENU > Gain > Manual. 2 Select until you need a compatible chartplotter or fishfinder and a compatible transducer. Alarms Select MENU > Setup > Alarms. 2 Sonar Sonar Frequencies NOTE: The frequencies available depend on one page applies that appears on the screen...


