
Owner's Manual
Page 3
... Ride 2 Customizing the Data Fields 3 Training 3 Pedal-Based Power 3 Maintenance Tips 3 Vector Data 3 Sending Your Ride to Garmin Connect 3 Garmin Connect 3 Disconnecting the USB Cable 3 Device Information 3 Vector Device Care 3 Removing the Pedal Pod and Pedal 4 Replacing the Pedals and Cartridges 4 Vector Storage 4 Vector Specifications 4 USB ANT Stick™ Specifications 4 Battery Information 4 Replacing the Pedal Pod...
... Ride 2 Customizing the Data Fields 3 Training 3 Pedal-Based Power 3 Maintenance Tips 3 Vector Data 3 Sending Your Ride to Garmin Connect 3 Garmin Connect 3 Disconnecting the USB Cable 3 Device Information 3 Vector Device Care 3 Removing the Pedal Pod and Pedal 4 Replacing the Pedals and Cartridges 4 Vector Storage 4 Vector Specifications 4 USB ANT Stick™ Specifications 4 Battery Information 4 Replacing the Pedal Pod...

Owner's Manual
Page 5
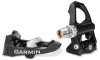
...and get years of service out of owning a precision power measurement system for the latest information including bike compatibility, software updates, and video tutorials. Vector was designed for cyclists, by cyclists, to fill the recess). Move your bike. The bike chain should contact.... Installing Vector Components Preparing the Crank Arms 1 Remove the existing pedals. 2 Clean the threads and remove old grease. For software updates, video tutorials, and everything you need to the largest chain ring and the smallest cassette gear. NOTICE Go to www.garmin.com/ ...
...and get years of service out of owning a precision power measurement system for the latest information including bike compatibility, software updates, and video tutorials. Vector was designed for cyclists, by cyclists, to fill the recess). Move your bike. The bike chain should contact.... Installing Vector Components Preparing the Crank Arms 1 Remove the existing pedals. 2 Clean the threads and remove old grease. For software updates, video tutorials, and everything you need to the largest chain ring and the smallest cassette gear. NOTICE Go to www.garmin.com/ ...

Owner's Manual
Page 10
...kilojoules. Power - Power - Power - NP Lap: The average Normalized Power for the current activity. Power - Troubleshooting Updating the Software Using Vector Updater Before you can either insert another compatible device, see your device owner's manual. Balance: The current left / right power ... balance. Power - kj: The accumulated work performed (power output) in watts. Power Zone: The current range of data fields to www.garmin.com/ vectorowner. 6 Appendix Tips for the Edge 500 device. 1 Hold MENU. 2 Select Settings > Bike Settings > Data Fields. 3...
...kilojoules. Power - Power - Power - NP Lap: The average Normalized Power for the current activity. Power - Troubleshooting Updating the Software Using Vector Updater Before you can either insert another compatible device, see your device owner's manual. Balance: The current left / right power ... balance. Power - kj: The accumulated work performed (power output) in watts. Power Zone: The current range of data fields to www.garmin.com/ vectorowner. 6 Appendix Tips for the Edge 500 device. 1 Hold MENU. 2 Select Settings > Bike Settings > Data Fields. 3...

Owner's Manual
Page 11
... 3 cleats 2 compatibility 6 customizing the device 3, 6 D data storing 3 transferring 3 data fields 3, 6 E Edge 2, 5 G Garmin Connect 3 storing data 3 H history 3 sending to computer 3 I installing 1, 2 M memory 3 P pairing 2, 5 pedal pods 1, 4, 5 pedals 1-4 power 3 product registration 5 R registering the device 5 replacement parts 4 S software, updating 6 specifications 4 storing data 3 storing the device 4 T tools 1 training 3 U updates, software 6 USB, disconnecting 3 USB ANT Stick 4, 6 W water resistance 4 Index 7
... 3 cleats 2 compatibility 6 customizing the device 3, 6 D data storing 3 transferring 3 data fields 3, 6 E Edge 2, 5 G Garmin Connect 3 storing data 3 H history 3 sending to computer 3 I installing 1, 2 M memory 3 P pairing 2, 5 pedal pods 1, 4, 5 pedals 1-4 power 3 product registration 5 R registering the device 5 replacement parts 4 S software, updating 6 specifications 4 storing data 3 storing the device 4 T tools 1 training 3 U updates, software 6 USB, disconnecting 3 USB ANT Stick 4, 6 W water resistance 4 Index 7

Quick Start Manual
Page 1
... for the latest information including bike compatibility, software updates, and video tutorials. See the Important Safety and Product Information guide in the outermost position to the largest crank gear and the smallest cassette gear. Garmin recommends placement of the pedal pod on the...between the chain and the crank arm. ➍ Getting Started Warning Read all instructions carefully before installing and using the Vector™ system. The bike chain should be pointing downward. 1 The right pedal tightens clockwise. TIP: Power and cadence calculations are ...
... for the latest information including bike compatibility, software updates, and video tutorials. See the Important Safety and Product Information guide in the outermost position to the largest crank gear and the smallest cassette gear. Garmin recommends placement of the pedal pod on the...between the chain and the crank arm. ➍ Getting Started Warning Read all instructions carefully before installing and using the Vector™ system. The bike chain should be pointing downward. 1 The right pedal tightens clockwise. TIP: Power and cadence calculations are ...


