Owner's Manual
Page 4
... Option Menu 14 Setup Radio 14 Setup Tones 15 Setup Scanlist 16 Turn Radio/GPS On/Off 16 Informational Picture 16 GPS Status 16 Radio Transmission Status 16 Mark Waypoint's Indicators 17 ii Using the Rino 110 Radio Features 18 Peer-to-Peer Positioning 18 New Contact Page Overview 18 Sending a Location ...Data Fields 26 Data Field Options 26 Setting up the Map 27 General Setup 27 Tracks Setup 28 Map Features Setup 28 Text Setup 28 Map Data Setup 28 Measuring Distance 28 Navigation Page 29 Using the Navigation Page 29 Navigation Page Options 31 Trip Computer Page 32 Trip ...
... Option Menu 14 Setup Radio 14 Setup Tones 15 Setup Scanlist 16 Turn Radio/GPS On/Off 16 Informational Picture 16 GPS Status 16 Radio Transmission Status 16 Mark Waypoint's Indicators 17 ii Using the Rino 110 Radio Features 18 Peer-to-Peer Positioning 18 New Contact Page Overview 18 Sending a Location ...Data Fields 26 Data Field Options 26 Setting up the Map 27 General Setup 27 Tracks Setup 28 Map Features Setup 28 Text Setup 28 Map Data Setup 28 Measuring Distance 28 Navigation Page 29 Using the Navigation Page 29 Navigation Page Options 31 Trip Computer Page 32 Trip ...

Owner's Manual
Page 26
...other fields, highlight the field and press the Thumb Stick In to start entering data, up to 30 characters. UNIT OPERATION > USING THE RINO 110 RADIO FEATURES To review a contact and contact details: 1. Highlight Find 'N Go and press the Thumb Stick In. 2. The Elevation, Position, and Note fields... List, select the desired contact and press the Thumb Stick In. To view a contact on that contact and display its name, direction, and distance near the top of the screen. Press the Page key when done to return to start changing the data. 2. Highlight the contact and the...
...other fields, highlight the field and press the Thumb Stick In to start entering data, up to 30 characters. UNIT OPERATION > USING THE RINO 110 RADIO FEATURES To review a contact and contact details: 1. Highlight Find 'N Go and press the Thumb Stick In. 2. The Elevation, Position, and Note fields... List, select the desired contact and press the Thumb Stick In. To view a contact on that contact and display its name, direction, and distance near the top of the screen. Press the Page key when done to return to start changing the data. 2. Highlight the contact and the...

Owner's Manual
Page 28
... map. When using a triangular Position Icon that contact and displays its name, direction, and distance. The smaller the circle, the more accurate your movements. The Rino 110 uses both map resolution and GPS accuracy in to show either the Contact Bar, Data Fields, or only the Map. Status ...map details. The map can be programmed to a point within the circle. residential streets, parks, etc.), if Garmin MapSource data has been loaded into the unit using the Pan Map feature, a small outline arrow (Map Pointer) can display a higher level of your location. location to provide a ...
... map. When using a triangular Position Icon that contact and displays its name, direction, and distance. The smaller the circle, the more accurate your movements. The Rino 110 uses both map resolution and GPS accuracy in to show either the Contact Bar, Data Fields, or only the Map. Status ...map details. The map can be programmed to a point within the circle. residential streets, parks, etc.), if Garmin MapSource data has been loaded into the unit using the Pan Map feature, a small outline arrow (Map Pointer) can display a higher level of your location. location to provide a ...

Owner's Manual
Page 30
...to your Rino 110. Restore Defaults-returns the Map Page to show either Contact Bar or Data Fields reduces the map area. Highlight an option then press the Thumb Stick In to the "Setting up the Map" section for complete instructions. Measure Distance-displays the distance from ...one point on the map. The Map Page options are not navigating to the "Using the Pan Map Option" section for complete instructions. Stop Navigation-quits navigation of operating and custom features for your requirements such as...
...to your Rino 110. Restore Defaults-returns the Map Page to show either Contact Bar or Data Fields reduces the map area. Highlight an option then press the Thumb Stick In to the "Setting up the Map" section for complete instructions. Measure Distance-displays the distance from ...one point on the map. The Map Page options are not navigating to the "Using the Pan Map Option" section for complete instructions. Stop Navigation-quits navigation of operating and custom features for your requirements such as...

Owner's Manual
Page 34
...screen size of Interest and Waypoints-None, Small, Medium, or Large; Map Data Setup Show-check box; Select Measure Distance from a different point, press the Thumb Stick In at which the feature should appear on the Map Page until you reach the point to measure. A new Map Pointer field displays ... from the Option Menu and then press the Thumb Stick In to show all, show none, or show specific MapSource data. 28 Measuring Distance To use the Measure Distance option: 1. To stop measuring, press the Page key. Map Pointer Field Measuring Distance Rino® 110 Owner's Manual
...screen size of Interest and Waypoints-None, Small, Medium, or Large; Map Data Setup Show-check box; Select Measure Distance from a different point, press the Thumb Stick In at which the feature should appear on the Map Page until you reach the point to measure. A new Map Pointer field displays ... from the Option Menu and then press the Thumb Stick In to show all, show none, or show specific MapSource data. 28 Measuring Distance To use the Measure Distance option: 1. To stop measuring, press the Page key. Map Pointer Field Measuring Distance Rino® 110 Owner's Manual

Owner's Manual
Page 39
The pages listed below provide enhancements to many features and pages in the Rino 110. Please refer to locate and Goto Waypoints, Favorite Locations, Cities, Interstate Exits, Rino® 110 Owner's Manual UNIT OPERATION > MAIN MENU PAGE Points of Interest, Addresses, and Intersections. (Some require ... when the unit is ready to set a proximity alert distance around contacts or waypoints. Using the Main Menu The Main Menu allows access to Rino 110 operation. Tracks Page-provides access to additional Rino 110 feature pages. Main Menu Page The Main Menu provides access to...
The pages listed below provide enhancements to many features and pages in the Rino 110. Please refer to locate and Goto Waypoints, Favorite Locations, Cities, Interstate Exits, Rino® 110 Owner's Manual UNIT OPERATION > MAIN MENU PAGE Points of Interest, Addresses, and Intersections. (Some require ... when the unit is ready to set a proximity alert distance around contacts or waypoints. Using the Main Menu The Main Menu allows access to Rino 110 operation. Tracks Page-provides access to additional Rino 110 feature pages. Main Menu Page The Main Menu provides access to...

Owner's Manual
Page 47
...), or Reposition Here. 41 Select Map to display the Information Page for that waypoint. 3. Nearest Waypoints selected in the Rino 110 can select: Send Location (to other Rino users), Project Waypoint, Set Proximity (alarm), Add to the waypoint. Use the Thumb Stick to select the desired waypoint... Goto to delete the waypoint. 4. Press the Thumb Stick In to access additional features. The Waypoint Information Page displays the waypoint name or number, a map symbol, the location in lat/lon, elevation, distance, bearing, and three on the map, or select Delete to create a direct line...
...), or Reposition Here. 41 Select Map to display the Information Page for that waypoint. 3. Nearest Waypoints selected in the Rino 110 can select: Send Location (to other Rino users), Project Waypoint, Set Proximity (alarm), Add to the waypoint. Use the Thumb Stick to select the desired waypoint... Goto to delete the waypoint. 4. Press the Thumb Stick In to access additional features. The Waypoint Information Page displays the waypoint name or number, a map symbol, the location in lat/lon, elevation, distance, bearing, and three on the map, or select Delete to create a direct line...

Owner's Manual
Page 50
... a city: 1. Press the Option Menu button to display the find Nearest or find By Name prompt. You can select: Send Location (to other Rino users), Project Waypoint, Save as a waypoint or add it on the map or create a Goto direct route to Route, View Sun & Moon (reports for that... using the keyboard. Use the Thumb Stick to select the desired city from your current location or from a location defined by population, and distance from the list and then press it In to access additional features. Rino® 110 Owner's Manual
... a city: 1. Press the Option Menu button to display the find Nearest or find By Name prompt. You can select: Send Location (to other Rino users), Project Waypoint, Save as a waypoint or add it on the map or create a Goto direct route to Route, View Sun & Moon (reports for that... using the keyboard. Use the Thumb Stick to select the desired city from your current location or from a location defined by population, and distance from the list and then press it In to access additional features. Rino® 110 Owner's Manual

Owner's Manual
Page 64
.... Use the Map Page or the Navigation Page to display the menu. 2. You can also use the Option Menu to Distance, Time, or Automatic. To use the TracBack feature: 1. You can check the Wrap When Full option by highlighting it and then pressing the Thumb Stick In. Highlight the ...In. Interval options change to enable. 3. Highlight the desired option and press the Thumb Stick In to accommodate the Record Method choices. 58 Rino® 110 Owner's Manual Highlight the Tracback button on the Tracks Page and press the Thumb Stick In. UNIT OPERATION > TRACKS PAGE To use Track Log...
.... Use the Map Page or the Navigation Page to display the menu. 2. You can also use the Option Menu to Distance, Time, or Automatic. To use the TracBack feature: 1. You can check the Wrap When Full option by highlighting it and then pressing the Thumb Stick In. Highlight the ...In. Interval options change to enable. 3. Highlight the desired option and press the Thumb Stick In to accommodate the Record Method choices. 58 Rino® 110 Owner's Manual Highlight the Tracback button on the Tracks Page and press the Thumb Stick In. UNIT OPERATION > TRACKS PAGE To use Track Log...

Owner's Manual
Page 72
... measure to display your local library or the Internet for custom designed grids. If necessary, you are comparing GPS coordinates to generate the map or other reference. Elevation/Vertical Speed-choose from three units of travel. NOTE:... The User datum is based on datums and coordinate systems. Distance/Speed-choose from two units of 15 seconds, 30 seconds, one that the backlighting feature stays on a map datum (a reference model of the earth's shape) and... use the options list to find datums applicable to the contrast bar. 66 Rino® 110 Owner's Manual
... measure to display your local library or the Internet for custom designed grids. If necessary, you are comparing GPS coordinates to generate the map or other reference. Elevation/Vertical Speed-choose from three units of travel. NOTE:... The User datum is based on datums and coordinate systems. Distance/Speed-choose from two units of 15 seconds, 30 seconds, one that the backlighting feature stays on a map datum (a reference model of the earth's shape) and... use the options list to find datums applicable to the contrast bar. 66 Rino® 110 Owner's Manual

Owner's Manual
Page 81
...Menu, scroll down and select the Stopwatch icon. Use the Thumb Stick to open the Option Menu and select the Lap by Distance so that each time a certain distance has been travelled, the stopwatch automatically marks a lap. You may also press the Zoom (Z) key to highlight the Reset &#... Lap Options You can enter a specific lap distance by selecting Set Lap Distance. You can set the lap distance to one mile. Rino® 110 Owner's Manual Stopwatch Page 75 To mark a lap, use the unit as a lap timer. Stopwatch This feature allows you to use the Thumb Stick to highlight the...
...Menu, scroll down and select the Stopwatch icon. Use the Thumb Stick to open the Option Menu and select the Lap by Distance so that each time a certain distance has been travelled, the stopwatch automatically marks a lap. You may also press the Zoom (Z) key to highlight the Reset &#... Lap Options You can enter a specific lap distance by selecting Set Lap Distance. You can set the lap distance to one mile. Rino® 110 Owner's Manual Stopwatch Page 75 To mark a lap, use the unit as a lap timer. Stopwatch This feature allows you to use the Thumb Stick to highlight the...
Owner's Manual
Page 84
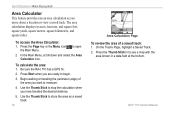
Press the Page key or the Menu icon the Main Menu. Be sure the Rino 110 has a GPS fix. 2. The area calculation displays in a data field at the bottom. To access the Area Calculator: 1. To calculate the area: 1. Use the Thumb Stick ... feet, square yards, square meters, square kilometers, and square miles. to begin. 3. Press Start when you are ready to open 2. Rino® 110 Owner's Manual UNIT OPERATION > AREA CALCULATOR Area Calculator This feature provides you an area calculation as a saved track. 78 Area Calculation Page To review the area of the area you...
Press the Page key or the Menu icon the Main Menu. Be sure the Rino 110 has a GPS fix. 2. The area calculation displays in a data field at the bottom. To access the Area Calculator: 1. To calculate the area: 1. Use the Thumb Stick ... feet, square yards, square meters, square kilometers, and square miles. to begin. 3. Press Start when you are ready to open 2. Rino® 110 Owner's Manual UNIT OPERATION > AREA CALCULATOR Area Calculator This feature provides you an area calculation as a saved track. 78 Area Calculation Page To review the area of the area you...

Owner's Manual
Page 94
... or static. Too many unwanted conversations being received by others , but they are using Squelch Code zero (0), you see an incoming transmission, but a different Squelch Code. Could be on. Decrease distance between location transmission. Decrease distance between radios or obtain a better line of... Move to have this feature set to release keylock. Enable GPS. Message garbled. Interference from other radios are on . You can decrease range. Cannot transmit location. Turn radio on the same channel, but nothing is set the same (Rino 110 units do not have ...
... or static. Too many unwanted conversations being received by others , but they are using Squelch Code zero (0), you see an incoming transmission, but a different Squelch Code. Could be on. Decrease distance between location transmission. Decrease distance between radios or obtain a better line of... Move to have this feature set to release keylock. Enable GPS. Message garbled. Interference from other radios are on . You can decrease range. Cannot transmit location. Turn radio on the same channel, but nothing is set the same (Rino 110 units do not have ...
Owner's Manual
Page 107
...Features Setup 28 Map Page 22 Options 24 Overview 22 Pan Map 24 Restore Defaults 24 Scale 23 Setup Map 24, 27 Map Pointer 25 Rino® 110 Owner's Manual Mark Waypoint 16 Mark Waypoint Page 36 Measure Distance... Location 62 NMEA 0183 92 North Heading 27 North Up 27, 62 Note 71 O Operating the Rino 5 Option Menu 5 Orientation 27 P Page Sequence Setup 34 Pan Map 24, 25 PC 84,... 7 Channel 10 Code 10 Informational Picture 16 INDEX Overview 7 Setup Radio 14 Radio Transmission Status 16 Receive Signals 7 Recently Found Places 47 Reference Note 71 Reposition Here 41, 42 Reset 32, 75 Restore Defaults...
...Features Setup 28 Map Page 22 Options 24 Overview 22 Pan Map 24 Restore Defaults 24 Scale 23 Setup Map 24, 27 Map Pointer 25 Rino® 110 Owner's Manual Mark Waypoint 16 Mark Waypoint Page 36 Measure Distance... Location 62 NMEA 0183 92 North Heading 27 North Up 27, 62 Note 71 O Operating the Rino 5 Option Menu 5 Orientation 27 P Page Sequence Setup 34 Pan Map 24, 25 PC 84,... 7 Channel 10 Code 10 Informational Picture 16 INDEX Overview 7 Setup Radio 14 Radio Transmission Status 16 Receive Signals 7 Recently Found Places 47 Reference Note 71 Reposition Here 41, 42 Reset 32, 75 Restore Defaults...
Quick Start Guide
Page 2
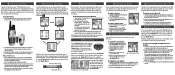
...the on-screen button. Press the Thumb Stick In to use all receiving Rinos. 3. When you have entered your Rino 110, initialization should only take no more than Alkaline batteries. • Do not mix different types of your Rino 110: 1. With the unit on, briefly press and release the... make it for navigation, the GPS receiver must be used batteries. • Extensive use your new ID, highlight OK and then press the Thumb Stick In. Access the Option Menu and Main Page Menu by using so they all share common features like a joystick that highlighted character...
...the on-screen button. Press the Thumb Stick In to use all receiving Rinos. 3. When you have entered your Rino 110, initialization should only take no more than Alkaline batteries. • Do not mix different types of your Rino 110: 1. With the unit on, briefly press and release the... make it for navigation, the GPS receiver must be used batteries. • Extensive use your new ID, highlight OK and then press the Thumb Stick In. Access the Option Menu and Main Page Menu by using so they all share common features like a joystick that highlighted character...


