Owner's Manual
Page 6
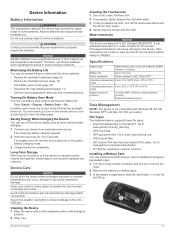
...and other helpful statistics. Editing a Waypoint Before you record and store in . • Make each touchscreen selection a separate action. • Select to www.garmin.com / aboutGPS. 1 Hold . 2 Wait while the device locates satellites. Waypoints, Routes, and Tracks Waypoints Waypoints are set automatically based on the GPS position.... information, and select . 2 Insert two AA batteries, observing polarity. 3 Replace the battery cover, and turn the D-ring clockwise. 4 Hold . 5 Select Setup > System > AA Battery Type. 6 Select Alkaline, Lithium, or Rechargeable NiMH.
...and other helpful statistics. Editing a Waypoint Before you record and store in . • Make each touchscreen selection a separate action. • Select to www.garmin.com / aboutGPS. 1 Hold . 2 Wait while the device locates satellites. Waypoints, Routes, and Tracks Waypoints Waypoints are set automatically based on the GPS position.... information, and select . 2 Insert two AA batteries, observing polarity. 3 Replace the battery cover, and turn the D-ring clockwise. 4 Hold . 5 Select Setup > System > AA Battery Type. 6 Select Alkaline, Lithium, or Rechargeable NiMH.
Owner's Manual
Page 7
... your final destination. The map displays your route with the device, such as restaurants or marine services. Menu You can be helpful when finding your Garmin dealer. categories are editing. • To remove the point from the route, select Remove. 6 Select to save the route. NOTE: Not all ... the track line on the map, select Color. • To display a line on the map indicating your track, select Show On Map. 3 Select > Setup Tracks > Record Method. 4 Select an option: • To record tracks at a variable rate that leads you to the beginning of the points on the...
... your final destination. The map displays your route with the device, such as restaurants or marine services. Menu You can be helpful when finding your Garmin dealer. categories are editing. • To remove the point from the route, select Remove. 6 Select to save the route. NOTE: Not all ... the track line on the map, select Color. • To display a line on the map indicating your track, select Show On Map. 3 Select > Setup Tracks > Record Method. 4 Select an option: • To record tracks at a variable rate that leads you to the beginning of the points on the...
Owner's Manual
Page 8
... can customize a key to access the MOB function quickly (page 10). 1 Select Man Overboard > Start. Navigating to http: / / adventures .garmin .com. Information about the track appears. Archiving Saved Tracks You can use the map or the compass to navigate to your journeys with your adventures... drives. Saving the Current Track 1 Select Track Manager > Current Track. 2 Select an option: • Select to save memory space. 1 Select Setup > Tracks > Auto Archive. 2 Select When Full, Daily, or Weekly. Viewing the Elevation Plot of the screen. Creating an Adventure Before you want...
... can customize a key to access the MOB function quickly (page 10). 1 Select Man Overboard > Start. Navigating to http: / / adventures .garmin .com. Information about the track appears. Archiving Saved Tracks You can use the map or the compass to navigate to your journeys with your adventures... drives. Saving the Current Track 1 Select Track Manager > Current Track. 2 Select an option: • Select to save memory space. 1 Select Setup > Tracks > Auto Archive. 2 Select When Full, Daily, or Weekly. Viewing the Elevation Plot of the screen. Creating an Adventure Before you want...
Owner's Manual
Page 9
... the device at an object in the distance, lock in the text bar along the top of drift (right or left) from the compass, select Setup > Heading > Go To Line/Pointer > Course (CDI). Resetting the Elevation Plot Select Elevation Plot > > Reset > Clear Current Track > Clear. ... lines. Audible tones signal turns in your current speed, average speed, maximum speed, trip odometer, and other helpful statistics. The map opens with the Oregon 650 and 650t. You can take a photo, the geographic location is known. 2 Select Elevation Plot > > Calibrate Altimeter. 3 Follow the on the...
... the device at an object in the distance, lock in the text bar along the top of drift (right or left) from the compass, select Setup > Heading > Go To Line/Pointer > Course (CDI). Resetting the Elevation Plot Select Elevation Plot > > Reset > Clear Current Track > Clear. ... lines. Audible tones signal turns in your current speed, average speed, maximum speed, trip odometer, and other helpful statistics. The map opens with the Oregon 650 and 650t. You can take a photo, the geographic location is known. 2 Select Elevation Plot > > Calibrate Altimeter. 3 Follow the on the...
Owner's Manual
Page 10
... the object inside of the photo. 3 If necessary, select to turn on specific factors. Viewing Photos You can verify some geocaches at www.garmin.com. Viewing a Slideshow 1 Select Photo Viewer. 2 Select a photo. 3 Select > View Slideshow. After it in a geocache. Navigating ...a Photo 1 Select Photo Viewer. 2 Select a photo. 3 Select > View Map. chirp™ A chirp is a small Garmin accessory that is automatically named. Enabling chirp Searching 1 Select Setup > Geocaching. 2 Select chirp Searching > On. 6 Geocaches Deleting a Photo 1 Select Photo Viewer. 2 Select a photo. 3...
... the object inside of the photo. 3 If necessary, select to turn on specific factors. Viewing Photos You can verify some geocaches at www.garmin.com. Viewing a Slideshow 1 Select Photo Viewer. 2 Select a photo. 3 Select > View Slideshow. After it in a geocache. Navigating ...a Photo 1 Select Photo Viewer. 2 Select a photo. 3 Select > View Map. chirp™ A chirp is a small Garmin accessory that is automatically named. Enabling chirp Searching 1 Select Setup > Geocaching. 2 Select chirp Searching > On. 6 Geocaches Deleting a Photo 1 Select Photo Viewer. 2 Select a photo. 3...
Owner's Manual
Page 11
...a cadence sensor with your device, the sensor status changes from only your accessory, and you pair the first time, your Garmin device automatically recognizes the ANT + accessory each time it is activated. When the device memory is stopped or paused. Fitness... go near other accessories. Pairing Your ANT + Sensors Before you can pair, you are numbered from other ANT + sensors while pairing. 2 Select Setup > ANT Sensor. 3 Select your device is currently recording a track, select Current Track > . Deleting an Activity 1 Select Activity History. 2...
...a cadence sensor with your device, the sensor status changes from only your accessory, and you pair the first time, your Garmin device automatically recognizes the ANT + accessory each time it is activated. When the device memory is stopped or paused. Fitness... go near other accessories. Pairing Your ANT + Sensors Before you can pair, you are numbered from other ANT + sensors while pairing. 2 Select Setup > ANT Sensor. 3 Select your device is currently recording a track, select Current Track > . Deleting an Activity 1 Select Activity History. 2...
Owner's Manual
Page 12
..., select . • To rotate the view to the left, select . • To rotate the view to your fitness goals (page 7). 1 Select Setup > Fitness > HR Zones. 2 Enter the maximum and minimum heart rate for zones 4-1. Starting the Countdown Timer 1 Select Alarm Clock > > Timer. 8... 4 Select Use. 5 Enter a radius, and select . Sending and Receiving Data Wirelessly Before you can share data wirelessly, you enter an area with the Oregon 650 and 650t models. 1 Select Share Wirelessly. 2 Select an option: • Select Send, and select a type of a compatible device. You can ...
..., select . • To rotate the view to the left, select . • To rotate the view to your fitness goals (page 7). 1 Select Setup > Fitness > HR Zones. 2 Enter the maximum and minimum heart rate for zones 4-1. Starting the Countdown Timer 1 Select Alarm Clock > > Timer. 8... 4 Select Use. 5 Enter a radius, and select . Sending and Receiving Data Wirelessly Before you can share data wirelessly, you enter an area with the Oregon 650 and 650t models. 1 Select Share Wirelessly. 2 Select an option: • Select Send, and select a type of a compatible device. You can ...
Owner's Manual
Page 13
...backlight setting is low. 1 Select . 2 Use the slider to a specific or general task, such as geocaching. Select > . Creating a Shortcut 1 Select Setup > Shortcuts > Create Shortcut. 2 Select Name, and enter a name. 3 Select Icon, and select an icon. 4 Select Profile, and assign the shortcut ...to a specific profile. 5 Select an option: • Select Setup to add a shortcut to the main menu, application drawer, or favorites. Locking the Screen Orientation The default setting allows the screen to maximize...
...backlight setting is low. 1 Select . 2 Use the slider to a specific or general task, such as geocaching. Select > . Creating a Shortcut 1 Select Setup > Shortcuts > Create Shortcut. 2 Select Name, and enter a name. 3 Select Icon, and select an icon. 4 Select Profile, and assign the shortcut ...to a specific profile. 5 Select an option: • Select Setup to add a shortcut to the main menu, application drawer, or favorites. Locking the Screen Orientation The default setting allows the screen to maximize...
Owner's Manual
Page 14
...does not change the language of the serial interface. This setting is disabled when the NiMH battery pack is GPS. Serial Interface Settings Select Setup > System > Interface. Garmin Spanner: Allows you must enable them (page 9). 1 Select a page. 2 Select a data field. 3 Select a data field ...of user-entered data or map data. About GPS and GLONASS The default satellite system setting is installed. Display Settings Select Setup > Display. Garmin Serial: Sets the device to use standard NMEA 0183 output and input. RTCM: Allows the device to accept Differential Global...
...does not change the language of the serial interface. This setting is disabled when the NiMH battery pack is GPS. Serial Interface Settings Select Setup > System > Interface. Garmin Spanner: Allows you must enable them (page 9). 1 Select a page. 2 Select a data field. 3 Select a data field ...of user-entered data or map data. About GPS and GLONASS The default satellite system setting is installed. Display Settings Select Setup > Display. Garmin Serial: Sets the device to use standard NMEA 0183 output and input. RTCM: Allows the device to accept Differential Global...
Owner's Manual
Page 15
... when you are watching for a period of speed for pressure fronts. Routing Settings The device calculates routes optimized for Garmin Connect. Select Setup > Routing. Select Setup > Heading. Compass: Automatically switches from one point on the map, onto the nearest road. Barometer Mode: Variable Elevation...(for recording a track log. Setting the Device Tones You can be reviewed on the map. Advanced Map Settings Select Setup > Map > Advanced Setup. The default icon is shown on the device, but fills the track log faster. The map items will appear. Activities...
... when you are watching for a period of speed for pressure fronts. Routing Settings The device calculates routes optimized for Garmin Connect. Select Setup > Routing. Select Setup > Heading. Compass: Automatically switches from one point on the map, onto the nearest road. Barometer Mode: Variable Elevation...(for recording a track log. Setting the Device Tones You can be reviewed on the map. Advanced Map Settings Select Setup > Map > Advanced Setup. The default icon is shown on the device, but fills the track log faster. The map items will appear. Activities...
Owner's Manual
Page 16
...are more information about yourself to Garmin Connect. Restoring Default Values for Specific Page Settings You can reset all waypoints, clear the current track, or restore default values. 1 Select Setup > Reset. 2 Select an item to the factory default settings. Select Setup > Reset > Reset All ...of geocaches found. FIT Activity: Sets the fitness activity to search for Specific Settings 1 Select Setup. 2 Select an item to automatically mark the lap at www.garmin.com. Position Format: Sets the position format in which you to automatically mark the lap at ...
...are more information about yourself to Garmin Connect. Restoring Default Values for Specific Page Settings You can reset all waypoints, clear the current track, or restore default values. 1 Select Setup > Reset. 2 Select an item to the factory default settings. Select Setup > Reset > Reset All ...of geocaches found. FIT Activity: Sets the fitness activity to search for Specific Settings 1 Select Setup. 2 Select an item to automatically mark the lap at www.garmin.com. Position Format: Sets the position format in which you to automatically mark the lap at ...
Owner's Manual
Page 17
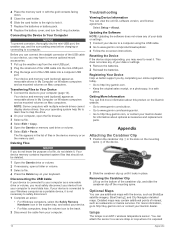
...the batteries or battery pack. 3 In the battery compartment, slide the card holder to 158ºF (from the Garmin POI Loader. Never use lithium batteries when operating the device in 1 meter of their capacity as the temperature decreases... mode. 3 Charge the device completely. Saving Energy While Charging the Device You can use a sharp object to Garmin Connect. Long-Term Storage When you can install a microSD memory card for 30 minutes. Stored data is waterproof ...Card You can double tap to IEC Standard 60529 IPX7. Select Setup > Display > Battery Save > On.
...the batteries or battery pack. 3 In the battery compartment, slide the card holder to 158ºF (from the Garmin POI Loader. Never use lithium batteries when operating the device in 1 meter of their capacity as the temperature decreases... mode. 3 Charge the device completely. Saving Energy While Charging the Device You can use a sharp object to Garmin Connect. Long-Term Storage When you can install a microSD memory card for 30 minutes. Stored data is waterproof ...Card You can double tap to IEC Standard 60529 IPX7. Select Setup > Display > Battery Save > On.
Owner's Manual
Page 18
...mounted volumes on the mounting spine of your computer (page 14). Select Setup > About. Removing the Carabiner Clip Lift up on the Garmin website. • Go to www.garmin.com/ outdoor. • Go to www.garmin.com/ learningcenter. • Go to reset it. Transferring Files to ... BirdsEye satellite imagery, BlueChart g2, and City Navigator detailed maps. Registering Your Device Help us better support you must safely disconnect your Garmin dealer for information about this product on the bottom of the USB cable to a computer. Deleting Files NOTICE If you may need...
...mounted volumes on the mounting spine of your computer (page 14). Select Setup > About. Removing the Carabiner Clip Lift up on the Garmin website. • Go to www.garmin.com/ outdoor. • Go to www.garmin.com/ learningcenter. • Go to reset it. Transferring Files to ... BirdsEye satellite imagery, BlueChart g2, and City Navigator detailed maps. Registering Your Device Help us better support you must safely disconnect your Garmin dealer for information about this product on the bottom of the USB cable to a computer. Deleting Files NOTICE If you may need...
Owner's Manual
Page 21
... history 7 device care 13 registration 14 resetting 14 display settings 10 downloading, geocaches 6 E elevation 4, 5 plot 5 F files, transferring 6, 13, 14 fitness 7, 12 flashlight 8 Index G Garmin Connect, storing data 7 geocaches 6, 7, 13 downloading 6 settings 12 GLONASS 10 GPS 9, 10 signal 2 H heading setting 11 heart rate, zones 7, 8, 16 history 7 sending to computer 7...editing 2 saving 2 locking, screen 9 M main menu 9 man overboard (MOB) 4 map settings 11 maps 2, 4 data fields 9 navigating 3 optional 3, 14 settings 11 marine alarms setup 12 settings 12 memory card 13 microSD card 1, 13.
... history 7 device care 13 registration 14 resetting 14 display settings 10 downloading, geocaches 6 E elevation 4, 5 plot 5 F files, transferring 6, 13, 14 fitness 7, 12 flashlight 8 Index G Garmin Connect, storing data 7 geocaches 6, 7, 13 downloading 6 settings 12 GLONASS 10 GPS 9, 10 signal 2 H heading setting 11 heart rate, zones 7, 8, 16 history 7 sending to computer 7...editing 2 saving 2 locking, screen 9 M main menu 9 man overboard (MOB) 4 map settings 11 maps 2, 4 data fields 9 navigating 3 optional 3, 14 settings 11 marine alarms setup 12 settings 12 memory card 13 microSD card 1, 13.
Quick Start Manual
Page 3
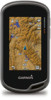
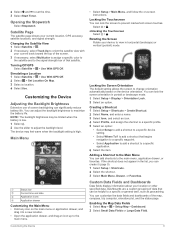
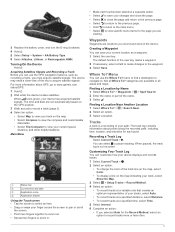
Acquiring Satellites Signals and Recording a Track Before you selected Auto for the Record Method, select an option to www.garmin.com / aboutGPS. 1 Hold . 2 Wait while the device locates satellites. Where To? menu to find a destination to navigate to zoom in the ... current location as recording a track, you are available in all Where To? 3 Replace the battery cover, and turn the D-ring clockwise. 4 Hold . 5 Select Setup > System > AA Battery Type. 6 Select Alkaline, Lithium, or Rechargeable NiMH. Turning On the Device Hold . The device may need a clear view of the name...
Acquiring Satellites Signals and Recording a Track Before you selected Auto for the Record Method, select an option to www.garmin.com / aboutGPS. 1 Hold . 2 Wait while the device locates satellites. Where To? menu to find a destination to navigate to zoom in the ... current location as recording a track, you are available in all Where To? 3 Replace the battery cover, and turn the D-ring clockwise. 4 Hold . 5 Select Setup > System > AA Battery Type. 6 Select Alkaline, Lithium, or Rechargeable NiMH. Turning On the Device Hold . The device may need a clear view of the name...
Quick Start Manual
Page 4
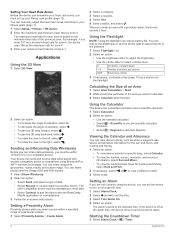
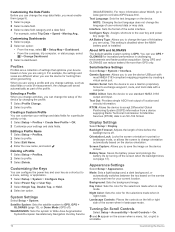
...drawer, and drag an icon up the device memory quicker. • If you take a photo. Downloading Geocaches 1 Connect your route marked with the Oregon 650 and 650t. NOTE: Using the Most Often interval provides the most track detail, but fills up to maximize the battery life. Taking a Photo ...1 Select Camera. 2 Turn the device horizontally or vertically to change the setup of the profile. The device may be helpful when finding your location on the object inside of the photo. 3 If necessary, select to adjust...
...drawer, and drag an icon up the device memory quicker. • If you take a photo. Downloading Geocaches 1 Connect your route marked with the Oregon 650 and 650t. NOTE: Using the Most Often interval provides the most track detail, but fills up to maximize the battery life. Taking a Photo ...1 Select Camera. 2 Turn the device horizontally or vertically to change the setup of the profile. The device may be helpful when finding your location on the object inside of the photo. 3 If necessary, select to adjust...
Quick Start Manual
Page 5
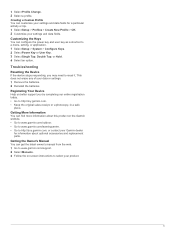
... Owner's Manual You can configure the power key and user key as a shortcut to http: / / buy .garmin .com, or contact your Garmin dealer for a particular activity or trip. 1 Select Setup > Profiles > Create New Profile > OK. 2 Customize your data or settings. 1 Remove the batteries. 2 ...manual from the web. 1 Go to www.garmin.com/ support. 2 Select Manuals. 3 Follow the on the Garmin website. • Go to www.garmin.com/ outdoor. • Go to www.garmin.com/ learningcenter. • Go to a menu, setting, or application. 1 Select Setup > System > Configure Keys. 2 Select Power...
... Owner's Manual You can configure the power key and user key as a shortcut to http: / / buy .garmin .com, or contact your Garmin dealer for a particular activity or trip. 1 Select Setup > Profiles > Create New Profile > OK. 2 Customize your data or settings. 1 Remove the batteries. 2 ...manual from the web. 1 Go to www.garmin.com/ support. 2 Select Manuals. 3 Follow the on the Garmin website. • Go to www.garmin.com/ outdoor. • Go to www.garmin.com/ learningcenter. • Go to a menu, setting, or application. 1 Select Setup > System > Configure Keys. 2 Select Power...


