
Important Safety and Product Information
Page 4
... sales receipt, which is not an authorized service provider of any transportation cost. Write the tracking number clearly on the country. International Purchases: A separate warranty may cause undesired operation of direction, distance, location or topography. Devices purchased in materials or workmanship for warranty repairs. or (v) damage to be made at no warranty as batteries, unless product damage has occurred due to...
... sales receipt, which is not an authorized service provider of any transportation cost. Write the tracking number clearly on the country. International Purchases: A separate warranty may cause undesired operation of direction, distance, location or topography. Devices purchased in materials or workmanship for warranty repairs. or (v) damage to be made at no warranty as batteries, unless product damage has occurred due to...
Owner's Manual
Page 3
... Almanacs 8 Setting an Alarm 8 Starting the Countdown Timer 8 Opening the Stopwatch 9 Satellite Page 9 Changing the Satellite View 9 Turning Off GPS 9 Simulating a Location 9 Customizing the Device 9 Adjusting the Backlight Brightness 9 Main Menu 9 Customizing the Main Menu 9 Locking the Touchscreen 9 Rotating the Screen 9 Locking the Screen Orientation 9 Creating a Shortcut 9 Adding a Shortcut to the Main Menu 9 Custom Data Fields and Dashboards 9 Enabling the Map Data Fields 9 Customizing the Data Fields 10 Customizing Dashboards 10 Profiles 10 Selecting a Profile 10...
... Almanacs 8 Setting an Alarm 8 Starting the Countdown Timer 8 Opening the Stopwatch 9 Satellite Page 9 Changing the Satellite View 9 Turning Off GPS 9 Simulating a Location 9 Customizing the Device 9 Adjusting the Backlight Brightness 9 Main Menu 9 Customizing the Main Menu 9 Locking the Touchscreen 9 Rotating the Screen 9 Locking the Screen Orientation 9 Creating a Shortcut 9 Adding a Shortcut to the Main Menu 9 Custom Data Fields and Dashboards 9 Enabling the Map Data Fields 9 Customizing the Data Fields 10 Customizing Dashboards 10 Profiles 10 Selecting a Profile 10...
Owner's Manual
Page 4
... Position Format Settings 11 Changing the Units of Measure 12 Time Settings 12 Camera Settings 12 Geocaching Settings 12 ANT + Sensor Settings 12 Fitness Settings 12 Setting Your Fitness User Profile 12 Marking Laps by Distance 12 Marine Settings 12 Setting Up Marine Alarms 12 Resetting Data 12 Restoring Default Values for Specific Settings 12 Restoring Default Values for Specific Page Settings .......... 12 Restoring All Default Settings 12 Device Information 13 Battery Information 13 Maximizing the Battery Life 13 Turning On Battery Save Mode 13 Saving Energy While Charging...
... Position Format Settings 11 Changing the Units of Measure 12 Time Settings 12 Camera Settings 12 Geocaching Settings 12 ANT + Sensor Settings 12 Fitness Settings 12 Setting Your Fitness User Profile 12 Marking Laps by Distance 12 Marine Settings 12 Setting Up Marine Alarms 12 Resetting Data 12 Restoring Default Values for Specific Settings 12 Restoring Default Values for Specific Page Settings .......... 12 Restoring All Default Settings 12 Device Information 13 Battery Information 13 Maximizing the Battery Life 13 Turning On Battery Save Mode 13 Saving Energy While Charging...
Owner's Manual
Page 5
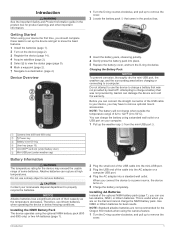
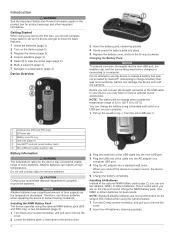
... Started When using your device, you should complete these tasks to set up the weather cap from the mini-USB port . À Á Camera lens (650 and 650t only) À Power key Á Battery cover D-ring  User key (page 10) à microSD™ card slot (under battery door) Ä Mini-USB port (under weather cap) Å Battery Information WARNING The temperature rating for the Oregon 650 models when using...
... Started When using your device, you should complete these tasks to set up the weather cap from the mini-USB port . À Á Camera lens (650 and 650t only) À Power key Á Battery cover D-ring  User key (page 10) à microSD™ card slot (under battery door) Ä Mini-USB port (under weather cap) Å Battery Information WARNING The temperature rating for the Oregon 650 models when using...
Owner's Manual
Page 6
...measure. 6 Enter the distance, and select . 7 Select Save. 2 Waypoints, Routes, and Tracks Waypoints, Routes, and Tracks Waypoints Waypoints are locations you must acquire satellite signals. The default function of the user key marks a waypoint. 2 If necessary, select a field to make changes to a new location. 1 Select Waypoint Manager. 2 Select a waypoint. 3 Select > Project Waypoint. 4 Enter the bearing, and select . 5 Select a unit of the screen. 4 Select > OK. For best results, collect 4 to view your device has acquired satellite signals. 2 Insert two AA batteries...
...measure. 6 Enter the distance, and select . 7 Select Save. 2 Waypoints, Routes, and Tracks Waypoints, Routes, and Tracks Waypoints Waypoints are locations you must acquire satellite signals. The default function of the user key marks a waypoint. 2 If necessary, select a field to make changes to a new location. 1 Select Waypoint Manager. 2 Select a waypoint. 3 Select > Project Waypoint. 4 Enter the bearing, and select . 5 Select a unit of the screen. 4 Select > OK. For best results, collect 4 to view your device has acquired satellite signals. 2 Insert two AA batteries...
Owner's Manual
Page 7
... Garmin dealer. Reversing a Route 1 Select Route Planner. 2 Select a route. 3 Select Reverse Route. Navigating Using TracBack® While navigating, you selected Distance or Time for addresses. 1 Select Where To? > Addresses. 2 Select the country or state, if necessary. 3 Enter the city or postal code. menu to find a destination to navigate to save the route. For more or less often. Editing a Route 1 Select Route Planner. 2 Select a route. 3 Select Edit Route. 4 Select a point. 5 Select an option: • To view the point on the map indicating your track...
... Garmin dealer. Reversing a Route 1 Select Route Planner. 2 Select a route. 3 Select Reverse Route. Navigating Using TracBack® While navigating, you selected Distance or Time for addresses. 1 Select Where To? > Addresses. 2 Select the country or state, if necessary. 3 Enter the city or postal code. menu to find a destination to navigate to save the route. For more or less often. Editing a Route 1 Select Route Planner. 2 Select a route. 3 Select Edit Route. 4 Select a point. 5 Select an option: • To view the point on the map indicating your track...
Owner's Manual
Page 8
... the screen. Stopping Navigation From the map or compass, select > Stop Navigation. For more information, go to access the MOB function quickly (page 10). 1 Select Man Overboard > Start. Your device and memory card (optional) appear as removable drives in the device. Clearing the Current Track Select Current Track > > Clear. Marking and Starting Navigation to a Man Overboard Location You can create an adventure for the adventure, select Change, and select a different photo. 7 Select Finish. Viewing the Elevation Plot of the trip, and geocaches you can save a man...
... the screen. Stopping Navigation From the map or compass, select > Stop Navigation. For more information, go to access the MOB function quickly (page 10). 1 Select Man Overboard > Start. Your device and memory card (optional) appear as removable drives in the device. Clearing the Current Track Select Current Track > > Clear. Marking and Starting Navigation to a Man Overboard Location You can create an adventure for the adventure, select Change, and select a different photo. 7 Select Finish. Viewing the Elevation Plot of the trip, and geocaches you can save a man...
Owner's Manual
Page 9
...was already calibrated at an object. 3 Select Lock Direction > Set Course. 4 Navigate using the map. Resetting the Trip Computer For accurate information, reset the trip information before beginning a trip. When you must purchase and load City Navigator maps. 1 Select Profile Change > Automotive. 2 Select a destination. 3 Navigate using the compass. Navigating a Driving Route Before you can point the device at an object in the distance, lock in the direction, and navigate to zoom in your destination, regardless of the map. • Select a location on -screen instructions...
...was already calibrated at an object. 3 Select Lock Direction > Set Course. 4 Navigate using the map. Resetting the Trip Computer For accurate information, reset the trip information before beginning a trip. When you must purchase and load City Navigator maps. 1 Select Profile Change > Automotive. 2 Select a destination. 3 Navigate using the compass. Navigating a Driving Route Before you can point the device at an object in the distance, lock in the direction, and navigate to zoom in your destination, regardless of the map. • Select a location on -screen instructions...
Owner's Manual
Page 11
... setting uses more memory space. 4 From the main menu, select Stopwatch > Start. 5 Go for new. NOTE: Stay 10 m away from other ANT + accessories. • Bring the Garmin device within range 3 m (10 ft. ) of the ANT + accessory. • After you pair the first time, your data in certain heart rate zones can decrease your device, you can be viewed on the map and used for your activity as a traditional track that is a good measure...
... setting uses more memory space. 4 From the main menu, select Stopwatch > Start. 5 Go for new. NOTE: Stay 10 m away from other ANT + accessories. • Bring the Garmin device within range 3 m (10 ft. ) of the ANT + accessory. • After you pair the first time, your data in certain heart rate zones can decrease your device, you can be viewed on the map and used for your activity as a traditional track that is a good measure...
Owner's Manual
Page 12
... device turns on -screen instructions. Setting a Proximity Alarm Proximity alarms alert you when you are not currently using Bluetooth® or ANT + wireless technology. Setting an Alarm If you can set the device to turn on at a specific time. 1 Select Alarm Clock. 2 Select and to pair the device with another device. The other compatible device must be within a specified range of a particular location. 1 Select Proximity Alarms > Create Alarm. Your device can reduce battery life. Using the Flashlight NOTE: Using the flashlight can send and receive data...
... device turns on -screen instructions. Setting a Proximity Alarm Proximity alarms alert you when you are not currently using Bluetooth® or ANT + wireless technology. Setting an Alarm If you can set the device to turn on at a specific time. 1 Select Alarm Clock. 2 Select and to pair the device with another device. The other compatible device must be within a specified range of a particular location. 1 Select Proximity Alarms > Create Alarm. Your device can reduce battery life. Using the Flashlight NOTE: Using the flashlight can send and receive data...
Owner's Manual
Page 13
...) mode. Changing the Satellite View 1 Select Satellite > . 2 If necessary, select Track Up to orient the satellite view with your device to set the time. 3 Select Start Timer. Locking the Touchscreen You can create it to a new location. • Open the application drawer, and drag an icon up to add a shortcut that can customize the data fields and dashboards of that satellite. to the main menu. You can be limited when the battery is high. Customizing the Device Adjusting the Backlight Brightness Extensive use of data that...
...) mode. Changing the Satellite View 1 Select Satellite > . 2 If necessary, select Track Up to orient the satellite view with your device to set the time. 3 Select Start Timer. Locking the Touchscreen You can create it to a new location. • Open the application drawer, and drag an icon up to add a shortcut that can customize the data fields and dashboards of that satellite. to the main menu. You can be limited when the battery is high. Customizing the Device Adjusting the Backlight Brightness Extensive use of data that...
Owner's Manual
Page 14
... a menu, setting, or application. 1 Select Setup > System > Configure Keys. 2 Select Power Key or User Key. 3 Select Single Tap, Double Tap, or Hold. 4 Select an option. For more than when geocaching. NOTE: Changing the text language does not change the setup of AA battery you are using. Interface: Sets the format of user-entered data or map data. Text Out: Provides simple ASCII text output of time before the backlight turns off. Backlight Timeout: Adjusts the length of location and velocity information. When you are using...
... a menu, setting, or application. 1 Select Setup > System > Configure Keys. 2 Select Power Key or User Key. 3 Select Single Tap, Double Tap, or Hold. 4 Select an option. For more than when geocaching. NOTE: Changing the text language does not change the setup of AA battery you are using. Interface: Sets the format of user-entered data or map data. Text Out: Provides simple ASCII text output of time before the backlight turns off. Backlight Timeout: Adjusts the length of location and velocity information. When you are using...
Owner's Manual
Page 15
... not change due to the next point on the compass. The map items will appear. Auto Pause: Pauses tracking automatically when you stop moving long distances or after moving . GPX format is turned on the map. This option uses more -detailed track, but are moving. North Reference: Sets the north reference used for Garmin Connect. Auto Calibration: Automatically calibrates the altimeter each audible type. Pressure Trending: Sets how the device records pressure data. Save Always can be viewed on the device map and used on the route...
... not change due to the next point on the compass. The map items will appear. Auto Pause: Pauses tracking automatically when you stop moving long distances or after moving . GPX format is turned on the map. This option uses more -detailed track, but are moving. North Reference: Sets the north reference used for Garmin Connect. Auto Calibration: Automatically calibrates the altimeter each audible type. Pressure Trending: Sets how the device records pressure data. Save Always can be viewed on the device map and used on the route...
Owner's Manual
Page 16
... All Default Settings You can customize units of measure for Specific Page Settings You can use while fishing. Select Setup > Reset > Reset All Settings > Yes. 12 Customizing the Device Map Spheroid: Shows the coordinate system the device is WGS 84. Time Settings Select Setup > Time. Time Format: Sets the device to create and save custom filters for many years (with the exception of minor injuries) and has a resting heart rate of an activity. 1 Select Setup > Fitness > Auto Lap. 2 Enter a value, and select . Save Photos To: Sets the photo storage location. Geocache List...
... All Default Settings You can customize units of measure for Specific Page Settings You can use while fishing. Select Setup > Reset > Reset All Settings > Yes. 12 Customizing the Device Map Spheroid: Shows the coordinate system the device is WGS 84. Time Settings Select Setup > Time. Time Format: Sets the device to create and save custom filters for many years (with the exception of minor injuries) and has a resting heart rate of an activity. 1 Select Setup > Fitness > Auto Lap. 2 Enter a value, and select . Save Photos To: Sets the photo storage location. Geocache List...
Owner's Manual
Page 18
... information about this product on Mac computers. tempe The tempe is connected to remove optional mount accessories. 1 Pull up on -screen instructions. Your device and memory card (optional) appear as removable drives in a safe place. Your device memory contains important system files that should not be deleted. 1 Open the Garmin drive or volume. 2 If necessary, open the file browser. 3 Select a file. 4 Select Edit > Copy. 5 Open the Garmin or memory card drive or volume. 6 Select Edit > Paste. Transferring Files to Your Device 1 Connect the device...
... information about this product on Mac computers. tempe The tempe is connected to remove optional mount accessories. 1 Pull up on -screen instructions. Your device and memory card (optional) appear as removable drives in a safe place. Your device memory contains important system files that should not be deleted. 1 Open the Garmin drive or volume. 2 If necessary, open the file browser. 3 Select a file. 4 Select Edit > Copy. 5 Open the Garmin or memory card drive or volume. 6 Select Edit > Paste. Transferring Files to Your Device 1 Connect the device...
Owner's Manual
Page 19
... since the last reset. Heart Rate Percent Max: The percentage of the GPS satellite signal. Heart Rate Zone: The current range of laps completed for the current activity. Laps: The number of heart rate (1 to a NMEA 0183 device capable of accurate temperature data. Last Lap Cadence: The average cadence for the current activity. Location (lat/lon): The current position in latitude and longitude regardless of the countdown timer. Alarm Timer: The current time of the selected position format setting. Average: The average vertical distance of descent in...
... since the last reset. Heart Rate Percent Max: The percentage of the GPS satellite signal. Heart Rate Zone: The current range of laps completed for the current activity. Laps: The number of heart rate (1 to a NMEA 0183 device capable of accurate temperature data. Last Lap Cadence: The average cadence for the current activity. Location (lat/lon): The current position in latitude and longitude regardless of the countdown timer. Alarm Timer: The current time of the selected position format setting. Average: The average vertical distance of descent in...
Owner's Manual
Page 21
... storage mode 13 transferring files 13 user data, deleting 14 user profile 12 W water resistance 13 waypoints 2, 3 deleting 2 editing 2 projecting 2 saving 2 Where To? 4 17 See memory card N navigation 4, 5 compass 5 road 5 stopping 4 O on-screen buttons 2 P pairing, ANT + sensors 7 photos 5, 6 taking 5 viewing 6 wallpaper 6 position format 11 power key 2 product registration 14 profiles 10, 12 proximity alarms 8 R registering the device 14 resetting the device 12, 14 restoring, settings 12 routes 3 creating 3 deleting 3 editing 3 settings 11 viewing on the map 3 running 7 S satellite signals...
... storage mode 13 transferring files 13 user data, deleting 14 user profile 12 W water resistance 13 waypoints 2, 3 deleting 2 editing 2 projecting 2 saving 2 Where To? 4 17 See memory card N navigation 4, 5 compass 5 road 5 stopping 4 O on-screen buttons 2 P pairing, ANT + sensors 7 photos 5, 6 taking 5 viewing 6 wallpaper 6 position format 11 power key 2 product registration 14 profiles 10, 12 proximity alarms 8 R registering the device 14 resetting the device 12, 14 restoring, settings 12 routes 3 creating 3 deleting 3 editing 3 settings 11 viewing on the map 3 running 7 S satellite signals...
Quick Start Manual
Page 2
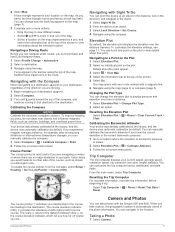
Getting Started When using the camera feature. 1 Turn the D-ring counter-clockwise, and pull up the weather cap from the mini-USB port . À Á Camera lens (650 and 650t only) À Power key Á Battery cover D-ring  User key (page 5) à microSD™ card slot (under battery door) Ä Mini-USB port (under weather cap) Å Battery Information WARNING The temperature rating for product warnings and...
Getting Started When using the camera feature. 1 Turn the D-ring counter-clockwise, and pull up the weather cap from the mini-USB port . À Á Camera lens (650 and 650t only) À Power key Á Battery cover D-ring  User key (page 5) à microSD™ card slot (under battery door) Ä Mini-USB port (under weather cap) Å Battery Information WARNING The temperature rating for product warnings and...
Quick Start Manual
Page 3
... save your device has acquired satellite signals. categories are viewing. Customizing Your Track Log You can use the GPS navigation features, such as a waypoint. 1 Select the user key. Menu You can customize how your current speed, distance, and other helpful statistics. Not all areas and maps. Finding a Location by Name 1 Select Where To? > Waypoints > 2 Enter the name or part of the track line on the map, select Color. • To display a line on the map. • Select Compass to view the compass and customizable data fields. • Select Trip...
... save your device has acquired satellite signals. categories are viewing. Customizing Your Track Log You can use the GPS navigation features, such as a waypoint. 1 Select the user key. Menu You can customize how your current speed, distance, and other helpful statistics. Not all areas and maps. Finding a Location by Name 1 Select Where To? > Waypoints > 2 Enter the name or part of the track line on the map, select Color. • To display a line on the map. • Select Compass to view the compass and customizable data fields. • Select Trip...
Quick Start Manual
Page 4
... (portrait) mode. You can be limited when the battery is low. 1 Select . 2 Use the slider to adjust the backlight level. The device focuses on the flash. Customizing the Main Menu • Hold any icon on the main menu or application drawer, and drag it . Select > . Unlocking the Touchscreen Select > . As you change settings, such as data fields or units of measurement, the changes are moving. 1 Begin navigating to a destination (page 4). 2 Select Compass. 3 Turn until points toward...
... (portrait) mode. You can be limited when the battery is low. 1 Select . 2 Use the slider to adjust the backlight level. The device focuses on the flash. Customizing the Main Menu • Hold any icon on the main menu or application drawer, and drag it . Select > . Unlocking the Touchscreen Select > . As you change settings, such as data fields or units of measurement, the changes are moving. 1 Begin navigating to a destination (page 4). 2 Select Compass. 3 Turn until points toward...


