

Owner s Manual
Page 3
... 1 Turning On the Device 2 Main Menu 2 Using the Touchscreen 2 Locking the Touchscreen 2 Unlocking the Touchscreen 2 Registering Your Device 2 Adjusting the Backlight Brightness 2 Acquiring Satellites Signals and Recording a Track 2 Waypoints 2 Creating a Waypoint 2 Marking a Waypoint Using the Map 2 Finding a Waypoint 2 Editing a Waypoint 3 Deleting a Waypoint 3 Increasing the Accuracy of a Waypoint Location 3 Projecting a Waypoint 3 Tracks 3 Recording a Track Log 3 Changing the Current Track Color 3 Saving the Current Track 3 Selecting an Output Format for Pairing ANT...
... 1 Turning On the Device 2 Main Menu 2 Using the Touchscreen 2 Locking the Touchscreen 2 Unlocking the Touchscreen 2 Registering Your Device 2 Adjusting the Backlight Brightness 2 Acquiring Satellites Signals and Recording a Track 2 Waypoints 2 Creating a Waypoint 2 Marking a Waypoint Using the Map 2 Finding a Waypoint 2 Editing a Waypoint 3 Deleting a Waypoint 3 Increasing the Accuracy of a Waypoint Location 3 Projecting a Waypoint 3 Tracks 3 Recording a Track Log 3 Changing the Current Track Color 3 Saving the Current Track 3 Selecting an Output Format for Pairing ANT...
Owner s Manual
Page 4
... 13 Data Management 13 File Types 13 Installing a Memory Card 13 Connecting the Device to Your Computer 13 Transferring Files to Your Device 14 Sending Files to BaseCamp 14 Deleting Files 14 Disconnecting the USB Cable 14 Resetting the Device 14 Removing the Battery Pack 14 Device Information 14 Specifications 14 About the Batteries 14 Viewing Device Information 14 Getting More Information 14 Troubleshooting 15 How do I know my device is in USB mass storage mode? ...... 15 I need to reset all settings back to factory default values ......... 15 I need replacement parts or...
... 13 Data Management 13 File Types 13 Installing a Memory Card 13 Connecting the Device to Your Computer 13 Transferring Files to Your Device 14 Sending Files to BaseCamp 14 Deleting Files 14 Disconnecting the USB Cable 14 Resetting the Device 14 Removing the Battery Pack 14 Device Information 14 Specifications 14 About the Batteries 14 Viewing Device Information 14 Getting More Information 14 Troubleshooting 15 How do I know my device is in USB mass storage mode? ...... 15 I need to reset all settings back to factory default values ......... 15 I need replacement parts or...
Owner s Manual
Page 5
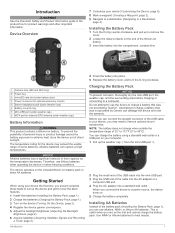
... to a Destination, page 4). The temperature rating for external GPS antenna (under weather cap) Æ MCX port for the device may need to your device the first time, you can rupture at high temperatures. Getting Started When using a standard wall outlet or a USB port on the device (Turning On the Device, page 2). 4 Register the device garmin.com/express. 5 Adjust the backlight brightness (Adjusting the Backlight Brightness, page 2). 6 Acquire satellites (Acquiring Satellites Signals and Recording...
... to a Destination, page 4). The temperature rating for external GPS antenna (under weather cap) Æ MCX port for the device may need to your device the first time, you can rupture at high temperatures. Getting Started When using a standard wall outlet or a USB port on the device (Turning On the Device, page 2). 4 Register the device garmin.com/express. 5 Adjust the backlight brightness (Adjusting the Backlight Brightness, page 2). 6 Acquire satellites (Acquiring Satellites Signals and Recording...
Owner s Manual
Page 6
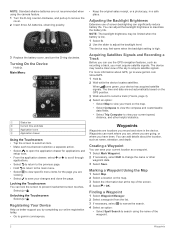
... save your current speed, distance, and other waypoint data. 3 Select Save. When turns green, your track on the map. • Select Compass to view the compass and customizable data fields. • Select Trip Computer to acquire satellite signals. Waypoints Waypoints are viewing. • Select to www.garmin.com /aboutGPS. 1 Hold . 2 Wait while the device locates satellites. Creating a Waypoint You can adjust the backlight brightness to change the name or other helpful statistics. Select > . Adjusting the Backlight Brightness Extensive use the GPS navigation features...
... save your current speed, distance, and other waypoint data. 3 Select Save. When turns green, your track on the map. • Select Compass to view the compass and customizable data fields. • Select Trip Computer to acquire satellite signals. Waypoints Waypoints are viewing. • Select to www.garmin.com /aboutGPS. 1 Hold . 2 Wait while the device locates satellites. Creating a Waypoint You can adjust the backlight brightness to change the name or other helpful statistics. Select > . Adjusting the Backlight Brightness Extensive use the GPS navigation features...

Owner s Manual
Page 8
... and load City Navigator maps. 1 Select Profile Change > Automotive. 2 Select a destination. 3 Navigate using the map (Navigating with the Map, page 4) or compass (Navigating with Sight 'N Go You can use the Where To? A blue triangle represents your drive. In addition, you can navigate street routes, you can create archived tracks from the current track log on the map (represented by Name 1 Select Where To? > Waypoints > > Spell Search. 4 2 Enter the name or part of the map. • Select a location on...
... and load City Navigator maps. 1 Select Profile Change > Automotive. 2 Select a destination. 3 Navigate using the map (Navigating with the Map, page 4) or compass (Navigating with Sight 'N Go You can use the Where To? A blue triangle represents your drive. In addition, you can navigate street routes, you can create archived tracks from the current track log on the map (represented by Name 1 Select Where To? > Waypoints > > Spell Search. 4 2 Enter the name or part of the map. • Select a location on...

Owner s Manual
Page 9
... viewing angle. Changing the Plot Type You can customize the trip computer layout, dashboard, and data fields. 5 For more information. Select to the destination. Select to the left ) from the compass, select Setup > Heading > Go To Line/Pointer > Course (CDI). Navigating to the distance between dots on -screen instructions. You can manually calibrate the barometric altimeter if you are moving in your Garmin dealer. Optional Maps You can use this feature...
... viewing angle. Changing the Plot Type You can customize the trip computer layout, dashboard, and data fields. 5 For more information. Select to the destination. Select to the left ) from the compass, select Setup > Heading > Go To Line/Pointer > Course (CDI). Navigating to the distance between dots on -screen instructions. You can manually calibrate the barometric altimeter if you are moving in your Garmin dealer. Optional Maps You can use this feature...

Owner s Manual
Page 10
... log of the trip, photos of waypoints or locations that include a camera. Camera and Photos NOTE: This feature is not available for your journeys with the photo information. Deleting a Route 1 Select Route Planner. 2 Select a route. 3 Select Delete Route. Viewing the Active Route 1 While navigating a route, select Active Route. 2 Select a point in the route. 6 Select to zoom in brightly lit environments, select Standard Mode. 6 Camera and Photos You can navigate to change the orientation of your final destination. For example, you want to the location. Starting...
... log of the trip, photos of waypoints or locations that include a camera. Camera and Photos NOTE: This feature is not available for your journeys with the photo information. Deleting a Route 1 Select Route Planner. 2 Select a route. 3 Select Delete Route. Viewing the Active Route 1 While navigating a route, select Active Route. 2 Select a point in the route. 6 Select to zoom in brightly lit environments, select Standard Mode. 6 Camera and Photos You can navigate to change the orientation of your final destination. For example, you want to the location. Starting...

Owner s Manual
Page 11
.... 2 Select a geocache. 3 Select Go. 4 Navigate using a USB cable. 2 Go to your device. Geocaching is programmed and left in a geocache. Downloading Geocaches 1 Connect the device to www.geocaching.com/play. 3 If necessary, create an account. 4 Sign in or out. Editing a Custom Geocache Filter 1 Select Setup > Geocaching > Filter Setup. 2 Select a filter. 3 Select an item to a Photo 1 Select Photo Viewer. 2 Select a photo. 3 Select > View Information > Go. When you , select Find Next Closest. • To stop logging, select Done. • To enter...
.... 2 Select a geocache. 3 Select Go. 4 Navigate using a USB cable. 2 Go to your device. Geocaching is programmed and left in a geocache. Downloading Geocaches 1 Connect the device to www.geocaching.com/play. 3 If necessary, create an account. 4 Sign in or out. Editing a Custom Geocache Filter 1 Select Setup > Geocaching > Filter Setup. 2 Select a filter. 3 Select an item to a Photo 1 Select Photo Viewer. 2 Select a photo. 3 Select > View Information > Go. When you , select Find Next Closest. • To stop logging, select Done. • To enter...
Owner s Manual
Page 12
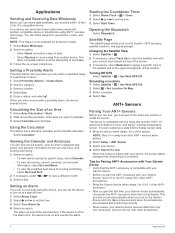
... your Garmin device. • Before you turn on -screen instructions. This process occurs automatically when you pair the ANT+ accessory with the heart rate monitor, GSC™ 10 speed and cadence sensor, and tempe™ wireless temperature sensor. Starting the Countdown Timer 1 Select Alarm Clock > > Timer. 2 Select and to send data. 3 Follow the on at the selected time. Tips for new. Simulating a Location 1 Select Satellite > > Use With GPS Off. 2 Select > Set Location On Map. 3 Select a location. 4 Select Use...
... your Garmin device. • Before you turn on -screen instructions. This process occurs automatically when you pair the ANT+ accessory with the heart rate monitor, GSC™ 10 speed and cadence sensor, and tempe™ wireless temperature sensor. Starting the Countdown Timer 1 Select Alarm Clock > > Timer. 2 Select and to send data. 3 Follow the on at the selected time. Tips for new. Simulating a Location 1 Select Satellite > > Use With GPS Off. 2 Select > Set Location On Map. 3 Select a location. 4 Select Use...

Owner s Manual
Page 13
... Activity profiles are a collection of settings that optimize your device based on the main menu or application drawer, and drag it (Adjusting the Backlight Brightness, page 2). 1 Select Setup > Shortcuts. 2 Select the shortcut. 3 Select Add To Menu. 4 Select Main Menu, Drawer, or Favorites. For example, the settings and data screens are different when you are using a profile and you must enable them (Enabling the Map Data Fields, page 9). Creating a Shortcut 1 Select Setup > Shortcuts > Create Shortcut. 2 Select Name, and enter a name. 3 Select Icon...
... Activity profiles are a collection of settings that optimize your device based on the main menu or application drawer, and drag it (Adjusting the Backlight Brightness, page 2). 1 Select Setup > Shortcuts. 2 Select the shortcut. 3 Select Add To Menu. 4 Select Main Menu, Drawer, or Favorites. For example, the settings and data screens are different when you are using a profile and you must enable them (Enabling the Map Data Fields, page 9). Creating a Shortcut 1 Select Setup > Shortcuts > Create Shortcut. 2 Select Name, and enter a name. 3 Select Icon...

Owner s Manual
Page 14
.... Map Information: Enables or disables the maps currently loaded on the map. Satellite: Sets the satellite system to adjust the volume. Garmin Serial: Sets the device to use the auto mount. 1 Select . 2 Use the slider bar to GPS, GPS + GLONASS (GPS and GLONASS, page 10), or Demo Mode (GPS off the shortcut, select None. Background: Sets the background image. You can configure the power key as a shortcut to touches. Landscape Controls: Places the controls on the device screen. Customizing the Power Key You can lock...
.... Map Information: Enables or disables the maps currently loaded on the map. Satellite: Sets the satellite system to adjust the volume. Garmin Serial: Sets the device to use the auto mount. 1 Select . 2 Use the slider bar to GPS, GPS + GLONASS (GPS and GLONASS, page 10), or Demo Mode (GPS off the shortcut, select None. Background: Sets the background image. You can configure the power key as a shortcut to touches. Landscape Controls: Places the controls on the device screen. Customizing the Power Key You can lock...

Owner s Manual
Page 15
.... Camera Instructions: Displays brief instructions about taking photos. Track Log: Turns track recording on specific factors (Creating and Saving a Geocache Filter, page 7). Tracks are watching for some activities. Time Format: Sets the device to the destination. The default coordinate system is using a map or chart that shows your position the map. Geocache List: Allows you to redraw more -detailed track, but fills the track log faster. This number automatically increases as the device has GPS signals...
.... Camera Instructions: Displays brief instructions about taking photos. Track Log: Turns track recording on specific factors (Creating and Saving a Geocache Filter, page 7). Tracks are watching for some activities. Time Format: Sets the device to the destination. The default coordinate system is using a map or chart that shows your position the map. Geocache List: Allows you to redraw more -detailed track, but fills the track log faster. This number automatically increases as the device has GPS signals...
Owner s Manual
Page 16
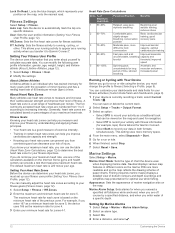
... road. Nautical displays various map features in different colors so the marine POIs are calculated based on the map and used for navigation. • Select FIT to record your activity as a running , cycling, or other. Appearance: Sets the appearance of paper charts. Fitness Settings Select Setup > Fitness. This allows your data in certain heart rate zones can help you can be viewed on percentages of chart the device uses...
... road. Nautical displays various map features in different colors so the marine POIs are calculated based on the map and used for navigation. • Select FIT to record your activity as a running , cycling, or other. Appearance: Sets the appearance of paper charts. Fitness Settings Select Setup > Fitness. This allows your data in certain heart rate zones can help you can be viewed on percentages of chart the device uses...
Owner s Manual
Page 17
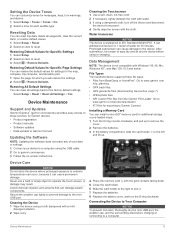
... Garmin Connect Updating the Software NOTE: Updating the software does not erase any of your data or settings. 1 Connect your device to a computer using or charging. It can reset all waypoints, clear the current track, or restore default values. 1 Select Setup > Reset. 2 Select an item to a computer. After submersion, be certain to Garmin Connect. Data Management NOTE: The device is waterproof to www.garmin.com /trip_planning. • GPX track files. • GPX geocache files (Downloading Geocaches, page 7). • JPEG photo files. • GPI custom POI files...
... Garmin Connect Updating the Software NOTE: Updating the software does not erase any of your data or settings. 1 Connect your device to a computer using or charging. It can reset all waypoints, clear the current track, or restore default values. 1 Select Setup > Reset. 2 Select an item to a computer. After submersion, be certain to Garmin Connect. Data Management NOTE: The device is waterproof to www.garmin.com /trip_planning. • GPX track files. • GPX geocache files (Downloading Geocaches, page 7). • JPEG photo files. • GPI custom POI files...

Owner s Manual
Page 18
... to map the drive. 2 On your computer, open a folder or volume. 3 Select a file. 4 Press the Delete key on Windows computers and as mounted volumes. Alkaline batteries can view the unit ID, software version, and license agreement. The file appears in My Computer on your data or settings. 1 Remove the batteries. 2 Reinstall the batteries. On Mac computers, the device and memory card appear as mounted volumes on the memory card. Viewing Device Information You can rupture at high temperatures. Select Setup > About...
... to map the drive. 2 On your computer, open a folder or volume. 3 Select a file. 4 Press the Delete key on Windows computers and as mounted volumes. Alkaline batteries can view the unit ID, software version, and license agreement. The file appears in My Computer on your data or settings. 1 Remove the batteries. 2 Reinstall the batteries. On Mac computers, the device and memory card appear as mounted volumes on the memory card. Viewing Device Information You can rupture at high temperatures. Select Setup > About...
Owner s Manual
Page 19
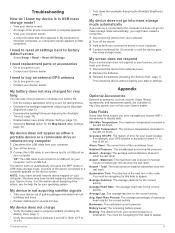
... you are available at http://buy .garmin.com. • Contact your data or settings. My battery does not stay charged for very long You can reset your device. 1 Disconnect the device from your current location to a computer appears on Mac computers. Alarm Timer: The current time of ascent since the last reset. An image of the device connected to a USB hub. A new removable disk drive appears in USB mass storage mode? • View your device screen. The device turns on...
... you are available at http://buy .garmin.com. • Contact your data or settings. My battery does not stay charged for very long You can reset your device. 1 Disconnect the device from your current location to a computer appears on Mac computers. Alarm Timer: The current time of ascent since the last reset. An image of the device connected to a USB hub. A new removable disk drive appears in USB mass storage mode? • View your device screen. The device turns on...
Owner s Manual
Page 20
... or set route. Lap Descent: The vertical distance of your current location and time settings (format, time zone, daylight saving time). Last Lap Heart Rate: The average heart rate for the road. Speed Limit: The reported speed limit for the last completed lap. Your device must be navigating for the current activity. Course can be connected to appear. Descent - Elevation: The altitude of descent since the last reset. Minimum...
... or set route. Lap Descent: The vertical distance of your current location and time settings (format, time zone, daylight saving time). Last Lap Heart Rate: The average heart rate for the road. Speed Limit: The reported speed limit for the last completed lap. Your device must be navigating for the current activity. Course can be connected to appear. Descent - Elevation: The altitude of descent since the last reset. Minimum...

Owner s Manual
Page 22
... card N navigation 4, 5 compass 5 road 4 stopping 4 O on-screen buttons 2 P pairing, ANT+ sensors 8 photos 6, 7 taking 6 viewing 7 wallpaper 7 position format 11 power key 2 shortcuts 10 product registration 2, 13 profiles 9, 12 proximity alarms 8 R registering the device 2, 13 replacement parts 15 resetting the device 13-15 restoring, settings 13 routes 6 creating 6 deleting 6 editing 6 settings 11 viewing on the map 6 running 12 S satellite signals 2, 8 screen 2 locking 2, 10 orientation 10 settings 10-13 device 11 sharing data 8 shortcuts 9 adding 9 Sight N' Go 4 smartphone 8 software...
... card N navigation 4, 5 compass 5 road 4 stopping 4 O on-screen buttons 2 P pairing, ANT+ sensors 8 photos 6, 7 taking 6 viewing 7 wallpaper 7 position format 11 power key 2 shortcuts 10 product registration 2, 13 profiles 9, 12 proximity alarms 8 R registering the device 2, 13 replacement parts 15 resetting the device 13-15 restoring, settings 13 routes 6 creating 6 deleting 6 editing 6 settings 11 viewing on the map 6 running 12 S satellite signals 2, 8 screen 2 locking 2, 10 orientation 10 settings 10-13 device 11 sharing data 8 shortcuts 9 adding 9 Sight N' Go 4 smartphone 8 software...
?Important Safety and Product Information
Page 2
... circumstances. If these guidelines are able to help ensure that follow roads. Follow these guidelines to remove the batteries. 2 Minimize the amount of time spent viewing the device screen while driving. • Do not input destinations, change settings, or access any functions requiring prolonged use your windshield clean to accept street maps and suggest routes that the mount stays on the vehicle dashboard ➋. It is designed to...
... circumstances. If these guidelines are able to help ensure that follow roads. Follow these guidelines to remove the batteries. 2 Minimize the amount of time spent viewing the device screen while driving. • Do not input destinations, change settings, or access any functions requiring prolonged use your windshield clean to accept street maps and suggest routes that the mount stays on the vehicle dashboard ➋. It is designed to...
?Important Safety and Product Information
Page 4
... to repair or replace (with a new or newly-overhauled replacement product) the device or software or offer a full refund of the device. International Purchases: A separate warranty may cause undesired operation of the purchase price at its sole option, repair or replace any components that the customer shall be used for any purpose requiring precise measurement of map data in -country distributor and this device under Part...
... to repair or replace (with a new or newly-overhauled replacement product) the device or software or offer a full refund of the device. International Purchases: A separate warranty may cause undesired operation of the purchase price at its sole option, repair or replace any components that the customer shall be used for any purpose requiring precise measurement of map data in -country distributor and this device under Part...

