Owner's Manual
Page 3
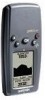
... that far outweigh its size. Serial Number: Introduction Product Registration i Well, here is in the battery compartment. This manual has been designed to operate your on-line registration today! Serial Number Use this Owner's Manual to record the serial number (8-digit number located inside the manual. Be sure to keep your new Geko 301, take the time to read through this area to understand the operating features of the unit. To get the most...
... that far outweigh its size. Serial Number: Introduction Product Registration i Well, here is in the battery compartment. This manual has been designed to operate your on-line registration today! Serial Number Use this Owner's Manual to record the serial number (8-digit number located inside the manual. Be sure to keep your new Geko 301, take the time to read through this area to understand the operating features of the unit. To get the most...
Owner's Manual
Page 4
... View Points 16 Reset 16 Calibrate Altimeter 17 Data Fields 18 TRIP COMPUTER 19-20 Data Field Options 20 MENU PAGE 21-33 Menu Navigation 21 Waypoints 22 Mark Waypoint Page 22 Review Waypoint Page 24 Tracks 26 Routes 29 Games 32 SETUP PAGE 34-44 Time Page 34 Time Zone 34 Daylight Savings Time 35 Display 36 Light Timeout 36 Contrast 36 Units 37 Position Format 37 Map Datums 37 Units of Measure 38 Interface 39 Heading 40 North Reference 40 System 42 GPS Mode 42 Compass Setting 43 Altimeter Setting...
... View Points 16 Reset 16 Calibrate Altimeter 17 Data Fields 18 TRIP COMPUTER 19-20 Data Field Options 20 MENU PAGE 21-33 Menu Navigation 21 Waypoints 22 Mark Waypoint Page 22 Review Waypoint Page 24 Tracks 26 Routes 29 Games 32 SETUP PAGE 34-44 Time Page 34 Time Zone 34 Daylight Savings Time 35 Display 36 Light Timeout 36 Contrast 36 Units 37 Position Format 37 Map Datums 37 Units of Measure 38 Interface 39 Heading 40 North Reference 40 System 42 GPS Mode 42 Compass Setting 43 Altimeter Setting...
Owner's Manual
Page 10
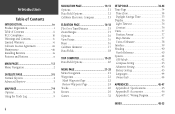
... Maintenance GPS CLEANING The Geko 301 is constructed of high quality materials and does not require user maintenance other than six months. STORAGE Storing alkaline batteries in the battery compartment, remove the batteries when storing the unit for long periods of time is not recommended. WATER IMMERSION The Geko 301 is always a good practice to back up important user data by manually recording it or downloading it to a PC (transferring...
... Maintenance GPS CLEANING The Geko 301 is constructed of high quality materials and does not require user maintenance other than six months. STORAGE Storing alkaline batteries in the battery compartment, remove the batteries when storing the unit for long periods of time is not recommended. WATER IMMERSION The Geko 301 is always a good practice to back up important user data by manually recording it or downloading it to a PC (transferring...
Owner's Manual
Page 12
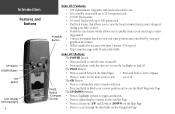
...;rm data entry or menu selection PAGE Button (Compass On/Off) • Press and hold to turn the unit on and off • Press and release (with up to 500 points each • PanTrack feature that allows you to view the bread crumbs (track points) dropped during your hike or drive • TracBack route feature which allows you to quickly retrace your current position and access the Mark Waypoint Page...
...;rm data entry or menu selection PAGE Button (Compass On/Off) • Press and hold to turn the unit on and off • Press and release (with up to 500 points each • PanTrack feature that allows you to view the bread crumbs (track points) dropped during your hike or drive • TracBack route feature which allows you to quickly retrace your current position and access the Mark Waypoint Page...
Owner's Manual
Page 14
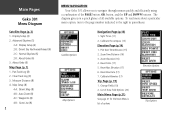
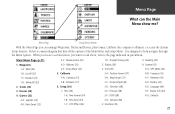
... Time/Distance (15) 2. List of Data Field Options (20) Main Menu Page (p.21) See page 21 for the Main Menu's list of all available options. About Geko (6) Map Page (p. 7) 1. Map Setup (8) 4-A: Orient Map (8) 4-B: Auto Zoom (8) 4-C: Waypoints (8) 4-D: Goto Line (8) 2 MENU NAVIGATION Your Geko 301 allows you a quick glance of options Elevation Options Trip Options Measure Distance (8) 4. View Points (17) 5. The diagram gives you to the right in parentheses. Clear Track Log (9) 3. Main Pages Geko 301 Menu Diagram Satellite Page (p. 3) 1. Zoom Elevation (16) 4. Calibrate...
... Time/Distance (15) 2. List of Data Field Options (20) Main Menu Page (p.21) See page 21 for the Main Menu's list of all available options. About Geko (6) Map Page (p. 7) 1. Map Setup (8) 4-A: Orient Map (8) 4-B: Auto Zoom (8) 4-C: Waypoints (8) 4-D: Goto Line (8) 2 MENU NAVIGATION Your Geko 301 allows you a quick glance of options Elevation Options Trip Options Measure Distance (8) 4. View Points (17) 5. The diagram gives you to the right in parentheses. Clear Track Log (9) 3. Main Pages Geko 301 Menu Diagram Satellite Page (p. 3) 1. Zoom Elevation (16) 4. Calibrate...
Owner's Manual
Page 20
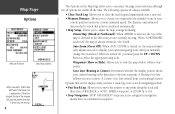
... display until you manually change the zoom level. Goto Line (Bearing or Course): Determines whether the display pointer shows your current estimated speed. When 'NORTHWARD' is selected, the map is a destination waypoint). The following options are always available: • Clear Track Log: Allows you are currently moving . 8 The Options on , the map automatically adjusts its scale to display your starting location. Map Page Options Measure Distance Map Setup Options When you to view the map with or without waypoints. The tip...
... display until you manually change the zoom level. Goto Line (Bearing or Course): Determines whether the display pointer shows your current estimated speed. When 'NORTHWARD' is selected, the map is a destination waypoint). The following options are always available: • Clear Track Log: Allows you are currently moving . 8 The Options on , the map automatically adjusts its scale to display your starting location. Map Page Options Measure Distance Map Setup Options When you to view the map with or without waypoints. The tip...
Owner's Manual
Page 21
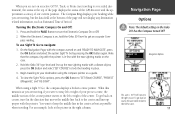
... starting a new trip. 9 To clear the track log: 1. From the Map Page, press the OK Button to the Map Page. To make use of the track log, select the 'PAN TRACK LOG' option to show a pointer which moves along the track log when you from the Map Page options allows you to return along a traveled path without marking any point on the track log and then create a Waypoint or navigate to the waypoint selected...
... starting a new trip. 9 To clear the track log: 1. From the Map Page, press the OK Button to the Map Page. To make use of the track log, select the 'PAN TRACK LOG' option to show a pointer which moves along the track log when you from the Map Page options allows you to return along a traveled path without marking any point on the track log and then create a Waypoint or navigate to the waypoint selected...
Owner's Manual
Page 22
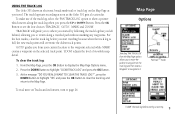
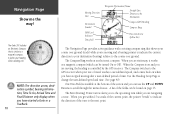
... are navigating a route. Navigation Page Show me the way! The Bent (Bearing) Pointer arrow alerts you to the upcoming turn to scroll through the menu choices. It points your course over ground. Use the Heading Setup Page to change the user-defined speed and time. (See page 40) One Data Field is on when you have stopped moving and a bearing pointer to indicate the current direction to the course over ground (track) while...
... are navigating a route. Navigation Page Show me the way! The Bent (Bearing) Pointer arrow alerts you to the upcoming turn to scroll through the menu choices. It points your course over ground. Use the Heading Setup Page to change the user-defined speed and time. (See page 40) One Data Field is on when you have stopped moving and a bearing pointer to indicate the current direction to the course over ground (track) while...
Owner's Manual
Page 23
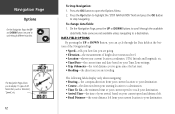
... select 'SET COURSE' to the right or east. Navigation Options This user is as a guide. 4. To view the Sight 'N Go options, press the OK Button to navigate: 1. Navigation Page Options Note: The default setting on an active GOTO, Track, or Route (not traveling to a recorded destination), the status at the top of the page displays the status of the GPS Receiver and the approximate accuracy of Arrival. Turning the Electronic Compass...
... select 'SET COURSE' to the right or east. Navigation Options This user is as a guide. 4. To view the Sight 'N Go options, press the OK Button to navigate: 1. Navigation Page Options Note: The default setting on an active GOTO, Track, or Route (not traveling to a recorded destination), the status at the top of the page displays the status of the GPS Receiver and the approximate accuracy of Arrival. Turning the Electronic Compass...
Owner's Manual
Page 24
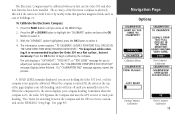
... 'STOP NAVIGATION' field and press the OK Button to open the Options Menu. 2. To change data fields: 1. the compass direction from your current location to your destination. • Course-the direction from your current location to your Time Zone settings. • Trip Odometer-the total distance you've gone since the last reset. • Heading-the direction you are going. • Elevation-the measurement of height above mean sea level. • Location-shows your current location coordinates, UTM...
... 'STOP NAVIGATION' field and press the OK Button to open the Options Menu. 2. To change data fields: 1. the compass direction from your current location to your destination. • Course-the direction from your current location to your Time Zone settings. • Trip Odometer-the total distance you've gone since the last reset. • Heading-the direction you are going. • Elevation-the measurement of height above mean sea level. • Location-shows your current location coordinates, UTM...
Owner's Manual
Page 25
... uses the GPS receiver to select it . 4. Sometimes when the compass is customized on a flat surface , but not necessary. Press the PAGE Button until you manually turn it will stay off until you first use the Geko 301 and after new batteries have been installed. When the compass is not held level or by nearby items that generate magnetic fields, such as needed. To Calibrate...
... uses the GPS receiver to select it . 4. Sometimes when the compass is customized on a flat surface , but not necessary. Press the PAGE Button until you manually turn it will stay off until you first use the Geko 301 and after new batteries have been installed. When the compass is not held level or by nearby items that generate magnetic fields, such as needed. To Calibrate...
Owner's Manual
Page 33
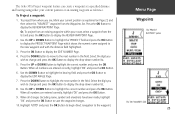
... Main Menu and Setup Menu. Main Menu Page (p.21) 4-C: Memory Race (33) 1-D: Daylight Saving (35) 5: Heading (40) 1. Routes (29) 4. Setup (34) 1: Time (34) 1-A: Time Format (34) 1-B: Time Zone (34) 1-C: UTC Offset (34) 2: Display (36) 3: Units (37) 3-A: Position Format (37) 3-B: Map Datum (37) 3-C: Distance/Spd (38) 3-D: Elevation (38) 3-E: Pressure (38) 3-F: VSPD (38) 3-G: Defaults (38) 4: Interface (39) 6: System (42) 6-A: GPS Mode (42) 6-B: Compass (43) 6-C: Altimeter (43) 6-D: Battery (43) 6-E: Language (44) 6-F: Owner Info (44) 6-G: Defaults 21 Waypoints 1-A: Mark...
... Main Menu and Setup Menu. Main Menu Page (p.21) 4-C: Memory Race (33) 1-D: Daylight Saving (35) 5: Heading (40) 1. Routes (29) 4. Setup (34) 1: Time (34) 1-A: Time Format (34) 1-B: Time Zone (34) 1-C: UTC Offset (34) 2: Display (36) 3: Units (37) 3-A: Position Format (37) 3-B: Map Datum (37) 3-C: Distance/Spd (38) 3-D: Elevation (38) 3-E: Pressure (38) 3-F: VSPD (38) 3-G: Defaults (38) 4: Interface (39) 6: System (42) 6-A: GPS Mode (42) 6-B: Compass (43) 6-C: Altimeter (43) 6-D: Battery (43) 6-E: Language (44) 6-F: Owner Info (44) 6-G: Defaults 21 Waypoints 1-A: Mark...

Owner's Manual
Page 34
... Button and highlight the 'POSITION DATA' field and press the OK Button to display the EDIT LOCATION Page. 3. From the MENU Page press the UP or DOWN Button to store your current location or another location as a Waypoint, works well for the waypoint. To mark a new waypoint and/or change , press the OK Button. The EDIT LOCATION Page displays on-screen instructions explaining how to edit the waypoint location. 22 The Waypoint options marks your location's position coordinates in a list for easy selection...
... Button and highlight the 'POSITION DATA' field and press the OK Button to display the EDIT LOCATION Page. 3. From the MENU Page press the UP or DOWN Button to store your current location or another location as a Waypoint, works well for the waypoint. To mark a new waypoint and/or change , press the OK Button. The EDIT LOCATION Page displays on-screen instructions explaining how to edit the waypoint location. 22 The Waypoint options marks your location's position coordinates in a list for easy selection...
Owner's Manual
Page 37
The Geko 301's Project waypoint feature can create a waypoint at a specified distance and bearing using either your current position or an existing waypoint as explained on Page 22 and then select this "NEAREST" waypoint from the Waypoints list. Press the UP or DOWN Button to display the drop-down number list. 5. Select the digit you wish to change and press the OK Button to save the waypoint changes. 10. Highlight 'GOTO' and press...
The Geko 301's Project waypoint feature can create a waypoint at a specified distance and bearing using either your current position or an existing waypoint as explained on Page 22 and then select this "NEAREST" waypoint from the Waypoints list. Press the UP or DOWN Button to display the drop-down number list. 5. Select the digit you wish to change and press the OK Button to save the waypoint changes. 10. Highlight 'GOTO' and press...

Owner's Manual
Page 49
... are using a map with a paper map increases the navigation capabilities of each. You should only change the Position Format (grid): 1. Using this setting requires an advanced knowledge of map datums. Setup Page Units Units Option Units Menu The default datum is a reference model of the map. Position Format The default position format (and the one most commonly used) for the Geko 301 is WGS 84 (World Geodetic Survey, 1984). Press the PAGE Button to return to approximate custom-designed grids. Map Datums A map datum is...
... are using a map with a paper map increases the navigation capabilities of each. You should only change the Position Format (grid): 1. Using this setting requires an advanced knowledge of map datums. Setup Page Units Units Option Units Menu The default datum is a reference model of the map. Position Format The default position format (and the one most commonly used) for the Geko 301 is WGS 84 (World Geodetic Survey, 1984). Press the PAGE Button to return to approximate custom-designed grids. Map Datums A map datum is...
Owner's Manual
Page 51
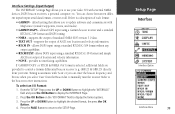
... Geko 301 with MapSource (transfer waypoints, routes, and tracks). • GARMIN DGPS - To select an I /O FORMAT' field to update software and communicate with external NMEA devices, DGPS beacon receivers, a personal computer, etc. You can enter the beacon frequency and bit rate when you select 'User' from the Beacon list to control a Garmin differential beacon receiver (e.g. allows DGPS input using a Garmin beacon receiver and a standard RTCM SC-104 format and DGPS tuning. • NMEA - If 'GARMIN...
... Geko 301 with MapSource (transfer waypoints, routes, and tracks). • GARMIN DGPS - To select an I /O FORMAT' field to update software and communicate with external NMEA devices, DGPS beacon receivers, a personal computer, etc. You can enter the beacon frequency and bit rate when you select 'User' from the Beacon list to control a Garmin differential beacon receiver (e.g. allows DGPS input using a Garmin beacon receiver and a standard RTCM SC-104 format and DGPS tuning. • NMEA - If 'GARMIN...
Owner's Manual
Page 53
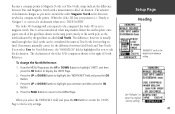
... compass if the Geko 301 is the direction in which a compass needle points. Press the UP or DOWN Button to highlight your postion (i.e. If necessary, manually correct for declination when set to magnetic north. Use 'Defaults' to return to highlight the 'NORTH REF' field and press the OK Button. 3. Magnetic North is set to 'TRUE NORTH'. Press the UP or DOWN Button to original factory settings 41 From the MENU...
... compass if the Geko 301 is the direction in which a compass needle points. Press the UP or DOWN Button to highlight your postion (i.e. If necessary, manually correct for declination when set to magnetic north. Use 'Defaults' to return to highlight the 'NORTH REF' field and press the OK Button. 3. Magnetic North is set to 'TRUE NORTH'. Press the UP or DOWN Button to original factory settings 41 From the MENU...

Owner's Manual
Page 54
.... To learn more accurate position fix. Setup Page System The SYSTEM Page allows you to change the GPS Mode, turn compass on and off, turn the altimeter auto-calibration on or off, to choose a battery type, to change the language display, includes owner information, and to default back to the original factory settings. GPS Mode The GPS receiver is capable of the Geko 301 to potential customers inside a closed building where satellite reception is number 33 or higher on the...
.... To learn more accurate position fix. Setup Page System The SYSTEM Page allows you to change the GPS Mode, turn compass on and off, turn the altimeter auto-calibration on or off, to choose a battery type, to change the language display, includes owner information, and to default back to the original factory settings. GPS Mode The GPS receiver is capable of the Geko 301 to potential customers inside a closed building where satellite reception is number 33 or higher on the...
Owner's Manual
Page 63
... Max Speed 12, 20 Measure Distance 8 Menu Page/Main Menu 21 Minimum Elevation 18 Moving Average 20 Moving Time 20 N Navigation Main Page 10 Nearest Waypoints 23 Next Destination 20 Distance 20 ETA 20 ETE 20 Nibbons 33 NMEA 45 NMEA OUT 39 NONE 39 Normal Skyview 3 Normal Skyview Options 4 North Reference 38, 40 O Odometer Trip 12, 20 Off Course 20 OK Button x On-screen Button 17 Option Menus 14 Orient Map...
... Max Speed 12, 20 Measure Distance 8 Menu Page/Main Menu 21 Minimum Elevation 18 Moving Average 20 Moving Time 20 N Navigation Main Page 10 Nearest Waypoints 23 Next Destination 20 Distance 20 ETA 20 ETE 20 Nibbons 33 NMEA 45 NMEA OUT 39 NONE 39 Normal Skyview 3 Normal Skyview Options 4 North Reference 38, 40 O Odometer Trip 12, 20 Off Course 20 OK Button x On-screen Button 17 Option Menus 14 Orient Map...
Owner's Manual
Page 64
... i Reset 16 Review Waypoint Page 24 Routes 29-31 RTCM/NMEA 39 RTCM/TEXT 39 RTCM IN 39 S Satellite Page 3-6 Select a Waypoint 23 Settings Input 39 Set course 10-14 Sight 'N Go 11 Skyview, Advanced 3 Software License Agreement vii Specifications 45 Speed 12, 20 Maximum 20 (Speed cont.) Overall 20 Vertical 20 Stopped Time 20 Stop Navigation 8 Storage viii Sunrise 20 Sunset 20 System Page GPS Mode 42, 43 Owner...
... i Reset 16 Review Waypoint Page 24 Routes 29-31 RTCM/NMEA 39 RTCM/TEXT 39 RTCM IN 39 S Satellite Page 3-6 Select a Waypoint 23 Settings Input 39 Set course 10-14 Sight 'N Go 11 Skyview, Advanced 3 Software License Agreement vii Specifications 45 Speed 12, 20 Maximum 20 (Speed cont.) Overall 20 Vertical 20 Stopped Time 20 Stop Navigation 8 Storage viii Sunrise 20 Sunset 20 System Page GPS Mode 42, 43 Owner...


