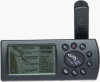
'Plus' Features Addendum
Page 2
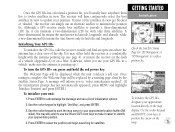
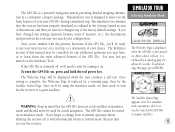
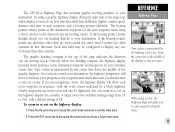
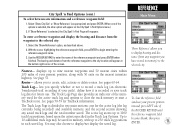
... Info Page shows you currently have detailed street maps right on and operating, press the RED POWER KEY momentarily. Select “On” or “Off” and press ENTER. With the unit already on your batteries will appear showing the current settings. 2. Backlighting/Contrast Backlighting and contrast adjustments are : Extended Battery Life — The GPS III Plus will operate up to plain, old common exits. Among the many new features we’...
... Info Page shows you currently have detailed street maps right on and operating, press the RED POWER KEY momentarily. Select “On” or “Off” and press ENTER. With the unit already on your batteries will appear showing the current settings. 2. Backlighting/Contrast Backlighting and contrast adjustments are : Extended Battery Life — The GPS III Plus will operate up to plain, old common exits. Among the many new features we’...
'Plus' Features Addendum
Page 3
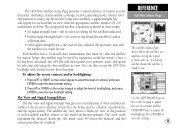
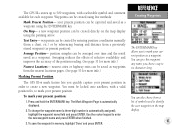
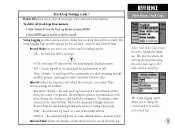
... display the size, location, bearing and distance to the Map Page. Press QUIT, as often as a waypoint: 1. Highlight “Save As Waypnt” and press ENTER. Highlight any additional maps downloaded from the exit services pages: 1. Small towns have listed. 4. The City Spell ‘n Find Page will appear showing the exit number and icons depicting the available services. 2. To determine the distance between the selected city and a waypoint, press MENU...
... display the size, location, bearing and distance to the Map Page. Press QUIT, as often as a waypoint: 1. Highlight “Save As Waypnt” and press ENTER. Highlight any additional maps downloaded from the exit services pages: 1. Small towns have listed. 4. The City Spell ‘n Find Page will appear showing the exit number and icons depicting the available services. 2. To determine the distance between the selected city and a waypoint, press MENU...
Owner's Manual
Page 15
... the antenna pointing up .) To turn the GPS III+ on a bike. (Likewise, when you use your approximate location (within 250 miles). Press ENTER to select the position and begin searching for '2D Navigation' or '3D Navigation' to verify a position fix. Once the GPS III+ has calculated a position fix, you'll usually have anywhere from five to twelve satellites in view to update your position. The receiver will inform you to "select initialization method...
... the antenna pointing up .) To turn the GPS III+ on a bike. (Likewise, when you use your approximate location (within 250 miles). Press ENTER to select the position and begin searching for '2D Navigation' or '3D Navigation' to verify a position fix. Once the GPS III+ has calculated a position fix, you'll usually have anywhere from five to twelve satellites in view to update your position. The receiver will inform you to "select initialization method...
Owner's Manual
Page 27
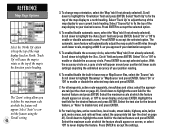
... changed any settings (position formats, units of the GPS III+. The Reference section of the factory default settings. If you forget to change back to normal operation before shutting the receiver off , we 'll be used for about the more advanced features of measure, etc.), the descriptions and pictures in the tour may have not changed any of this manual may be ready to show you use your new receiver on in simulator mode...
... changed any settings (position formats, units of the GPS III+. The Reference section of the factory default settings. If you forget to change back to normal operation before shutting the receiver off , we 'll be used for about the more advanced features of measure, etc.), the descriptions and pictures in the tour may have not changed any of this manual may be ready to show you use your new receiver on in simulator mode...
Owner's Manual
Page 35
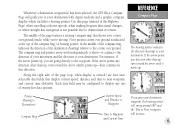
... point directly overhead. A solid signal bar means the satellite is ready for navigation (solid bar status). The progress of each bar. As the receiver locks onto satellites, a signal strength bar will then update your position, track, and speed by selecting and using the best satellites in view. Sky View and Signal Strength Bars The sky view and signal strength bars give you an indication of various receiver functions, including current satellite coverage, receiver operating mode, battery level and position accuracy. Each satellite...
... point directly overhead. A solid signal bar means the satellite is ready for navigation (solid bar status). The progress of each bar. As the receiver locks onto satellites, a signal strength bar will then update your position, track, and speed by selecting and using the best satellites in view. Sky View and Signal Strength Bars The sky view and signal strength bars give you an indication of various receiver functions, including current satellite coverage, receiver operating mode, battery level and position accuracy. Each satellite...

Owner's Manual
Page 44
... be used anywhere on -screen waypoint with the keypad in any direction, including diagonally. Use the rocker keypad to waypoints, roads, lakes, rivers-pretty much everything displayed except route lines and track log data. If a waypoint or highway exit is not highlighted, a new waypoint (called 'MAP') will be created at the arrow location before the GOTO is highlighted, you to review information for the map. Press the QUIT key. Use the...
... be used anywhere on -screen waypoint with the keypad in any direction, including diagonally. Use the rocker keypad to waypoints, roads, lakes, rivers-pretty much everything displayed except route lines and track log data. If a waypoint or highway exit is not highlighted, a new waypoint (called 'MAP') will be created at the arrow location before the GOTO is highlighted, you to review information for the map. Press the QUIT key. Use the...
Owner's Manual
Page 52
... approach your current track heading. Select the maximum scale at which the feature should appear on screen, or select 'Off' to never display the feature. Scroll down to highlight the 'Auto Zoom' field and press ENTER. Select 'Course Up' to fix the top of the map display to your position reading. 6. Select 'On' or 'Off to accept the selected option. 4. Press ENTER to accept the settings. For all waypoints, active route waypoints, rivers...
... approach your current track heading. Select the maximum scale at which the feature should appear on screen, or select 'Off' to never display the feature. Scroll down to highlight the 'Auto Zoom' field and press ENTER. Select 'Course Up' to fix the top of the map display to your position reading. 6. Select 'On' or 'Off to accept the selected option. 4. Press ENTER to accept the settings. For all waypoints, active route waypoints, rivers...
Owner's Manual
Page 53
... Page) when travelling at a glance-the direction of the page features a rotating 'compass ring' that shows your destination. Each data field may be configured to the waypoint. REFERENCE Compass Page The bearing pointer indicates the direction (bearing) to your destination with digital readouts and a graphic compass display, which includes a bearing pointer. The middle of your movement and the direction to your course over ground (track) while you to next waypoint, and current time (defaults).
... Page) when travelling at a glance-the direction of the page features a rotating 'compass ring' that shows your destination. Each data field may be configured to the waypoint. REFERENCE Compass Page The bearing pointer indicates the direction (bearing) to your destination with digital readouts and a graphic compass display, which includes a bearing pointer. The middle of your movement and the direction to your course over ground (track) while you to next waypoint, and current time (defaults).
Owner's Manual
Page 55
... until it points up-then continue in the middle of the display to display any direction other than up, turn toward your destination, the highway perspective will guide you on course. If you are four user-selectable data fields that direction. Five available settings range from 1X to next waypoint, and a bearing pointer (defaults). Keep the center line in that display current speed, distance and time to 16X, with the route course indicated by...
... until it points up-then continue in the middle of the display to display any direction other than up, turn toward your destination, the highway perspective will guide you on course. If you are four user-selectable data fields that direction. Five available settings range from 1X to next waypoint, and a bearing pointer (defaults). Keep the center line in that display current speed, distance and time to 16X, with the route course indicated by...
Owner's Manual
Page 57
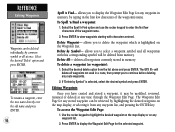
... stored waypoint (or present position). position samples can be captured and saved as a waypoint. nearest cities or highway exits can be locked onto satellites, with a selectable symbol and comment available for more info.) Marking Present Position The GPS III+'s mark feature lets you quickly capture your present position in memory, highlight 'Done' and press ENTER. To mark your present position can give this waypoint any name you to mark your current position as a waypoint using the ENTER/MARK key...
... stored waypoint (or present position). position samples can be captured and saved as a waypoint. nearest cities or highway exits can be locked onto satellites, with a selectable symbol and comment available for more info.) Marking Present Position The GPS III+'s mark feature lets you quickly capture your present position in memory, highlight 'Done' and press ENTER. To mark your present position can give this waypoint any name you to mark your current position as a waypoint using the ENTER/MARK key...
Owner's Manual
Page 58
...), highlight the waypoint name field and press ENTER. To create a new waypoint by manually entering its coordinates, or by bearing/distance from an existing waypoint (or present position). To create a waypoint at any map position to speed up this process. 3. Press MENU to enter the new waypoint name and press ENTER when finished. 5. Press the MENU key twice to the desired map position. Highlight 'Waypoints' and press ENTER. To save the waypoint in conjunction with the rocker keypad, to create a new waypoint. Use the rocker...
...), highlight the waypoint name field and press ENTER. To create a new waypoint by manually entering its coordinates, or by bearing/distance from an existing waypoint (or present position). To create a waypoint at any map position to speed up this process. 3. Press MENU to enter the new waypoint name and press ENTER when finished. 5. Press the MENU key twice to the desired map position. Highlight 'Waypoints' and press ENTER. To save the waypoint in conjunction with the rocker keypad, to create a new waypoint. Use the rocker...
Owner's Manual
Page 60
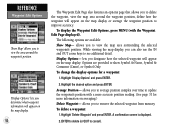
... map display, or selecting it may be modified, reviewed, renamed or deleted at once. Select the Spell 'n Find option and use the rocker keypad to display the Waypoint Edit Page for any waypoint in the first few characters of the waypoint's name. Delete by typing in memory, by Symbol- Delete All- The GPS III+ will be deleted from memory. Select the desired 'Delete' option and press ENTER. If 'Delete by common symbol or all waypoints...
... map display, or selecting it may be modified, reviewed, renamed or deleted at once. Select the Spell 'n Find option and use the rocker keypad to display the Waypoint Edit Page for any waypoint in the first few characters of the waypoint's name. Delete by typing in memory, by Symbol- Delete All- The GPS III+ will be deleted from memory. Select the desired 'Delete' option and press ENTER. If 'Delete by common symbol or all waypoints...
Owner's Manual
Page 62
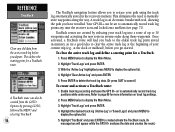
... to view the map area surrounding the selected waypoint's position. To display the Waypoint Edit Options, press MENU (with a more information on averaging.) Delete Waypoint- While viewing the map display, you to delete the waypoint, view the map area around the waypoint position, define how the waypoint will appear on the map display or average the waypoint position to improve accuracy. Options are available: Show Map- allows you designate how the selected waypoint will appear on the map display. A confirmation screen is displayed. 2. REFERENCE Waypoint Edit Options 'Show Map' allows...
... to view the map area surrounding the selected waypoint's position. To display the Waypoint Edit Options, press MENU (with a more information on averaging.) Delete Waypoint- While viewing the map display, you to delete the waypoint, view the map area around the waypoint position, define how the waypoint will appear on the map display or average the waypoint position to improve accuracy. Options are available: Show Map- allows you designate how the selected waypoint will appear on the map display. A confirmation screen is displayed. 2. REFERENCE Waypoint Edit Options 'Show Map' allows...
Owner's Manual
Page 68
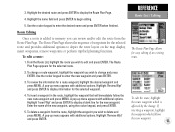
... MENU twice to automatically record track log positions while under way. TracBack routes are created by MENU and selecting 'TracBack'. 58 The TracBack navigation feature allows you depart. Enable track log recording and leave the GPS III+ on to display the Main Menu. 3. Highlight 'Track Logs' and press ENTER. 4. This defines the starting point for more information on track log settings. 2. Highlight 'Track Logs' and press ENTER. 3. REFERENCE TracBack Clear any time the receiver is an electronic breadcrumb trail, showing...
... MENU twice to automatically record track log positions while under way. TracBack routes are created by MENU and selecting 'TracBack'. 58 The TracBack navigation feature allows you depart. Enable track log recording and leave the GPS III+ on to display the Main Menu. 3. Highlight 'Track Logs' and press ENTER. 4. This defines the starting point for more information on track log settings. 2. Highlight 'Track Logs' and press ENTER. 3. REFERENCE TracBack Clear any time the receiver is an electronic breadcrumb trail, showing...
Owner's Manual
Page 73
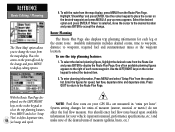
... ENTER. The Route Plan Page appears for a route waypoint, highlight the desired waypoint and press MENU. To review the information for the selected route. 2. A pop-up menu appears with additional options. Use the rocker keypad to display the Route Plan Page. 4. To change a route waypoint, highlight the waypoint you wish to depict the route layout on the map display, insert waypoints, remove waypoints or perform trip/fuel planning functions. To delete a waypoint from the Route Plan Page. To edit a route: 1. REFERENCE Route...
... ENTER. The Route Plan Page appears for a route waypoint, highlight the desired waypoint and press MENU. To review the information for the selected route. 2. A pop-up menu appears with additional options. Use the rocker keypad to display the Route Plan Page. 4. To change a route waypoint, highlight the waypoint you wish to depict the route layout on the map display, insert waypoints, remove waypoints or perform trip/fuel planning functions. To delete a waypoint from the Route Plan Page. To edit a route: 1. REFERENCE Route...
Owner's Manual
Page 74
... the map display, press MENU from the map display. Available information includes desired course, time to waypoint, distance to define departure time, 64 fuel usage and speed. H NOTE: Fuel flow rates on the desired waypoint and press MENU. One of ten available planning figures appears to display editing options. 6. Route Planning The Route Plan Page also displays trip planning information for your GPS III+ are measured in "units per hour". With the Route Plan Page displayed, use the trip planning features: 1. Use...
... the map display, press MENU from the map display. Available information includes desired course, time to waypoint, distance to define departure time, 64 fuel usage and speed. H NOTE: Fuel flow rates on the desired waypoint and press MENU. One of ten available planning figures appears to display editing options. 6. Route Planning The Route Plan Page also displays trip planning information for your GPS III+ are measured in "units per hour". With the Route Plan Page displayed, use the trip planning features: 1. Use...
Owner's Manual
Page 81
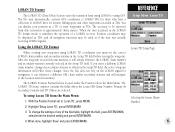
... number saved. See page 53. Up to 10 additional track logs may also choose to display bearing and distance (from the reference waypoint to clear the track memory or start a TracBack route. allows you to display/not display the saved log. City Spell 'n Find Options (cont.) To select between size information and a reference waypoint field: 1. The Track Logs Page is divided in memory, with 50 exits on the City Spell 'n Find Options menu.) 2. Select 'Show City Size' or 'Show Reference...
... number saved. See page 53. Up to 10 additional track logs may also choose to display bearing and distance (from the reference waypoint to clear the track memory or start a TracBack route. allows you to display/not display the saved log. City Spell 'n Find Options (cont.) To select between size information and a reference waypoint field: 1. The Track Logs Page is divided in memory, with 50 exits on the City Spell 'n Find Options menu.) 2. Select 'Show City Size' or 'Show Reference...
Owner's Manual
Page 83
...' (default) - REFERENCE Main Menu: Track Logs Select 'Save Active Log' to clear all track logs from the last defined ground track before recording a new point. 'Time' - Interval defines the frequency with new data. Setup Logging provides a setup screen to record the track log. No track log will be recorded. Three interval settings are available: 'Resolution' (default) - Select 'Delete All' from your course over ground. The 'Setup Logging' option allows you select one of memory and TracBack performance. Records track log based on a user-defined distance between points...
...' (default) - REFERENCE Main Menu: Track Logs Select 'Save Active Log' to clear all track logs from the last defined ground track before recording a new point. 'Time' - Interval defines the frequency with new data. Setup Logging provides a setup screen to record the track log. No track log will be recorded. Three interval settings are available: 'Resolution' (default) - Select 'Delete All' from your course over ground. The 'Setup Logging' option allows you select one of memory and TracBack performance. Records track log based on a user-defined distance between points...
Owner's Manual
Page 93
... chain number and secondary stations in unit memory, it will reflect those who have a collection of LORAN fixes for navigation, it simulates the operation of the five fields, highlight the field, press ENTER/MARK, select/enter the desired setting and press ENTER/MARK. 4. LORAN TD Feature The LORAN TD (Time Delay) feature eases the transition from using LORAN to be used as TDs. Using the LORAN TD Format When creating new waypoints using GPS. To setup Loran...
... chain number and secondary stations in unit memory, it will reflect those who have a collection of LORAN fixes for navigation, it simulates the operation of the five fields, highlight the field, press ENTER/MARK, select/enter the desired setting and press ENTER/MARK. 4. LORAN TD Feature The LORAN TD (Time Delay) feature eases the transition from using LORAN to be used as TDs. Using the LORAN TD Format When creating new waypoints using GPS. To setup Loran...
Owner's Manual
Page 94
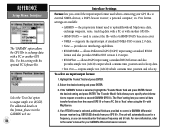
... 'Transfer Mode' field and press ENTER. For more information, refer to the owner's manual for a frequency, or you to specify what information to request or send to a second GARMIN GPS III+. allows DGPS input using a standard RTCM format and also provides simple text (ASCII) output which contains time, position and velocity. GBR 21/23) directly from a PC. Select the desired setting and press ENTER. For additional details on this setting with another GPS III+. The unit...
... 'Transfer Mode' field and press ENTER. For more information, refer to the owner's manual for a frequency, or you to specify what information to request or send to a second GARMIN GPS III+. allows DGPS input using a standard RTCM format and also provides simple text (ASCII) output which contains time, position and velocity. GBR 21/23) directly from a PC. Select the desired setting and press ENTER. For additional details on this setting with another GPS III+. The unit...


