Owner's Manual
Page 3
... hazard-free open water. When you should select Menu, and then select Setup. Introduction ‹ Warnings You are instructed to select an item on the device, press a soft key along the bottom of the screen. Use caution when operating the GHP near hazards in the text indicate that will enhance your capability to operate your boat. Manual Conventions In this manual, the GHP autopilot system is referred...
... hazard-free open water. When you should select Menu, and then select Setup. Introduction ‹ Warnings You are instructed to select an item on the device, press a soft key along the bottom of the screen. Use caution when operating the GHP near hazards in the text indicate that will enhance your capability to operate your boat. Manual Conventions In this manual, the GHP autopilot system is referred...
Owner's Manual
Page 4
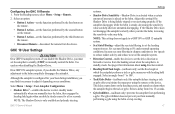
... 17 GHC 10 User Settings 17 Power Mode 18 Changing the Power Mode....... 18 Customizing the Power Mode.. 18 ii GHC 10 Owner's Manual Appendix 19 12 Configuring the Autopilot.......... 19 Heading Hold 12 Software License Agreement... 19 Heading Adjustment 12 Declaration of Contents Introduction i Tips and Shortcuts i Manual Conventions i Getting Started 1 Front Panel 1 Turning On the Autopilot 1 Turning Off the Autopilot 1 Adjusting the Display 1 Adjusting the Color Mode........... 1 Adjusting the Backlight 1 Turning On Network Sharing...... 1 About the Heading Screen...
... 17 GHC 10 User Settings 17 Power Mode 18 Changing the Power Mode....... 18 Customizing the Power Mode.. 18 ii GHC 10 Owner's Manual Appendix 19 12 Configuring the Autopilot.......... 19 Heading Hold 12 Software License Agreement... 19 Heading Adjustment 12 Declaration of Contents Introduction i Tips and Shortcuts i Manual Conventions i Getting Started 1 Front Panel 1 Turning On the Autopilot 1 Turning Off the Autopilot 1 Adjusting the Display 1 Adjusting the Color Mode........... 1 Adjusting the Backlight 1 Turning On Network Sharing...... 1 About the Heading Screen...
Owner's Manual
Page 5
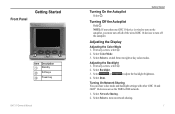
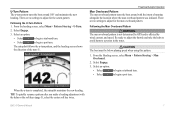
... ➂ Power key GHC 10 Owner's Manual Turning On the Autopilot Select . Adjusting the Display Adjusting the Color Mode 1. From any screen, select . 2. Select or to switch between night or day color modes. Select Color Mode. 3. Turning On Network Sharing You can share color mode and backlight settings with other GHC 10 and GMI™ 10 devices across the NMEA 2000 network. 1. Note: If more than one GHC 10 device is wired to turn off...
... ➂ Power key GHC 10 Owner's Manual Turning On the Autopilot Select . Adjusting the Display Adjusting the Color Mode 1. From any screen, select . 2. Select or to switch between night or day color modes. Select Color Mode. 3. Turning On Network Sharing You can share color mode and backlight settings with other GHC 10 and GMI™ 10 devices across the NMEA 2000 network. 1. Note: If more than one GHC 10 device is wired to turn off...
Owner's Manual
Page 7
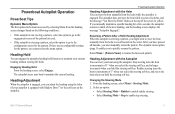
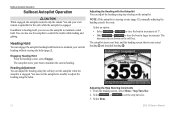
... boat using the helm (if your autopilot is not steering a pattern, select the option to go to quickly resume the pattern. From the heading screen, select Menu > Steering Mode. 2. If there are no configurable settings for the pattern. After you have the helm, and the message "You Have the Helm" flashes at the top of the new heading, and the heading screen displays the message "Autopilot...
... boat using the helm (if your autopilot is not steering a pattern, select the option to go to quickly resume the pattern. From the heading screen, select Menu > Steering Mode. 2. If there are no configurable settings for the pattern. After you have the helm, and the message "You Have the Helm" flashes at the top of the new heading, and the heading screen displays the message "Autopilot...
Owner's Manual
Page 8
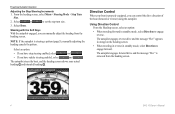
... intended heading ➋. From the heading screen, select Menu > Steering Mode > Step Turn Size. 2. Select or to engage reverse. Select an option: • If you have step steering enabled, select and . • If you can control the drive direction of the boat (forward or reverse) using the autopilot. The autopilot steers the boat, and the heading screen shows your boat is steering a pattern (page 5), manually adjusting the heading cancels...
... intended heading ➋. From the heading screen, select Menu > Steering Mode > Step Turn Size. 2. Select or to engage reverse. Select an option: • If you have step steering enabled, select and . • If you can control the drive direction of the boat (forward or reverse) using the autopilot. The autopilot steers the boat, and the heading screen shows your boat is steering a pattern (page 5), manually adjusting the heading cancels...
Owner's Manual
Page 9
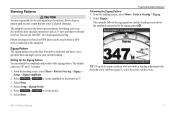
... back, over a specified time and angle, across your boat. The default values are 30° and 1.5 minutes. 1. From the heading screen, select Menu > Pattern Steering > Zigzag > Setup > Zigzag Amplitude. 2. Steering Patterns ‹ Caution You are responsible for fishing, and it can be used without a GPS device connected to the autopilot. Select Done. 4. Pattern steering is clear of 5°. 3. Setting Up the Zigzag Pattern...
... back, over a specified time and angle, across your boat. The default values are 30° and 1.5 minutes. 1. From the heading screen, select Menu > Pattern Steering > Zigzag > Setup > Zigzag Amplitude. 2. Steering Patterns ‹ Caution You are responsible for fishing, and it can be used without a GPS device connected to the autopilot. Select Done. 4. Pattern steering is clear of 5°. 3. Setting Up the Zigzag Pattern...
Owner's Manual
Page 10
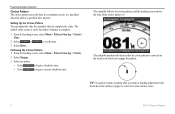
... twice. 6 GHC 10 Owner's Manual The default value creates a circle that the circle pattern is centered on the location at a specified time interval. From the heading screen, select Menu > Pattern Steering > Circles. 2. TIP: To quickly resume a pattern after you engage the pattern. Setting Up the Circles Pattern You can adjust the time the autopilot takes to complete. 1. From the heading screen, select Menu > Pattern Steering > Circles...
... twice. 6 GHC 10 Owner's Manual The default value creates a circle that the circle pattern is centered on the location at a specified time interval. From the heading screen, select Menu > Pattern Steering > Circles. 2. TIP: To quickly resume a pattern after you engage the pattern. Setting Up the Circles Pattern You can adjust the time the autopilot takes to complete. 1. From the heading screen, select Menu > Pattern Steering > Circles...
Owner's Manual
Page 11
... Heading screen, select Menu > Pattern Steering > Man Overboard. 2. Select Engage. 3. TIP: To quickly resume a pattern after you make a heading adjustment with the intent of the turn pattern turns the boat around with the helm or the soft keys (page 3), select the center soft key twice. GHC 10 Owner's Manual 7 The autopilot follows the u-turn pattern, and the heading screen shows the direction of running alongside the location...
... Heading screen, select Menu > Pattern Steering > Man Overboard. 2. Select Engage. 3. TIP: To quickly resume a pattern after you make a heading adjustment with the intent of the turn pattern turns the boat around with the helm or the soft keys (page 3), select the center soft key twice. GHC 10 Owner's Manual 7 The autopilot follows the u-turn pattern, and the heading screen shows the direction of running alongside the location...
Owner's Manual
Page 12
... based on connecting a compatible GPS device, see the autopilot installation instructions. For more information on a GPS location (waypoint). The autopilot can steer the boat along a route defined by your autopilot is called the active waypoint. 8 GHC 10 Owner's Manual Do not begin a GPS pattern until you are responsible for the safe operation of the turn ➀. ➀ TIP: To quickly resume a pattern after you make a heading adjustment with Shadow Drive). • Use the soft...
... based on connecting a compatible GPS device, see the autopilot installation instructions. For more information on a GPS location (waypoint). The autopilot can steer the boat along a route defined by your autopilot is called the active waypoint. 8 GHC 10 Owner's Manual Do not begin a GPS pattern until you are responsible for the safe operation of the turn ➀. ➀ TIP: To quickly resume a pattern after you make a heading adjustment with Shadow Drive). • Use the soft...
Owner's Manual
Page 13
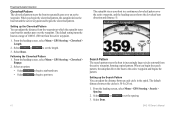
... connected to a NMEA 2000 or NMEA 0183 compatible chartplotter to use route to the next turn . From the heading screen, select Menu > GPS Steering > Orbit > Engage. 2. Following the Route To Pattern Before you begin the orbit pattern. From the heading screen, select Menu > GPS Steering > Route To. Your GHC 10 must define a route on your chartplotter. The autopilot steers your boat according to the route defined on your chartplotter, and the heading screen shows the distance to . The size...
... connected to a NMEA 2000 or NMEA 0183 compatible chartplotter to use route to the next turn . From the heading screen, select Menu > GPS Steering > Orbit > Engage. 2. Following the Route To Pattern Before you begin the orbit pattern. From the heading screen, select Menu > GPS Steering > Route To. Your GHC 10 must define a route on your chartplotter. The autopilot steers your boat according to the route defined on your chartplotter, and the heading screen shows the distance to . The size...
Owner's Manual
Page 14
... set the spacing. 3. The default distance between each circle in the spiral. Following the Cloverleaf Pattern 1. From the heading screen, select Menu > GPS Steering > Cloverleaf > Engage. 2. Select Done. When you begin a port turn. 10 The autopilot steers your boat for another pass over the waypoint. Powerboat Autopilot Operation Cloverleaf Pattern The cloverleaf pattern steers the boat to repeatedly pass over the active waypoint, and the heading screen shows...
... set the spacing. 3. The default distance between each circle in the spiral. Following the Cloverleaf Pattern 1. From the heading screen, select Menu > GPS Steering > Cloverleaf > Engage. 2. Select Done. When you begin a port turn. 10 The autopilot steers your boat for another pass over the waypoint. Powerboat Autopilot Operation Cloverleaf Pattern The cloverleaf pattern steers the boat to repeatedly pass over the active waypoint, and the heading screen shows...
Owner's Manual
Page 16
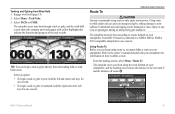
... set the step turn size. 3. The increment size is engaged. The autopilot steers your current heading without steering the helm (page 2). Select Done. 12 GHC 10 Owner's Manual You and your actual heading ➊ and intended heading ➋. ➊ ➋ Adjusting the Step Steering Increments 1. Adjusting the Heading with the Autopilot You can adjust the heading using step steering on the soft key. The autopilot steers your boat, and the heading screen shows...
... set the step turn size. 3. The increment size is engaged. The autopilot steers your current heading without steering the helm (page 2). Select Done. 12 GHC 10 Owner's Manual You and your actual heading ➊ and intended heading ➋. ➊ ➋ Adjusting the Step Steering Increments 1. Adjusting the Heading with the Autopilot You can adjust the heading using step steering on the soft key. The autopilot steers your boat, and the heading screen shows...
Owner's Manual
Page 17
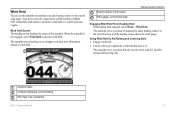
... wind hold. Using Wind Hold to the current wind angle. Engage wind hold or a wind-based tack or gybe. The autopilot steers your boat to maintain the same heading relative to perform a wind hold . 2. Wind Hold Screen The heading screen displays the status of the autopilot. Your device must be connected to a NMEA 2000 or NMEA 0183 compatible wind sensor to the wind direction, and the heading screen shows the wind gauge. Wind Hold You can set the autopilot to maintain a specific...
... wind hold. Using Wind Hold to the current wind angle. Engage wind hold or a wind-based tack or gybe. The autopilot steers your boat to maintain the same heading relative to perform a wind hold . 2. Wind Hold Screen The heading screen displays the status of the autopilot. Your device must be connected to a NMEA 2000 or NMEA 0183 compatible wind sensor to the wind direction, and the heading screen shows the wind gauge. Wind Hold You can set the autopilot to maintain a specific...
Owner's Manual
Page 19
.... 3. Sailboat Autopilot Operation Route To ‹ caution Garmin recommends using route to only under sail can begin using route to, you must be damaged or cause injury to . Refer to the next turn ➀ and the distance off course ➋. ➊ ➋ GHC 10 Owner's Manual 15 From the heading screen, select Menu > Route To. The autopilot steers your sailboat. The autopilot steers the boat according to a route defined on your chartplotter. Using Route To...
.... 3. Sailboat Autopilot Operation Route To ‹ caution Garmin recommends using route to only under sail can begin using route to, you must be damaged or cause injury to . Refer to the next turn ➀ and the distance off course ➋. ➊ ➋ GHC 10 Owner's Manual 15 From the heading screen, select Menu > Route To. The autopilot steers your sailboat. The autopilot steers the boat according to a route defined on your chartplotter. Using Route To...
Owner's Manual
Page 20
...; Unit Voltage-the device displays an alert and sounds an alarm when the battery reaches a specified voltage. Variance is available only when the Heading is set to True. ◦◦ Auto-automatically determines the ideal variance setting. ◦◦ User-you define the variance setting. • Beeper-set the reference used in store demonstration mode. • System Information-shows the device ID numbers and software information for the GHC and GHP. • Factory Defaults...
...; Unit Voltage-the device displays an alert and sounds an alarm when the battery reaches a specified voltage. Variance is available only when the Heading is set to True. ◦◦ Auto-automatically determines the ideal variance setting. ◦◦ User-you define the variance setting. • Beeper-set the reference used in store demonstration mode. • System Information-shows the device ID numbers and software information for the GHC and GHP. • Factory Defaults...
Owner's Manual
Page 21
... Shadow Drive, any adjustment to enter standby mode automatically when you manually steer the helm, then engages the heading hold a steady course for a few seconds. Although the autopilot is placed on the heading screen, and sounds an alarm when the autopilot begins the tack or gybe. NOTE: The Shadow Drive is only available on hydraulic steering GHC 10 Owner's Manual Settings systems. • Shadow Drive...
... Shadow Drive, any adjustment to enter standby mode automatically when you manually steer the helm, then engages the heading hold a steady course for a few seconds. Although the autopilot is placed on the heading screen, and sounds an alarm when the autopilot begins the tack or gybe. NOTE: The Shadow Drive is only available on hydraulic steering GHC 10 Owner's Manual Settings systems. • Shadow Drive...
Owner's Manual
Page 22
... autopilot system. Power Mode You can adjust the level of rudder activity while in degrees to port or starboard. Select a percentage and select Done. If the rate of heading performance. From the heading screen, select Menu > Setup > User Autopilot Configuration. 2. Settings • Wind Hold Type-(sailboats only) autopilot steers to apparent wind or true wind when wind hold option if your boat is equipped with a wind sensor and no water speed sensor. ◦◦ True wind data...
... autopilot system. Power Mode You can adjust the level of rudder activity while in degrees to port or starboard. Select a percentage and select Done. If the rate of heading performance. From the heading screen, select Menu > Setup > User Autopilot Configuration. 2. Settings • Wind Hold Type-(sailboats only) autopilot steers to apparent wind or true wind when wind hold option if your boat is equipped with a wind sensor and no water speed sensor. ◦◦ True wind data...
Owner's Manual
Page 23
... Configuring the Autopilot NOTICE Changes made to the configuration of the autopilot directly affect the behavior of the autopilot, and should be adjusted. For advanced autopilot configuration, see the installation instructions included with the essential requirements and other applicable country. Registering Your Product 1. Go to www.garmin.com/compliance. Follow the on the Software. PLEASE READ THIS AGREEMENT CAREFULLY. The GHP 10...
... Configuring the Autopilot NOTICE Changes made to the configuration of the autopilot directly affect the behavior of the autopilot, and should be adjusted. For advanced autopilot configuration, see the installation instructions included with the essential requirements and other applicable country. Registering Your Product 1. Go to www.garmin.com/compliance. Follow the on the Software. PLEASE READ THIS AGREEMENT CAREFULLY. The GHP 10...

Owner's Manual
Page 24
Autopilot placed in normal operation "Rudder near limit" flashes on a chartplotter prior to disengaging the autopilot. Rudder sensor is no longer receiving valid wind data. • Alarm sounds for user input. The rudder remains near its limit (rudder stop ) for more than • Sounds alarm 5 seconds. • Continues in heading hold Connection with autopilot lost The GHC lost connection with CCU. Would you The autopilot has detected that the user has attempted...
Autopilot placed in normal operation "Rudder near limit" flashes on a chartplotter prior to disengaging the autopilot. Rudder sensor is no longer receiving valid wind data. • Alarm sounds for user input. The rudder remains near its limit (rudder stop ) for more than • Sounds alarm 5 seconds. • Continues in heading hold Connection with autopilot lost The GHC lost connection with CCU. Would you The autopilot has detected that the user has attempted...
Owner's Manual
Page 25
... 18 Wind Hold 13 Adjustment 14 Engaging 13 Screen 13 Wind Hold Screen 13 Z Zigzag 5 21 Index A Alarms 16 Alerts 16 Appendix 19 Autopilot Steering Cancelling 8 GPS Pattern Steering 8 Pattern Steering 5 Auto Power 16 C Circles 6 Cloverleaf 10 Configuring Remote 17 Connecting Remote 16 D Demo Mode 16 Direction Control 4 Settings 17 Using 4 Display Adjusting 1 Backlight 1 Color Mode 1 GHC 10 Owner's Manual E Economy 18 Error Messages 20 G Garmin Product Support 19 H Heading Hold Powerboat 3 Sailboat 12. See also Wind Hold Heading Screen 2.
... 18 Wind Hold 13 Adjustment 14 Engaging 13 Screen 13 Wind Hold Screen 13 Z Zigzag 5 21 Index A Alarms 16 Alerts 16 Appendix 19 Autopilot Steering Cancelling 8 GPS Pattern Steering 8 Pattern Steering 5 Auto Power 16 C Circles 6 Cloverleaf 10 Configuring Remote 17 Connecting Remote 16 D Demo Mode 16 Direction Control 4 Settings 17 Using 4 Display Adjusting 1 Backlight 1 Color Mode 1 GHC 10 Owner's Manual E Economy 18 Error Messages 20 G Garmin Product Support 19 H Heading Hold Powerboat 3 Sailboat 12. See also Wind Hold Heading Screen 2.

