
GXI Imbedded Intelligence Brochure
Page 2
...-time display of object classification, speed, area and height > Speed filter with add on functions > Unique, easy to Ganz PixelPro, an already feature-rich IP camera series. Objects are stopped inside a zone, or remain inside to the outside of the ways GXi's Imbedded Intelligence enables you to capture the real-time data needed to SD card. Applications include detection of...
...-time display of object classification, speed, area and height > Speed filter with add on functions > Unique, easy to Ganz PixelPro, an already feature-rich IP camera series. Objects are stopped inside a zone, or remain inside to the outside of the ways GXi's Imbedded Intelligence enables you to capture the real-time data needed to SD card. Applications include detection of...
PixelPro GXI Camera Model Comparison
Page 1
... & MJPEG, Embedded Intelligence Technology, Text Overlay, Video ZN-BT662XE-MIR motion detection support, ProSet Remote Zoom & Focus, 34 Built-in auto-tracking license, Up to 432X PTZ, 36X Optical 12X Digital Zoom (Selectable), Pan/Tilt speed control while zooming, Full video recording to SD card. TRUE D/N Outdoor Bullet Indoor Dome ZN-NH11VNE 1/3" CCD, Full Frame at VGA, H.264, MPEG-4 & MJPEG, Embedded Intelligence Technology, Text Overlay, Video motion detection support, Two-way audio. D1 ZN1-N4NFN6 1/2.9" CMOS, Full HD 1080p...
... & MJPEG, Embedded Intelligence Technology, Text Overlay, Video ZN-BT662XE-MIR motion detection support, ProSet Remote Zoom & Focus, 34 Built-in auto-tracking license, Up to 432X PTZ, 36X Optical 12X Digital Zoom (Selectable), Pan/Tilt speed control while zooming, Full video recording to SD card. TRUE D/N Outdoor Bullet Indoor Dome ZN-NH11VNE 1/3" CCD, Full Frame at VGA, H.264, MPEG-4 & MJPEG, Embedded Intelligence Technology, Text Overlay, Video motion detection support, Two-way audio. D1 ZN1-N4NFN6 1/2.9" CMOS, Full HD 1080p...

ZN-DN312XE_ZN-DNT352XE Specifications
Page 1
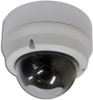
... camera tampering and failure detection. The Imbedded Intelligence provides intelligent analysis of video with GXi Technology The ZN-D312XE-M and ZN-D352XE feature GXi Technology maximizing the surveillance capabilities by bringing an added feature set of video • Video motion detection • Dual-Streaming IP Video - H.264 and MJPEG compression • Full video recording to SD cards (card not included) • ONVIF Profile (S) compliant • 12 VDC/PoE...
... camera tampering and failure detection. The Imbedded Intelligence provides intelligent analysis of video with GXi Technology The ZN-D312XE-M and ZN-D352XE feature GXi Technology maximizing the surveillance capabilities by bringing an added feature set of video • Video motion detection • Dual-Streaming IP Video - H.264 and MJPEG compression • Full video recording to SD cards (card not included) • ONVIF Profile (S) compliant • 12 VDC/PoE...
ZN-DN312XE_ZN-DNT352XE Specifications
Page 2
...-in Text Privacy Mask Analogue Output Audio Streaming Audio Compression Audio input / output Ethernet Standard Network Protocol Security Application Programming Interface Integration Imbedded Intelligence (standard) Imbedded Intelligence (optional) Physical Event Sources Event Actions Event Metadata Streaming (RTSP/RTP) Analytics Engine Detection Zones and Rules Tamper Detection Camera Shake Cancellation Detection Behavior 3D Behavior Counting Counting Line Meta Data Material Edge Storage External I/O Terminals Users Power / Consumption Operating Conditions Operating Temp. Built-in total...
...-in Text Privacy Mask Analogue Output Audio Streaming Audio Compression Audio input / output Ethernet Standard Network Protocol Security Application Programming Interface Integration Imbedded Intelligence (standard) Imbedded Intelligence (optional) Physical Event Sources Event Actions Event Metadata Streaming (RTSP/RTP) Analytics Engine Detection Zones and Rules Tamper Detection Camera Shake Cancellation Detection Behavior 3D Behavior Counting Counting Line Meta Data Material Edge Storage External I/O Terminals Users Power / Consumption Operating Conditions Operating Temp. Built-in total...

Manual
Page 3
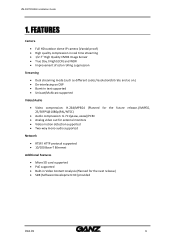
ZN-DNT352XE Installation Guide Table of Contents 1. FEATURES ...4 2. Installation Template...8 4.2. Setting the Image Attribute 9 5. View video using IPAdmin Tool 14 6.2.2.View video using IP address 15 6.3. INSTALLATION ...7 4.1. CONNECTIONS ...10 6. PACKAGE CONTENTS 5 3. Reset...15 6.4. View video on web page 13 6.2.1. Factory Default...15 APPENDIX (A): SPECIFICATIONS 16 Summary ...16 Electrical Characteristics ...17 Environment Condition ...17 Mechanical Condition ...17 APPENDIX (B): POWER OVER ETHERNET 18 PoE compatibility ...18 Power classification...18 APPENDIX...
ZN-DNT352XE Installation Guide Table of Contents 1. FEATURES ...4 2. Installation Template...8 4.2. Setting the Image Attribute 9 5. View video using IPAdmin Tool 14 6.2.2.View video using IP address 15 6.3. INSTALLATION ...7 4.1. CONNECTIONS ...10 6. PACKAGE CONTENTS 5 3. Reset...15 6.4. View video on web page 13 6.2.1. Factory Default...15 APPENDIX (A): SPECIFICATIONS 16 Summary ...16 Electrical Characteristics ...17 Environment Condition ...17 Mechanical Condition ...17 APPENDIX (B): POWER OVER ETHERNET 18 PoE compatibility ...18 Power classification...18 APPENDIX...
Manual
Page 4
.../30FPS@1080p(PAL/NTSC) Audio compression: G.711(µLaw, aLaw)/PCM Analog video out for external monitors Video motion detection supported Two-way mono audio supported Network RTSP/ HTTP protocol supported 10/100 Base-T Ethernet Additional Features Micro SD card supported PoE supported Built-in Video Content Analysis (Planned for the next release.) SDK (Software Development Kit) provided 01A.01 4
.../30FPS@1080p(PAL/NTSC) Audio compression: G.711(µLaw, aLaw)/PCM Analog video out for external monitors Video motion detection supported Two-way mono audio supported Network RTSP/ HTTP protocol supported 10/100 Base-T Ethernet Additional Features Micro SD card supported PoE supported Built-in Video Content Analysis (Planned for the next release.) SDK (Software Development Kit) provided 01A.01 4
Manual
Page 6
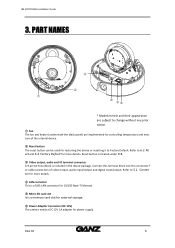
... Factory Default. ZN-DNT352XE Installation Guide 3. Connect this terminal block into this connector f or cable connection of the internal device. ② Reset button The reset button can be used for more details. ④ LAN connector This is a RJ45 LAN connector for power supply. 01A.01 6 Reset button is located under PCB. ③ Video output, audio and IO terminal connector A 9-pin terminal block is a memory card slot for external storage. ⑥ Power Adaptor Connector (DC 12V) The camera needs a DC 12V 1A adapter...
... Factory Default. ZN-DNT352XE Installation Guide 3. Connect this terminal block into this connector f or cable connection of the internal device. ② Reset button The reset button can be used for more details. ④ LAN connector This is a RJ45 LAN connector for power supply. 01A.01 6 Reset button is located under PCB. ③ Video output, audio and IO terminal connector A 9-pin terminal block is a memory card slot for external storage. ⑥ Power Adaptor Connector (DC 12V) The camera needs a DC 12V 1A adapter...
Manual
Page 7
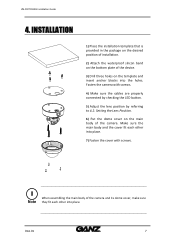
... into the holes. Setting the Lens Position. 6) Put the dome cover on the template and insert anchor blocks into place. 7) Fasten the cover with screws. 4) Make sure the cables are properly connected by checking the LED button. 5) Adjust the lens position by referring to 4.2. i Note When assembling the main body of the camera. Fasten the camera with screws. INSTALLATION 1) Place the installation template that is...
... into the holes. Setting the Lens Position. 6) Put the dome cover on the template and insert anchor blocks into place. 7) Fasten the cover with screws. 4) Make sure the cables are properly connected by checking the LED button. 5) Adjust the lens position by referring to 4.2. i Note When assembling the main body of the camera. Fasten the camera with screws. INSTALLATION 1) Place the installation template that is...
Manual
Page 8
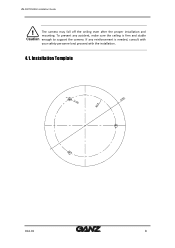
To prevent any reinforcement is firm and stable Caution enough to support the camera. The camera may fall off the ceiling even after the proper installation and mounting. Installation Template Installation template 3502 V1.0 01A.01 8 ZN-DNT352XE Installation Guide ! If any accident, make sure the ceiling is needed, consult with your safety personnel and proceed with the installation. 4.1.
To prevent any reinforcement is firm and stable Caution enough to support the camera. The camera may fall off the ceiling even after the proper installation and mounting. Installation Template Installation template 3502 V1.0 01A.01 8 ZN-DNT352XE Installation Guide ! If any accident, make sure the ceiling is needed, consult with your safety personnel and proceed with the installation. 4.1.
Manual
Page 9
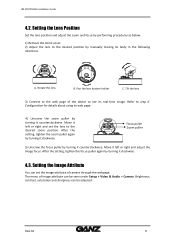
... C. Configuration for details about using its web page. 4) Unscrew the zoom puller by turning it left or right and adjust the image focus. ZN-DNT352XE Installation Guide 4.2. Rotate the lens B. Brightness, contrast, saturation and sharpness can be adjusted. 01A.01 9 After the setting, tighten the zoom puller again by manually moving its real-time image. A. Setting the Lens Position Set the lens position and adjust the zoom and focus by performing procedures as below. 1) Remove the dome cover. 2) Adjust the lens...
... C. Configuration for details about using its web page. 4) Unscrew the zoom puller by turning it left or right and adjust the image focus. ZN-DNT352XE Installation Guide 4.2. Rotate the lens B. Brightness, contrast, saturation and sharpness can be adjusted. 01A.01 9 After the setting, tighten the zoom puller again by manually moving its real-time image. A. Setting the Lens Position Set the lens position and adjust the zoom and focus by performing procedures as below. 1) Remove the dome cover. 2) Adjust the lens...

Manual
Page 10
... ZN-DNT352XE Installation Guide 5. Since the output power for the audio is low, an amplifier speaker is installed properly. ③ Sensor (DI) connection The camera provides 1 channel D/I. Input voltage range: 0VDC minimum to the camera). CONNECTIONS SW1 SW2 N / A SW5 N / A SW3 N / A SW6 N / A VIDEO DO DI AUDIO Out C 1 C 1 Out In ETHERNET MICRO SD DC12V + SW1 SW2 N / A SW3 N / A SW5① Audio inSpWut6/output...
... ZN-DNT352XE Installation Guide 5. Since the output power for the audio is low, an amplifier speaker is installed properly. ③ Sensor (DI) connection The camera provides 1 channel D/I. Input voltage range: 0VDC minimum to the camera). CONNECTIONS SW1 SW2 N / A SW5 N / A SW3 N / A SW6 N / A VIDEO DO DI AUDIO Out C 1 C 1 Out In ETHERNET MICRO SD DC12V + SW1 SW2 N / A SW3 N / A SW5① Audio inSpWut6/output...

Manual
Page 13
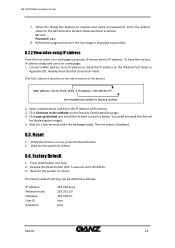
... network environment The default IP address of your PC's settings as below. Please make sure the device and your PC are on the web page. 01A.01 13 You can find the available IP address from the MAC address of your IP device and its IP address. View video on web page View the live video on a web page using your IP device is different, change your device. ZN-DNT352XE Installation Guide...
... network environment The default IP address of your PC's settings as below. Please make sure the device and your PC are on the web page. 01A.01 13 You can find the available IP address from the MAC address of your IP device and its IP address. View video on web page View the live video on a web page using your IP device is different, change your device. ZN-DNT352XE Installation Guide...
Manual
Page 14
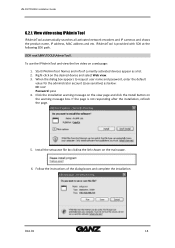
... the view page and click the Install button on the desired device and select Web view. 3. View video using IPAdmin Tool IPAdminTool automatically searches all activated network encoders and IP cameras and shows the product name, IP address, MAC address and etc. Names and info of the dialog boxes and complete the installation. 01A.01 14 ZN-DNT352XE Installation Guide 6.2.1. Install the setup.exe file by clicking the link shown on a web...
... the view page and click the Install button on the desired device and select Web view. 3. View video using IPAdmin Tool IPAdminTool automatically searches all activated network encoders and IP cameras and shows the product name, IP address, MAC address and etc. Names and info of the dialog boxes and complete the installation. 01A.01 14 ZN-DNT352XE Installation Guide 6.2.1. Install the setup.exe file by clicking the link shown on a web...
Manual
Page 15
... number. 2. Release the Reset button after 5 seconds until LED blinks. 3. ZN-DNT352XE Installation Guide 7. Reset 1. Wait for a few seconds while the web page loads. To have the correct IP address ready and use , press the Reset button. 2. You need to install the ActiveX for the system to this website on a web page: 1. The live video on the side or bottom of the device. 3. Click Continue to reboot. Factory Default 1. Press reset button and hold. 2. Convert a MAC address...
... number. 2. Release the Reset button after 5 seconds until LED blinks. 3. ZN-DNT352XE Installation Guide 7. Reset 1. Wait for a few seconds while the web page loads. To have the correct IP address ready and use , press the Reset button. 2. You need to install the ActiveX for the system to this website on a web page: 1. The live video on the side or bottom of the device. 3. Click Continue to reboot. Factory Default 1. Press reset button and hold. 2. Convert a MAC address...
Manual
Page 16
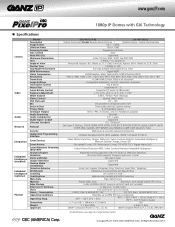
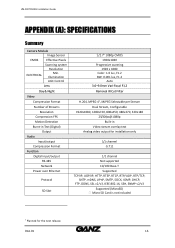
ZN-DNT352XE Installation Guide APPENDIX (A): SPECIFICATIONS Summary Camera Module Image Sensor CMOS Effective Pixels Scanning system Resolution ELECTRICAL Min. Illumination AGC Control Lens Day & Night Video Compression Format Number of Streams Resolution Compression FPS Motion Detection Burnt-in Text (Digital) Output Audio Input/output Compression Format Function Digital Input/output RS-485 Network Power over Ethernet Protocol SD Slot 1/2.7" 1080p CMOS 1920x1080 Progressive scanning 1920 x 1080 Color: 1.0 lux, F1.2 BW: 0.001 lux, F1.2 Auto 3.0~9.0mm Vari-Focal F1.2 ...
ZN-DNT352XE Installation Guide APPENDIX (A): SPECIFICATIONS Summary Camera Module Image Sensor CMOS Effective Pixels Scanning system Resolution ELECTRICAL Min. Illumination AGC Control Lens Day & Night Video Compression Format Number of Streams Resolution Compression FPS Motion Detection Burnt-in Text (Digital) Output Audio Input/output Compression Format Function Digital Input/output RS-485 Network Power over Ethernet Protocol SD Slot 1/2.7" 1080p CMOS 1920x1080 Progressive scanning 1920 x 1080 Color: 1.0 lux, F1.2 BW: 0.001 lux, F1.2 Auto 3.0~9.0mm Vari-Focal F1.2 ...

Quick User Guide
Page 1
... the polarity is located under PCB. Connect cables to IP device Connect required cables to the IP device Power Adaptor Connector (DC 12V) NC3502 Ver1.3 1 Reset Button *This button is correct. Incorrect connection may cause malfunction or damage to the device including the power cable, LAN cable, and other optional cables. ZN-DNT352XE Quick User Guide This manual provides instructions for quick installation and basic configuration of all connectors, refer to change without any prior notice. !
... the polarity is located under PCB. Connect cables to IP device Connect required cables to the IP device Power Adaptor Connector (DC 12V) NC3502 Ver1.3 1 Reset Button *This button is correct. Incorrect connection may cause malfunction or damage to the device including the power cable, LAN cable, and other optional cables. ZN-DNT352XE Quick User Guide This manual provides instructions for quick installation and basic configuration of all connectors, refer to change without any prior notice. !

Quick User Guide
Page 3
... sure the device and your device. Tilt the lens Connect to the web page of your PC are on the same network segment before running the installation. Configuration for details about using its web page. 3) Unscrew the zoom puller by turning it left or right and adjust the image focus. You can find the available IP address from the MAC address of the device to the desired...
... sure the device and your device. Tilt the lens Connect to the web page of your PC are on the same network segment before running the installation. Configuration for details about using its web page. 3) Unscrew the zoom puller by turning it left or right and adjust the image focus. You can find the available IP address from the MAC address of the device to the desired...

Quick User Guide
Page 4
... Install button on a web page using your IP device and its IP address. View video on web page View the live video on the warning message box. Step5. When the dialog box appears to an IP address. Convert a MAC address to request user name and password, enter the default value for the administrator account (case‐sensitive) as below: ID: root Password: pass 4. Open a web browser and enter the IP address...
... Install button on a web page using your IP device and its IP address. View video on web page View the live video on the warning message box. Step5. When the dialog box appears to an IP address. Convert a MAC address to request user name and password, enter the default value for the administrator account (case‐sensitive) as below: ID: root Password: pass 4. Open a web browser and enter the IP address...

Quick User Guide
Page 5
... live image is displayed as below . 2. Setting IP Address To set up the Network configuration: 1. To use DHCP, select Obtain an IP address via DHCP. When the dialog box appears to the Web Page User's Manual, which is available on the bottom of the page. Step6. Enter the default user name (root) and password (pass), and then select OK. To change the IP address, please make sure to set...
... live image is displayed as below . 2. Setting IP Address To set up the Network configuration: 1. To use DHCP, select Obtain an IP address via DHCP. When the dialog box appears to the Web Page User's Manual, which is available on the bottom of the page. Step6. Enter the default user name (root) and password (pass), and then select OK. To change the IP address, please make sure to set...

Quick User Guide
Page 6
Release the Reset button after 5 seconds until LED blinks. 3. z Configure IP address, subnet mask, and gateway z Show network related information such as MAC address z Update firmware z Reboot the device IPAdminTool is available on the SDK at the following SDK path. {SDK root}\BIN\TOOLS\AdminTool\ Rebooting Perform the following path. {SDK root}\DOC\ NC3502 Ver1.3 6 For the Factory Default reset: 1. Wait for the system to...
Release the Reset button after 5 seconds until LED blinks. 3. z Configure IP address, subnet mask, and gateway z Show network related information such as MAC address z Update firmware z Reboot the device IPAdminTool is available on the SDK at the following SDK path. {SDK root}\BIN\TOOLS\AdminTool\ Rebooting Perform the following path. {SDK root}\DOC\ NC3502 Ver1.3 6 For the Factory Default reset: 1. Wait for the system to...
