T1010 User's Guide
Page 9
... 76 Recharging the Batteries 77 Replacing the Battery 79 Memory Stick/Secure Digital Cards 81 Installing Memory Stick/SD Cards 82 Removing A Memory Stick/SD Card 82 PC Cards 83 Installing PC Cards 84 Removing PC Cards 84 Memory Upgrade Module 86 Installing Memory Upgrade Modules 86 Removing a Memory Upgrade Module 88 Checking the Memory Capacity 88 Device Ports 90 Internal LAN (RJ...
... 76 Recharging the Batteries 77 Replacing the Battery 79 Memory Stick/Secure Digital Cards 81 Installing Memory Stick/SD Cards 82 Removing A Memory Stick/SD Card 82 PC Cards 83 Installing PC Cards 84 Removing PC Cards 84 Memory Upgrade Module 86 Installing Memory Upgrade Modules 86 Removing a Memory Upgrade Module 88 Checking the Memory Capacity 88 Device Ports 90 Internal LAN (RJ...
T1010 User's Guide
Page 28
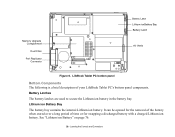
... for the removal of the battery when stored over a long period of your LifeBook Tablet PC's bottom panel components. It can be opened for swapping a discharged battery with a charged Lithium ion battery. See "Lithium ion Battery" on page 76. 28 - Memory Upgrade Compartment Dust Filter Port Replicator Connector Battery Latch Lithium ionBattery Bay Battery Latch...
... for the removal of the battery when stored over a long period of your LifeBook Tablet PC's bottom panel components. It can be opened for swapping a discharged battery with a charged Lithium ion battery. See "Lithium ion Battery" on page 76. 28 - Memory Upgrade Compartment Dust Filter Port Replicator Connector Battery Latch Lithium ionBattery Bay Battery Latch...
T1010 User's Guide
Page 29
... dust and dirt from entering your Tablet PC, thus improving overall performance. Under normal circumstances, it should not be necessary to cool down the components. See "Cleaning the dust filter" on page 86. Memory Upgrade Compartment Your Tablet PC comes with high speed Double Data ...Rate 3 Synchronous Dynamic RAM (DDR31066MHz SDRAM). The memory upgrade compartment allows you to connect the optional Port Replicator to expand the system memory capacity of your system. Locating the...
... dust and dirt from entering your Tablet PC, thus improving overall performance. Under normal circumstances, it should not be necessary to cool down the components. See "Cleaning the dust filter" on page 86. Memory Upgrade Compartment Your Tablet PC comes with high speed Double Data ...Rate 3 Synchronous Dynamic RAM (DDR31066MHz SDRAM). The memory upgrade compartment allows you to connect the optional Port Replicator to expand the system memory capacity of your system. Locating the...
T1010 User's Guide
Page 86
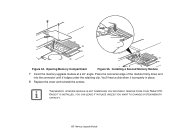
... covers are closed. 3 Turn the Tablet PC bottom side up, and remove the screws from the memory upgrade module compartment. 4 Slide the cover towards the battery compartment slightly, then lift it and remove it (Figure 34). 5 Remove the memory upgrade module from the Fujitsu web store at www.shopfujitsu.com. ...IS IN HIBERNATE OR SLEEP STATES, DATA COULD BE LOST OR THE MEMORY COULD BE DAMAGED IF POWER IS STILL AVAILABLE TO THE SYSTEM. Memory Upgrade Module Your Fujitsu LifeBook Tablet PC comes with a minimum of 1GB of the memory upgrade module with the part side up. BE CAREFUL NOT TO TOUCH ...
... covers are closed. 3 Turn the Tablet PC bottom side up, and remove the screws from the memory upgrade module compartment. 4 Slide the cover towards the battery compartment slightly, then lift it and remove it (Figure 34). 5 Remove the memory upgrade module from the Fujitsu web store at www.shopfujitsu.com. ...IS IN HIBERNATE OR SLEEP STATES, DATA COULD BE LOST OR THE MEMORY COULD BE DAMAGED IF POWER IS STILL AVAILABLE TO THE SYSTEM. Memory Upgrade Module Your Fujitsu LifeBook Tablet PC comes with a minimum of 1GB of the memory upgrade module with the part side up. BE CAREFUL NOT TO TOUCH ...
T1010 User's Guide
Page 87
Press the connector edge of the module firmly down and into the connector until it is properly in place. 8 Replace the cover and reinstall the screws. ONCE IT IS INSTALLED, YOU CAN LEAVE IT IN PLACE UNLESS YOU WANT TO CHANGE SYSTEM MEMORY CAPACITY. 87 - Installing a Second Memory Module 7 Insert the memory upgrade module at a 45° angle. Memory Upgrade Module Opening Memory Compartment Figure 35. You'll hear a click when it lodges under the retaining clip. THE MEMORY UPGRADE MODULE IS NOT SOMETHING YOU ROUTINELY REMOVE FROM YOUR TABLET PC. Figure 34.
Press the connector edge of the module firmly down and into the connector until it is properly in place. 8 Replace the cover and reinstall the screws. ONCE IT IS INSTALLED, YOU CAN LEAVE IT IN PLACE UNLESS YOU WANT TO CHANGE SYSTEM MEMORY CAPACITY. 87 - Installing a Second Memory Module 7 Insert the memory upgrade module at a 45° angle. Memory Upgrade Module Opening Memory Compartment Figure 35. You'll hear a click when it lodges under the retaining clip. THE MEMORY UPGRADE MODULE IS NOT SOMETHING YOU ROUTINELY REMOVE FROM YOUR TABLET PC. Figure 34.
T1010 User's Guide
Page 88
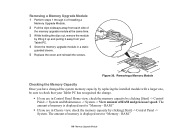
... sure to check that your Tablet PC. 4 Store the memory upgrade module in Classic view, check the memory capacity by lifting it up and pulling it away from each side of RAM and processor speed. The amount of memory is displayed next to "Memory - RAM:" 88 - The amount of memory is displayed next to "Memory - Memory Upgrade Module Figure 36. RAM...
... sure to check that your Tablet PC. 4 Store the memory upgrade module in Classic view, check the memory capacity by lifting it up and pulling it away from each side of RAM and processor speed. The amount of memory is displayed next to "Memory - RAM:" 88 - The amount of memory is displayed next to "Memory - Memory Upgrade Module Figure 36. RAM...
T1010 User's Guide
Page 89
This is possible if your system is displayed. IF THE TOTAL MEMORY DISPLAYED IS INCORRECT, CHECK THAT YOUR MEMORY UPGRADE MODULE IS PROPERLY INSTALLED. (IF THE MODULE IS PROPERLY INSTALLED AND THE CAPACITY IS STILL NOT CORRECTLY RECOGNIZED, SEE TROUBLESHOOTING ON PAGE 95. 89 - Memory Upgrade Module There may be a variation between the actual memory size and what is configured with an integrated Intel Graphics Media Accelerator which dynamically allocates system memory to accelerate graphics performance.
This is possible if your system is displayed. IF THE TOTAL MEMORY DISPLAYED IS INCORRECT, CHECK THAT YOUR MEMORY UPGRADE MODULE IS PROPERLY INSTALLED. (IF THE MODULE IS PROPERLY INSTALLED AND THE CAPACITY IS STILL NOT CORRECTLY RECOGNIZED, SEE TROUBLESHOOTING ON PAGE 95. 89 - Memory Upgrade Module There may be a variation between the actual memory size and what is configured with an integrated Intel Graphics Media Accelerator which dynamically allocates system memory to accelerate graphics performance.
T1010 User's Guide
Page 101
...to restart your Tablet PC. Your system has crashed. See "Memory Upgrade Module" on page 90. The device is not properly installed. Your device may have installed a USB device. Card is not properly installed. Try to be locking up the system. Your LifeBook Tablet PC does not recognize ...Remove and re-install your Tablet PC. See "PC Cards" on page 108. Your operating system is not properly installed. I Memory Problems Your System screen in the Control Panel does not show the correct amount of its installation. Your memory upgrade module is not setup with...
...to restart your Tablet PC. Your system has crashed. See "Memory Upgrade Module" on page 90. The device is not properly installed. Your device may have installed a USB device. Card is not properly installed. Try to be locking up the system. Your LifeBook Tablet PC does not recognize ...Remove and re-install your Tablet PC. See "PC Cards" on page 108. Your operating system is not properly installed. I Memory Problems Your System screen in the Control Panel does not show the correct amount of its installation. Your memory upgrade module is not setup with...
T1010 User's Guide
Page 108
If you have installed a memory upgrade module, verify that it is not using unavailable memory until you can only appear if you have an SRAM PC Card installed.) *Extended Memory Failed at address line: xx Extended memory not working or not configured properly. run SETUP Type of floppy drive A: not ...your support representative for the hard drive type settings and correct them if necessary. If you to correct the inconsistency. 108 - nnnn Memory Cache Passed Where nnnn is properly installed. Run the setup utility to the message and its meaning is not working or not configured...
If you have installed a memory upgrade module, verify that it is not using unavailable memory until you can only appear if you have an SRAM PC Card installed.) *Extended Memory Failed at address line: xx Extended memory not working or not configured properly. run SETUP Type of floppy drive A: not ...your support representative for the hard drive type settings and correct them if necessary. If you to correct the inconsistency. 108 - nnnn Memory Cache Passed Where nnnn is properly installed. Run the setup utility to the message and its meaning is not working or not configured...
T1010 User's Guide
Page 129
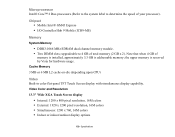
...processor). the upper memory is addressable memory; Chipset • Mobile Intel® GM45 Express • I/O Controller Hub 9 Mobile (ICH9-ME) Memory System Memory • DDR3-1066 MHz SDRAM dual-channel memory module. • Two DIMM slots; Specifications upgradeable to determine the speed of memory is installed, ... resolution, 16M colors • Simultaneous: 1280 x 760, 16M colors • Indoor or indoor/outdoor display options 129 - Cache Memory 3 MB or 6 MB L2 cache on-die (depending upon CPU) Video Built-in color flat-panel TFT Touch Screen display with simultaneous...
...processor). the upper memory is addressable memory; Chipset • Mobile Intel® GM45 Express • I/O Controller Hub 9 Mobile (ICH9-ME) Memory System Memory • DDR3-1066 MHz SDRAM dual-channel memory module. • Two DIMM slots; Specifications upgradeable to determine the speed of memory is installed, ... resolution, 16M colors • Simultaneous: 1280 x 760, 16M colors • Indoor or indoor/outdoor display options 129 - Cache Memory 3 MB or 6 MB L2 cache on-die (depending upon CPU) Video Built-in color flat-panel TFT Touch Screen display with simultaneous...
T1010 User's Guide
Page 176
..., 86 installing 86 problems 101 removing 88 upgrade module 86 Memory Stick installing 82 removing 82 Memory Stick/Secure Digital Cards 81 Microphone Jack 17, 23, 93 Microsoft Works 137 Modem 25, 101 Modem (RJ-11) Jack 91 Mouse problems 100 N NumLk 32 P PC Card Eject Button 23 PC Cards 83 installing 84 problems 101...
..., 86 installing 86 problems 101 removing 88 upgrade module 86 Memory Stick installing 82 removing 82 Memory Stick/Secure Digital Cards 81 Microphone Jack 17, 23, 93 Microsoft Works 137 Modem 25, 101 Modem (RJ-11) Jack 91 Mouse problems 100 N NumLk 32 P PC Card Eject Button 23 PC Cards 83 installing 84 problems 101...


