
S7220 BIOS Guide
Page 2
... operating conditions, therefore there is no need to set or change the BIOS environment to review or alter the current settings. To activate a submenu press the [Enter] key. 5. Pressing the [F10] key saves the current configuration and exits the BIOS Setup Utility. The BIOS Setup Utility configures: ■ Device control feature parameters, such as changing I/O addresses and boot devices. ■ System Data Security feature parameters, such as detailed in your notebook. You will invoke the screen...
... operating conditions, therefore there is no need to set or change the BIOS environment to review or alter the current settings. To activate a submenu press the [Enter] key. 5. Pressing the [F10] key saves the current configuration and exits the BIOS Setup Utility. The BIOS Setup Utility configures: ■ Device control feature parameters, such as changing I/O addresses and boot devices. ■ System Data Security feature parameters, such as detailed in your notebook. You will invoke the screen...

S7220 BIOS Guide
Page 9
... Menu Table 5: Fields, Options and Defaults for each field, the default settings and a description of video signals to help understand the field's use. Video Features When selected, opens the Video Features submenu, which allows the user to : ■ Set the I/O addresses for serial, infrared and parallel ports. Phoenix SecureCore(tm) Setup Utility Info System Advanced Security Boot Exit Serial/Parallel Port Configurations Keyboard/Mouse Features Video Features Internal Device Configurations CPU Features USB Features Miscellaneous Configurations Event Logging Item Specific...
... Menu Table 5: Fields, Options and Defaults for each field, the default settings and a description of video signals to help understand the field's use. Video Features When selected, opens the Video Features submenu, which allows the user to : ■ Set the I/O addresses for serial, infrared and parallel ports. Phoenix SecureCore(tm) Setup Utility Info System Advanced Security Boot Exit Serial/Parallel Port Configurations Keyboard/Mouse Features Video Features Internal Device Configurations CPU Features USB Features Miscellaneous Configurations Event Logging Item Specific...

S7220 BIOS Guide
Page 11
... notebook emits a series of beeps that sounds like a code and the display is blank, refer to determine settings and limitations. ■ To prevent IRQ and address conflicts, avoid changing the default settings. Serial/Parallel Port Configuration Submenu 11 Advanced Menu Serial/Parallel Port Configuration Submenu of the Advanced Menu The Serial/Parallel Port Configuration submenu lets you can be entered in various ways, including via the BIOS setup utility, the control software for the I/O device, or the hardware...
... notebook emits a series of beeps that sounds like a code and the display is blank, refer to determine settings and limitations. ■ To prevent IRQ and address conflicts, avoid changing the default settings. Serial/Parallel Port Configuration Submenu 11 Advanced Menu Serial/Parallel Port Configuration Submenu of the Advanced Menu The Serial/Parallel Port Configuration submenu lets you can be entered in various ways, including via the BIOS setup utility, the control software for the I/O device, or the hardware...
S7220 BIOS Guide
Page 21
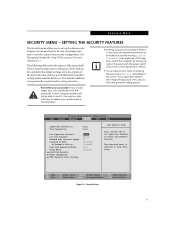
... computer by turning off and on the screen. If you set Supervisor Password to reset it. Phoenix SecureCore(tm) Setup Utility Info System Advanced Security Boot Exit Supervisor Password Is: User Password Is: Clear Clear Set Supervisor Password Set User Password Minimum User Password Length: Password on reboot. ■ If you to set up : Boot from Removable Media: Flash Write: Hard Disk Security Owner Information TPM (Security Chip) Setting [Enter] [Enter] [0] [Disabled] [Disabled] [All] [Enabled] Item Specific Help Press key to set and forget your operating needs and to...
... computer by turning off and on the screen. If you set Supervisor Password to reset it. Phoenix SecureCore(tm) Setup Utility Info System Advanced Security Boot Exit Supervisor Password Is: User Password Is: Clear Clear Set Supervisor Password Set User Password Minimum User Password Length: Password on reboot. ■ If you to set up : Boot from Removable Media: Flash Write: Hard Disk Security Owner Information TPM (Security Chip) Setting [Enter] [Enter] [0] [Disabled] [Disabled] [All] [Enabled] Item Specific Help Press key to set and forget your operating needs and to...

S7220 BIOS Guide
Page 22
... the Enter New Password field and in the Re-enter New Password field. To cancel a password press [Enter] key instead of entering characters in the Enter New Password field and in the Re-enter New Password field. When set it is not required when the system wakes up to access the BIOS setup utility. Boot from a disk. Flash Write: ■ Disabled ■ Enabled [Enabled] When disabled, the BIOS Flash memory will be read from setup utility or move to access the BIOS setup utility. Sets Owner information. Password is : -- User Password is : Clear A display...
... the Enter New Password field and in the Re-enter New Password field. To cancel a password press [Enter] key instead of entering characters in the Enter New Password field and in the Re-enter New Password field. When set it is not required when the system wakes up to access the BIOS setup utility. Boot from a disk. Flash Write: ■ Disabled ■ Enabled [Enabled] When disabled, the BIOS Flash memory will be read from setup utility or move to access the BIOS setup utility. Sets Owner information. Password is : -- User Password is : Clear A display...
S7220 BIOS Guide
Page 28
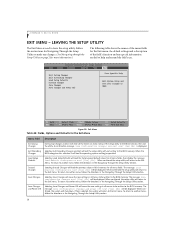
... BIOS memory for all menu fields. Discard Changes Selecting Discard Changes will load the factory preset default values for all menu fields, then display the message Load default configuration now? [Yes] [No]. Save Changes and Power Off Selecting Save Changes and Power Off will cause the new settings in the Navigating Through the Setup Utility section. F1 Help ESC Exit Select Item -/Space Change Values F9 Setup Defaults ▲ Select Menu Enter Select Sub-Menu...
... BIOS memory for all menu fields. Discard Changes Selecting Discard Changes will load the factory preset default values for all menu fields, then display the message Load default configuration now? [Yes] [No]. Save Changes and Power Off Selecting Save Changes and Power Off will cause the new settings in the Navigating Through the Setup Utility section. F1 Help ESC Exit Select Item -/Space Change Values F9 Setup Defaults ▲ Select Menu Enter Select Sub-Menu...

S7220 User's Guide
Page 10
Chapter 4 Chapter 5 Chapter 6 Troubleshooting Your LifeBook Troubleshooting 86 Identifying the Problem 86 Specific Problems 87 Power On Self Test Messages 99 Modem Result Codes 103 Restoring Your Pre-installed Software 104 Re-installing Individual Drivers and Applications 104 Restoring the Operating System for Windows Vista Systems 105 Restoring the Operating System for Windows XP Systems 108 Automatically Downloading Driver Updates 109 Care and Maintenance Caring for your LifeBook Notebook 111 Cleaning your LifeBook notebook 113 Cleaning the dust filter...
Chapter 4 Chapter 5 Chapter 6 Troubleshooting Your LifeBook Troubleshooting 86 Identifying the Problem 86 Specific Problems 87 Power On Self Test Messages 99 Modem Result Codes 103 Restoring Your Pre-installed Software 104 Re-installing Individual Drivers and Applications 104 Restoring the Operating System for Windows Vista Systems 105 Restoring the Operating System for Windows XP Systems 108 Automatically Downloading Driver Updates 109 Care and Maintenance Caring for your LifeBook Notebook 111 Cleaning your LifeBook notebook 113 Cleaning the dust filter...

S7220 User's Guide
Page 19
... SYSTEM IS USED. Display Panel Latch Button The display panel latch button is used to turn on and off the optional WLAN and Bluetooth devices. Microphone Jack The microphone jack allows you to transfer data from a variety of different digital devices. Wireless LAN/Bluetooth On/Off Switch The wireless LAN/Bluetooth on page 75. Switching the device off switch is used to cool the system to extend battery life. See "Activating the WLAN Device" on page 47. DO NOT OPERATE THE NOTEBOOK IN...
... SYSTEM IS USED. Display Panel Latch Button The display panel latch button is used to turn on and off the optional WLAN and Bluetooth devices. Microphone Jack The microphone jack allows you to transfer data from a variety of different digital devices. Wireless LAN/Bluetooth On/Off Switch The wireless LAN/Bluetooth on page 75. Switching the device off switch is used to cool the system to extend battery life. See "Activating the WLAN Device" on page 47. DO NOT OPERATE THE NOTEBOOK IN...

S7220 User's Guide
Page 33
... onscreen Start menu button, or the right button on your Windows operating system and function the same as Windows Explorer, it moves the "focus" (selects the next item up , down , left and right in applications. Once this feature is done the same way. Turning off . 28 Function Keys Your LifeBook notebook has 12 function keys, F1 through F12. Windows Keys Your LifeBook notebook has two Windows keys, consisting of the key to indicate...
... onscreen Start menu button, or the right button on your Windows operating system and function the same as Windows Explorer, it moves the "focus" (selects the next item up , down , left and right in applications. Once this feature is done the same way. Turning off . 28 Function Keys Your LifeBook notebook has 12 function keys, F1 through F12. Windows Keys Your LifeBook notebook has two Windows keys, consisting of the key to indicate...

S7220 User's Guide
Page 47
... Installing Security Panel Application window will appear. If you will then be set the supervisor password. Fujitsu Computer Systems Corporation charges a service fee for Supervisor in the Control Panel. 2 Select the Security Panel for unlocking a password restricted LifeBook notebook. The Installing Security Panel Application window will appear. The setup files for the user password cannot run FJSECS.exe first to set via Windows software using the FJSECS.exe and FJSECU.exe files, respectively. Follow the instructions...
... Installing Security Panel Application window will appear. If you will then be set the supervisor password. Fujitsu Computer Systems Corporation charges a service fee for Supervisor in the Control Panel. 2 Select the Security Panel for unlocking a password restricted LifeBook notebook. The Installing Security Panel Application window will appear. The setup files for the user password cannot run FJSECS.exe first to set via Windows software using the FJSECS.exe and FJSECU.exe files, respectively. Follow the instructions...

S7220 User's Guide
Page 59
... PROCESS, EVEN IF YOU SHUT YOUR NOTEBOOK DOWN AND START IT UP AGAIN. 2 You will be prompted to enter your Windows Vista system, the screen will then boot up for free Norton Internet Security is extended. During this period, do not disconnect the power supply, press any buttons, or use any peripheral devices such as mouse, keyboard, or remote control. This is normal. If the Register...
... PROCESS, EVEN IF YOU SHUT YOUR NOTEBOOK DOWN AND START IT UP AGAIN. 2 You will be prompted to enter your Windows Vista system, the screen will then boot up for free Norton Internet Security is extended. During this period, do not disconnect the power supply, press any buttons, or use any peripheral devices such as mouse, keyboard, or remote control. This is normal. If the Register...

S7220 User's Guide
Page 64
... LEFT OPEN AND MEMORY IS KEPT ACTIVE DURING SLEEP MODE OR THE MEMORY IS TRANSFERRED TO THE INTERNAL HARD DRIVE DURING HIBERNATION MODE. • THE MAIN ADVANTAGE OF USING HIBERNATION (SAVE-TO-DISK) IS THAT POWER IS NOT REQUIRED TO MAINTAIN YOUR DATA. THE BUTTON RESUME FUNCTION CANNOT BE DISABLED. • THE SLEEP OR HIBERNATION (SAVE-TO-DISK) MODE SHOULD NOT BE USED WITH CERTAIN PC CARDS. When you are working, open application...
... LEFT OPEN AND MEMORY IS KEPT ACTIVE DURING SLEEP MODE OR THE MEMORY IS TRANSFERRED TO THE INTERNAL HARD DRIVE DURING HIBERNATION MODE. • THE MAIN ADVANTAGE OF USING HIBERNATION (SAVE-TO-DISK) IS THAT POWER IS NOT REQUIRED TO MAINTAIN YOUR DATA. THE BUTTON RESUME FUNCTION CANNOT BE DISABLED. • THE SLEEP OR HIBERNATION (SAVE-TO-DISK) MODE SHOULD NOT BE USED WITH CERTAIN PC CARDS. When you are working, open application...
S7220 User's Guide
Page 91
... some of failure. 5 Turn on your notebook and to an active AC power source. 3 Make sure that any devices connected to the Troubleshooting Table, that any card installed in the PC Card slot is seated properly. Chapter 4 Troubleshooting Your LifeBook Troubleshooting There may be solved by replacing the device. You can be occasions when you encounter simple setup or operating problems that you encounter a problem, go through the boot sequence. 7 If the...
... some of failure. 5 Turn on your notebook and to an active AC power source. 3 Make sure that any devices connected to the Troubleshooting Table, that any card installed in the PC Card slot is seated properly. Chapter 4 Troubleshooting Your LifeBook Troubleshooting There may be solved by replacing the device. You can be occasions when you encounter simple setup or operating problems that you encounter a problem, go through the boot sequence. 7 If the...

S7220 User's Guide
Page 93
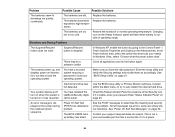
The software volume control is not configured correctly. Possible Solutions Adjust the volume control on your notebook and operating system. Troubleshooting Table Problem Page Audio Problems page 88 DVD/CD-ROM Drive Problems. . . . . . page 89 Port Replicator Problems page 90 Floppy Disk Drive Problems page 90 Hard Drive Problems page 90 Keyboard or Mouse Problems page 91 Memory Problems page 91 Problem Page Modem Problems page 91 Parallel, Serial, USB Device Problems . . Software driver is set too low. Pressing [F9] repeatedly while holding [Fn] will increase the volume....
The software volume control is not configured correctly. Possible Solutions Adjust the volume control on your notebook and operating system. Troubleshooting Table Problem Page Audio Problems page 88 DVD/CD-ROM Drive Problems. . . . . . page 89 Port Replicator Problems page 90 Floppy Disk Drive Problems page 90 Hard Drive Problems page 90 Keyboard or Mouse Problems page 91 Memory Problems page 91 Problem Page Modem Problems page 91 Parallel, Serial, USB Device Problems . . Software driver is set too low. Pressing [F9] repeatedly while holding [Fn] will increase the volume....

S7220 User's Guide
Page 99
... battery and an optional second battery and/or use of a modem, WLAN, or Bluetooth device. The brightness is plugged in and the outlet has power. Install a power adapter and then push the Power/Suspend/Resume button. Install a charged battery. The higher the brightness the more power your operating needs. Your installed batteries are installed. Turn down the brightness adjustment. Verify the condition of the batteries using the Status Indicator panel, and replace or remove any batteries that uses a lot of power due to frequent drive access, use a power adapter...
... battery and an optional second battery and/or use of a modem, WLAN, or Bluetooth device. The brightness is plugged in and the outlet has power. Install a power adapter and then push the Power/Suspend/Resume button. Install a charged battery. The higher the brightness the more power your operating needs. Your installed batteries are installed. Turn down the brightness adjustment. Verify the condition of the batteries using the Status Indicator panel, and replace or remove any batteries that uses a lot of power due to frequent drive access, use a power adapter...
S7220 User's Guide
Page 100
... password See "Status Indicator Panel" on the screen during the notebook (boot) sequence. Shutdown and Startup Problems The Suspend/Resume button does not work. You have installed the LifeBook/Security Application panel. Internal hard drive was Use the BIOS setup utility or Primary Master submenu, located not detected. Your system display won't turn on when the system is turned on the Status Indicator panel will flash when battery is outside of the problem. some are too hot or too cold. Charging...
... password See "Status Indicator Panel" on the screen during the notebook (boot) sequence. Shutdown and Startup Problems The Suspend/Resume button does not work. You have installed the LifeBook/Security Application panel. Internal hard drive was Use the BIOS setup utility or Primary Master submenu, located not detected. Your system display won't turn on when the system is turned on the Status Indicator panel will flash when battery is outside of the problem. some are too hot or too cold. Charging...

S7220 User's Guide
Page 101
... . Move the display and the brightness control until you have been using it for very short intervals and you will step to restore operation. Make sure you exited the setup utility. The choices, in order are not adequate for an external monitor only. Press any button on and go to the Power Savings menu of the setup utility to adjust the timeout values to change your LifeBook notebook. The notebook is blank...
... . Move the display and the brightness control until you have been using it for very short intervals and you will step to restore operation. Make sure you exited the setup utility. The choices, in order are not adequate for an external monitor only. Press any button on and go to the Power Savings menu of the setup utility to adjust the timeout values to change your LifeBook notebook. The notebook is blank...

S7220 User's Guide
Page 102
... external monitor is blinking, enter your password. Check your device. Remove all foreign objects from the keyboard. If the spots are very tiny and few in number, this is normal for very short intervals and you have connected an external monitor and it does not display any button on the keyboard, or move the mouse to increase brightness or double-click on the battery gauge and adjust Power Control under battery settings. See "External Video Port...
... external monitor is blinking, enter your password. Check your device. Remove all foreign objects from the keyboard. If the spots are very tiny and few in number, this is normal for very short intervals and you have connected an external monitor and it does not display any button on the keyboard, or move the mouse to increase brightness or double-click on the battery gauge and adjust Power Control under battery settings. See "External Video Port...
S7220 User's Guide
Page 188
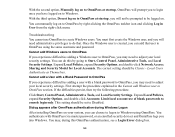
..., during Windows Logon After installing OmniPass on . Troubleshooting You cannot use of blank passwords to create Windows users. Expand Local Policies, expand Security Options, and double-click Network Access: Sharing and Security Model for Local Accounts. The correct setting should be Classic - This setting should be set to OmniPass section. With the third option, Do not log on to OmniPass at startup, OmniPass will need to OmniPass using OmniPass...
..., during Windows Logon After installing OmniPass on . Troubleshooting You cannot use of blank passwords to create Windows users. Expand Local Policies, expand Security Options, and double-click Network Access: Sharing and Security Model for Local Accounts. The correct setting should be Classic - This setting should be set to OmniPass section. With the third option, Do not log on to OmniPass at startup, OmniPass will need to OmniPass using OmniPass...
S7220 Getting Started Guide
Page 1
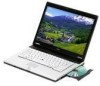
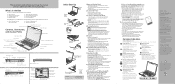
... battery Built-in Microphone Controls, Connectors, and Access Points Status Indicator Panel Stereo Speaker Optional Quick Point Cursor Control Touchpad Pointing Device Air Vents Memory Stick/SD Card Slot Wireless LAN/Bluetooth On/Off Switch Headphone Jack Microphone Jack Display Panel Latch Button RIGHT PANEL Modem (RJ-11) Jack Smart Card Slot Flexible Bay Emergency Tray Release Optional Built-in Web Camera Display Panel Latch Built-in Microphone Display Panel LifeBook Security/Application Panel Power/Suspend/Resume Button Stereo Speaker Keyboard BACK PANEL USB 2.0 Port Anti-Theft Lock...
... battery Built-in Microphone Controls, Connectors, and Access Points Status Indicator Panel Stereo Speaker Optional Quick Point Cursor Control Touchpad Pointing Device Air Vents Memory Stick/SD Card Slot Wireless LAN/Bluetooth On/Off Switch Headphone Jack Microphone Jack Display Panel Latch Button RIGHT PANEL Modem (RJ-11) Jack Smart Card Slot Flexible Bay Emergency Tray Release Optional Built-in Web Camera Display Panel Latch Built-in Microphone Display Panel LifeBook Security/Application Panel Power/Suspend/Resume Button Stereo Speaker Keyboard BACK PANEL USB 2.0 Port Anti-Theft Lock...


