B6210 BIOS Guide
Page 18
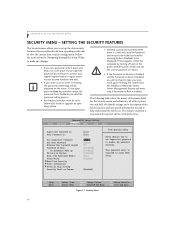
... modes. To try again, press the Enter key and then retype the password. If this happens, restart the computer by turning off and on the power with the power switch and use . SETTING THE SECURITY FEATURES The Security menu allows you set Supervisor password to enable any special information needed to fit your password upon resuming the system from Removable Media: Flash Write: Hard Disk Security Owner Information Security Chip Setting Security Panel on the screen. PhoenixBIOS Setup Utility Main Advanced Security Boot...
... modes. To try again, press the Enter key and then retype the password. If this happens, restart the computer by turning off and on the power with the power switch and use . SETTING THE SECURITY FEATURES The Security menu allows you set Supervisor password to enable any special information needed to fit your password upon resuming the system from Removable Media: Flash Write: Hard Disk Security Owner Information Security Chip Setting Security Panel on the screen. PhoenixBIOS Setup Utility Main Advanced Security Boot...

B6210 User's Guide
Page 6
... Internal LAN (RJ-45) jack 50 Docking Port 50 Universal Serial Bus 2.0 Ports 50 Microphone/Line-In Jack 50 Headphone/Line-Out Jack 50 External Video Port 51 5 TROUBLESHOOTING YOUR LIFEBOOK NOTEBOOK Troubleshooting Identifying the Problem 55 Specific Problems 55 Troubleshooting Table 56 Power On Self Test Messages 62 Modem Result Codes 63 Restoring Pre-installed Software Restoring the Factory Image 64 Automatically Downloading Driver Updates. . . . 65 6 CARING FOR YOUR LIFEBOOK NOTEBOOK Care and Maintenance LifeBook Notebook 69 Keyboard 70 Batteries 70 Floppy Disks and Drives...
... Internal LAN (RJ-45) jack 50 Docking Port 50 Universal Serial Bus 2.0 Ports 50 Microphone/Line-In Jack 50 Headphone/Line-Out Jack 50 External Video Port 51 5 TROUBLESHOOTING YOUR LIFEBOOK NOTEBOOK Troubleshooting Identifying the Problem 55 Specific Problems 55 Troubleshooting Table 56 Power On Self Test Messages 62 Modem Result Codes 63 Restoring Pre-installed Software Restoring the Factory Image 64 Automatically Downloading Driver Updates. . . . 65 6 CARING FOR YOUR LIFEBOOK NOTEBOOK Care and Maintenance LifeBook Notebook 69 Keyboard 70 Batteries 70 Floppy Disks and Drives...

B6210 User's Guide
Page 29
... notebooks in a working group, office, or company to Know Your LifeBook (1) Application A Button (2) Application B Button (3) Internet Button (4) E-Mail Button Enter Button Figure 2-22. A valid stroke consists of having no passwords are valid passwords. The Security/Application Panel also allows you to enter a password code using more than one button. ■ {[2]+[3]}, [1], [enter] ■ [4], [enter] ■ {[1]+[3]}, {[2]+[3]+[4]}, [1], [4], [2], [enter] Setting Passwords When shipped from Standby mode the security system requires you to launch applications with Windows...
... notebooks in a working group, office, or company to Know Your LifeBook (1) Application A Button (2) Application B Button (3) Internet Button (4) E-Mail Button Enter Button Figure 2-22. A valid stroke consists of having no passwords are valid passwords. The Security/Application Panel also allows you to enter a password code using more than one button. ■ {[2]+[3]}, [1], [enter] ■ [4], [enter] ■ {[1]+[3]}, {[2]+[3]+[4]}, [1], [4], [2], [enter] Setting Passwords When shipped from Standby mode the security system requires you to launch applications with Windows...

B6210 User's Guide
Page 31
...) User Password" box, as appropriate. Setting User Password 1 Go to the password. Opening the cover does not automatically place the notebook into Standby mode. Your notebook does not unlock, the Security Indicator turns off . To clear passwords, follow same procedure in : C:\Program Files\Fujitsu\ Security Panel Application\ Supervisor\FJSECS.EXE, then press [Enter] 4. OPERATING YOUR LIFEBOOK SECURITY/ APPLICATION PANEL The security lock feature is entered within a minute (while system beeps), the beeping will stop and the notebook will disable all security...
...) User Password" box, as appropriate. Setting User Password 1 Go to the password. Opening the cover does not automatically place the notebook into Standby mode. Your notebook does not unlock, the Security Indicator turns off . To clear passwords, follow same procedure in : C:\Program Files\Fujitsu\ Security Panel Application\ Supervisor\FJSECS.EXE, then press [Enter] 4. OPERATING YOUR LIFEBOOK SECURITY/ APPLICATION PANEL The security lock feature is entered within a minute (while system beeps), the beeping will stop and the notebook will disable all security...

B6210 User's Guide
Page 32
... Panel Setup utility that LifeBook Application Panel is pre-installed with the Application buttons, click on the tab for the user password cannot run FJSECS.exe first to launch specific programs, as the buttons on . When the Confirm File Deletion box appears, click Yes. Follow instructions under LifeBook Application Panel. You will appear in the Control Panel. 3. Your notebook is active. An icon resembling a finger pressing a button will then be set up the Panel...
... Panel Setup utility that LifeBook Application Panel is pre-installed with the Application buttons, click on the tab for the user password cannot run FJSECS.exe first to launch specific programs, as the buttons on . When the Confirm File Deletion box appears, click Yes. Follow instructions under LifeBook Application Panel. You will appear in the Control Panel. 3. Your notebook is active. An icon resembling a finger pressing a button will then be set up the Panel...
B6210 User's Guide
Page 39
... be displayed the next time you turn on your notebook. 2. IF SO, ADD WARNING BIOS SETUP UTILITY The BIOS Setup Utility is a program that the AC or Auto/Airline adapter is connected and has power. The BIOS Setup Utility configures: ■ Device control feature parameters, such as changing I/O addresses and boot devices. ■ System Data Security feature parameters, such as you turn on your notebook is performing a standard boot sequence including a Power On Self Test (POST). Turn on or restart your LifeBook notebook...
... be displayed the next time you turn on your notebook. 2. IF SO, ADD WARNING BIOS SETUP UTILITY The BIOS Setup Utility is a program that the AC or Auto/Airline adapter is connected and has power. The BIOS Setup Utility configures: ■ Device control feature parameters, such as changing I/O addresses and boot devices. ■ System Data Security feature parameters, such as you turn on your notebook is performing a standard boot sequence including a Power On Self Test (POST). Turn on or restart your LifeBook notebook...

B6210 User's Guide
Page 40
... if you may click the Skip button. B Series.book Page 32 Friday, May 19, 2006 3:00 PM LifeBook B6200 Series - Several additional windows will display a Fujitsu logo on the User's Guides tab, select your notebook's BIOS number, refer to complete registration. Press the [RIGHT ARROW] or [LEFT ARROW] key to utilities that ClickMe! Acceptance of your system model and click [Go]. You can do I register my LifeBook Tablet PC?
... if you may click the Skip button. B Series.book Page 32 Friday, May 19, 2006 3:00 PM LifeBook B6200 Series - Several additional windows will display a Fujitsu logo on the User's Guides tab, select your notebook's BIOS number, refer to complete registration. Press the [RIGHT ARROW] or [LEFT ARROW] key to utilities that ClickMe! Acceptance of your system model and click [Go]. You can do I register my LifeBook Tablet PC?

B6210 User's Guide
Page 52
... Flash Card Slot Compact Flash Cards Your Fujitsu LifeBook notebook supports Compact Flash (CF) cards, which can perform a variety of your card. Compact Flash Slot Plug Compact Flash Card Eject Button Figure 4-8. Removing Compact Flash Slot plug 3. Insert your notebook. 1. You will hear a click and the Eject button will be a protective plug inserted in the slot. Whenever you receive your LifeBook, there will pop away from the slot. 4. Some available Compact Flash Cards: ■ Memory cards ■ Fax/data modem cards...
... Flash Card Slot Compact Flash Cards Your Fujitsu LifeBook notebook supports Compact Flash (CF) cards, which can perform a variety of your card. Compact Flash Slot Plug Compact Flash Card Eject Button Figure 4-8. Removing Compact Flash Slot plug 3. Insert your notebook. 1. You will hear a click and the Eject button will be a protective plug inserted in the slot. Whenever you receive your LifeBook, there will pop away from the slot. 4. Some available Compact Flash Cards: ■ Memory cards ■ Fax/data modem cards...
B6210 User's Guide
Page 63
... section helps you can also disconnect such devices, thus eliminating them as a possible cause of the troubleshooting table for that you with peripheral devices, that symptom under Possible Solutions. B Series.book Page 55 Friday, May 19, 2006 3:00 PM Troubleshooting Troubleshooting Your LifeBook notebook is sturdy and subject to few problems in solving, go through the boot sequence. 7. book and to an active AC power source...
... section helps you can also disconnect such devices, thus eliminating them as a possible cause of the troubleshooting table for that you with peripheral devices, that symptom under Possible Solutions. B Series.book Page 55 Friday, May 19, 2006 3:00 PM Troubleshooting Troubleshooting Your LifeBook notebook is sturdy and subject to few problems in solving, go through the boot sequence. 7. book and to an active AC power source...

B6210 User's Guide
Page 64
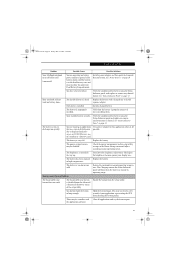
... cannot access your notebook. The setup utility is enabled in your password and security settings. The wrong drive designator was used to write enable. Floppy disk is not configured correctly. to toggle the with function keys. Section Five TROUBLESHOOTING TABLE Problem Page Audio Problems page 56 Docking Problems page 56 Floppy Disk Drive Problems page 56 Hard Drive Problems page 56 Keyboard or Mouse Problems page 57 Memory Problems page 57 Problem Page Modem Problems page 57 USB Device Problems page 57 PC Card Problems page 58 Power...
... cannot access your notebook. The setup utility is enabled in your password and security settings. The wrong drive designator was used to write enable. Floppy disk is not configured correctly. to toggle the with function keys. Section Five TROUBLESHOOTING TABLE Problem Page Audio Problems page 56 Docking Problems page 56 Floppy Disk Drive Problems page 56 Hard Drive Problems page 56 Keyboard or Mouse Problems page 57 Memory Problems page 57 Problem Page Modem Problems page 57 USB Device Problems page 57 PC Card Problems page 58 Power...

B6210 User's Guide
Page 65
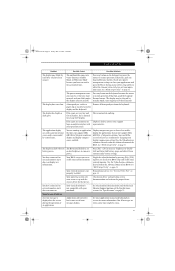
... fails, turn off power, wait at least 10 seconds, then re-apply power. See "Device Ports" on page 46. Check your password and security settings. See "Memory Upgrade Module" on page 50. Select the Hardware tab and click the [Device Manager] button. The device is not properly installed. See "Device Ports" on page 62. You have a memory failure. Remove and re-install your software documentation and activate the correct driver. 57 See your notebook. See...
... fails, turn off power, wait at least 10 seconds, then re-apply power. See "Device Ports" on page 46. Check your password and security settings. See "Memory Upgrade Module" on page 50. Select the Hardware tab and click the [Device Manager] button. The device is not properly installed. See "Device Ports" on page 62. You have a memory failure. Remove and re-install your software documentation and activate the correct driver. 57 See your notebook. See...
B6210 User's Guide
Page 67
... hard drive access or CD-ROM access, use of the battery using the Status Indicator panel, and replace or remove any battery that is shorted. Hold the button longer. B Series.book Page 59 Friday, May 19, 2006 3:00 PM Troubleshooting Problem Possible Cause Possible Solutions Your LifeBook notebook turns off all by re-installing them. No battery is faulty. Check the power management and/or setup utility settings in long enough. The battery has been exposed Replace the battery...
... hard drive access or CD-ROM access, use of the battery using the Status Indicator panel, and replace or remove any battery that is shorted. Hold the button longer. B Series.book Page 59 Friday, May 19, 2006 3:00 PM Troubleshooting Problem Possible Cause Possible Solutions Your LifeBook notebook turns off all by re-installing them. No battery is faulty. Check the power management and/or setup utility settings in long enough. The battery has been exposed Replace the battery...
B6210 User's Guide
Page 69
... smaller display for a large LCD display. See "BIOS Setup Utility" on page 31. The display is not set up with your notebook. You have connected an external monitor and it for that do nothing. Your BIOS setup is dark when on page 75. See "BIOS Setup Utility" on properly installed. Your external monitor is not compatible with the correct driver for a period of an application. See "External Video Port" on page 31. Check your device. Your external monitor...
... smaller display for a large LCD display. See "BIOS Setup Utility" on page 31. The display is not set up with your notebook. You have connected an external monitor and it for that do nothing. Your BIOS setup is dark when on page 75. See "BIOS Setup Utility" on properly installed. Your external monitor is not compatible with the correct driver for a period of an application. See "External Video Port" on page 31. Check your device. Your external monitor...
B6210 User's Guide
Page 70
... This is set all settings to use an external keyboard until you have to be able to the default conditions. B Series.book Page 62 Friday, May 19, 2006 3:00 PM LifeBook B6200 Series - If you may be re-installed from your setup utility does not agree with an *. run SETUP Type of system cache in your support representative. *Keyboard error nn BIOS discovered a stuck key and displays the scan code for assistance...
... This is set all settings to use an external keyboard until you have to be able to the default conditions. B Series.book Page 62 Friday, May 19, 2006 3:00 PM LifeBook B6200 Series - If you may be re-installed from your setup utility does not agree with an *. run SETUP Type of system cache in your support representative. *Keyboard error nn BIOS discovered a stuck key and displays the scan code for assistance...
B6210 User's Guide
Page 72
... hard disk, including all of reading DVDs attached to your system. BOOT Priority Change Before restoring an image, you must select grey and green components separately. 5. Using the arrow keys, go to install, click [Install Selected Subsystems]; If "Optical Media Drive" or "CD-ROM Drive" is already installed. 4. Note that the component needs to install applications and/or drivers from being reused. A window will enter the BIOS Setup Utility. 2. Do not use the Hard Disk Data Delete utility...
... hard disk, including all of reading DVDs attached to your system. BOOT Priority Change Before restoring an image, you must select grey and green components separately. 5. Using the arrow keys, go to install, click [Install Selected Subsystems]; If "Optical Media Drive" or "CD-ROM Drive" is already installed. 4. Note that the component needs to install applications and/or drivers from being reused. A window will enter the BIOS Setup Utility. 2. Do not use the Hard Disk Data Delete utility...

B6210 User's Guide
Page 73
... called the Fujitsu Driver Update (FDU) utility. Turn on Fujitsu Driver Update; The menu contains the following items: ■ Check for updates now Allows for updates and downloads them. When the update is disabled, press the space bar to enable it. • Scroll down to the USB Features submenu and press the Enter key to open it can be used , you have a device that have changed the boot priority, you can restore a backup image...
... called the Fujitsu Driver Update (FDU) utility. Turn on Fujitsu Driver Update; The menu contains the following items: ■ Check for updates now Allows for updates and downloads them. When the update is disabled, press the space bar to enable it. • Scroll down to the USB Features submenu and press the Enter key to open it can be used , you have a device that have changed the boot priority, you can restore a backup image...

B6210 User's Guide
Page 83
... to 224 MB of shared memory using Unified Memory Architecture (UMA). Simultaneous Video: 1024 x 768, 16M colors (XGA, SVGA and VGA compatible) Video RAM Up to Table 2-2 on your Fujitsu LifeBook B6200 Series notebook. Hard Disk Drive 40 GB, 60 GB, or 80 GB fixed hard drive, Ultra ATA/100 type, 2.5": 9.5mm, 4200 rpm, shock-mounted INTEGRATED POINTING DEVICE Touchpad pointing device LIFEBOOK SECURITY/APPLICATION PANEL Depending upon the operating system installed on page 22. 75...
... to 224 MB of shared memory using Unified Memory Architecture (UMA). Simultaneous Video: 1024 x 768, 16M colors (XGA, SVGA and VGA compatible) Video RAM Up to Table 2-2 on your Fujitsu LifeBook B6200 Series notebook. Hard Disk Drive 40 GB, 60 GB, or 80 GB fixed hard drive, Ultra ATA/100 type, 2.5": 9.5mm, 4200 rpm, shock-mounted INTEGRATED POINTING DEVICE Touchpad pointing device LIFEBOOK SECURITY/APPLICATION PANEL Depending upon the operating system installed on page 22. 75...

B6210 User's Guide
Page 102
... establish wireless network connectivity using this option opens the 802.1x EAP type drop-down menu. Enables WPA-Pre-Shared Key. The Advanced tab allows for the correct settings. Configure network settings ■ TCP/IP settings ■ Workgroup or Domain settings. This is contained in the table below . Click the Advanced tab. 11. FLOW OF OPERATIONS 1. If these settings are entered. B Series.book Page 94 Friday, May 19, 2006 3:00 PM LifeBook B6200 Series - Support...
... establish wireless network connectivity using this option opens the 802.1x EAP type drop-down menu. Enables WPA-Pre-Shared Key. The Advanced tab allows for the correct settings. Configure network settings ■ TCP/IP settings ■ Workgroup or Domain settings. This is contained in the table below . Click the Advanced tab. 11. FLOW OF OPERATIONS 1. If these settings are entered. B Series.book Page 94 Friday, May 19, 2006 3:00 PM LifeBook B6200 Series - Support...
B6210 User's Guide
Page 121
...-click Network Access: Sharing and Security Model for a user to update OmniPass with your Windows Logon. You authenticate with OmniPass (via master password, or an enrolled security device) and OmniPass logs you will need to be logged on to do that user to OmniPass using the same username and password Cannot add Windows users to OmniPass If you experience difficulties adding a Windows user to OmniPass, you may need to Start, Settings, Control Panel...
...-click Network Access: Sharing and Security Model for a user to update OmniPass with your Windows Logon. You authenticate with OmniPass (via master password, or an enrolled security device) and OmniPass logs you will need to be logged on to do that user to OmniPass using the same username and password Cannot add Windows users to OmniPass If you experience difficulties adding a Windows user to OmniPass, you may need to Start, Settings, Control Panel...
B6210 User's Guide
Page 123
... 39 replacing 40 shorted 40 suspend mode 39 Battery Pack Latches 11 BIOS guide 32 setup utility 31 Bluetooth 103 Where to Find Information 103 Boot Sequence 31 Built-in Microphone 8 C CapsLock Indicator 14 CD-ROM care 71 Click Me 32 Clicking 17 Compact Flash Card 44 Compact Flash Card Eject Button 10 Compact Flash Card Slot 10 Configuration Label 11 Conventions used 3 Cursor 17 Cursor Keys 15 D DC Power Jack 9, 29 Device Ports...
... 39 replacing 40 shorted 40 suspend mode 39 Battery Pack Latches 11 BIOS guide 32 setup utility 31 Bluetooth 103 Where to Find Information 103 Boot Sequence 31 Built-in Microphone 8 C CapsLock Indicator 14 CD-ROM care 71 Click Me 32 Clicking 17 Compact Flash Card 44 Compact Flash Card Eject Button 10 Compact Flash Card Slot 10 Configuration Label 11 Conventions used 3 Cursor 17 Cursor Keys 15 D DC Power Jack 9, 29 Device Ports...

