
English Manual.
Page 6
... Install the CPU and CPU Cooler 8 Install the Memory 11 Install an Expansion Card 13 Install other Internal Connectors 14 OnBoard Button 18 OnBoard LED 18 OnBoard Debug LED 18 Chapter 3 BIOS Setup Enter BIOS Setup 20 Main Menu 20 System Information 22 Advanced BIOS Features 24 Advanced Chipset Features 29 Boot Configuration...
... Install the CPU and CPU Cooler 8 Install the Memory 11 Install an Expansion Card 13 Install other Internal Connectors 14 OnBoard Button 18 OnBoard LED 18 OnBoard Debug LED 18 Chapter 3 BIOS Setup Enter BIOS Setup 20 Main Menu 20 System Information 22 Advanced BIOS Features 24 Advanced Chipset Features 29 Boot Configuration...

English Manual.
Page 14
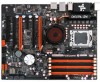
... the CPU and CPU Cooler ■ Install the Memory ■ Install an Expansion Card ■ Install other Internal Connectors ■ OnBoard Button ■ OnBoard LED ■ OnBoard Debug LED Please visit this chapter carefully. Caution should be exercised during the installation of jumpers. Please refer to the motherboard layout prior to any installation...
... the CPU and CPU Cooler ■ Install the Memory ■ Install an Expansion Card ■ Install other Internal Connectors ■ OnBoard Button ■ OnBoard LED ■ OnBoard Debug LED Please visit this chapter carefully. Caution should be exercised during the installation of jumpers. Please refer to the motherboard layout prior to any installation...

English Manual.
Page 25
...hold it . Do not remove or plug in it there for a couple of seconds to clear the CMOS completely, then release. 2-6 OnBoard LED DRAM Power LED: The LED lights up indicating the system is on or the system is staying at S1 or S3 sleeping state. +5V Standby... when the onboard LED is switched on. Channel C DRAM Support LED: The LED will light whenever the power supply that connected to the motherboard is lighting on the system. 2 CAUTION 2-5 OnBoard Button Power on Button: PWR_ON Push the power on button to power on . 2-7 OnBoard Debug LED 2-digital LED readout displays hardware ...
...hold it . Do not remove or plug in it there for a couple of seconds to clear the CMOS completely, then release. 2-6 OnBoard LED DRAM Power LED: The LED lights up indicating the system is on or the system is staying at S1 or S3 sleeping state. +5V Standby... when the onboard LED is switched on. Channel C DRAM Support LED: The LED will light whenever the power supply that connected to the motherboard is lighting on the system. 2 CAUTION 2-5 OnBoard Button Power on Button: PWR_ON Push the power on button to power on . 2-7 OnBoard Debug LED 2-digital LED readout displays hardware ...


