
User manual
Page 1
Rattler Series Motherboard User's Manual
Rattler Series Motherboard User's Manual
User manual
Page 2
...this product. Warning: indicating a potential risk of hardware damage or physical injury may not be changed or modified at any time, Foxconn does not obligate itself to avoid problems. WARNING! All images are the property of their respective owners. Trademark: All trademarks are... for reference only, please refer to the physical motherboard for Rattler Series motherboard. Version: User's Manual V1.0 for specific features. WEEE: The use motherboard better, and tells you purchased this product may exist. All trade...
...this product. Warning: indicating a potential risk of hardware damage or physical injury may not be changed or modified at any time, Foxconn does not obligate itself to avoid problems. WARNING! All images are the property of their respective owners. Trademark: All trademarks are... for reference only, please refer to the physical motherboard for Rattler Series motherboard. Version: User's Manual V1.0 for specific features. WEEE: The use motherboard better, and tells you purchased this product may exist. All trade...
User manual
Page 20
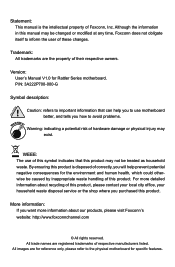
Carefully read the manual that supports your computer. Secure the card's metal bracket to prevent hardware damage. Installing and Removing a PCI Express x16 Graphics Card : • Installing a Graphics Card: ...
Carefully read the manual that supports your computer. Secure the card's metal bracket to prevent hardware damage. Installing and Removing a PCI Express x16 Graphics Card : • Installing a Graphics Card: ...

User manual
Page 25
... the various functions of this motherboard by changing the jumper settings. Users should read the following table explains different types of Jumpers 1. However, in this manual, pin 1 is turned on. 18 18 The following content carefully prior to short them . Put a metal object(such as BIOS data, date, time information, hardware...
... the various functions of this motherboard by changing the jumper settings. Users should read the following table explains different types of Jumpers 1. However, in this manual, pin 1 is turned on. 18 18 The following content carefully prior to short them . Put a metal object(such as BIOS data, date, time information, hardware...
User manual
Page 28
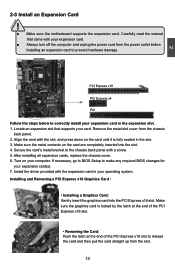
...9632; Boot ■ Security ■ Save & Exit ■ Quantum BIOS Since BIOS could be updated some other times, the BIOS information described in this manual will remain consistent with the newly released BIOS at any given time in the future. An error message appears on the screen during the system... Power On Self Test (POST) process. 2. Please visit our website for updated manual if it is for reference only. You want to change system settings through the BIOS Setup menus. This chapter tells how to change the ...
...9632; Boot ■ Security ■ Save & Exit ■ Quantum BIOS Since BIOS could be updated some other times, the BIOS information described in this manual will remain consistent with the newly released BIOS at any given time in the future. An error message appears on the screen during the system... Power On Self Test (POST) process. 2. Please visit our website for updated manual if it is for reference only. You want to change system settings through the BIOS Setup menus. This chapter tells how to change the ...

User manual
Page 38
... host controller. [Auto] : This is default option. For a root port, the default time is 100ms. For a hub port, the delay is taken from hub descriptor. [Manual]: you can change the value by pressing "+/-" keys, or input the number you want by the following item. ► Device Power-up delay" to... [Manual]) You can be changed from 5 to 40. 31 3 ► USB Transfer time-out This item is used to select the USB mass storage device start ...
... host controller. [Auto] : This is default option. For a root port, the default time is 100ms. For a hub port, the delay is taken from hub descriptor. [Manual]: you can change the value by pressing "+/-" keys, or input the number you want by the following item. ► Device Power-up delay" to... [Manual]) You can be changed from 5 to 40. 31 3 ► USB Transfer time-out This item is used to select the USB mass storage device start ...
User manual
Page 57
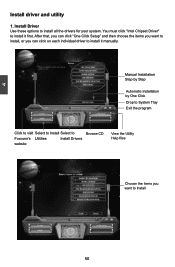
Manual Installation Step by Step Automatic Installation by One Click Drop to System Tray Exit the program Click to visit Select to Install Select to Foxconn's Utilities Install Drivers website Browse CD View the Utility Help files Choose the items you can click "One Click ...Setup" and then choose the items you want to install, or you want to install it first. 4 Install driver and utility 1. Install Driver Use these options to install it manually...
Manual Installation Step by Step Automatic Installation by One Click Drop to System Tray Exit the program Click to visit Select to Install Select to Foxconn's Utilities Install Drivers website Browse CD View the Utility Help files Choose the items you can click "One Click ...Setup" and then choose the items you want to install, or you want to install it first. 4 Install driver and utility 1. Install Driver Use these options to install it manually...

User manual
Page 58
4 2. Install Utility Use these options to view the utility(AEGIS PANEL,FOX LOGO, FOX DMI, etc.) help manual. 51 51 Utility Help Click this button to install additional software programs. 3.
4 2. Install Utility Use these options to view the utility(AEGIS PANEL,FOX LOGO, FOX DMI, etc.) help manual. 51 51 Utility Help Click this button to install additional software programs. 3.

User manual
Page 92
...(Vol ID) Recovery Disk(0) Master Disk(0) Non-RAID Disk Non-RAID Disk [↑↓]-Select [ESC]-Exit [ENTER]-Select Menu 85 Continuous: volume is updated manually. In "Sync" item, we suggest you want to create this volume ? (Y/N) : Press to create the volume and return to Non-RAID 2. 5 6. A warning message will skip...
...(Vol ID) Recovery Disk(0) Master Disk(0) Non-RAID Disk Non-RAID Disk [↑↓]-Select [ESC]-Exit [ENTER]-Select Menu 85 Continuous: volume is updated manually. In "Sync" item, we suggest you want to create this volume ? (Y/N) : Press to create the volume and return to Non-RAID 2. 5 6. A warning message will skip...

User manual
Page 103
... chosen to continue the specific driver installation. S=Specify Additional Device ENTER=Continue F3=Exit 6. It will load support for the following picture appears, press to manually specify an adapter. Currently, Setup will ask you to specify additional mass storage devices for use with Windows, press ENTER. 5. Press after it is done...
... chosen to continue the specific driver installation. S=Specify Additional Device ENTER=Continue F3=Exit 6. It will load support for the following picture appears, press to manually specify an adapter. Currently, Setup will ask you to specify additional mass storage devices for use with Windows, press ENTER. 5. Press after it is done...


