English manual.
Page 1
... you want more detailed information about our products, please visit Foxconn's website: http://www.foxconnchannel.com WEEE: The use motherboard better. Attention: indicates that a potential risk of Foxconn, Inc. Version: User's Manual V1.0 for the environment and human health, which could otherwise...help prevent potential negative consequences for P35AP-S Series motherboard. By ensuring this product may be treated as household waste. For more information about recycling of this manual may not be changed or modified at any time, Foxconn does not obligate itself to use...
... you want more detailed information about our products, please visit Foxconn's website: http://www.foxconnchannel.com WEEE: The use motherboard better. Attention: indicates that a potential risk of Foxconn, Inc. Version: User's Manual V1.0 for the environment and human health, which could otherwise...help prevent potential negative consequences for P35AP-S Series motherboard. By ensuring this product may be treated as household waste. For more information about recycling of this manual may not be changed or modified at any time, Foxconn does not obligate itself to use...

English manual.
Page 6
... that your system or memory module. W e do not guarantee that the DC power supply is just for your device. Attention: Please visit the Foxconn global English website (http://www. Failure to switch off before inserting or removing expansion cards or other peripherals, especially when you insert or remove a memory... module. Attach the CPU and heatsink using silica gel to download the latest BIOS file and drivers for this manual is turned off the DC power supply may result in serious damage to time, the BIOS description in the future. Attention: Since BIOS...
... that your system or memory module. W e do not guarantee that the DC power supply is just for your device. Attention: Please visit the Foxconn global English website (http://www. Failure to switch off before inserting or removing expansion cards or other peripherals, especially when you insert or remove a memory... module. Attach the CPU and heatsink using silica gel to download the latest BIOS file and drivers for this manual is turned off the DC power supply may result in serious damage to time, the BIOS description in the future. Attention: Since BIOS...
English manual.
Page 22
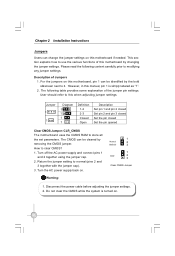
... Jumper 1. Description of this motherboard if needed. Turn off the AC power supply and connect pins 1 and 2 together using the jumper cap. 2. However, in this manual, pin 1 is turned on this when adjusting jumper settings. Disconnect the power cable before adjusting the jumper settings. 2. Return the jumper setting to this motherboard...
... Jumper 1. Description of this motherboard if needed. Turn off the AC power supply and connect pins 1 and 2 together using the jumper cap. 2. However, in this manual, pin 1 is turned on this when adjusting jumper settings. Disconnect the power cable before adjusting the jumper settings. 2. Return the jumper setting to this motherboard...
English manual.
Page 26
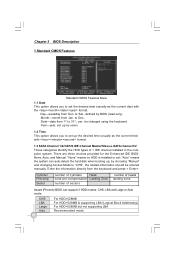
"None" means no HDD is installed or set up ; Enter the information directly from 1st to 31st, can be entered manually. to Sat., defined by choosing "Manual" and changing Access Mode to "CHS", the related information should be changed using the keyboard. Date-date from the keyboard and ...desired date (usually as the current time) with the format. There are three choices provided for the Enhanced IDE BIOS: None, Auto, and Manual. Chapter 3 BIOS Description 1.Standard CMOS Features Standard CMOS Features Menu 1.1 Date This option allows you to set up the desired time (usually...
"None" means no HDD is installed or set up ; Enter the information directly from 1st to 31st, can be entered manually. to Sat., defined by choosing "Manual" and changing Access Mode to "CHS", the related information should be changed using the keyboard. Date-date from the keyboard and ...desired date (usually as the current time) with the format. There are three choices provided for the Enhanced IDE BIOS: None, Auto, and Manual. Chapter 3 BIOS Description 1.Standard CMOS Features Standard CMOS Features Menu 1.1 Date This option allows you to set up the desired time (usually...
English manual.
Page 37
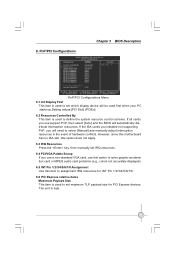
However, since this motherboard has no ISA slot ,this option does not apply. 6.3 IRQ Resources Press the key, then manually set IRQ resources. 6.4 PCI/VGA Palette Snoop If you use a non-standard VGA card, use support PnP, then select [Auto] and the BIOS will ...resources for INT Pin 1/2/3/4/5/6/7/8. 6.6 PCI Express relative items Maximum Payload Size This item is used to set which display device will need to select [Manual] and manually adjust interruption resources in the event of hardware conflicts. If all cards you will be used first when your PC starts up.Setting values:[PCI...
However, since this motherboard has no ISA slot ,this option does not apply. 6.3 IRQ Resources Press the key, then manually set IRQ resources. 6.4 PCI/VGA Palette Snoop If you use a non-standard VGA card, use support PnP, then select [Auto] and the BIOS will ...resources for INT Pin 1/2/3/4/5/6/7/8. 6.6 PCI Express relative items Maximum Payload Size This item is used to set which display device will need to select [Manual] and manually adjust interruption resources in the event of hardware conflicts. If all cards you will be used first when your PC starts up.Setting values:[PCI...
English manual.
Page 40
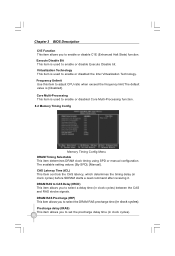
...disabled Core Multi-Processing function. 8.2 Memory Timing Config Memory Timing Config Menu DRAM Timing Selectable This item determines DRAM clock timing using SPD or manual configuration. Core Multi-Processing This item is used to enable or disable Execute Disable bit. DRAM RAS to CAS Delay (tRCD) This item allows..., which determines the timing delay (in clock cycles) before SDRAM starts a read command after receiving it. The available setting values: [By SPD]; [Manual]. Chapter 3 BIOS Description C1E Function This item allows you to set the precharge delay time (in clock cycles). 34
...disabled Core Multi-Processing function. 8.2 Memory Timing Config Memory Timing Config Menu DRAM Timing Selectable This item determines DRAM clock timing using SPD or manual configuration. Core Multi-Processing This item is used to enable or disable Execute Disable bit. DRAM RAS to CAS Delay (tRCD) This item allows..., which determines the timing delay (in clock cycles) before SDRAM starts a read command after receiving it. The available setting values: [By SPD]; [Manual]. Chapter 3 BIOS Description C1E Function This item allows you to set the precharge delay time (in clock cycles). 34
English manual.
Page 42
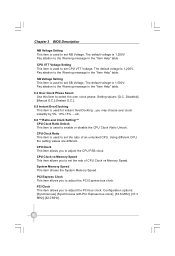
... the W arning message in the "Item Help" table. CPU Clock Ratio This item is used to enable or disable the CPU Clock Ratio Unlock. Disabled]; [Manual O.C.]; [Instant O.C.]. 8.5 Instant OverClocking This item is used for instant OverClocking , you to adjust the PCI bus clock. Chapter 3 BIOS Description NB Voltage Setting This item...
... the W arning message in the "Item Help" table. CPU Clock Ratio This item is used to enable or disable the CPU Clock Ratio Unlock. Disabled]; [Manual O.C.]; [Instant O.C.]. 8.5 Instant OverClocking This item is used for instant OverClocking , you to adjust the PCI bus clock. Chapter 3 BIOS Description NB Voltage Setting This item...
English manual.
Page 47
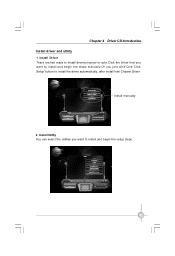
Install Utility You can select the utilities you want to install and begin the setup steps. 41 Install manually 2. Install Driver There are two ways to install drivers,manual or auto.Click the driver that you just click"One Click Setup"button to install and begin the steps manually.Or you want to install the driver automatically, after install Intel Chipset Driver. Chapter 4 Driver CD Introduction Install driver and utility 1.
Install Utility You can select the utilities you want to install and begin the setup steps. 41 Install manually 2. Install Driver There are two ways to install drivers,manual or auto.Click the driver that you just click"One Click Setup"button to install and begin the steps manually.Or you want to install the driver automatically, after install Intel Chipset Driver. Chapter 4 Driver CD Introduction Install driver and utility 1.
English manual.
Page 51
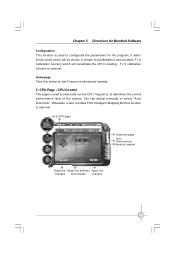
... select "Auto Overclock". Homepage Click this page Auto Overclocking Ajust by manual Reset the Select the different Apply the changes benchmarks changes 45 CPU Control This page is optional. Otherwise, it also provides F.I .S calibration function is used ... optional. F.I .S calibration function which items will be shown in simple mode.Besides,it also provides FOX Intelligent Stepping,But this function is used to visit Foxconn motherboard website. 2. Chapter 5 Directions for the program. It determines which will recalibrate the CPU's loading.
... select "Auto Overclock". Homepage Click this page Auto Overclocking Ajust by manual Reset the Select the different Apply the changes benchmarks changes 45 CPU Control This page is optional. Otherwise, it also provides F.I .S calibration function is used ... optional. F.I .S calibration function which items will be shown in simple mode.Besides,it also provides FOX Intelligent Stepping,But this function is used to visit Foxconn motherboard website. 2. Chapter 5 Directions for the program. It determines which will recalibrate the CPU's loading.

English manual.
Page 52
... limit value of CPU temperature Set high limit by dragging the lever 46 Frequency Control This page enables you to Freq. Go to set Adjust manually Reset the changes Apply the changes 4.1 Limit Setting - Freq. Chapter 5 Directions for Bundled Software 3. Page - Show current CPU Go to set memory and PCI Express...
... limit value of CPU temperature Set high limit by dragging the lever 46 Frequency Control This page enables you to Freq. Go to set Adjust manually Reset the changes Apply the changes 4.1 Limit Setting - Freq. Chapter 5 Directions for Bundled Software 3. Page - Show current CPU Go to set memory and PCI Express...
English manual.
Page 55
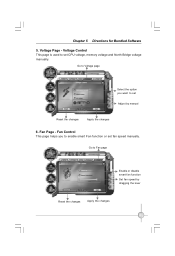
Fan Control This page helps you want to enable smart Fan function or set fan speed manually. Voltage Control This page is used to Fan page Enable or disable smart fan function Set fan speed by manual Reset the changes Apply the changes 6. Fan Page - Go to Voltage page Select the option you to set CPU voltage, memory voltage and North Bridge voltage manually. Go to set Adjust by dragging the lever Reset the changes Apply the changes 49 Voltage Page - Chapter 5 Directions for Bundled Software 5.
Fan Control This page helps you want to enable smart Fan function or set fan speed manually. Voltage Control This page is used to Fan page Enable or disable smart fan function Set fan speed by manual Reset the changes Apply the changes 6. Fan Page - Go to Voltage page Select the option you to set CPU voltage, memory voltage and North Bridge voltage manually. Go to set Adjust by dragging the lever Reset the changes Apply the changes 49 Voltage Page - Chapter 5 Directions for Bundled Software 5.


