English manual.
Page 4
Table of Contents Chapter 1 Product Introduction Main Features 2 Layout ...4 Rear I/O Ports 5 Chapter 2 Installation Instructions CPU ...7 Memory ...9 Power Supply 11 Other Connectors 12 Expansion Slots 15 Jumpers 16 Chapter 3 BIOS Description Enter BIOS Setup 18 Main menu 18 1.Standard BIOS Features ...
Table of Contents Chapter 1 Product Introduction Main Features 2 Layout ...4 Rear I/O Ports 5 Chapter 2 Installation Instructions CPU ...7 Memory ...9 Power Supply 11 Other Connectors 12 Expansion Slots 15 Jumpers 16 Chapter 3 BIOS Description Enter BIOS Setup 18 Main menu 18 1.Standard BIOS Features ...

English manual.
Page 6
...to avoid damage to the motherboard and CPU due to download the latest BIOS file and drivers for your system or memory module. Attach the CPU and heatsink using silica gel to the physical motherboard. Attention: Please visit the Foxconn global English website (http://www. Normal... operation depends on the machine if the CPU fan is just for reference. foxconnchannel.com) to high...
...to avoid damage to the motherboard and CPU due to download the latest BIOS file and drivers for your system or memory module. Attach the CPU and heatsink using silica gel to the physical motherboard. Attention: Please visit the Foxconn global English website (http://www. Normal... operation depends on the machine if the CPU fan is just for reference. foxconnchannel.com) to high...
English manual.
Page 10
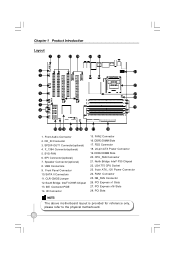
... 8 9 10 11 12 13 14 15 16 17 18 1. SPI Connector(optional) 7. CLR-CMOS Jumper 12. FAN2 Connector 16. DDR3 DIMM Slots 17. LGA 775 CPU Socket 23. 8-pin ATX_12V Power Connector 24. FAN1 Connector 25. South Bridge: Intel® ICH9R Chipset 13. SYS-FAN 6. PCI Express x16 Slots 28.
... 8 9 10 11 12 13 14 15 16 17 18 1. SPI Connector(optional) 7. CLR-CMOS Jumper 12. FAN2 Connector 16. DDR3 DIMM Slots 17. LGA 775 CPU Socket 23. 8-pin ATX_12V Power Connector 24. FAN1 Connector 25. South Bridge: Intel® ICH9R Chipset 13. SYS-FAN 6. PCI Express x16 Slots 28.

English manual.
Page 12
Chapter 1 Product Introduction 2 Chapter This chapter introduces the hardware installation process, including the installation of the CPU, memory, power supply, slots, pin headers, and the mounting of these modules. Caution should be exercised during the installation of jumpers. This chapter includes the following information: v CPU v Memory v Power Supply v Other Connectors v Expansion Slots v Jumpers 6 Please refer to the motherboard layout prior to any installation and read the contents in this chapter carefully.
Chapter 1 Product Introduction 2 Chapter This chapter introduces the hardware installation process, including the installation of the CPU, memory, power supply, slots, pin headers, and the mounting of these modules. Caution should be exercised during the installation of jumpers. This chapter includes the following information: v CPU v Memory v Power Supply v Other Connectors v Expansion Slots v Jumpers 6 Please refer to the motherboard layout prior to any installation and read the contents in this chapter carefully.
English manual.
Page 13
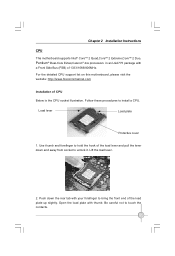
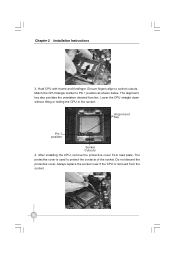
...Use thumb and forefinger to hold the hook of the load plate up slightly. Load lever Load plate Protective cover 1. For the detailed CPU support list on this motherboard, please visit the website: http://www.foxconnchannel.com Installation of 1333/1066/800MHz. Be careful not to ...unlock it. Lift the load lever. 2. Open the load plate with thumb. Chapter 2 Installation Instructions CPU This motherboard supports Intel® CoreTM 2 Quad,CoreTM 2 Extreme,CoreTM 2 Duo, Pentium® Dual-Core E2xxx,Celeron® 4xx processors in ...
...Use thumb and forefinger to hold the hook of the load plate up slightly. Load lever Load plate Protective cover 1. For the detailed CPU support list on this motherboard, please visit the website: http://www.foxconnchannel.com Installation of 1333/1066/800MHz. Be careful not to ...unlock it. Lift the load lever. 2. Open the load plate with thumb. Chapter 2 Installation Instructions CPU This motherboard supports Intel® CoreTM 2 Quad,CoreTM 2 Extreme,CoreTM 2 Duo, Pentium® Dual-Core E2xxx,Celeron® 4xx processors in ...
English manual.
Page 14
...Ensure fingers align to Pin 1 position as shown below. Always replace the socket cover if the CPU is used to protect the contacts of the socket. Match the CPU triangle marker to socket cutouts. The alignment key also provides the orientation directed function. Lower the... CPU straight down without tilting or sliding the CPU in the socket. Alignment Key Pin 1 position Socket Cutouts 4. After installing the CPU, remove the protective cover from the socket. 8 Chapter 2 Installation Instructions 3. Hold CPU with thumb and forefinger. Do ...
...Ensure fingers align to Pin 1 position as shown below. Always replace the socket cover if the CPU is used to protect the contacts of the socket. Match the CPU triangle marker to socket cutouts. The alignment key also provides the orientation directed function. Lower the... CPU straight down without tilting or sliding the CPU in the socket. Alignment Key Pin 1 position Socket Cutouts 4. After installing the CPU, remove the protective cover from the socket. 8 Chapter 2 Installation Instructions 3. Hold CPU with thumb and forefinger. Do ...
English manual.
Page 15
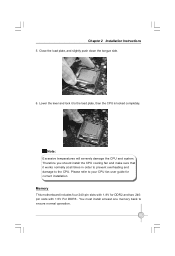
You must install at all times in order to prevent overheating and damage to the load plate, then the CPU is locked completely. Please refer to ensure normal operation. 9 Memory This motherboard includes four 240-pin slots with 1.8V for correct installation. Close ..., and slightly push down the tongue side. 6. Chapter 2 Installation Instructions 5. Therefore you should install the CPU cooling fan and make sure that it to the CPU. Note : Excessive temperatures will severely damage the CPU and system. Lower the lever and lock it works normally at least one memory bank to your...
You must install at all times in order to prevent overheating and damage to the load plate, then the CPU is locked completely. Please refer to ensure normal operation. 9 Memory This motherboard includes four 240-pin slots with 1.8V for correct installation. Close ..., and slightly push down the tongue side. 6. Chapter 2 Installation Instructions 5. Therefore you should install the CPU cooling fan and make sure that it to the CPU. Note : Excessive temperatures will severely damage the CPU and system. Lower the lever and lock it works normally at least one memory bank to your...
English manual.
Page 17
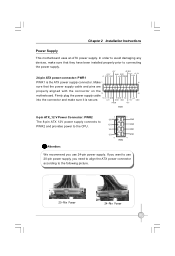
... GND GND +5 V GND PSON +5V PWR1 8-pin ATX_12 V Power Connector: PWR2 The 8-pin ATX 12V power supply connects to PWR2 and provides power to the CPU.
... GND GND +5 V GND PSON +5V PWR1 8-pin ATX_12 V Power Connector: PWR2 The 8-pin ATX 12V power supply connects to PWR2 and provides power to the CPU.

English manual.
Page 25
... settings and parameters can be set up through the two menu. 12.Save & Exit Setup Save CMOS value settings to configure some special features of CPU and Memory. 9. Power Management Setup All the items of your PC. 8. Chapter 3 BIOS Description 4. Gladiator BIOS This menu is used to CMOS and exit setup...
... settings and parameters can be set up through the two menu. 12.Save & Exit Setup Save CMOS value settings to configure some special features of CPU and Memory. 9. Power Management Setup All the items of your PC. 8. Chapter 3 BIOS Description 4. Gladiator BIOS This menu is used to CMOS and exit setup...

English manual.
Page 28
... is used to turn on the screen if any program wants to write any information to Enabled, a warning message will not be displayed until a CPU that support Hyperthreading technology has been installed. 2.5 First/Second/Third Boot Device This option allows you can select the HDD using the / or Up/... to enable, the system will give an audible warning. Note: This function will appear on or off the Hyper-Threading function of the CPU. Advanced BIOS Features Advanced BIOS Features Menu 2.1 Hard Disk Boot Priority This option is used to the startup sector only; Chapter 3 BIOS Description...
... is used to turn on the screen if any program wants to write any information to Enabled, a warning message will not be displayed until a CPU that support Hyperthreading technology has been installed. 2.5 First/Second/Third Boot Device This option allows you can select the HDD using the / or Up/... to enable, the system will give an audible warning. Note: This function will appear on or off the Hyper-Threading function of the CPU. Advanced BIOS Features Advanced BIOS Features Menu 2.1 Hard Disk Boot Priority This option is used to the startup sector only; Chapter 3 BIOS Description...
English manual.
Page 38
...to controll the fan by the Duty-Cycle directly. Chapter 3 BIOS Description 7. You can input the value between 0 and 99. 7.5 Current CPU Fan Speed This item shows the Current CPUFan Speed detected automatically by the system. 7.3 Smart CPUFan Function This item is used to set the ... hen the temperature exceeds the setting value,the motherboard will automatically cut off power to the computer. 7.2 Current CPU/System/NB Temperature These items show the current CPU/System/NB Temperature detected automatically by the system. 7.6 Smart SYSFan Function This item is used to set the Smart...
...to controll the fan by the Duty-Cycle directly. Chapter 3 BIOS Description 7. You can input the value between 0 and 99. 7.5 Current CPU Fan Speed This item shows the Current CPUFan Speed detected automatically by the system. 7.3 Smart CPUFan Function This item is used to set the ... hen the temperature exceeds the setting value,the motherboard will automatically cut off power to the computer. 7.2 Current CPU/System/NB Temperature These items show the current CPU/System/NB Temperature detected automatically by the system. 7.6 Smart SYSFan Function This item is used to set the Smart...

English manual.
Page 39
Gladiator BIOS 8.1 CPU Feature Gladiator BIOS Menu CPU Feature Menu EIST Function Use this item to enable or disable CPUID maximum value limit configuration. Limit CPUID MaxVal This item is used to enable ...) Function. Chapter 3 BIOS Description 7.9 Current NB Fan Speed This item shows the Current NBFan Speed detected automatically by system. 7.10 Current CPU/ DRAM / NB Voltage These items show the Current CPU/DRAM/NB Voltage detected automatically by the system. 7.11 Current + 5/ + 12 / + 3.3 / BAT Voltage These items show the + 5 / + 12 / + 3.3 / BAT Voltage detected...
Gladiator BIOS 8.1 CPU Feature Gladiator BIOS Menu CPU Feature Menu EIST Function Use this item to enable or disable CPUID maximum value limit configuration. Limit CPUID MaxVal This item is used to enable ...) Function. Chapter 3 BIOS Description 7.9 Current NB Fan Speed This item shows the Current NBFan Speed detected automatically by system. 7.10 Current CPU/ DRAM / NB Voltage These items show the Current CPU/DRAM/NB Voltage detected automatically by the system. 7.11 Current + 5/ + 12 / + 3.3 / BAT Voltage These items show the + 5 / + 12 / + 3.3 / BAT Voltage detected...
English manual.
Page 40
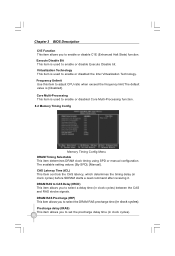
... Description C1E Function This item allows you to set the precharge delay time (in clock cycles). 34 Virtualization Technology This item is used to adjust CPU ratio when exceed the frequency limit.The default value is used to enable or disabled Core Multi-Processing function. 8.2 Memory Timing Config Memory Timing Config...
... Description C1E Function This item allows you to set the precharge delay time (in clock cycles). 34 Virtualization Technology This item is used to adjust CPU ratio when exceed the frequency limit.The default value is used to enable or disabled Core Multi-Processing function. 8.2 Memory Timing Config Memory Timing Config...
English manual.
Page 41
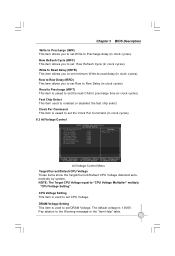
...Write to Read Delay (tWTR) This item allows you to set minimum W rite-to set DRAM Voltage. CPU Voltage Setting This item is used to -read CAS to "CPU Voltage Multiplier" multiply "CPU Voltage Setting" . Clock Per Command This item is 1.800V. Pay attation to Precharge delay (in clock ...item allows you to Row Delay (in clock cycles). 8.3 All Voltage Control All Voltage Control Menu Target/Current/Default CPU Voltage These items show the Target/Current/Default CPU Voltage detected automatically by system. Fast Chip Select This item used to set the Clock Per Command (in clock ...
...Write to Read Delay (tWTR) This item allows you to set minimum W rite-to set DRAM Voltage. CPU Voltage Setting This item is used to -read CAS to "CPU Voltage Multiplier" multiply "CPU Voltage Setting" . Clock Per Command This item is 1.800V. Pay attation to Precharge delay (in clock ...item allows you to Row Delay (in clock cycles). 8.3 All Voltage Control All Voltage Control Menu Target/Current/Default CPU Voltage These items show the Target/Current/Default CPU Voltage detected automatically by system. Fast Chip Select This item used to set the Clock Per Command (in clock ...
English manual.
Page 42
...Phase Select Use this item to select the over clock instantly by 5%, 10%,15%.....etc. 8.6 ***Ratio and Clock Setting*** CPU Clock Ratio Unlock This item is used to adjust the CPU FSB clock. Pay attation to the W arning message in the "Item Help" table. Configuration options: [Synchronous] (Synchronous...used to set NB Voltage. The default voltage is used to set the rate of an unlocked CPU. Setting values: [O.C. Chapter 3 BIOS Description NB Voltage Setting This item is 1.200V. CPU Clock Ratio This item is 1.500V. PCI Express Clock This item allows you to set the ...
...Phase Select Use this item to select the over clock instantly by 5%, 10%,15%.....etc. 8.6 ***Ratio and Clock Setting*** CPU Clock Ratio Unlock This item is used to adjust the CPU FSB clock. Pay attation to the W arning message in the "Item Help" table. Configuration options: [Synchronous] (Synchronous...used to set NB Voltage. The default voltage is used to set the rate of an unlocked CPU. Setting values: [O.C. Chapter 3 BIOS Description NB Voltage Setting This item is 1.200V. CPU Clock Ratio This item is 1.500V. PCI Express Clock This item allows you to set the ...
English manual.
Page 49
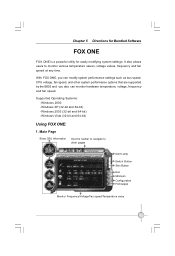
...is a powerful utility for easily modifying system settings. With FOX ONE, you can modify system performance settings such as bus speed, CPU voltage, fan speed, and other pages Alert Lamp Switch Button Skin Button Exit Minimum Configuration Homepage Monitor Frequency/Voltage/Fan speed/Temperature... value 43 Main Page Show CPU Information Use the toolbar to navigate to monitor various temperature values, voltage values, frequency and fan speed at any time. It...
...is a powerful utility for easily modifying system settings. With FOX ONE, you can modify system performance settings such as bus speed, CPU voltage, fan speed, and other pages Alert Lamp Switch Button Skin Button Exit Minimum Configuration Homepage Monitor Frequency/Voltage/Fan speed/Temperature... value 43 Main Page Show CPU Information Use the toolbar to navigate to monitor various temperature values, voltage values, frequency and fan speed at any time. It...
English manual.
Page 51
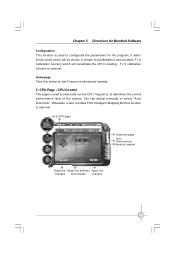
.... Otherwise, it also provides F.I .S calibration function is optional. CPU Page - Go to CPU page Close this button to determine the current performance level of the system. Homepage Click this page Auto Overclocking Ajust by manual Reset the Select ....Besides,it also provides FOX Intelligent Stepping,But this function is optional. You can adjust manually or select "Auto Overclock". Chapter 5 Directions for the program. CPU Control This page is used to configurate the parameters for Bundled Software Configuration This function is used to select and run the...
.... Otherwise, it also provides F.I .S calibration function is optional. CPU Page - Go to CPU page Close this button to determine the current performance level of the system. Homepage Click this page Auto Overclocking Ajust by manual Reset the Select ....Besides,it also provides FOX Intelligent Stepping,But this function is optional. You can adjust manually or select "Auto Overclock". Chapter 5 Directions for the program. CPU Control This page is used to configurate the parameters for Bundled Software Configuration This function is used to select and run the...

English manual.
Page 52
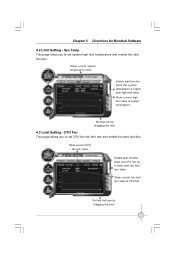
... the changes Apply the changes 4.1 Limit Setting - CPU Temp. Freq. Go to limit Setting page temperature value Enable alert function when the CPU temperature is higher than high limit value Show current high limit value of CPU temperature Set high limit by dragging the lever 46 ...Show current CPU Go to Freq. Chapter 5 Directions for Bundled Software 3. Frequency ...
... the changes Apply the changes 4.1 Limit Setting - CPU Temp. Freq. Go to limit Setting page temperature value Enable alert function when the CPU temperature is higher than high limit value Show current high limit value of CPU temperature Set high limit by dragging the lever 46 ...Show current CPU Go to Freq. Chapter 5 Directions for Bundled Software 3. Frequency ...
English manual.
Page 53
... alert function when the system temperature is lower than high limit value Show current high limit value of CPU fan Set low limit rpm by dragging the lever 4.3 Limit Setting - CPU Fan This page allows you to set system high limit temperature and enable the alert function. Sys Temp.... Chapter 5 Directions for Bundled Software 4.2 Limit Setting - Show current CPU fan rpm value Enable alert function when the CPU fan rev is higher than low limit rpm value Show current low limit rpm value of system temperature Set high limit...
... alert function when the system temperature is lower than high limit value Show current high limit value of CPU fan Set low limit rpm by dragging the lever 4.3 Limit Setting - CPU Fan This page allows you to set system high limit temperature and enable the alert function. Sys Temp.... Chapter 5 Directions for Bundled Software 4.2 Limit Setting - Show current CPU fan rpm value Enable alert function when the CPU fan rev is higher than low limit rpm value Show current low limit rpm value of system temperature Set high limit...
English manual.
Page 55
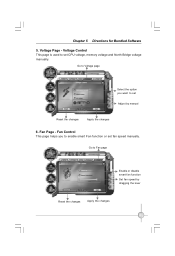
Voltage Page - Go to set Adjust by dragging the lever Reset the changes Apply the changes 49 Fan Control This page helps you want to Fan page Enable or disable smart fan function Set fan speed by manual Reset the changes Apply the changes 6. Fan Page - Voltage Control This page is used to enable smart Fan function or set CPU voltage, memory voltage and North Bridge voltage manually. Go to Voltage page Select the option you to set fan speed manually. Chapter 5 Directions for Bundled Software 5.
Voltage Page - Go to set Adjust by dragging the lever Reset the changes Apply the changes 49 Fan Control This page helps you want to Fan page Enable or disable smart fan function Set fan speed by manual Reset the changes Apply the changes 6. Fan Page - Voltage Control This page is used to enable smart Fan function or set CPU voltage, memory voltage and North Bridge voltage manually. Go to Voltage page Select the option you to set fan speed manually. Chapter 5 Directions for Bundled Software 5.


