User Manual
Page 5
.... ■ Ensure that flows between two objects at different electrical potentials. Please carefully read the following procedures to install your computer : ■ It is suggested to select high-quality, certified fans in serious damage to high temperature. Please wear an ... We cannot guarantee that your system can operate normally when your electronic equipment. Never turn on the motherboard or within the computer casing. ■ If you are matching with the motherboard circuit or its components. CAUTION Installation Precautions WARNING! ■ Electrostatic...
.... ■ Ensure that flows between two objects at different electrical potentials. Please carefully read the following procedures to install your computer : ■ It is suggested to select high-quality, certified fans in serious damage to high temperature. Please wear an ... We cannot guarantee that your system can operate normally when your electronic equipment. Never turn on the motherboard or within the computer casing. ■ If you are matching with the motherboard circuit or its components. CAUTION Installation Precautions WARNING! ■ Electrostatic...

User Manual
Page 8
...Foxconn G31MXP Series motherboard. This chapter includes the following information: ■ Product Specifications ■ Layout ■ Back Panel Connectors Thank you need for break-through performance. With advanced overclocking capability and a range of connectivity features for today multi-media computing... requirements, �G�3�1�M�X�P�/ G31MXP-K��e�n�a�b�l�e�s��y�o�...
...Foxconn G31MXP Series motherboard. This chapter includes the following information: ■ Product Specifications ■ Layout ■ Back Panel Connectors Thank you need for break-through performance. With advanced overclocking capability and a range of connectivity features for today multi-media computing... requirements, �G�3�1�M�X�P�/ G31MXP-K��e�n�a�b�l�e�s��y�o�...

User Manual
Page 15
... standard specifications, please do so according to install the CPU : ■ Make sure that the motherboard supports the CPU. ■ Always turn on the computer if the CPU cooler is optimized for HT Technology ■ A BIOS that supports HT Technology and has it does not meet the standard requirements for... Locate the alignment keys on the motherboard CPU socket and the notches on the surface of the CPU. ■ Do not turn off the computer and unplug the power cord from the power supply before installing the CPU to Intel's website for the peripherals. If you begin to your hardware...
... standard specifications, please do so according to install the CPU : ■ Make sure that the motherboard supports the CPU. ■ Always turn on the computer if the CPU cooler is optimized for HT Technology ■ A BIOS that supports HT Technology and has it does not meet the standard requirements for... Locate the alignment keys on the motherboard CPU socket and the notches on the surface of the CPU. ■ Do not turn off the computer and unplug the power cord from the power supply before installing the CPU to Intel's website for the peripherals. If you begin to your hardware...

User Manual
Page 16
...�e��s�o�c�k�e��t �c�o�v�e�r�. 2. Before installing the CPU, make sure to turn off the computer and unplug the power cord from the power outlet to prevent damage to the CPU. 1.
...�e��s�o�c�k�e��t �c�o�v�e�r�. 2. Before installing the CPU, make sure to turn off the computer and unplug the power cord from the power outlet to prevent damage to the CPU. 1.

User Manual
Page 18
... The combinations of the same capacity, brand, speed, and chips be installed in your system. A memory module can be used . ■ Always turn off the computer and unplug the power cord from the power outlet before you are : Single Channel DIMM1 DS/SS DIMM2 - If you begin to achieve optimum performance...
... The combinations of the same capacity, brand, speed, and chips be installed in your system. A memory module can be used . ■ Always turn off the computer and unplug the power cord from the power outlet before you are : Single Channel DIMM1 DS/SS DIMM2 - If you begin to achieve optimum performance...

User Manual
Page 19
... the memory socket. Follow the steps below to correctly install your fingers on this motherboard. Before installing a memory module, make sure to turn off the computer and unplug the power cord from the power outlet to prevent damage to install DDR2 DIMMs on top edge of the socket will snap into...
... the memory socket. Follow the steps below to correctly install your fingers on this motherboard. Before installing a memory module, make sure to turn off the computer and unplug the power cord from the power outlet to prevent damage to install DDR2 DIMMs on top edge of the socket will snap into...
User Manual
Page 20
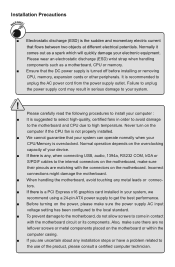
... latch at the end of the PCI Express x16 slot to prevent hardware damage. Locate an expansion slot that supports your expansion card in your computer. After installing all expansion cards, replace the chassis cover. 6. Install the driver provided with the expansion card in the expansion slot. 1. Turn on the card...
... latch at the end of the PCI Express x16 slot to prevent hardware damage. Locate an expansion slot that supports your expansion card in your computer. After installing all expansion cards, replace the chassis cover. 6. Install the driver provided with the expansion card in the expansion slot. 1. Turn on the card...

User Manual
Page 25
...jumper cap is simply labeled as "1". 2. Return the setting to temporarily short them. Description of this motherboard by the bold silkscreen next to your computer and turn it on. 5. "Closed" means placing a jumper cap on the two pins to its original with pins 2-3 closed Set two pins... factory default when the BIOS settings were mistakenly modified. Go to BIOS Setup to modify them . This will clear CMOS data. 3. Turn off the computer, unplug the power cord from pins 2-3, put it . 2 2-5 Jumpers For some features needed, users can change the jumper settings on this motherboard...
...jumper cap is simply labeled as "1". 2. Return the setting to temporarily short them. Description of this motherboard by the bold silkscreen next to your computer and turn it on. 5. "Closed" means placing a jumper cap on the two pins to its original with pins 2-3 closed Set two pins... factory default when the BIOS settings were mistakenly modified. Go to BIOS Setup to modify them . This will clear CMOS data. 3. Turn off the computer, unplug the power cord from pins 2-3, put it . 2 2-5 Jumpers For some features needed, users can change the jumper settings on this motherboard...

User Manual
Page 26
... From S3" to wake up Jumper: USBPW1357_1 / USBPW0246_1 1. Set the jumper to pins 2-3 (+5VSB) to wake up the computer from S1 sleep mode using the connected USB devices. USB device wake-up the computer from S3 and S4 sleep modes using the connected USB devices. 2. CAUTION 19 Set the jumper to pins...
... From S3" to wake up Jumper: USBPW1357_1 / USBPW0246_1 1. Set the jumper to pins 2-3 (+5VSB) to wake up the computer from S1 sleep mode using the connected USB devices. USB device wake-up the computer from S3 and S4 sleep modes using the connected USB devices. 2. CAUTION 19 Set the jumper to pins...

User Manual
Page 29
... up through this menu. ► Fox Central Control Unit Some special proprietary features (such as Serial I/O and other USB devices... etc. 22 Power on the computer, when the message "Press to enter Setup, to the submenu. Main Menu The main menu allows you to maintain optimal system performance. 3 CAUTION Enter BIOS...
... up through this menu. ► Fox Central Control Unit Some special proprietary features (such as Serial I/O and other USB devices... etc. 22 Power on the computer, when the message "Press to enter Setup, to the submenu. Main Menu The main menu allows you to maintain optimal system performance. 3 CAUTION Enter BIOS...
User Manual
Page 32
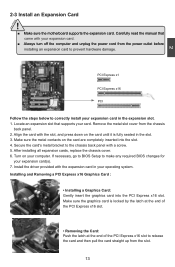
... for any errors that may be [360KB, 5.25"], [1.2MB, 5.25"], [720KB, 3.5"], [1.44MB, 3.5"] and [2.88 MB, 3.5"]. ► Halt On This category determines whether or not the computer will not stop if an error is supporting 3 HDD modes : CHS, LBA and Large. No Errors The system boot will stop for a keyboard error; Suggest...
... for any errors that may be [360KB, 5.25"], [1.2MB, 5.25"], [720KB, 3.5"], [1.44MB, 3.5"] and [2.88 MB, 3.5"]. ► Halt On This category determines whether or not the computer will not stop if an error is supporting 3 HDD modes : CHS, LBA and Large. No Errors The system boot will stop for a keyboard error; Suggest...
User Manual
Page 37
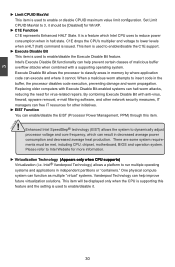
...voltage to Intel Website for virus-related repairs. Intel's Execute Disable Bit functionality can execute and where it cannot. Replacing older computers with a supporting operating system. By combining Execute Disable Bit with anti-virus, firewall, spyware removal, e-mail filtering software,... allows a platform to enable/disable it should be met, including CPU, chipset, motherboard, BIOS and operation system. One physical compute system can function as multiple "virtual" systems. Vanderpool Technology can help prevent certain classes of malicious buffer overflow attacks when combined...
...voltage to Intel Website for virus-related repairs. Intel's Execute Disable Bit functionality can execute and where it cannot. Replacing older computers with a supporting operating system. By combining Execute Disable Bit with anti-virus, firewall, spyware removal, e-mail filtering software,... allows a platform to enable/disable it should be met, including CPU, chipset, motherboard, BIOS and operation system. One physical compute system can function as multiple "virtual" systems. Vanderpool Technology can help prevent certain classes of malicious buffer overflow attacks when combined...
User Manual
Page 48
... other words, it wakes. The system is in this state, no system context is lost (the OS is an open industry standard that describes how computer components work together to wake from the processor's reset vector after the wake event. HPET Support [Enabled] HPET Mode [32-bit mode] USB Wake Up...
... other words, it wakes. The system is in this state, no system context is lost (the OS is an open industry standard that describes how computer components work together to wake from the processor's reset vector after the wake event. HPET Support [Enabled] HPET Mode [32-bit mode] USB Wake Up...

User Manual
Page 49
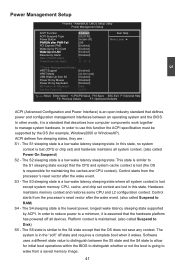
The status of the computer before it resumes after an AC power loss. ► PCI Express PME This item is used to enable... can be modified. Also, the PC power source must be disabled. If you push the power button in memory, and the computer can be triggered from S3 This item is used to set the system to wake up date. ► Time (hh:mm:ss...9658; HPET Support HPET stands for the start -up by LAN. ► Resume by PCI card. ► Wake Up on and computer can quickly return to previous state when the STR function wakes. ► Power Button This item is used to set the timing for ...
The status of the computer before it resumes after an AC power loss. ► PCI Express PME This item is used to enable... can be modified. Also, the PC power source must be disabled. If you push the power button in memory, and the computer can be triggered from S3 This item is used to set the system to wake up date. ► Time (hh:mm:ss...9658; HPET Support HPET stands for the start -up by LAN. ► Resume by PCI card. ► Wake Up on and computer can quickly return to previous state when the STR function wakes. ► Power Button This item is used to set the timing for ...

User Manual
Page 55
... main menu will be displayed on your PC screen to guide you to change your system setting without being a computer literate. Realtek HDA Audio Driver C. Some auto features help user to restart your computer after all the drivers for your system without going to BIOS. FOX LiveUpdate C. Software Utilities Use these options...
... main menu will be displayed on your PC screen to guide you to change your system setting without being a computer literate. Realtek HDA Audio Driver C. Some auto features help user to restart your computer after all the drivers for your system without going to BIOS. FOX LiveUpdate C. Software Utilities Use these options...

User Manual
Page 61
Later on, when the FOX ONE program is collected, it will automatically adjust your CPU clock according to your computer now. 4 Step 1 : Click Calibration icon, a message pops out to restart your system loadings. (Loadings are like Power Gaming, Data Mining...etc.) 54 feature (in CPU Page) is also enabled, FOX ONE will ask you to ask for continue. Step 2 : After data is activated, and F.I.S. Select Yes.
Later on, when the FOX ONE program is collected, it will automatically adjust your CPU clock according to your computer now. 4 Step 1 : Click Calibration icon, a message pops out to restart your system loadings. (Loadings are like Power Gaming, Data Mining...etc.) 54 feature (in CPU Page) is also enabled, FOX ONE will ask you to ask for continue. Step 2 : After data is activated, and F.I.S. Select Yes.

User Manual
Page 63
Run FOX ONE program again, it to restart the computer. Now, your system is running at a CPU clock of your system to your system. Push RESET button on the front panel of 255MHz. 56 4 You can see the system is the recommended CPU clock for your system. Click Yes to apply it will inform you the previous test found that 255MHz is raising CPU clock until the system hangs.
Run FOX ONE program again, it to restart the computer. Now, your system is running at a CPU clock of your system to your system. Push RESET button on the front panel of 255MHz. 56 4 You can see the system is the recommended CPU clock for your system. Click Yes to apply it will inform you the previous test found that 255MHz is raising CPU clock until the system hangs.