English Manual.
Page 6
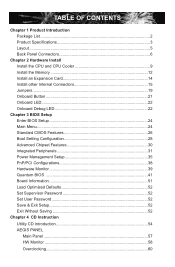
... Card 14 Install other Internal Connectors 15 Jumpers...19 Onboard Button 21 Onboard LED 22 Onboard Debug LED 22 Chapter 3 BIOS Setup Enter BIOS Setup 24 Main Menu 24 Standard CMOS Features 26 Boot Setting Configuration 28 Advanced Chipset Features 30 Integrated Peripherals 31 Power... Management Setup 35 PnP/PCI Configurations 38 Hardware Monitor 39 Quantum BIOS 41 Board Information 51 Load Optimized Defaults 52 Set Supervisor Password 52 Set User Password 52 Save & Exit Setup 52 Exit...
... Card 14 Install other Internal Connectors 15 Jumpers...19 Onboard Button 21 Onboard LED 22 Onboard Debug LED 22 Chapter 3 BIOS Setup Enter BIOS Setup 24 Main Menu 24 Standard CMOS Features 26 Boot Setting Configuration 28 Advanced Chipset Features 30 Integrated Peripherals 31 Power... Management Setup 35 PnP/PCI Configurations 38 Hardware Monitor 39 Quantum BIOS 41 Board Information 51 Load Optimized Defaults 52 Set Supervisor Password 52 Set User Password 52 Save & Exit Setup 52 Exit...
English Manual.
Page 7
... 70 FOX DMI...71 Chapter 5 RAID Configuration RAID Configuration Introduction 74 Intel® Matrix Storage Manager 76 Create a RAID Driver Diskette 77 BIOS Configuration 79 Create RAID in BIOS 79 Install a New Windows XP 103 Existing Windows XP with RAID built as data storage 107 Appendix ATI® CrossFireXTM Technology 111 NVIDIA...
... 70 FOX DMI...71 Chapter 5 RAID Configuration RAID Configuration Introduction 74 Intel® Matrix Storage Manager 76 Create a RAID Driver Diskette 77 BIOS Configuration 79 Create RAID in BIOS 79 Install a New Windows XP 103 Existing Windows XP with RAID built as data storage 107 Appendix ATI® CrossFireXTM Technology 111 NVIDIA...
English Manual.
Page 16
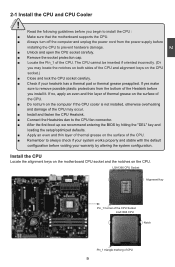
... CPU Notch Pin_1 triangle marking of the CPU. ■ Remember to the CPU fan connector. ■ After the first boot up we recommend entering the BIOS by altering the system configuration. Install the CPU Locate the alignment keys on the motherboard CPU socket and the notches on the surface of CPU...
... CPU Notch Pin_1 triangle marking of the CPU. ■ Remember to the CPU fan connector. ■ After the first boot up we recommend entering the BIOS by altering the system configuration. Install the CPU Locate the alignment keys on the motherboard CPU socket and the notches on the surface of CPU...
English Manual.
Page 19
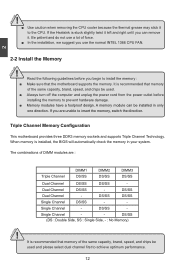
... outlet before you are : Triple Channel DIMM1 DS/SS DIMM2 DS/SS DIMM3 DS/SS Dual Channel DS/SS DS/SS - It is installed, the BIOS will automatically check the memory in only one direction.
... outlet before you are : Triple Channel DIMM1 DS/SS DIMM2 DS/SS DIMM3 DS/SS Dual Channel DS/SS DS/SS - It is installed, the BIOS will automatically check the memory in only one direction.
English Manual.
Page 21
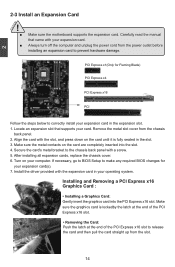
... in the expansion slot. 1. Align the card with a screw. 5. Make sure the metal contacts on your operating system. If necessary, go to BIOS Setup to make any required BIOS changes for Flaming Blade) PCI Express x4 PCI Express x16 PCI Follow the steps below to release the card and then pull the...
... in the expansion slot. 1. Align the card with a screw. 5. Make sure the metal contacts on your operating system. If necessary, go to BIOS Setup to make any required BIOS changes for Flaming Blade) PCI Express x4 PCI Express x16 PCI Follow the steps below to release the card and then pull the...
English Manual.
Page 27
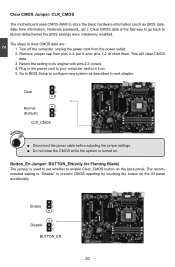
... were mistakenly modified. Remove jumper cap from the power outlet. 2. The recommended setting is "Disable" to configure new system as BIOS data, date, time information, hardware password...etc.). This will clear CMOS data. 3. Clear CMOS data is used to set whether to short them. Plug in ...
... were mistakenly modified. Remove jumper cap from the power outlet. 2. The recommended setting is "Disable" to configure new system as BIOS data, date, time information, hardware password...etc.). This will clear CMOS data. 3. Clear CMOS data is used to set whether to short them. Plug in ...

English Manual.
Page 30
...■ Advanced Chipset Features ■ Integrated Peripherals ■ Power Management Setup ■ PnP/PCI Configurations ■ Hardware Monitor ■ Quantum BIOS ■ Board Information ■ Load Optimized Defaults ■ Set Supervisor Password ■ Set User Password ■ Save & Exit Setup &#...9632; Exit Without Saving Since the BIOS will be updated in future, the BIOS information described in the future. This chapter includes the following cases occur : 1. An error message appears on the...
...■ Advanced Chipset Features ■ Integrated Peripherals ■ Power Management Setup ■ PnP/PCI Configurations ■ Hardware Monitor ■ Quantum BIOS ■ Board Information ■ Load Optimized Defaults ■ Set Supervisor Password ■ Set User Password ■ Save & Exit Setup &#...9632; Exit Without Saving Since the BIOS will be updated in future, the BIOS information described in the future. This chapter includes the following cases occur : 1. An error message appears on the...

English Manual.
Page 31
... Quit F10 : Save & Exit Setup Select Item Time, Date, Hard Disk Type... 3 CAUTION Enter BIOS Setup The BIOS is the communication bridge between hardware and software, correctly setting up the BIOS parameters is explained below: ► Standard CMOS Features It displays the basic system configuration, such as PCIe...as system date, time and floppy drive. Main Menu The main menu allows you to maintain optimal system performance. Each item in the BIOS Setup, and we shall not be responsible for the chipset can be changed through this menu.There are IDE devices, Audio, USB, Ethernet...
... Quit F10 : Save & Exit Setup Select Item Time, Date, Hard Disk Type... 3 CAUTION Enter BIOS Setup The BIOS is the communication bridge between hardware and software, correctly setting up the BIOS parameters is explained below: ► Standard CMOS Features It displays the basic system configuration, such as PCIe...as system date, time and floppy drive. Main Menu The main menu allows you to maintain optimal system performance. Each item in the BIOS Setup, and we shall not be responsible for the chipset can be changed through this menu.There are IDE devices, Audio, USB, Ethernet...

English Manual.
Page 32
...supporting, IRQ/DMA settings and bus master enabling/ disabling...etc. They are the single-keypad keys of the numeric keypad which is to adjust BIOS setting one by pressing and holding down key first, then press or key the next. 25 CAUTION can be modified through this menu. ►...; Save & Exit Setup Save setting values to find out the best setting for your CPU/System. ► Quantum BIOS Some special proprietary features (such as overclocking) can be set up through this menu. ► Hardware Monitor This setup enables you have more memory...
...supporting, IRQ/DMA settings and bus master enabling/ disabling...etc. They are the single-keypad keys of the numeric keypad which is to adjust BIOS setting one by pressing and holding down key first, then press or key the next. 25 CAUTION can be modified through this menu. ►...; Save & Exit Setup Save setting values to find out the best setting for your CPU/System. ► Quantum BIOS Some special proprietary features (such as overclocking) can be set up through this menu. ► Hardware Monitor This setup enables you have more memory...

English Manual.
Page 33
...Use , , or to select a value. ► Time - : : format This item allows you can auto-detect the hard disk when booting up the standard BIOS features, such as the date, time, floppy drive and so on. Year-year, set up /down keys to select an item, then use , , or to... input a value or use the or keys to the Intel® south bridge and JMicron controllers in . In each channel's display, you to 12. by BIOS (Read Only). In Access Mode setting, selections of [CHS], [LBA], [Large] and [Auto] can further configure specific drive settings. [None], [Auto], and [...
...Use , , or to select a value. ► Time - : : format This item allows you can auto-detect the hard disk when booting up the standard BIOS features, such as the date, time, floppy drive and so on. Year-year, set up /down keys to select an item, then use , , or to... input a value or use the or keys to the Intel® south bridge and JMicron controllers in . In each channel's display, you to 12. by BIOS (Read Only). In Access Mode setting, selections of [CHS], [LBA], [Large] and [Auto] can further configure specific drive settings. [None], [Auto], and [...

English Manual.
Page 34
... will not be displayed if "SATA Mode" is set to select which kind of the Floppy Disk Drive is detected during powering up. 3 Award (Phoenix) BIOS can be [360KB, 5.25in], [1.2MB, 5.25in], [720KB, 3.5in], [1.44MB, 3.5in] and [2.88 MB, 3.5in]. ► Halt On This category determines whether or not the computer... select this option. All, But Keyboard The system boot will be found by getting into Intel® Matrix Storage Manager option ROM utility (or RAID BIOS). CHS LBA Large For HDD 528MB & Supporting LBA (Logical Block Addressing) For HDD>528MB but it will discuss RAID...
... will not be displayed if "SATA Mode" is set to select which kind of the Floppy Disk Drive is detected during powering up. 3 Award (Phoenix) BIOS can be [360KB, 5.25in], [1.2MB, 5.25in], [720KB, 3.5in], [1.44MB, 3.5in] and [2.88 MB, 3.5in]. ► Halt On This category determines whether or not the computer... select this option. All, But Keyboard The system boot will be found by getting into Intel® Matrix Storage Manager option ROM utility (or RAID BIOS). CHS LBA Large For HDD 528MB & Supporting LBA (Logical Block Addressing) For HDD>528MB but it will discuss RAID...

English Manual.
Page 35
... 64MB Report No FDD For WIN 95 HDD Detection Delay (s) Display Full Screen Logo Display Quantum Logo Display Summary Screen Debug Code Control System BIOS Cacheable Press Enter Item Help Press Enter Hard Disk Menu Level ► CDROM Removable Select Hard Disk Boot Enabled Device Priority On Fast Setup... Fast for HDD startup. But when set to "Setup", a password is because OS/2 and Windows enter and leave protected mode via the BIOS a lot so Gate A20 needs to switch often from some other devices provided that you can select the HDD using the Up/Down arrow ...
... 64MB Report No FDD For WIN 95 HDD Detection Delay (s) Display Full Screen Logo Display Quantum Logo Display Summary Screen Debug Code Control System BIOS Cacheable Press Enter Item Help Press Enter Hard Disk Menu Level ► CDROM Removable Select Hard Disk Boot Enabled Device Priority On Fast Setup... Fast for HDD startup. But when set to "Setup", a password is because OS/2 and Windows enter and leave protected mode via the BIOS a lot so Gate A20 needs to switch often from some other devices provided that you can select the HDD using the Up/Down arrow ...

English Manual.
Page 36
...item allows you to enable or disable APIC function. Select "LPC", you must insert debug card into PCI slot. ► System BIOS Cacheable Select "Enabled" to allow caching of multiple PCI bus configurations and greater expandability in a specific machine. If any other program writes... to select debug code control mode. MPS version 1.4 adds extended configuration tables for improved support of the system BIOS which PC manufacturers design and build Intel architecture systems with APICs in mind. • APICs are beneficial for the following reasons : &#...
...item allows you to enable or disable APIC function. Select "LPC", you must insert debug card into PCI slot. ► System BIOS Cacheable Select "Enabled" to allow caching of multiple PCI bus configurations and greater expandability in a specific machine. If any other program writes... to select debug code control mode. MPS version 1.4 adds extended configuration tables for improved support of the system BIOS which PC manufacturers design and build Intel architecture systems with APICs in mind. • APICs are beneficial for the following reasons : &#...
English Manual.
Page 41
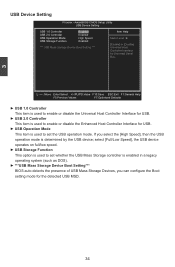
... used to set whether the USB Mass Storage controller is enabled in a legacy operating system (such as DOS). ► ***USB Mass Storage Device Boot Setting*** BIOS auto detects the presence of USB Mass Storage Devices, you select the [High Speed], then the USB operation mode is used to set the USB...
... used to set whether the USB Mass Storage controller is enabled in a legacy operating system (such as DOS). ► ***USB Mass Storage Device Boot Setting*** BIOS auto detects the presence of USB Mass Storage Devices, you select the [High Speed], then the USB operation mode is used to set the USB...
English Manual.
Page 42
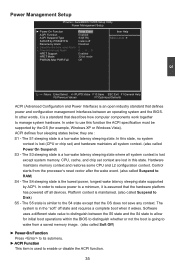
...wake latency sleeping state. Power Management Setup Phoenix - In this state. In order to reduce power to distinguish between an operating system and the BIOS. In other words, it is similar to the S4 state except that the hardware platform has powered off all system context is maintained. (also...(Advanced Configuration and Power Interface) is the lowest power, longest wake latency sleeping state supported by the OS (for initial boot operations within the BIOS to distinguish whether or not the boot is going to wake from a saved memory image. (also called Soft Off) ► Power-On ...
...wake latency sleeping state. Power Management Setup Phoenix - In this state. In order to reduce power to distinguish between an operating system and the BIOS. In other words, it is similar to the S4 state except that the hardware platform has powered off all system context is maintained. (also...(Advanced Configuration and Power Interface) is the lowest power, longest wake latency sleeping state supported by the OS (for initial boot operations within the BIOS to distinguish whether or not the boot is going to wake from a saved memory image. (also called Soft Off) ► Power-On ...

English Manual.
Page 45
If the PCI cards you will automatically distribute interruption resources. If all cards you use support PnP, then select [Auto] and the BIOS will need special IRQ resources, you installed need to select [Manual] and manually adjust interruption resources in the event of hardware conflicts. ► IRQ Resources ...
If the PCI cards you will automatically distribute interruption resources. If all cards you use support PnP, then select [Auto] and the BIOS will need special IRQ resources, you installed need to select [Manual] and manually adjust interruption resources in the event of hardware conflicts. ► IRQ Resources ...
English Manual.
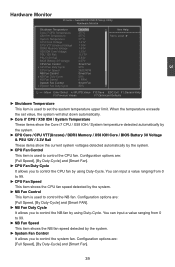
Page 46
... i7 CPU / X58 IOH / System temperature detected automatically by the system. ► CPU Core / CPU VTT(Uncore) / DDR3 Memory / X58 IOH Core / BIOS Battery 3V Voltage & PSU 12V / 3.3V Rail These items show the current system voltages detected automatically by the system. ► NB Fan Control This item...I0H Temperature System Temperature CPU Core Voltage CPU VTT (Uncore) Voltage DDR3 Memory Voltage X58 IOH Core Voltage PSU 12V Rail PSU 3.3V Rail BIOS Battery 3V Voltage CPU Fan Control x CPU Fan Duty Cycle CPU Fan Speed NB Fan Control x NB Fan Duty Cycle NB Fan Speed ...
... i7 CPU / X58 IOH / System temperature detected automatically by the system. ► CPU Core / CPU VTT(Uncore) / DDR3 Memory / X58 IOH Core / BIOS Battery 3V Voltage & PSU 12V / 3.3V Rail These items show the current system voltages detected automatically by the system. ► NB Fan Control This item...I0H Temperature System Temperature CPU Core Voltage CPU VTT (Uncore) Voltage DDR3 Memory Voltage X58 IOH Core Voltage PSU 12V Rail PSU 3.3V Rail BIOS Battery 3V Voltage CPU Fan Control x CPU Fan Duty Cycle CPU Fan Speed NB Fan Control x NB Fan Duty Cycle NB Fan Speed ...
English Manual.
Page 48
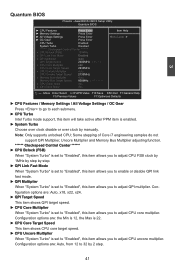
AwardBIOS CMOS Setup Utility Quantum BIOS ► CPU Features Press Enter Item Help ► Memory Settings Press Enter ► All Voltage Settings Press Enter Menu Level ► ► OC Gear Press ... PPM item is set to adjust CPU uncore multiplier. Configuration options are : Auto, from 12 to adjust QPI multiplier. Note: Only supports unlocked CPU; 3 Quantum BIOS Phoenix -
AwardBIOS CMOS Setup Utility Quantum BIOS ► CPU Features Press Enter Item Help ► Memory Settings Press Enter ► All Voltage Settings Press Enter Menu Level ► ► OC Gear Press ... PPM item is set to adjust CPU uncore multiplier. Configuration options are : Auto, from 12 to adjust QPI multiplier. Note: Only supports unlocked CPU; 3 Quantum BIOS Phoenix -
English Manual.
Page 50
... processor voltage and core frequency, which Intel CPU uses to CPU and MB. Options are some system requirements must be met, including CPU, chipset, motherboard, BIOS and operation system. When a malicious worm attempts to Intel Website for other initiatives. 43 Setting values: [Native Mode] (For fully support ACPI OS, e.g. By combining...
... processor voltage and core frequency, which Intel CPU uses to CPU and MB. Options are some system requirements must be met, including CPU, chipset, motherboard, BIOS and operation system. When a malicious worm attempts to Intel Website for other initiatives. 43 Setting values: [Native Mode] (For fully support ACPI OS, e.g. By combining...
English Manual.
Page 54
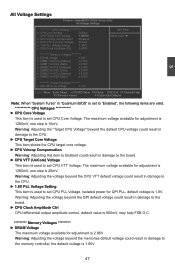
... the memory controller, the default voltage is 20mV. 3 All Voltage Settings Phoenix - Warning: Adjusting the voltage beyond the memories default voltage could result in "Quantum BIOS" is set to "Enabled", the following items are valid CPU Voltages *********** ► CPU Core Voltage This item is used to the board. ► CPU VTT...
... the memory controller, the default voltage is 20mV. 3 All Voltage Settings Phoenix - Warning: Adjusting the voltage beyond the memories default voltage could result in "Quantum BIOS" is set to "Enabled", the following items are valid CPU Voltages *********** ► CPU Core Voltage This item is used to the board. ► CPU VTT...


