English Manual.
Page 11
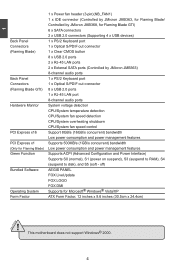
...Back Panel 1 x PS/2 Keyboard port Connectors 1 x Optical S/PDIF out connector (Flaming Blade GTI) 8 x USB 2.0 ports 1 x RJ-45 LAN port 8-channel audio ports Hardware Monitor System voltage detection CPU/System temperature detection CPU/System fan speed detection CPU/System overheating shutdown CPU/System fan speed control PCI Express x16 Support 8GB/s (16GB/s concurrent) bandwidth Low power consumption and power management features PCI Express x1 Supports 500MB/s (1GB/s concurrent) bandwidth (Only for Microsoft® Windows® Vista/XP Form Factor ATX...
...Back Panel 1 x PS/2 Keyboard port Connectors 1 x Optical S/PDIF out connector (Flaming Blade GTI) 8 x USB 2.0 ports 1 x RJ-45 LAN port 8-channel audio ports Hardware Monitor System voltage detection CPU/System temperature detection CPU/System fan speed detection CPU/System overheating shutdown CPU/System fan speed control PCI Express x16 Support 8GB/s (16GB/s concurrent) bandwidth Low power consumption and power management features PCI Express x1 Supports 500MB/s (1GB/s concurrent) bandwidth (Only for Microsoft® Windows® Vista/XP Form Factor ATX...
English Manual.
Page 15
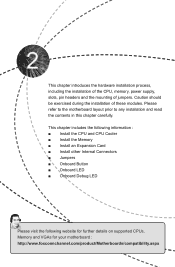
... CPU and CPU Cooler ■ Install the Memory ■ Install an Expansion Card ■ Install other Internal Connectors ■ Jumpers ■ Onboard Button ■ Onboard LED ■ Onboard Debug LED Please visit the following website for further details on supported CPUs, Memory and VGAs for your motherboard : http://www.foxconnchannel.com/product/Motherboards/compatibility.aspx Caution should be exercised during the installation of jumpers. This chapter introduces the hardware installation process, including the installation of the CPU, memory, power supply, slots, pin headers...
... CPU and CPU Cooler ■ Install the Memory ■ Install an Expansion Card ■ Install other Internal Connectors ■ Jumpers ■ Onboard Button ■ Onboard LED ■ Onboard Debug LED Please visit the following website for further details on supported CPUs, Memory and VGAs for your motherboard : http://www.foxconnchannel.com/product/Motherboards/compatibility.aspx Caution should be exercised during the installation of jumpers. This chapter introduces the hardware installation process, including the installation of the CPU, memory, power supply, slots, pin headers...
English Manual.
Page 21
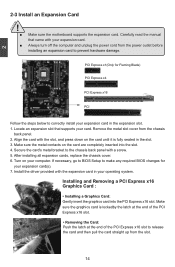
... After installing all expansion cards, replace the chassis cover. 6. If necessary, go to BIOS Setup to make any required BIOS changes for Flaming Blade) PCI Express x4 PCI Express x16 PCI Follow the steps below to prevent hardware damage. Make sure the graphics card is fully seated in the expansion slot. 1. Install the driver provided with your computer. Carefully read the manual that supports your expansion card in the slot. 3. Locate an expansion slot...
... After installing all expansion cards, replace the chassis cover. 6. If necessary, go to BIOS Setup to make any required BIOS changes for Flaming Blade) PCI Express x4 PCI Express x16 PCI Follow the steps below to prevent hardware damage. Make sure the graphics card is fully seated in the expansion slot. 1. Install the driver provided with your computer. Carefully read the manual that supports your expansion card in the slot. 3. Locate an expansion slot...

English Manual.
Page 24
... connector is directional with SATA Hard 1 GND TX+ Disk or CD devices which support this switch allows the system to be connected CD_L GND CD_R to a CD/DVD-ROM drive through a CD/DVD audio cable. 1 CD_IN Speaker Connector : SPEAKER The speaker connector is used to connect with +/- Power Switch Connector (PWR-SW) Connect to the Reset switch on the front panel of the hard disks. 2 Front Panel Connector : FP1 This motherboard includes one connector for connecting the front panel switch and LED Indicators. Reset Switch (RESET-SW) Attach the connector to the power button...
... connector is directional with SATA Hard 1 GND TX+ Disk or CD devices which support this switch allows the system to be connected CD_L GND CD_R to a CD/DVD-ROM drive through a CD/DVD audio cable. 1 CD_IN Speaker Connector : SPEAKER The speaker connector is used to connect with +/- Power Switch Connector (PWR-SW) Connect to the Reset switch on the front panel of the hard disks. 2 Front Panel Connector : FP1 This motherboard includes one connector for connecting the front panel switch and LED Indicators. Reset Switch (RESET-SW) Attach the connector to the power button...

English Manual.
Page 26
... a few seconds, but using jumper cap is turned on. ■ Only suggest to use the various functions of this motherboard to modify them . Jumper 1 1 Diagram 1 1 1 1 Definition 1-2 2-3 Closed Opened Description Set Pin 1 and Pin 2 closed Set Pin 2 and Pin 3 closed Set two pins closed Set two pins opened Discharge Battery Jumper: VBAT_DISCHARGE Resetting the CMOS isn't always good enough since in more recent chipset versions some features needed, users can change the jumper settings on this motherboard by changing the jumper settings.
... a few seconds, but using jumper cap is turned on. ■ Only suggest to use the various functions of this motherboard to modify them . Jumper 1 1 Diagram 1 1 1 1 Definition 1-2 2-3 Closed Opened Description Set Pin 1 and Pin 2 closed Set Pin 2 and Pin 3 closed Set two pins closed Set two pins opened Discharge Battery Jumper: VBAT_DISCHARGE Resetting the CMOS isn't always good enough since in more recent chipset versions some features needed, users can change the jumper settings on this motherboard by changing the jumper settings.

English Manual.
Page 30
... of this manual to run the Setup Program when the following information : ■ Enter BIOS Setup ■ Main Menu ■ Standard CMOS Features ■ Boot Setting Configuration ■ Advanced Chipset Features ■ Integrated Peripherals ■ Power Management Setup ■ PnP/PCI Configurations ■ Hardware Monitor ■ Quantum BIOS ■ Board Information ■ Load Optimized Defaults ■ Set Supervisor Password ■ Set User Password ■ Save & Exit Setup ■ Exit Without Saving Since the BIOS will be updated in future...
... of this manual to run the Setup Program when the following information : ■ Enter BIOS Setup ■ Main Menu ■ Standard CMOS Features ■ Boot Setting Configuration ■ Advanced Chipset Features ■ Integrated Peripherals ■ Power Management Setup ■ PnP/PCI Configurations ■ Hardware Monitor ■ Quantum BIOS ■ Board Information ■ Load Optimized Defaults ■ Set Supervisor Password ■ Set User Password ■ Save & Exit Setup ■ Exit Without Saving Since the BIOS will be updated in future...

English Manual.
Page 32
... this menu. ► Hardware Monitor This setup enables you to read/change fan speeds, and displays temperatures and voltages of your system loading is to adjust BIOS setting one , trial and error, to find out the best setting for your CPU/System. ► Quantum BIOS Some special proprietary features (such as less I/O cards, less memory ...etc.), still, it may offer better performance in this manual, they are not the combination keys...
... this menu. ► Hardware Monitor This setup enables you to read/change fan speeds, and displays temperatures and voltages of your system loading is to adjust BIOS setting one , trial and error, to find out the best setting for your CPU/System. ► Quantum BIOS Some special proprietary features (such as less I/O cards, less memory ...etc.), still, it may offer better performance in this manual, they are not the combination keys...

English Manual.
Page 33
... can auto-detect the hard disk when booting up by users. You can help you to 31st. Halt On All Errors Move Enter:Select +/-/PU/PD:Value F10:Save ESC:Exit F1:General Help F5:Previous Values F7:Optimized Defaults ► Date - to Sat., automatically displayed by choosing "Manual" and changing Access Mode to configure the desired time. Use the arrow up the standard BIOS features...
... can auto-detect the hard disk when booting up by users. You can help you to 31st. Halt On All Errors Move Enter:Select +/-/PU/PD:Value F10:Save ESC:Exit F1:General Help F5:Previous Values F7:Optimized Defaults ► Date - to Sat., automatically displayed by choosing "Manual" and changing Access Mode to configure the desired time. Use the arrow up the standard BIOS features...

English Manual.
Page 35
... controller controls Gate A20. AwardBIOS CMOS Setup Utility Boot Setting Configuration ► HDD Boot Priority ► Removable Boot Priority 1st Boot Device 2nd Boot Device 3rd Boot Device Boot Other Devices Boot Up NumLock Status Gate A20 Option Security Option APIC Mode MPS Version Control For OS OS Select For DRAM > 64MB Report No FDD For WIN 95 HDD Detection Delay (s) Display Full Screen Logo Display Quantum Logo Display Summary Screen Debug Code Control System BIOS Cacheable Press Enter Item Help Press Enter Hard Disk Menu...
... controller controls Gate A20. AwardBIOS CMOS Setup Utility Boot Setting Configuration ► HDD Boot Priority ► Removable Boot Priority 1st Boot Device 2nd Boot Device 3rd Boot Device Boot Other Devices Boot Up NumLock Status Gate A20 Option Security Option APIC Mode MPS Version Control For OS OS Select For DRAM > 64MB Report No FDD For WIN 95 HDD Detection Delay (s) Display Full Screen Logo Display Quantum Logo Display Summary Screen Debug Code Control System BIOS Cacheable Press Enter Item Help Press Enter Hard Disk Menu...

English Manual.
Page 36
... Windows 95 logo certification. ► HDD Detection Delay (s) This item allows you can have installed more processors. Select "PCI", you to enable or disable APIC function. MPS 1.1 was the original specification. MPS version 1.4 adds extended configuration tables for enabling new features in the future. APIC interrupt subsystems can use . Time out value: 0~15s. ► Display Full Screen Logo This item allows you to enable or disable...
... Windows 95 logo certification. ► HDD Detection Delay (s) This item allows you can have installed more processors. Select "PCI", you to enable or disable APIC function. MPS 1.1 was the original specification. MPS version 1.4 adds extended configuration tables for enabling new features in the future. APIC interrupt subsystems can use . Time out value: 0~15s. ► Display Full Screen Logo This item allows you to enable or disable...
English Manual.
Page 40
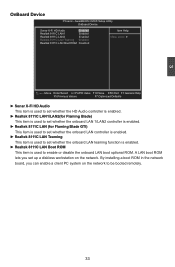
... the network. AwardBIOS CMOS Setup Utility OnBoard Device . 3 OnBoard Device Phoenix - Sonar X-Fi HD Audio Enabled Item Help Realtek 8111C LAN1 Enabled Realtek 8111C LAN2 Enabled Menu Level ► Realtek 8111C LAN Teaming Enabled Realtek 8111C LAN Boot ROM Disabled Move Enter:Select +/-/PU/PD:Value F10:Save ESC:Exit F1:General Help F5:Previous Values F7:Optimized Defaults ► Sonar X-Fi HD Audio This item is used to set whether the HD Audio controller is enabled...
... the network. AwardBIOS CMOS Setup Utility OnBoard Device . 3 OnBoard Device Phoenix - Sonar X-Fi HD Audio Enabled Item Help Realtek 8111C LAN1 Enabled Realtek 8111C LAN2 Enabled Menu Level ► Realtek 8111C LAN Teaming Enabled Realtek 8111C LAN Boot ROM Disabled Move Enter:Select +/-/PU/PD:Value F10:Save ESC:Exit F1:General Help F5:Previous Values F7:Optimized Defaults ► Sonar X-Fi HD Audio This item is used to set whether the HD Audio controller is enabled...
English Manual.
Page 41
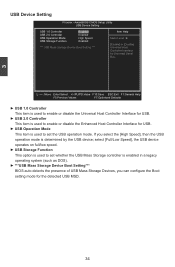
... is used to set whether the USB Mass Storage controller is enabled in a legacy operating system (such as DOS). ► ***USB Mass Storage Device Boot Setting*** BIOS auto detects the presence of USB Mass Storage Devices, you select the [High Speed], then the USB operation mode is used to set the USB operation mode. select [Full/Low Speed], the USB device operates on full/low speed. ► USB Storage Function This option is determined by the USB device; If you can configure the Boot setting mode for Universal Serial Bus. 3 USB Device Setting...
... is used to set whether the USB Mass Storage controller is enabled in a legacy operating system (such as DOS). ► ***USB Mass Storage Device Boot Setting*** BIOS auto detects the presence of USB Mass Storage Devices, you select the [High Speed], then the USB operation mode is used to set the USB operation mode. select [Full/Low Speed], the USB device operates on full/low speed. ► USB Storage Function This option is determined by the USB device; If you can configure the Boot setting mode for Universal Serial Bus. 3 USB Device Setting...

English Manual.
Page 45
.... Default INT Pin assignments can press the key, then manually set to "Manual", this item is used first when your PC starts up. AwardBIOS CMOS Setup Utility PnP/PCI Configurations Init Display First PCI Slot Item Help Reset Configuration Data Disabled Menu Level ► Resources Controlled By Auto (ESCD) x IRQ Resources Press Enter INT Pin 1 Assignment Auto INT Pin 2 Assignment Auto INT Pin 3 Assignment Auto INT Pin 4 Assignment Auto INT Pin 5 Assignment Auto INT Pin 6 Assignment Auto INT Pin 7 Assignment Auto INT Pin...
.... Default INT Pin assignments can press the key, then manually set to "Manual", this item is used first when your PC starts up. AwardBIOS CMOS Setup Utility PnP/PCI Configurations Init Display First PCI Slot Item Help Reset Configuration Data Disabled Menu Level ► Resources Controlled By Auto (ESCD) x IRQ Resources Press Enter INT Pin 1 Assignment Auto INT Pin 2 Assignment Auto INT Pin 3 Assignment Auto INT Pin 4 Assignment Auto INT Pin 5 Assignment Auto INT Pin 6 Assignment Auto INT Pin 7 Assignment Auto INT Pin...
English Manual.
Page 48
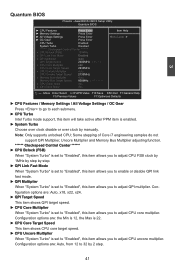
... CMOS Setup Utility Quantum BIOS ► CPU Features Press Enter Item Help ► Memory Settings Press Enter ► All Voltage Settings Press Enter Menu Level ► ► OC Gear Press Enter CPU Turbo Enabled System Turbo Disabled ******* Clockspeed Control Center ******* x CPU Bclock (FSB) 133MHz x QPI Link Fast Mode Enabled x QPI Multiplier Auto QPI Target Speed 2400MHz (4.8GT/s) x CPU Core Multiplier x22 CPU Core Target Speed 2933MHz x CPU Uncore Multiplier Auto CPU Uncore Target Speed 2133MHz x Memory Bus Multiplier Auto Memory Bus...
... CMOS Setup Utility Quantum BIOS ► CPU Features Press Enter Item Help ► Memory Settings Press Enter ► All Voltage Settings Press Enter Menu Level ► ► OC Gear Press Enter CPU Turbo Enabled System Turbo Disabled ******* Clockspeed Control Center ******* x CPU Bclock (FSB) 133MHz x QPI Link Fast Mode Enabled x QPI Multiplier Auto QPI Target Speed 2400MHz (4.8GT/s) x CPU Core Multiplier x22 CPU Core Target Speed 2933MHz x CPU Uncore Multiplier Auto CPU Uncore Target Speed 2133MHz x Memory Bus Multiplier Auto Memory Bus...
English Manual.
Page 50
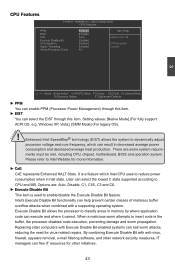
...:Optimized Defaults ► PPM You can enable PPM (Processor Power Management) through this item. ► EIST You can execute and where it cannot. Enhanced Intel SpeedStep® technology (EIST) allows the system to dynamically adjust processor voltage and core frequency, which Intel CPU uses to enable/disable the Execute Disable Bit feature. User can result in halt state. Windows XP, Vista); [SMM Mode] (For legacy OS). ! There are : Auto, Disable, C1...
...:Optimized Defaults ► PPM You can enable PPM (Processor Power Management) through this item. ► EIST You can execute and where it cannot. Enhanced Intel SpeedStep® technology (EIST) allows the system to dynamically adjust processor voltage and core frequency, which Intel CPU uses to enable/disable the Execute Disable Bit feature. User can result in halt state. Windows XP, Vista); [SMM Mode] (For legacy OS). ! There are : Auto, Disable, C1...

English Manual.
Page 61
... the necessary drivers for more detail. 54 Driver Click on the screen. 1. Realtek 811X LAN Driver Use it to install Realtek LAN driver. Intel Chipset Driver Use it to install Intel chipset driver. This restriction forces us to find out another way to install this driver needs "SATA Mode" in BIOS to be set to install Realtek HDA audio driver. You need to "5-5 Existing Windows XP with RAID built as data storage." Realtek HDA Audio Driver Use it to [AHCI] or [RAID].
... the necessary drivers for more detail. 54 Driver Click on the screen. 1. Realtek 811X LAN Driver Use it to install Realtek LAN driver. Intel Chipset Driver Use it to install Intel chipset driver. This restriction forces us to find out another way to install this driver needs "SATA Mode" in BIOS to be set to install Realtek HDA audio driver. You need to "5-5 Existing Windows XP with RAID built as data storage." Realtek HDA Audio Driver Use it to [AHCI] or [RAID].

English Manual.
Page 62
... IDE PATA ports (Master/Slave). Utility Use these options to backup or update the system BIOS, drivers and utilities in Windows® environment. Microsoft DirectX 9.0 Use it provides three DMI data formats. Due to limitation of load balance and fail over. Fox LiveUpdate The Fox LiveUpdate allows you building RAID system by using onboard SATA ports (controlled by viruses. 55 AEGIS PANEL Foxconn new utility software for details. See "Fox LiveUpdate" for monitoring...
... IDE PATA ports (Master/Slave). Utility Use these options to backup or update the system BIOS, drivers and utilities in Windows® environment. Microsoft DirectX 9.0 Use it provides three DMI data formats. Due to limitation of load balance and fail over. Fox LiveUpdate The Fox LiveUpdate allows you building RAID system by using onboard SATA ports (controlled by viruses. 55 AEGIS PANEL Foxconn new utility software for details. See "Fox LiveUpdate" for monitoring...

English Manual.
Page 110
... SCSI or RAID driver. 103 Windows Setup 5 Press F6 if you need to your Windows XP system. 1. Set the "1st Boot Device" to enter BIOS Setup during POST. 2. The computer will start installing Windows Operating System. AwardBIOS CMOS Setup Utility Boot Setting Configuration ► HDD Boot Priority ► Removable Boot Priority 1st Boot Device 2nd Boot Device 3rd Boot Device Boot Other Devices Boot Up NumLock Status Gate A20 Option Security Option APIC Mode MPS Version Control For OS OS Select For DRAM > 64MB Report No FDD For WIN 95 HDD Detection...
... SCSI or RAID driver. 103 Windows Setup 5 Press F6 if you need to your Windows XP system. 1. Set the "1st Boot Device" to enter BIOS Setup during POST. 2. The computer will start installing Windows Operating System. AwardBIOS CMOS Setup Utility Boot Setting Configuration ► HDD Boot Priority ► Removable Boot Priority 1st Boot Device 2nd Boot Device 3rd Boot Device Boot Other Devices Boot Up NumLock Status Gate A20 Option Security Option APIC Mode MPS Version Control For OS OS Select For DRAM > 64MB Report No FDD For WIN 95 HDD Detection...

English Manual.
Page 111
... mass storage device(s): * To specify additional SCSI adapters, CD-ROM drivers, or special disk controllers for use with Windows, including those for use with Windows, press ENTER. Press after it is done. Currently, Setup will ask you to manually specify an adapter. It will load support for the following picture appears, press to continue the specific driver installation. 5 Windows Setup Setup could not determine the type of one or more mass storage devices installed in...
... mass storage device(s): * To specify additional SCSI adapters, CD-ROM drivers, or special disk controllers for use with Windows, including those for use with Windows, press ENTER. Press after it is done. Currently, Setup will ask you to manually specify an adapter. It will load support for the following picture appears, press to continue the specific driver installation. 5 Windows Setup Setup could not determine the type of one or more mass storage devices installed in...
English Manual.
Page 115
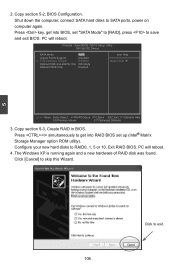
... new hard disks to SATA ports, power on computer again. Exit RAID BIOS. The Windows XP is running again and a new hardware of RAID disk was found. Shut down the computer, connect SATA hard disks to RAID0, 1, 5 or 10. Press key, get into BIOS, set up (Intel® Matrix Storage Manager option ROM utility). Copy section 5-2, BIOS Configuration. Press simultaneously to get into RAID BIOS set "SATA Mode" to [RAID], press to exit. 108 AwardBIOS CMOS Setup Utility OnChip IDE Device SATA Mode Legacy Mode Support x Turbo Memory Support OnBoard IDE and eSATA Chip OnBoard...
... new hard disks to SATA ports, power on computer again. Exit RAID BIOS. The Windows XP is running again and a new hardware of RAID disk was found. Shut down the computer, connect SATA hard disks to RAID0, 1, 5 or 10. Press key, get into BIOS, set up (Intel® Matrix Storage Manager option ROM utility). Copy section 5-2, BIOS Configuration. Press simultaneously to get into RAID BIOS set "SATA Mode" to [RAID], press to exit. 108 AwardBIOS CMOS Setup Utility OnChip IDE Device SATA Mode Legacy Mode Support x Turbo Memory Support OnBoard IDE and eSATA Chip OnBoard...


