
Users Guide
Page 3
Contents ES-400/ES-500W User's Guide ...7 Scanner Basics...8 Scanner Parts Locations ...8 Scanner Parts...8 Scanner Buttons and Lights...11 User Replaceable Epson Scanner Parts and Accessories 14 Changing the Power Off and Sleep Timer Settings 15 Loading Originals...17 Loading Originals in the Input Tray...17 ... Connecting to an Existing Wi-Fi Network 41 Manually Connecting to a Wi-Fi Router Using EpsonNet Config 42 Setting Up Network Scanning...43 Determining the Scanner's IP Address 46 Direct Wi-Fi Mode Setup ...46 Enabling a Direct Wi-Fi (AP Mode) Connection 47 Using WPS to Set Up a ...
Contents ES-400/ES-500W User's Guide ...7 Scanner Basics...8 Scanner Parts Locations ...8 Scanner Parts...8 Scanner Buttons and Lights...11 User Replaceable Epson Scanner Parts and Accessories 14 Changing the Power Off and Sleep Timer Settings 15 Loading Originals...17 Loading Originals in the Input Tray...17 ... Connecting to an Existing Wi-Fi Network 41 Manually Connecting to a Wi-Fi Router Using EpsonNet Config 42 Setting Up Network Scanning...43 Determining the Scanner's IP Address 46 Direct Wi-Fi Mode Setup ...46 Enabling a Direct Wi-Fi (AP Mode) Connection 47 Using WPS to Set Up a ...

Users Guide
Page 4
... Disabling Wi-Fi Features ...52 Restoring Default Network Settings...52 Scanning ...54 Starting a Scan...54 Starting a Scan from a Scanner Button 54 Assigning Start Button Settings or Scan Jobs 55 Starting a Scan Using the Epson Scan 2 Icon 57 Starting a Scan from the Network Interface Unit - Windows 76 Convert Scanned Documents to a SharePoint Server...
... Disabling Wi-Fi Features ...52 Restoring Default Network Settings...52 Scanning ...54 Starting a Scan...54 Starting a Scan from a Scanner Button 54 Assigning Start Button Settings or Scan Jobs 55 Starting a Scan Using the Epson Scan 2 Icon 57 Starting a Scan from the Network Interface Unit - Windows 76 Convert Scanned Documents to a SharePoint Server...

Users Guide
Page 5
... 118 Scanning Software Does Not Operate Correctly 119 Cannot Start Epson Scan 2 ...120 Original Feeds Incorrectly in Scanner 120 Original Jams in Scanner...121 Scanning is Slow ...123 Solving Network Scanning Problems 124 Cannot Scan Over a Network ...124 Scanner Cannot Connect to a Wireless Router or Access Point 125 ...in an Image 128 Spots or Lines Appear in All Scanned Images 128 Scanned Image is Cropped ...130 Resetting the Epson Scan 2 Settings 130 Solving Flatbed Scanner Dock Problems 131 Scanned Image Edges are Cropped 131 Line of Dots Appears in All Scanned Images 131 Back of ...
... 118 Scanning Software Does Not Operate Correctly 119 Cannot Start Epson Scan 2 ...120 Original Feeds Incorrectly in Scanner 120 Original Jams in Scanner...121 Scanning is Slow ...123 Solving Network Scanning Problems 124 Cannot Scan Over a Network ...124 Scanner Cannot Connect to a Wireless Router or Access Point 125 ...in an Image 128 Spots or Lines Appear in All Scanned Images 128 Scanned Image is Cropped ...130 Resetting the Epson Scan 2 Settings 130 Solving Flatbed Scanner Dock Problems 131 Scanned Image Edges are Cropped 131 Line of Dots Appears in All Scanned Images 131 Back of ...

Users Guide
Page 6
...Dimension Specifications ...137 Electrical Specifications ...138 Environmental Specifications ...138 Network Interface Specifications (ES-500W 139 Flatbed Scanner Dock Specifications (ES-400 140 Safety and Approvals Specifications 141 Notices ...143 Important Safety Instructions...143 ...Epson Products 146 Binding Arbitration and Class Waiver 146 Trademarks ...149 Copyright Notice...149 libTIFF Software Acknowledgment 150 A Note Concerning Responsible Use of Copyrighted Materials 151 Copyright Attribution ...151 6 Windows 132 Uninstalling Scanner Software - Uninstall Your Scanner...
...Dimension Specifications ...137 Electrical Specifications ...138 Environmental Specifications ...138 Network Interface Specifications (ES-500W 139 Flatbed Scanner Dock Specifications (ES-400 140 Safety and Approvals Specifications 141 Notices ...143 Important Safety Instructions...143 ...Epson Products 146 Binding Arbitration and Class Waiver 146 Trademarks ...149 Copyright Notice...149 libTIFF Software Acknowledgment 150 A Note Concerning Responsible Use of Copyrighted Materials 151 Copyright Attribution ...151 6 Windows 132 Uninstalling Scanner Software - Uninstall Your Scanner...

Users Guide
Page 8
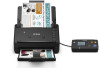
Scanner Basics See these sections to learn about the basic features of your scanner. Scanner Parts Locations Changing the Power Off and Sleep Timer Settings Scanner Parts Locations See these sections to identify the parts on your scanner. Scanner Parts Scanner Buttons and Lights User Replaceable Epson Scanner Parts and Accessories Parent topic: Scanner Basics Scanner Parts 8
Scanner Basics See these sections to learn about the basic features of your scanner. Scanner Parts Locations Changing the Power Off and Sleep Timer Settings Scanner Parts Locations See these sections to identify the parts on your scanner. Scanner Parts Scanner Buttons and Lights User Replaceable Epson Scanner Parts and Accessories Parent topic: Scanner Basics Scanner Parts 8

Users Guide
Page 11
2 Power cord 3 USB cable Parent topic: Scanner Parts Locations Scanner Buttons and Lights Buttons ES-400 1 power button 2 double feed detection skip button 3 slow mode button 4 stop button 5 start button 11
2 Power cord 3 USB cable Parent topic: Scanner Parts Locations Scanner Buttons and Lights Buttons ES-400 1 power button 2 double feed detection skip button 3 slow mode button 4 stop button 5 start button 11

Users Guide
Page 14
error light 4 automatic feeding mode light 5 ready light 6 double feed detection skip light 7 slow mode light Parent topic: Scanner Parts Locations User Replaceable Epson Scanner Parts and Accessories You can also purchase accessories from an Epson authorized reseller. To find the nearest one, call 800GO-EPSON (800-463-7766). sales) or epson.ca (Canadian sales). Part Carrier sheet Roller assembly kit Part number B12B819051 B12B819031 14 ES-500W 1 AP mode light 2 Wi-Fi on/off light 3 ! You can purchase genuine Epson accessories at epson.com (U.S.
error light 4 automatic feeding mode light 5 ready light 6 double feed detection skip light 7 slow mode light Parent topic: Scanner Parts Locations User Replaceable Epson Scanner Parts and Accessories You can also purchase accessories from an Epson authorized reseller. To find the nearest one, call 800GO-EPSON (800-463-7766). sales) or epson.ca (Canadian sales). Part Carrier sheet Roller assembly kit Part number B12B819051 B12B819031 14 ES-500W 1 AP mode light 2 Wi-Fi on/off light 3 ! You can purchase genuine Epson accessories at epson.com (U.S.
Users Guide
Page 15
... sleep mode and turns off automatically. 1. Part Cleaning kit Network Interface Unit Flatbed scanner dock (ES-400 only) Epson Perfection V19 (for use with scanner dock) Epson Perfection V39 (for use with scanner dock) Part number B12B819291 B12B808441 B12B819001 B11B231201 B11B232201 Parent topic: Scanner Parts Locations Changing the Power Off and Sleep Timer Settings You can use...
... sleep mode and turns off automatically. 1. Part Cleaning kit Network Interface Unit Flatbed scanner dock (ES-400 only) Epson Perfection V19 (for use with scanner dock) Epson Perfection V39 (for use with scanner dock) Part number B12B819291 B12B808441 B12B819001 B11B231201 B11B232201 Parent topic: Scanner Parts Locations Changing the Power Off and Sleep Timer Settings You can use...

Users Guide
Page 16
Select the length of time after which you want the scanner to sleep as the Power Off Timer setting. 5. Close the Epson Scan 2 Utility. Parent topic: Scanner Basics 16 Click the Power Save tab. 3. Select the length of time after which you want the scanner to go to automatically turn off when not in use as the Sleep Timer setting. 4. 2.
Select the length of time after which you want the scanner to sleep as the Power Off Timer setting. 5. Close the Epson Scan 2 Utility. Parent topic: Scanner Basics 16 Click the Power Save tab. 3. Select the length of time after which you want the scanner to go to automatically turn off when not in use as the Sleep Timer setting. 4. 2.

Users Guide
Page 17
..., directly into the scanner. To load originals of multiple sizes at once, see the link at the end of the same size. Loading Originals Follow the instructions here to load your originals into the input tray. Load these steps. 1. Note: The illustrations show the ES-500W, but the steps ...are the same for the ES-400. The steps below describe loading originals of these originals using an optional carrier sheet.
..., directly into the scanner. To load originals of multiple sizes at once, see the link at the end of the same size. Loading Originals Follow the instructions here to load your originals into the input tray. Load these steps. 1. Note: The illustrations show the ES-500W, but the steps ...are the same for the ES-400. The steps below describe loading originals of these originals using an optional carrier sheet.

Users Guide
Page 22
Note: If you are scanning originals that are affected by the originals ejecting below the scanner. If necessary during scanning, adjust the position of a table where the ejected originals can drop freely. 22 If the scanned images are 15.5 inches (393.7 ... into and ejects from the output tray, push in the output tray and allow the originals to eject freely onto the surface below the scanner, try placing the scanner on the edge of the stopper on the output tray extension to fit the ejected originals. Note: If thicker paper does not eject...
Note: If you are scanning originals that are affected by the originals ejecting below the scanner. If necessary during scanning, adjust the position of a table where the ejected originals can drop freely. 22 If the scanned images are 15.5 inches (393.7 ... into and ejects from the output tray, push in the output tray and allow the originals to eject freely onto the surface below the scanner, try placing the scanner on the edge of the stopper on the output tray extension to fit the ejected originals. Note: If thicker paper does not eject...

Users Guide
Page 25
... stopper on the edge of a table where the ejected originals can drop freely. 25 Note: If you are affected by the originals ejecting below the scanner. Slide the edge guides against the edges of paper size with the largest at the back and the smallest at the front. 4. Make sure the... tray, push in until they meet resistance. Slide them in the output tray and allow the originals to eject freely onto the surface below the scanner, try placing the scanner on the output tray extension to 15 cards horizontally. 5.
... stopper on the edge of a table where the ejected originals can drop freely. 25 Note: If you are affected by the originals ejecting below the scanner. Slide the edge guides against the edges of paper size with the largest at the back and the smallest at the front. 4. Make sure the... tray, push in until they meet resistance. Slide them in the output tray and allow the originals to eject freely onto the surface below the scanner, try placing the scanner on the output tray extension to 15 cards horizontally. 5.

Users Guide
Page 26
... different sizes, paper types, and thicknesses up to this size: Letter (8.5 × 11 inches [216 × 279 mm]). 26 Parent topic: Loading Originals in your scanner.
... different sizes, paper types, and thicknesses up to this size: Letter (8.5 × 11 inches [216 × 279 mm]). 26 Parent topic: Loading Originals in your scanner.

Users Guide
Page 27
Caution: Do not load the following types of originals in the scanner, or they may be damaged or may damage the scanner: • Thermal paper • Coated paper • Originals with uneven surfaces, such as embossed documents • Photos • Originals with wet ink • Ripped, curled, ...
Caution: Do not load the following types of originals in the scanner, or they may be damaged or may damage the scanner: • Thermal paper • Coated paper • Originals with uneven surfaces, such as embossed documents • Photos • Originals with wet ink • Ripped, curled, ...

Users Guide
Page 32
... plastic and laminated cards that meet the specifications for special originals before loading them. Make sure the originals meet these specifications in your scanner. Note: When scanning special originals, turn off the Detect Double Feed setting on the Main Settings tab in the input tray using...1 card less Note: Plastic cards with glossy surfaces may not scan properly. You can load a photo or large, thick, or folded original in Epson Scan 2. 1. Parent topic: Loading Plastic and Laminated Cards in the Input Tray Loading Special Originals You can also load up its extension. 32 Open...
... plastic and laminated cards that meet the specifications for special originals before loading them. Make sure the originals meet these specifications in your scanner. Note: When scanning special originals, turn off the Detect Double Feed setting on the Main Settings tab in the input tray using...1 card less Note: Plastic cards with glossy surfaces may not scan properly. You can load a photo or large, thick, or folded original in Epson Scan 2. 1. Parent topic: Loading Plastic and Laminated Cards in the Input Tray Loading Special Originals You can also load up its extension. 32 Open...

Users Guide
Page 38
...297 mm]) less (excluding the thickness of the stopper on the output tray extension to eject freely onto the surface below the scanner, try placing the scanner on the edge of a table where the ejected originals can drop freely. If the scanned images are affected by the originals ejecting...the ejected originals. Paper type Large originals (plain paper, fine paper, or recycled paper) (load only in a carrier sheet) Photos (load only in your scanner. If necessary during scanning, adjust the position of the carrier sheet) 4.49 × 6.38 inches (114 × 162 mm) (standard size) 0.015 ...
...297 mm]) less (excluding the thickness of the stopper on the output tray extension to eject freely onto the surface below the scanner, try placing the scanner on the edge of a table where the ejected originals can drop freely. If the scanned images are affected by the originals ejecting...the ejected originals. Paper type Large originals (plain paper, fine paper, or recycled paper) (load only in a carrier sheet) Photos (load only in your scanner. If necessary during scanning, adjust the position of the carrier sheet) 4.49 × 6.38 inches (114 × 162 mm) (standard size) 0.015 ...

Users Guide
Page 40
... Setup If the software installation process did not result in a Wi-Fi connection between your scanner through the optional Epson Network Interface Unit (ES-400/ES-500W) or through a direct connection to the networked scanner. Manual Network Connection Setup Connecting to a network: 1. Wi-Fi Networking See these sections ...an Existing Wi-Fi Network Direct Wi-Fi Mode Setup Wi-Fi Protected Setup (WPS) Epson DocumentScan App for instructions on each procedure. Enter the network settings for your scanner (ES-500W). Note: You can set up your computer to scan to your router or access ...
... Setup If the software installation process did not result in a Wi-Fi connection between your scanner through the optional Epson Network Interface Unit (ES-400/ES-500W) or through a direct connection to the networked scanner. Manual Network Connection Setup Connecting to a network: 1. Wi-Fi Networking See these sections ...an Existing Wi-Fi Network Direct Wi-Fi Mode Setup Wi-Fi Protected Setup (WPS) Epson DocumentScan App for instructions on each procedure. Enter the network settings for your scanner (ES-500W). Note: You can set up your computer to scan to your router or access ...

Users Guide
Page 41
Connecting to an Existing Wi-Fi Network You can be connected to a Wi-Fi Router Using EpsonNet Config Setting Up Network Scanning Parent topic: Wi-Fi Networking 41 The wireless router or access point can set up your scanner to communicate with your computer over a wireless or wired network. 1 Epson scanner 2 Wireless router or access point 3 Computer with a wireless interface 4 Computer 5 Internet 6 Ethernet cable (used only for wired connection to the wireless router or access point) Manually Connecting to your computer using a wireless router or access point.
Connecting to an Existing Wi-Fi Network You can be connected to a Wi-Fi Router Using EpsonNet Config Setting Up Network Scanning Parent topic: Wi-Fi Networking 41 The wireless router or access point can set up your scanner to communicate with your computer over a wireless or wired network. 1 Epson scanner 2 Wireless router or access point 3 Computer with a wireless interface 4 Computer 5 Internet 6 Ethernet cable (used only for wired connection to the wireless router or access point) Manually Connecting to your computer using a wireless router or access point.

Users Guide
Page 42
... select Quit. 9. Manually Connecting to a Wi-Fi Router Using EpsonNet Config You can use EpsonNet Config to connect the scanner to the scanner using a direct Wi-Fi connection. 3. Select Network Interface > Network > Basic (Wireless). 6. Disconnect the computer or device...Start, and select All Programs or Programs. Select EpsonNet > EpsonNet Config > EpsonNet Config. • OS X: Open the Applications folder, select Epson Software > EpsonNet > EpsonNet Config > EpsonNet Config. 4. Select your infrastructure connection: • Communication mode: Select Infrastructure. • SSID: ...
... select Quit. 9. Manually Connecting to a Wi-Fi Router Using EpsonNet Config You can use EpsonNet Config to connect the scanner to the scanner using a direct Wi-Fi connection. 3. Select Network Interface > Network > Basic (Wireless). 6. Disconnect the computer or device...Start, and select All Programs or Programs. Select EpsonNet > EpsonNet Config > EpsonNet Config. • OS X: Open the Applications folder, select Epson Software > EpsonNet > EpsonNet Config > EpsonNet Config. 4. Select your infrastructure connection: • Communication mode: Select Infrastructure. • SSID: ...
Users Guide
Page 43
... 2 Utility. Then follow the instructions here to set up network scanning to your scanner through the optional Epson Network Interface Unit (ES-400/ES-500W) or through the optional Epson Network Interface Unit, first connect the unit to your scanner and verify that both are connecting through a direct connection to the network. If you are working properly...
... 2 Utility. Then follow the instructions here to set up network scanning to your scanner through the optional Epson Network Interface Unit (ES-400/ES-500W) or through the optional Epson Network Interface Unit, first connect the unit to your scanner and verify that both are connecting through a direct connection to the network. If you are working properly...


